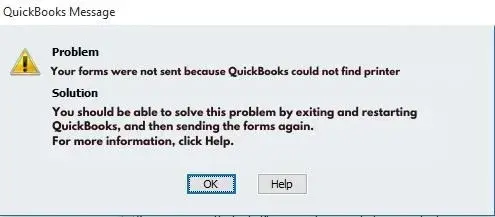
The “QuickBooks no printer installed” issue is a common scenario that can occur while running the printing functions in the app. This printing problem can arise when the printer is incorrectly set or the QBPrint.QBP file is damaged. If you are experiencing this issue, keep reading this article to learn the main reasons and top solutions for QB printing problems.
QB uses printers to perform many crucial functions, like printing forms, invoices, reports, and checks. However, this printing issue prevents users from performing any of these functions and also affects the app’s performance. Not only this, but the issue can make the printer preview icon disappear and also affect the tag printer in QuickBooks POS. Thus, you need to eliminate the “QuickBooks printer setup not opening” problem to perform the printing functions seamlessly. To do so, you need to follow this in-depth guide, wherein we discuss the reasons for the issue and provide expert-recommended solutions to resolve them. So, come, let’s terminate QB printing issues with ease.
Printing issues in QuickBooks Desktop can be very frustrating and can restrict a lot of functions. Although the solutions given below will help you tackle these issues, if you are unwilling to undertake the process on your own, you can reach out to our team of Proadvisor solutions experts at 1.855.888.3080 to get immediate assistance in fixing the problem.
Table of Contents
Primary Reasons for No Printer Installed Error in QuickBooks Desktop
The first step to resolving any issue is to understand the reasons behind it. Knowing about the common triggers for the printing issues in QB can help you understand why the error arises, which can help fix the problems in a better way.
The no printer installed error in QuickBooks may arise due to the following common reasons:
- Your printer might be incompatible with QuickBooks Desktop and QB Desktop Point of Sale.
- The thermal paper may not be appropriately set in the printer.
- Your printer may not be attached to the computer, and the printer may be offline or incorrectly set.
- The Point of Sale preferences don’t have the printer configured.
- You are attempting to print to non-thermal tags that may lead to printing issues in QB.
- The Zebra printer driver installation may be damaged.
- Your Zebra printer may be part of the shipment, which was supplied with incorrect power, giving the computer insufficient voltage.
- The printer drivers might not be correctly set, and they might be damaged, corrupted, or outdated.
- The company files and other program files in QuickBooks might be damaged or corrupted, which can cause problems while printing these files.
- QuickBooks might be incorrectly installed in the system, and the installation process might be faulty or incomplete.
- The TEMP folder permissions might be incorrectly set while running the prints in QuickBooks Desktop.
- The Adobe Acrobat Reader might be damaged or outdated, and the Adobe Reader preferences might be incorrectly set.
- The Adobe Reader app might be incorrectly installed or outdated, and the preferences in the utility might be incorrect.
- Printer, browser, or software problems in QB Online may bring this error.
- The printer setup window may be missing from the PC, and the window may be opening off-screen.
- You may have chosen Intuit’s internal printer as the default one.
- You may have a damaged or corrupted QBprint.qbp file, or the file might be missing from the PC.
- The default.pdf plugin in recent editions of Google Chrome may lack a print button.
- If you’re utilizing QuickBooks Online on Internet Explorer 11 (IE 11), the absence of a Print button when attempting to print reports may be due to the current lack of native print support in IE 11.
Now that we understand the various reasons that can trigger the “cannot print due to a problem with the printer setup” issue, let’s move to the next section to learn about the prerequisites before troubleshooting the problem.
Pre-considerations to Fix QuickBooks Desktop No Printer Installed Issue
Before we move to the resolution steps for the no printer installed error message in QuickBooks, you need to ensure that the following prerequisites are met. This will ensure that the troubleshooting process runs seamlessly and all the considerations are fulfilled beforehand.
- Keep QuickBooks updated by installing the latest release as follows:
- Tap Help in QuickBooks and select the Update QuickBooks Now option.
- Choose Update Now and hit Get Updates.
- Install the update and restart your system and QB.
- Ensure your QuickBooks is connected to the printer.
- You must install the latest driver printers.
- Ensure your printer doesn’t show warning lights or error messages.
- Generate a report after viewing it as a PDF file.
- Your printer should be installed, turned on, and plugged into your computer.
This is how you can review the printer’s functionality –
- Disconnect and reconnect the cable between the printer and the computer at both ends.
- Verify the printer is turned on and properly plugged in.
- Ensure the paper is loaded correctly and not printing on the wrong side. Use a fingernail or a coin to scratch thermal paper to identify the correct printing side.
- Ensure the power supply provides 20 volts. Prefer using the original power supply.
Recommended to read : Fix QuickBooks Migration Failed Unexpectedly Windows 11
Essential Solutions to Terminate the “QuickBooks Printer Setup Not Opening” Issue
We have curated a list of tried and tested solutions that can help you eliminate the QB Desktop printer setup not opening issue. After you have fulfilled the prerequisites for resolving QuickBooks printing issues, you can undertake the following effective solutions –
Solution 1: Try Printing from Another Program
Firstly, you need to check whether you can print from a program other than QuickBooks. This will help analyze whether the issues are with the printer setup or with the QB program. For this, undertake the following steps by using Notepad –
- Tap the Windows Start icon and choose Notepad, then enter some text in the Notepad.
- Go to the File menu, choose Print, select the correct printer’s name, and then hit Print again.
Solution 2: Check the Printer’s Setup
Since you were unable to print from another program, the issues might reside in the printer’s setup. Hence, you need to verify the setup by following these steps –
Step 1: Ensure the Correct Printer Setup
Firstly, perform the following steps to ensure that the printer is correctly set.
- Disable the printer, restart your computer, and then power the printer back on.
- Ensure proper loading of printer paper, then click Start and navigate to the Control Panel.
- Double-click Printers and Faxes, and if the printer displays as Offline, right-click the printer and choose Use Printer Online.
- Double-click the printer, and if any print jobs are in the queue, go to Printer, then Cancel All Documents.
- Close the window, then right-click the printer and choose Properties.
- Select Print Test Page, and if the printer is a network printer and the test page fails to print, there might be some network problems.
Once the printer is correctly set, move to the next step to ensure that the right printer is selected.
Step 2: Confirm the Correct Printer
You need to make sure that the printer is the right one; otherwise, you will need to correct the printer setup on your PC. This can help resolve the “set default printer in quickbooks desktop” issue.
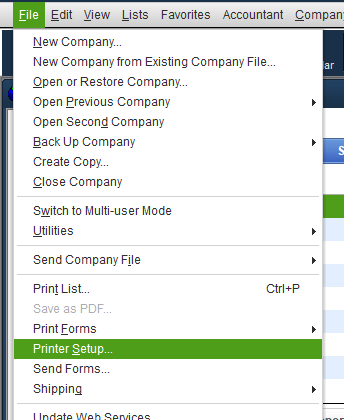
- In QuickBooks, access the File menu and choose Printer Setup.
- Tap the form you intend to print and confirm that the printer name precisely matches the intended printer’s name on your PC.
- If the name doesn’t match, you need to adjust the setup in your computer’s Printer Setup in the following manner –
For Windows OS –
- Select Settings from the Windows Start menu and go to Bluetooth and Devices.
- Select Printers and Scanners, then select a printer that matches the name and click Set as Default.
- If the Set as default option is not visible, it’s possible that the Let Windows manage my default printer option is selected. You’ll need to unselect this option before you can manually choose a default printer.
To enable the default to be the printer you last used:
- Open Start, click Settings, then select Bluetooth & devices and go to the Printers & scanners section.
- In Printers & scanners, toggle on the option next to Let Windows manage my default printer and confirm that it displays as On.
This will reset the default printer on Windows, which can help with the printing problems in QB.
For Mac –
If you’re using QuickBooks for Mac, you can adjust the printer setup on the PC to resolve the mismatch problems in the following manner –
- Choose the Apple menu on Mac and select System Settings, then click Printers and Scanners.
- In the Printers & Scanners dialog, where the Add Printer, Scanner, or Fax button is visible, click the Default Printer menu.
- Choose the option that matches the name while printing in QuickBooks, and hit OK.
Note: If you wish for a specific printer to always be the default printer, select that printer. The default printer doesn’t modify it even if you print to a different printer.
Note: If you prefer the default printer to be the one you last printed to, choose Last Printer Used. Your Mac retains the information about the last printer used in your current network location, such as at home or at work.
Alternate ways to set the default printer in Mac –
- For a swift selection of a default printer, Control-click on a printer in the Printers list within the Printers & Scanners settings, and then choose Set Default Printer from the shortcut menu.
- You can also efficiently set a default printer using Print Center in the Utilities folder. When the Print Center is open, choose the printer in the sidebar, and then go to Printer > Make Default.
If you are facing issues and need further assistance with the printer settings, select Help in this area.
Step 3: Test with a Different Printer
Lastly, try printing with a different printer, like a Microsoft XP printer.
- In QuickBooks, go to File, then hit Printer Setup.
- Choose the form you wish to print, then Select a different printer, such as the Microsoft XP printer.
For additional help with these settings, select Help in this area.
Once you have set the printer settings correctly, the printing problems in QB will be resolved. If they are not, you can try the next troubleshooting solution.
Solution 3: Verify the Data Integrity in QuickBooks Company File
If you were able to print with another program in Solution 1, you need to review your QuickBooks data integrity to ensure that the “QuickBooks no printer installed” error is fixed.
You can check your company file for damage through the following steps:
- Print an alternative form or, if you’re using customized forms or memorized reports, attempt a standard form or report.
- If you originally printed a batch of forms in QuickBooks, attempt to print a single form. If successful, consider printing smaller batches.
- Access one of the QuickBooks sample company files and try printing the same form or report.
If you are able to print with the sample file, your QB company file might be damaged. To resolve this issue, you can employ the following actions –
Action 1 – Run the Verify/Rebuild Data Tool in QB
The Verify and Rebuild Data feature on your company file can address data damage and corruption that might lead to printing issues.
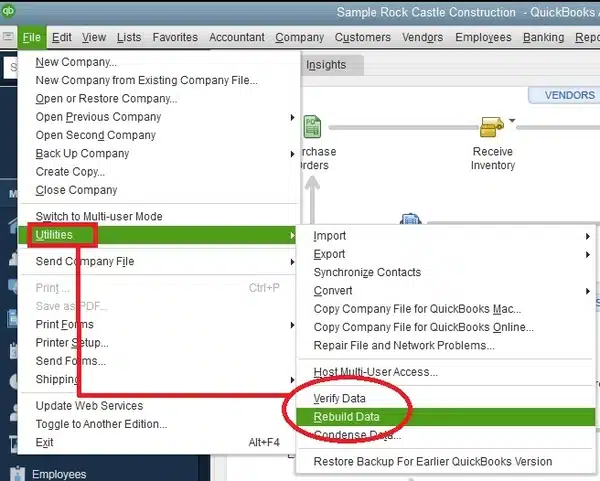
- Navigate to File in QB, then tap Utilities and click Rebuild Data.
- On the QuickBooks Information window, click OK. Follow the onscreen instructions to back up and secure your files.
- Allow the procedure to fix your file. It may take some time, and even if QuickBooks appears unresponsive, the tool is actively working as long as you can move your mouse.
- Once the tool ends the repair, click OK and return to the File tab.
- Click Utilities, hit Verify Data, and let the utility examine your file for any data issues.

- If QuickBooks identifies no problems, click OK to indicate that your company file is data damage-free.
- If QuickBooks sees an issue with your company file, run the Rebuild Data tool in the following manner –
- Go to the QB File tab, select Utilities, and choose Rebuild Now.
The tool might ask for a backup, and if it does, create a backup, hit OK, and save the file with the new name. - Run the tool, and once the “Rebuild has Completed” message appears, go back to the File tab.
- Rerun the Verify Data tool from the Utilities section to check for additional damage, and if none is found, restore the backup.
- If damage is found, you might need support assistance in fixing the extensive data damage.
- Go to the QB File tab, select Utilities, and choose Rebuild Now.
Now, check if the company files are running correctly, and if issues persist, use the QB File Doctor Tool to fix the damage in the next section.
Action 2 – Utilize the QuickBooks File Doctor Utility
If the QB Verify/Rebuild Data tool was unable to rectify the damage, you can utilize the QuickBooks Tool Hub.
- The first step is to install the QuickBooks Tool Hub with these steps –
- Download the most recent version (1.6.0.3) of the QuickBooks Tool Hub and save the file at an accessible location on your PC.
Note: If this is not your first time installing QB Tool Hub, you can find out which version you currently have from the Home tab. - Open the download QuickBooksToolHub.exe file and follow the on-screen steps to install, then agree to the terms and conditions.
- When the installation finishes, double-click the icon on your Windows to open the tool hub and run the tools in the following step.
- Download the most recent version (1.6.0.3) of the QuickBooks Tool Hub and save the file at an accessible location on your PC.
Note: If you can’t find the icon, you can manually search for QB Tool Hub in Windows and select the program.
- Once the tool hub is installed, run the Quick Fix My File tool in the following way –
- From the tool hub, select Company File Issues, then locate & select Quick Fix my File.
- Select OK, and when the tool stops running, launch your QuickBooks to check if the damage is fixed.
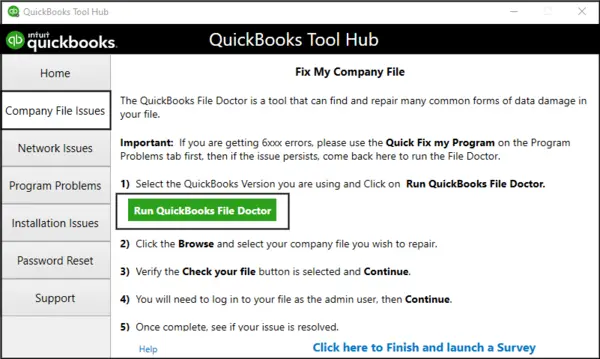
- If the damage isn’t fixed with the Quick Fix My File tool, the last step is to use QB File Doctor –
- From the tool hub, select Company File Issues, then select Run QuickBooks File Doctor to initiate the repair.
It can take up to one minute to open the tool, and if it doesn’t open, manually search for QuickBooks Desktop File Doc.
- In QuickBooks File Doctor, select your company file from the drop-down menu or select Browse and search your file.
- Select Check your file (middle option only), hit Continue, and enter your QuickBooks admin credentials.
- Select Next and let the scan process take its time, which can be up to 15 minutes.
Note: The scan may say it was unsuccessful even if the file issues are fixed; hence, you need to reopen QuickBooks and check the company file.
Also Read: Why QuickBooks Crashing after login
Solution 4: Repair QuickBooks
Since one of the reasons why you are able to print from another program (except QB) is installation problems (refer to Solution 1), you can try repairing QuickBooks.
For this, you can take the help of QuickBooks Tool Hub and run the following utilities –
Step 1: Get help from Quick Fix My Program
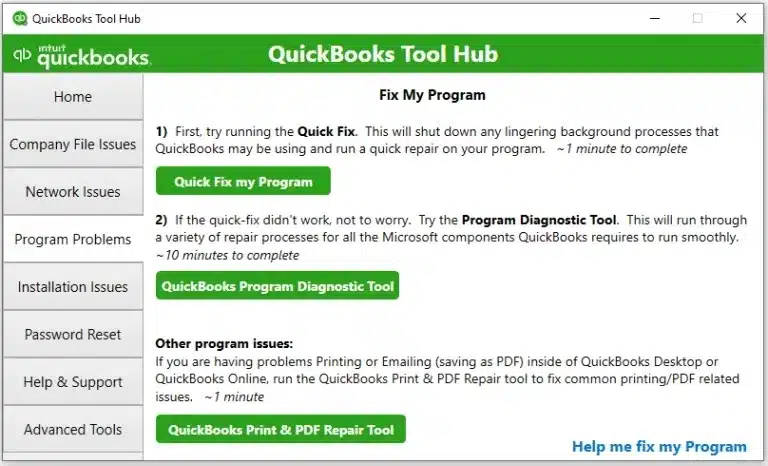
- Open the QB Tool Hub, go to the Program Problems option, and click Quick Fix My Program to start scanning.
- Once the tool stops, open QB Desktop and your data file and try printing.
If the issues persist, move to the next step to run an installation scan.
Step 2: Get help from QuickBooks Install Diagnostic Tool
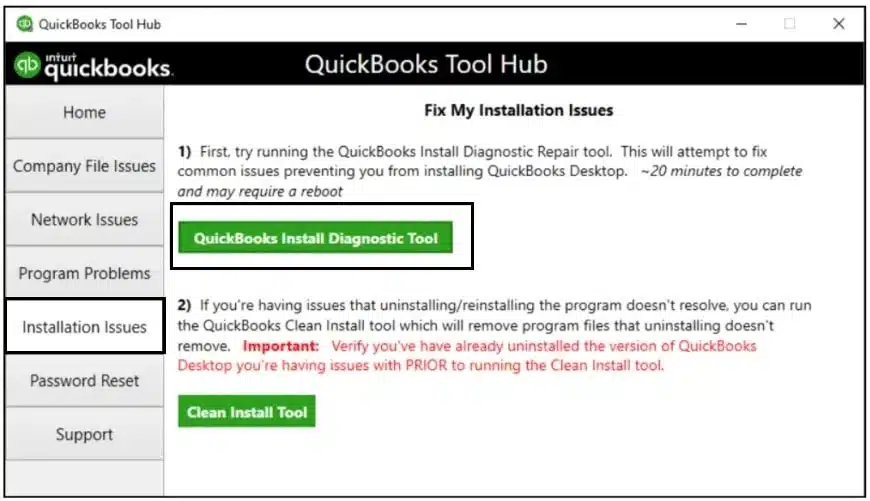
- Hit the Installation Issues option in QB Tool Hub, and choose the QuickBooks Install Diagnostic Tool option.
- Start the scan process to detect installation issues, and once the tool stops, reboot your system and reopen QB.
If repairing QB doesn’t help fix the program issues that were causing printing issues, try reinstalling the app in the next solution.
Solution 5: Reinstall QB Desktop for Windows
If the printing problems aren’t resolved by modifying the printer setup, fixing the company file damage, or repairing the QB program, the next option is to fix QB installation problems.
Note: Before we start the process, ensure to download the QB installer version as per your QB version and keep your license details handy.
Action 1: Remove QuickBooks
Firstly, you need to uninstall the current QB version from the Control Panel.
- From the Windows Start menu, search for “Control Panel,” then open Control Panel.
- Select Programs and Features or click Uninstall a Program, then access the program list.
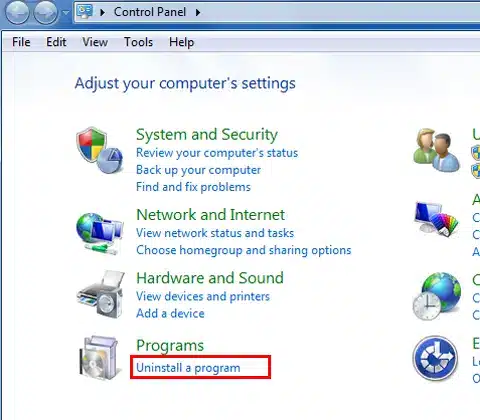
- Select the version of QuickBooks Desktop you want to remove, click Uninstall/Change, Remove, and then hit Next.
- If you don’t see this option, sign back into Windows as an admin and complete the QB uninstallation process.
Action 2: Install QuickBooks
Once QuickBooks is uninstalled, you need to rerun the installation process with these steps –
- Download the QuickBooks Desktop setup file from Intuit, save it on the PC, and open the .EXE setup file.
- Follow the given prompts to install the app, accept the License Agreement, and hit Next.
- Enter your Product Details and License Info, and once done, hit Next again.
- Review your internet connection, and if it is secure and stable, move to the Installation Type section.
- Select Express Install, hit Next, then click Install to install QuickBooks Desktop successfully.
- Now, activate QuickBooks from the Help tab and verify your info by following the prompt on the screen.
Also, ensure that you rename all the folders left in the QuickBooks installation directory by adding OLD at the end of their names, like FolderName.OLD.
Once QuickBooks is reinstalled, the problems will be fixed, and you will be able to run the print functions with ease.
If you are still facing the “cannot print due to a problem with the printer setup” issue, move to Solution 6.
Solution 6: Employ QuickBooks Tool Hub’s Print & PDF Repair Tool
The QuickBooks PDF & Print Repair utility is an excellent tool that helps you resolve print & PDF related issues that might trigger the printing problems in the app.
- Install the QuickBooks Tool Hub as mentioned in Solution 3, open the utility, and then choose Program Problems.
- Select QuickBooks PDF & Print Repair Tool, and let the tool complete the process, which will take around a minute.
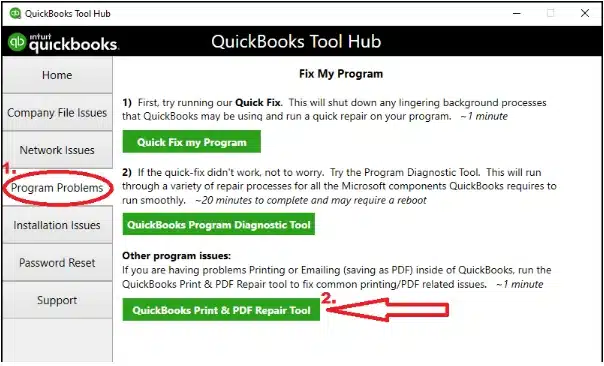
- Once the tool stops running, rerun QuickBooks and try running the PDF and print functions to check the status of the issue.
If the QuickBooks Desktop printer setup issue persists, you can try renaming the QBPrint.QBP file in the next solution.
Solution 7: Change the QBPrint.QBP File Name
If the Print & PDF repair tool takes longer to resolve your errors, you can try to change this file name. Further, if this file is damaged, it’s better to rely on this solution:
Action 1: Locate the QBPrint.qbp file:
Firstly, locate the file by following the navigation path provided below –
Tip: You should set Windows to show hidden files and folders and use the Windows search function to locate the QBPrint.qbp file easily.
- Windows 10 and newer: C:\ProgramData\Intuit\QuickBooks 20xx (20xx denotes your QuickBooks version.)
- Server 2012 and latest: C:\Program Data\Intuit\QuickBooks YEAR and C:\Usersremote user\AppData\Roaming\Intuit\ YEAR VERSION\TSPrinterSettings.
Note: If you are a terminal service user, you may find duplicate QbPrint.qbp files with stored client data files, and you need to inspect all folders for unusual occurrences.
Action 2: Rename the QBprint.qbp file:
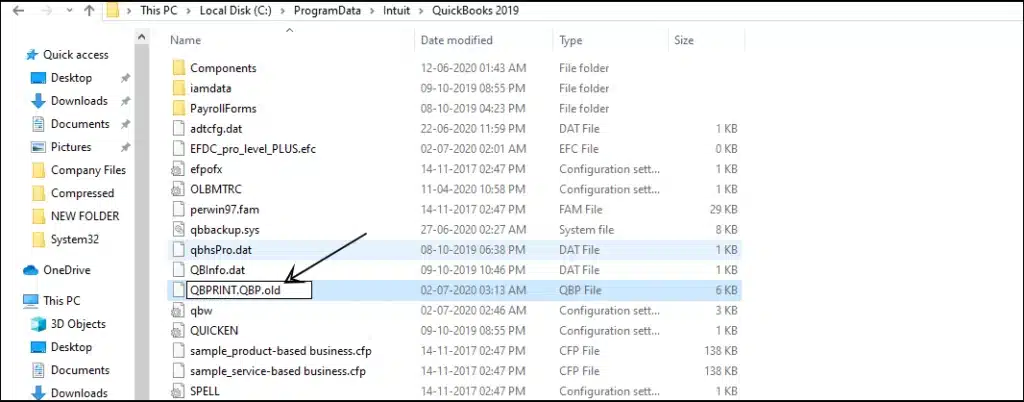
- Right-click the QBprint.qbp file corresponding to your QuickBooks version and choose Rename.
- Add the word “old” to the QBprint.qbp file name (e.g., QBPrint.qbp.old).
- Access QuickBooks Desktop and navigate to the File menu, then select Printer Setup.
- Click any transaction in the Form Name list and hit OK. This action will generate a new QBprint.qbp file.
Note: This process doesn’t need to be repeated for every transaction.
Once done, attempt to open and print any transaction to check the status of the printing problems. If the printing problems persist, you can move to the next troubleshooting solution.
Solution 8: Configure Preferences in Point of Sale
Since the QuickBooks Desktop no printer installed issue can also affect the POS function, you need to ensure your Point of Sale preferences are compatible with the printer settings. To set the default template for printing different documents, follow these steps –
- Navigate to File > Preferences > Workstation.
- Select Documents & Printers and Ensure the correct printer is selected.
- Next, confirm an appropriate template is chosen for the printer and hit Save to save the changes.
Note: You can also set the default printer for each document in QuickBooks POS separately.
Are you still getting the “QuickBooks printer setup not opening” issue? You can verify the printer’s status in the next solution.
You may also read : What is QuickBooks Error Code 15227
Solution 9: Verify Printer Status and Queue
When the printer’s status is offline, it can cause problems while running the printing functions in QB. In such cases, you need to ensure the printer status is online and there’s no queue:
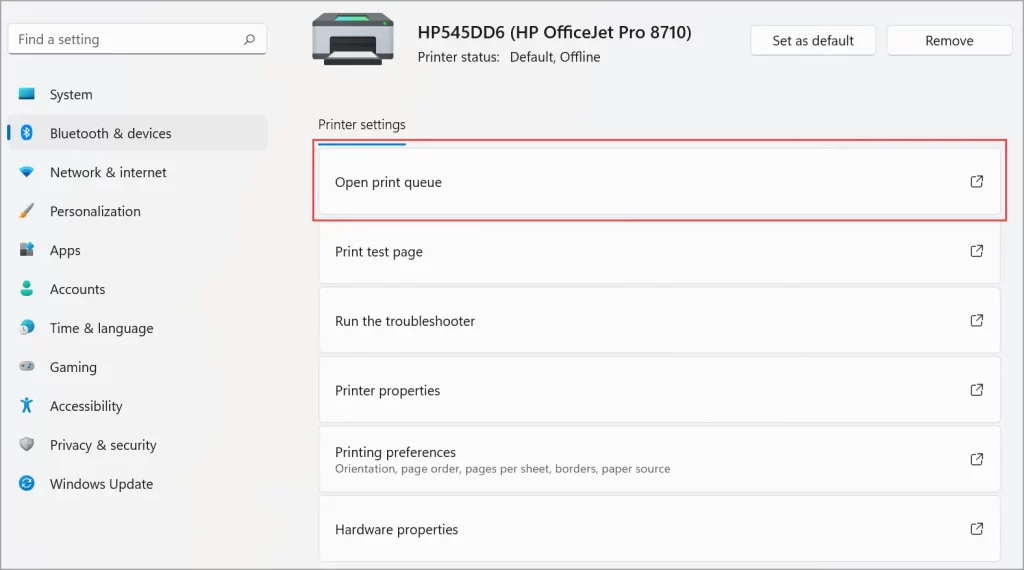
- Access the Windows Start and select Control Panel, then choose Devices and Printers.
- Right-click the non-printing printer, and if “Use Printer Online” is available, select the option and bring the printer online.
To remove and restart the printing queue, you need to reset the service as follows –
- Go to the Search panel of the Taskbar and type Services, then select the service list.
- Scroll down and locate the Printer Spooler, then right-click the service to select Restart.
Once the printer is online and the queue is reset, you will be able to run the QB print functions successfully. If there are still problems in the process, move to Solution 9.
Solution 10: Check Printer Properties for USB Port
Tag printer issues can arise in QuickBooks Desktop POS when the printer is not connected to the correct USB port. To resolve this, review your printer properties, as it will show if you have chosen the accurate USB Port :
- Access Windows Start menu and hit the Control Panel, then tap the View by drop-down list.
- Select Small Icons, hit Devices and Printers, and right-click Zebra LP2824.
- Select Printer properties, then navigate to the Ports tab and select the correct USB port.
- If uncertain, contact the computer manufacturer, and once the port is selected, hit OK.
- If a USB port is unavailable, connect the printer to another USB port and repeat steps 1-4 again.
- If no USB port is detected after attempting all ports on the computer, one of the following issues may be present:
- The USB cable might be defective. Seek assistance from the vendor from which the printer was purchased.
- The computer may be unable to identify USB devices. Consult your computer manufacturer for help.
Once the USB port is successfully selected, try printing the tags. If the problem keeps appearing, follow the next solution.
Solution 11: Print a Windows Test Page
If none of the above solutions help, you can try printing a test page, which can help determine if the printer is correctly installed or not.
Follow these steps to resolve the no printer is installed error in QuickBooks :
- Access the Windows Start menu and choose the Control Panel.
- Tap Devices and Printers, right-click Zebra LP2824, then choose Printer properties.
- If multiple Zebra printers exist, attempt the test page on each printer, then select Print Test Page.
- If successful, try printing a tag in QuickBooks Desktop Point of Sale.
- If the test page fails to print, take the following steps:
- Close the Zebra LP2824 Printer Properties window.
- Double-click the Zebra LP2824 printer, then “See what’s printing.”
- Click Printer, select Cancel All Documents, then restart Windows.
- Lastly, consider deleting the printer and then reinstalling it in Solution 11.
Follow the next solution to reinstall the printer drivers if the test page is unsuccessful.
Solution 12: Reinstall Printer Drivers
Reinstalling the print drivers can be another solution to fix the QB no printer installed issue in QuickBooks POS –
Automatic Reinstallation –
- Right-click the printer in the Printers window and tap Remove Device.
- Reboot your computer and let Windows attempt automatic reinstallation.
Manual Reinstallation –
Follow Zebra printer installation instructions for manual reinstallation if needed.
- Navigate to Zebra.com/drivers and click Printers, then select your printer model.
- On the printer product page, click Drivers, then download the appropriate driver for Windows.
- The driver executable file (such as zd86423827-certified.exe) will be added to your Download folder, and once done, run the executable file.
- Follow the prompts, and when setup is complete, you may select to add all of the drivers to your system or to add/configure specific printers.
- Select Configure System, click Finish, and let the Printer Installation Wizard install the drivers.
For more info, you can visit Zebra’s official page and run the installation.
If the “set default printer in QuickBooks Desktop” issue isn’t addressed, try the next troubleshooting solution.
Solution 13: Bypass Windows Print Spooling
The Windows Print Spooler allows you to send a document to the printer and hold it in the queue while another document is printing. You can try stopping Windows print spooling to print directly to the printer. This can help with the printing issues that might arise due to printing queues.
- Right-click the printer in the Printers window and choose Printer properties.
- In the Advanced tab, choose Print directly to the printer. Select OK.
If none of these solutions help fix the printing problems in QuickBooks and QuickBooks POS, there might be issues with the Adobe Reader app. For this, follow the next few solutions and resolve the QB printer setup not opening issue.
Solution 14: Edit Preferences in Adobe Acrobat Reader
Sometimes, the Adobe Acrobat Reader can cause problems with essential printing functions, like printing reconciliation reports. To fix this problem, you can modify the preferences in Adobe Reader as follows:
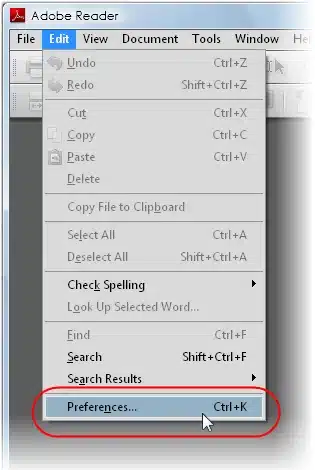
- Launch Adobe Reader and navigate to the Edit menu, then select the Preferences option.
- Click Internet from the Preference list, and unmark the first checkbox labeled Display PDF in Browser.
- If the box is already unchecked, mark the box, then access the Reconciliation report.
If there are problems while running the Adobe Reader, even after editing the preferences, move to the next solution to update and repair the utility.
Solution 15: Update, Repair, and Reinstall Adobe Acrobat Reader
Another solution you can try is updating, repairing, and reinstalling Adobe Acrobat Reader to the latest version to fix any glitches. This can help fix the app, which can remove the printing issues while running QuickBooks.
You can easily repair the Adobe Reader by following these steps –
- Exit Acrobat/Reader and all currently active web browser windows, then click Start.
- Type Control Panel > Enter, and click Programs and Features.
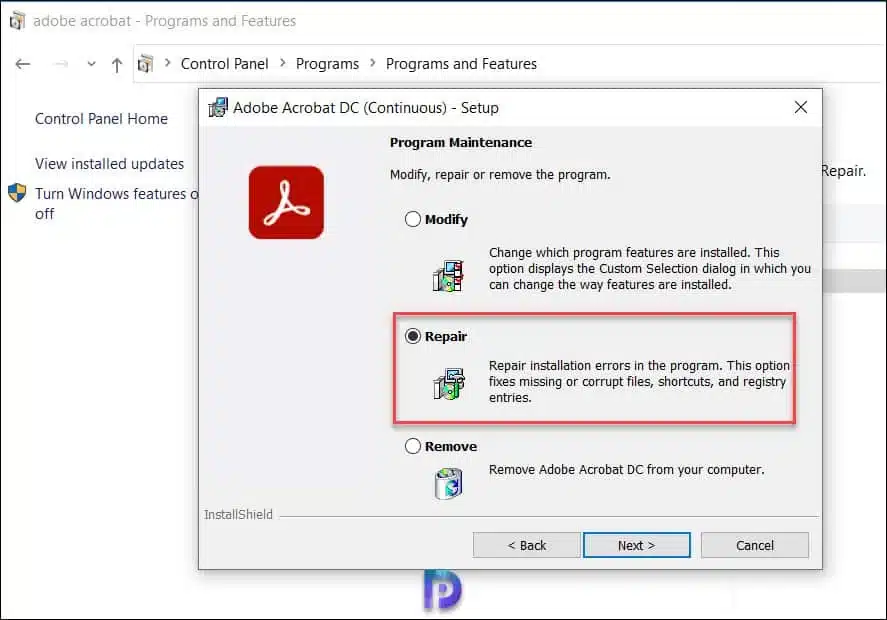
- Choose Acrobat or Adobe Reader, then hit the Uninstall/Change option, and click Next on the Setup dialog box.
- Hit Repair, then click Next and choose Install to run the process.
- Once the process halts, click Finish and reboot your PC to give effect to the changes.
Subsequently, open the reconciliation report again and check if the printing issues are rectified. If not, you can update the Adobe Reader in the following way –
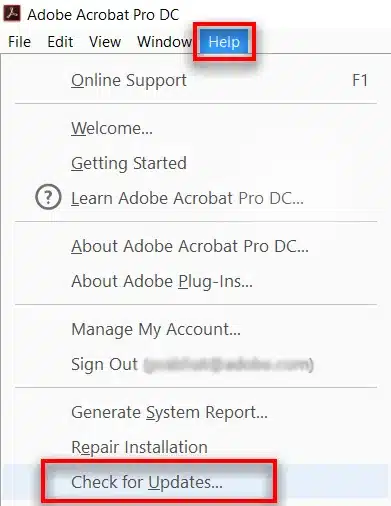
- Launch Acrobat, go to Help, then select Check for updates.
- If an update is available, you will see a dialog box, and once it appears, click Download.
- The update will be downloaded in the background, and once complete, you might see a prompt to quit Acrobat.
- Quit Acrobat and click Retry, and once the update is installed, the Update successful dialog box is displayed.
- Click Close to end the process and rerun the printing functions with the updated app.
This will help you fix the issues while running the Adobe Reader, and if you are still experiencing printing problems, move to Solution 16.
Solution 16: Install the Microsoft Writer v4
The Microsoft XPS Document Writer is a print-to-file driver that is used by Windows to create XML Paper Specification (XPS) document files. If the document writer is incorrectly installed or missing, it can create printing problems in QB. So, install it successfully to resolve the no printer installed error in QuickBooks.
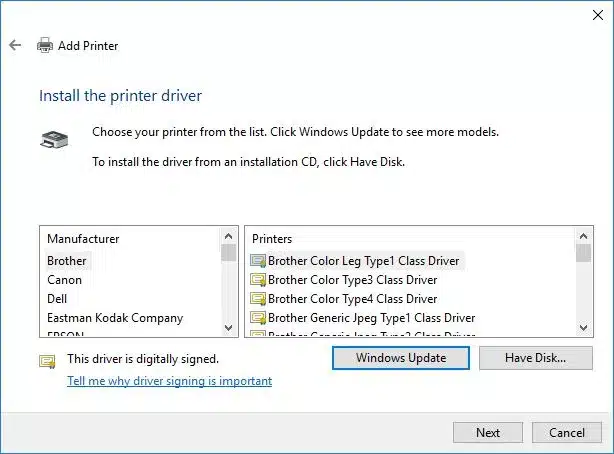
- Go to the Control Panel, click Hardware and Sound, then choose Devices and Printers.
- Click Add a Printer and select the “The printer I want isn’t listed” box, then choose to Add a local printer or network printer.
- Once you have added the printer with manual settings, click Use an existing port and set it to the default “LPT1: (Printer Port), then hit Next.
- Select Microsoft as the Manufacturer from the “Install the Printer drive” dialog box and click Windows Update.
- Update the list of printers, and after Windows Update completes, select the “Microsoft XPS Document Writer v4” from the Printers section (with Microsoft selected as the Manufacturer).
If the XPS Document Writer is already installed on the PC, printing issues might arise when the writer isn’t running correctly. This can be fixed by using these troubleshooting steps –
NOTE: Please note that these suggestions are applicable to Windows and not Terminal Services.
- Confirm that XPS services are enabled and test the XPS Document Writer by printing outside of QuickBooks.
If you encounter difficulties printing to your XPS printer outside of QuickBooks, you should seek assistance from your IT professional or contact Microsoft for support.
Reinstall Microsoft XPS Document Writer
Firstly, remove the writer from the Control Panel and then follow the steps given above to install the XPS Document Writer again.
Adjust security software settings
Settings in security software like Norton Antivirus or McAfee Firewall may obstruct the creation of .xps files. Review the settings in your security software to ensure that .xps files are not being blocked.
Modify Windows user permissions for the XPS Document Writer
If a Windows user lacks permission to print to the XPS Document Writer, QuickBooks will be unable to convert the file to a .pdf. Admin Rights may be required to change these permissions.
If none of the steps work, you can try resetting the TEMP folder permissions in Solution 17.
Solution 17: Reboot and Reset the TEMP Folder Permissions
Incorrect TEMP folder permissions are one of the main causes for the “cannot print due to a problem with the printer setup” issue. Thus, you need to reset the TEMP Folder permissions to fix QB printing problems –
- Press the Windows key + R to access the RUN command and input %TEMP%, then hit Enter.
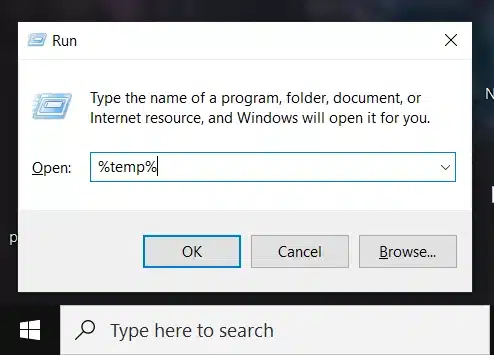
- Right-click an empty location of the temp folder and select Properties, then choose the Security tab.
- Ensure all user names and groups in the Security tab have Full Control, and if not, set the Permissions to Full Control.
- Lastly, attempt to save it as a PDF and print it again in QuickBooks to check the status of the printing issues.
Solution 18: Resolve Browser or Software Issues for QB Online Payroll
If you can’t print due to the no installed printer error message in QuickBooks Online, browser and software issues might be the reasons behind the issue. There are some general steps that can fix the browser issues while printing in QBO
- Clear cookies or browsing history for optimal browsing performance.
- Disable pop-up blockers.
- Ensure Intuit is a trusted site and not blocked by the browser.
- Install, register, and update Adobe Acrobat Reader (see solution 14).
Bottom Line
We hope this thorough guide on QuickBooks no printer installed error helps you eliminate the issue. If you are facing issues with a particular solution or the process doesn’t help rectify the printing problems, you can get assistance from the program specialists at 1.855.888.3080 to fix the issue with professional guidance.
FAQs
How do I modify pop-up settings in Chrome to get my printer to work in QB?
Here’s how to modify the pop-up settings in Google Chrome :
1. Open Chrome, click More, and hit Settings at the top-right.
2. Choose Privacy and Security, click Site Settings, and select Pop-ups and redirects.
3. Tap the option you want as your default setting.
How can I reset my printer’s default settings to get my printer to work in QB?
To reset the default printer settings, hold the Shift key while clicking File and Printer Setup, then reset the default printer settings in Windows:
1. Click the Start button, then choose Settings, and click Printers and Faxes.
2. Next, go to the Printers and Faxes window, right-click on a functioning printer, then select Set as Default Printer.
3. Exit the Windows Printer and Faxes window, then open QuickBooks and access the Printer Setup window to confirm the changes.
Note: If you encounter difficulties resetting the default printer, right-click on the printer name and choose to delete it.
Why is my printer not activated in QuickBooks?
Here are some reasons why the printer is deactivated in QuickBooks Desktop –
1. HKey_current_config\software might be eliminated, and the Windows registry files might be damaged.
2. There are multiple QB versions on your PC.
3. QuickBooks isn’t compatible with the printer driver or Windows OS.
Why won’t my computer print from QuickBooks?
If your computer won’t print from QuickBooks, the following reasons might be responsible –
1. QuickBooks might be outdated on the PC.
2. Your computer might not be connected to the printer.
3. The print driver might not be correctly updated, which can cause incompatibility in QB.
Where is the printer setup in QuickBooks?
The printer setup is available in the top menu bar of the QB File tab. If you are struggling with setting up the printer, follow these steps –
1. Go to the File tab, then choose Printer Setup and select which form you want to print.
2. Select a printer whose name matches the exact name of the intended printer from the given options.
3. If it doesn’t, you’ll need to correct your setup in the computer’s Printer Setup by following step 2 of solution 2 above.
Why can’t I print to PDF in QuickBooks Desktop?
You might not be able to print to PDF in QB due to the following main reasons –
1. There are issues while connecting with your current printer, or the printer is unable to print.
2. An essential PDF file component might be missing, or the PDF convertor might be offline.
3. QuickBooks might be unresponsive, or the app might be unable to save your forms as PDFs.
4. The printer drivers might have stopped working, or they might be damaged.

Erica Watson is writing about accounting and bookkeeping for over 7+ years, making even the difficult technical topics easy to understand. She is skilled at creating content about popular accounting and tax softwares such as QuickBooks, Sage, Xero, Quicken, etc. Erica’s knowledge of such softwares allows her to create articles and guides that are both informative and easy to follow. Her writing builds trust with readers, thanks to her ability to explain things clearly while showing a real understanding of the industry.