When QuickBooks users wish to move from one computer to another, they need a hassle-free migration process. So, Intuit offers a specialized Migration Tool, facilitating quick migration from one PC to another. However, what would you do when you find the QuickBooks Migrator tool not working? In certain instances, the QuickBooks migration tool suddenly stops working with an error message: “Something’s not right- try again later.” In another instance, you might get an error message that reads, “Downloading QuickBooks Installer setup failed.” Let’s find out why the QuickBooks migrator tool stops working and what can be done to get it back on track.
Are you not able to migrate your QuickBooks data because of issues with the migrator tool? Contact the Proadvisor solutions Specialists at the Helpdesk number 1.855.888.3080 to eliminate any problems and get guidance in the correct direction
Table of Contents
Reasons Why QuickBooks Migrator Tool Not Working
The following reasons might explain why the QuickBooks Migration Tool has stopped working:
- You may be switching from a 64-bit computer to a 32-bit computer.
- The flash drive used to migrate and the new computer you’re moving to may not have enough space.
- The connection between your internet and PC may be broken or weak.
- Your system might not be meeting the minimum system requirements for QuickBooks migration.
- The QB version and operating system may not be compatible.
Recommended To Read – Fix QuickBooks Error 6000 301
Rectifying QuickBooks Migration Tool Not Working Error
Now that you know the causes behind QuickBooks migrator tool failure, we can quickly jump into troubleshooting the problem. However, before that, users must ensure the following points:
Update Windows
You should update your Windows version and ensure it goes successfully.
- Click Start.
- Access Settings.
- Choose Windows Update.
Upgrade System Configuration if Required
Your new PC should Fulfill the system requirements for the migration procedure to finish hassle-free.
Transfer Data from QBO (US) to QBD (US)
If you’re converting data from QuickBooks Online to QuickBooks Desktop using the Migrator Tool, ensure you use the same version on both sides.
Be the QB Administrator
Ensure you have admin-level access to run QuickBooks on the new PC before you start migrating. To launch QuickBooks as an admin, right-click QuickBooks Desktop and choose the Run as administrator option.
Get Windows Admin Rights
You should also use the Windows Admin user account to ensure seamless migration to the new PC. Here’s how to change your account type on Windows to Admin:
- Choose Start, then Settings and Accounts.
- Click the account owner name under Family & Other Users. Now, click Change Account Type.
- Hit Administrator under Account Type, then OK.
- Log in with the new Windows admin account.
We suggest you try the following workarounds if your QuickBooks migrator tool is not working.
Solution 1: Undertake the Manual Migration Process
You can switch to the manual method of moving your files when the QuickBooks migrator tool stops working. The simplest method involves generating and recovering a backup company file, which saves your data and associated files. Alternatively, you can easily duplicate and transfer your entire QuickBooks folder to a different location. Now, the procedure involves doing the following:
Step 1: Install QB on the New PC
Follow the steps to download and install the latest QuickBooks Desktop version on your PC. First, ensure your PC meets the system requirements for QB, then download the QB file to a quickly accessible location. Also, keep your product and license information with you. Then, follow the below-mentioned QB installation steps:
- Access the QuickBooks.exe file.
- Follow the commands on the screen, accept the license agreement, and tap Next.
- Input your product and license numbers, then tap Next.
- Now, depending on your needs, go after Express or Custom and Network Install options.
- After installing QuickBooks, register it as follows:
- Navigate to Help and choose Register QuickBooks to initiate the registration process.
- Once you input your information, Intuit identifies the registration status of your QuickBooks copy and records the details for the new computer.
Read Also : Why QuickBooks Desktop Freezing
Step 2: Create a Backup on your Original PC
Now, create a backup file on your original system as follows:
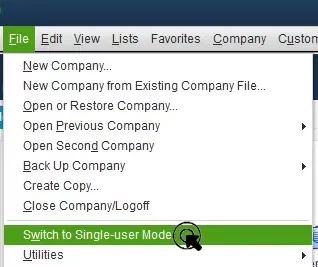
- Click the File tab in QuickBooks.
- Select Switch to single-user mode.

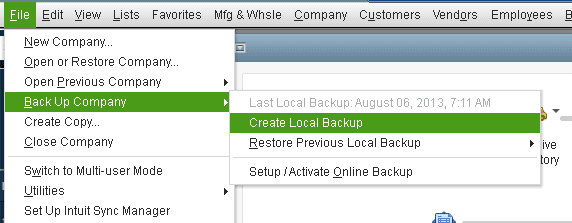
- Again, click File, tap Back Up Company, then choose Create Local Backup.

- Hit Local Backup in the window, then Next.
- Hit Browse in the Local Backup Only section, then choose a place to save this backup.
- Choose as many backups as you need.
- After a test is run to decide if the file is in good shape, and once you ensure everything is fine, click OK.
- Choose Save it now, then Next.
Step 3: Save the Backup file
After your backup file gets created, save the file with a unique name on your PC for easy identification. Also, where the file is saved should be quickly and conveniently accessible.
Step 4: Move the Backup file
Now, it’s time to move the backup company file to your new computer with an external device, flash drive, or USB. If your PC is on the same network, you can share it from there, too.
Step 5: Restore the Backup on the new PC
QuickBooks uses the backup company file (.qbb) to create a new company file (.qbw) for restoration.
Important: If your backup company file is stored on an external device such as a USB or a hosting service like Box, it must first be transferred to your local hard drive. Then, follow the outlined steps.
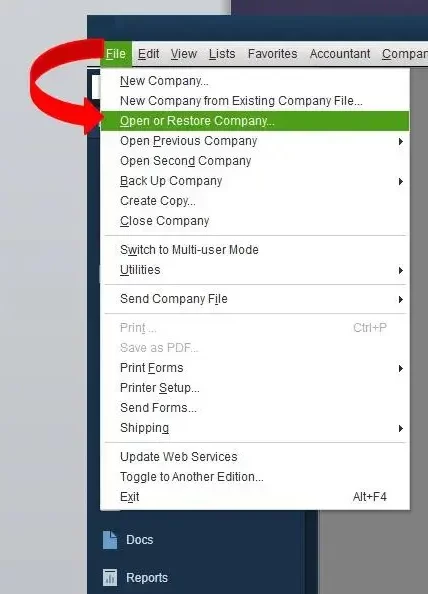
- Navigate to the File tab in QB and tap Open or Restore Company.

- Tap Restore a backup copy, then Next.
- Click Local Backup, then hit Next.
- Browse your computer for the backup company file, resembling this format: [Your company name].qbb.
- Choose a destination folder to save the restored company file, then click Open.
Note: To prevent accidental data overwriting, consider renaming your existing company or the backup file to ensure unique names. Alternatively, save the backup in an entirely different folder. - Once ready, click Save. Select the option that matches your preferences if you encounter messages regarding potential data overwriting. Avoid overwriting anything unless you are certain.
Step 6: Download Tax Tables (Optional)
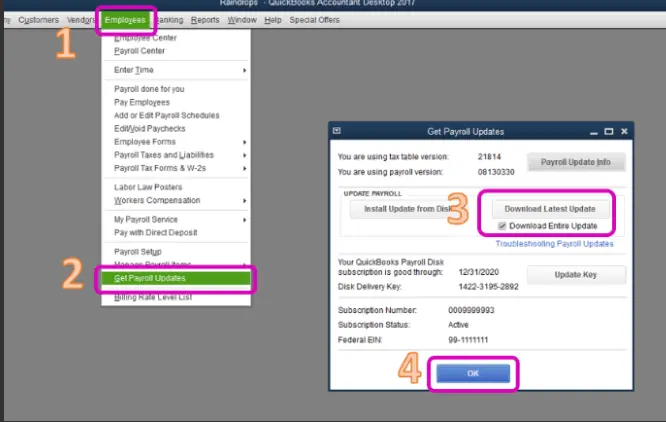
If you use Payroll, we recommend you download the latest tax tables as follows:
- Choose Employees, then go to Get Payroll Updates.
- Click Download Entire Update.

- Choose Update. Look for the informational window indicating the success of the update on the screen.
- Begin with creating QuickBooks file backups on your old computer. Use Intuit Data Protect for the same.
- Next, you must use Intuit Data Protect on your new computer. Use the same login credentials entered in the old computer to sign into the new one.
- Open the QuickBooks application on the new computer and head to the File menu.
- Choose the Back-Up Company option from the drop-down File menu.
- Select the Set-up or Activate Online backup button.

- Hit the QuickBooks company file you need and click Continue.
- You’ll see a checkbox against the Backup local selected documents option. Mark it.
- Finally, tap Continue and create your backup schedule smoothly.
- Now, restore your backup on the new PC.

Now, restore your backup on the new PC. You’ll find the following files through the IDP backup in the QuickBooks Data folder:
- Transaction Log Files
- Logos and Image files
- Cash Flow Projector Files
- Loan Manager Files
- Network Data Files
- Business Planner Files
Also, find files and add-ons from other locations as follows:
- QuickBooks letters and templates
- Fixed Asset Manager
- Spell checker
- Printer setting (QuickBooks can recreate these files.)
- QuickBooks Statement Writer (Use for Premier Accountant and Enterprise only)
You May Also Like To Read – How to fix QuickBooks has Stopped Working
Solution 2: Manually Restore Files on a New PC
After transferring backup files from the Old PC to the new PC, restore the QuickBooks backup files manually on the new PC as follows:
- Access the folder where the restored backup files are located and select them.
- Choose the Restored_CompanyName_Files folder.
- Right-click the file you wish to move and tap the Copy (Ctrl + C) option.
- Paste this file (Ctrl + V) to a new location.
- The files you should copy and paste are given below:
- QuickBooks Letters and Templates – C:\Program Data\Intuit\QuickBooks [version]\QuickBooks Letter Templates
- Printer Settings (PrintEng.ini, wpr.ini, and QBPrint.qbp) – C:\Program Data\Intuit\QuickBooks [version]
- (FSD clients) Financial Statement Designer – C:\Program Data\Intuit\Intuit\QuickBooks\Company Files\FSD\Clients
- Cash Flow Projector (.cfp) – [Company Name].qbw
Solution 3: Cancel Migration when SN is Asked
An old-school method to try when, for some reason, your QuickBooks Migration Tool Not Working is given below:
- Go to the QuickBooks Products download page and install the version you are moving.
- Cancel the process when it asks for your S/N and Code.
- Now, run the migrator tool and see if it works.
If you are still facing QuickBooks Migration Failure, then follow the next solution.
Solution 4: Re-run the move.QuickBooks.bat File
Re-run the move .QuickBooks.bat file on the new PC to see if QuickBooks migrator tool failure issue persist:
- Put the USB flash drive in the new PC. There is a huge possibility that your QuickBooks Migration tool has stopped working because of Windows security restrictions.
- Access the flash drive to see its files and double-click on the file Move_QuickBooks.bat to launch the migrator.
- Enter the password you generated, and then click on Let’s go.
- Allow the Migrator Tool to conclude the process. Please be aware that the duration depends on your computer’s speed, internet speed, and company file size (s).
Solution 5: Resolve Download QuickBooks Installer Setup Failed
You don’t need a disc to reinstall QB; keep your license and products handy.
- Visit the official QB website and download the software.
- Access the Downloads & Updates page.
- Choose Standard Setup to tap the QB version.
Solution 6: Solutions when Converting QBDT to QBO
After updating your Windows and meeting the system requirements, try the following steps:
- Log in to the QuickBooks Online account you wish to convert using a compatible web browser. Type your Intuit Account credentials for the same.
- Select the URL and replace everything following /app/ with exportqbodatatoqbdt. The URL should read https://app.qbo.intuit.com/app/exportqbodatatoqbdt. Then, press Enter. Note that other support task links will not be functional during this process.
- An Export Overview Window will appear. Review the Export Overview and hit Get Started.
- Download the QuickBooks Desktop migration tool by clicking the Download tool.
- Once the download is complete, initiate the installer and run it.
- Follow the prompts and end the installation process easily.
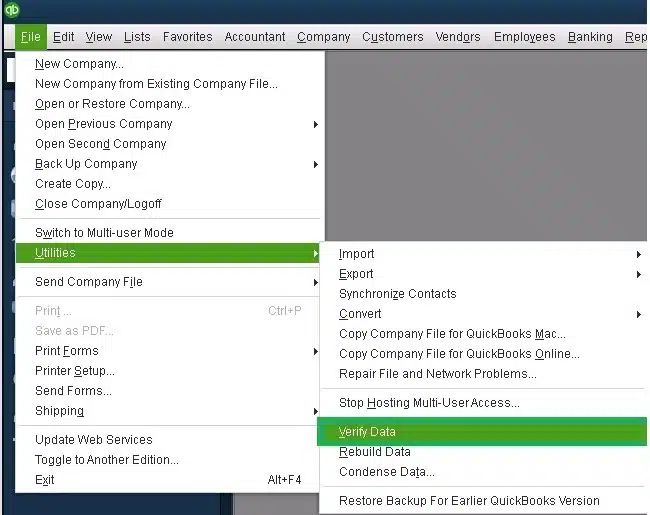
Solution 7: Run the Verify/ Rebuild Tool
Data damage in your company file may cause troubles with the QuickBooks Migrator tool migrating your files. So, run the Verify and Rebuild Data utilities as follows:
- Choose File on the top menu.
- Click Utilities.
- Tap Verify Data.

- Hit OK if no problems get detected with your data.
- However, if issues are found, you’ll have to Rebuild Now or View Errors.
- Tap the Close or View Errors option, then note the specific message.
- Now rebuild data by going to File.
- Click Utilities.
- Choose the Rebuild Data option.

- If prompted to back up your company file, select OK.
- Click OK once the rebuild process is finished and proceed to the next step.
- Rerun Rebuild Data to confirm no errors.

Solution 8: Keep QuickBooks Updated
Ensure your QuickBooks Desktop on the new system is up-to-date as follows:
- Choose Help.
- Select Update QuickBooks Desktop.

- Tap Update Now.
- Choose Get Updates.
- Finish installing the updates.

Read Also – Why QuickBooks Desktop won’t open
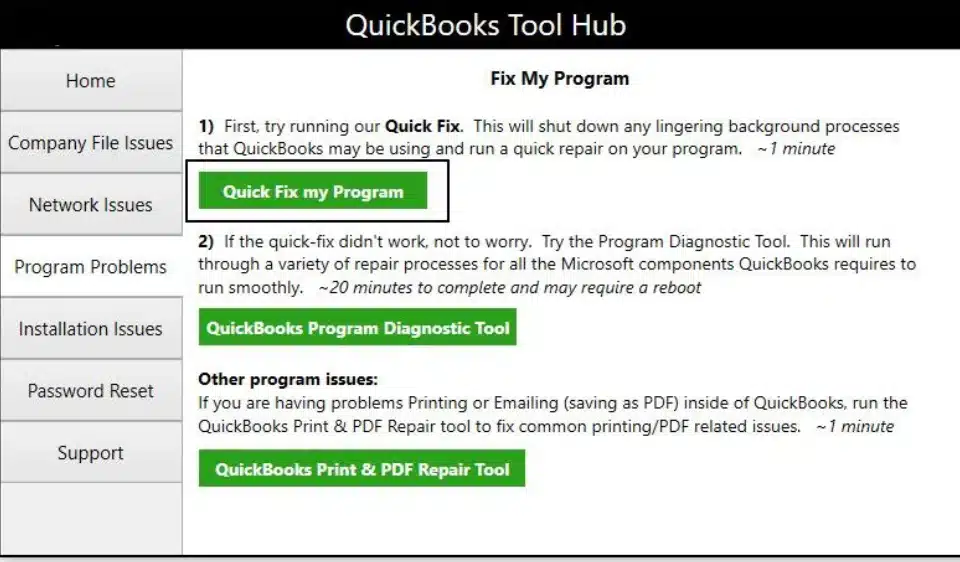
Solution 9: Use Quick Fix My Program
Download the QuickBooks Tool Hub and ensure your program performance is good:
- Undertake QuickBooks Tool Hub download.
- Save the tool hub file in a convenient place for quick access.
- Double-click the QuickBooksToolHub.exe file.
- Let the InstallShield wizards finish and accept the License Agreement.
- After QuickBooks Tool Hub is installed successfully, open it.
- Click Program Problems.
- Select Quick Fix My Program.

Bottom Line
Hopefully, this comprehensive guide enlightened you about the QuickBooks Migrator Tool Not Working problem. The causes and troubleshooting solutions should help you overcome the issue from the depths. If not, you can contact Proadvisor solutions specialists at the toll-free number 1.855.888.3080 for assistance. The certified experts will resolve any issues with the QuickBooks migration process in no time.
FAQs
What should I do as my QuickBooks Migrator Tool has stopped working unexpectedly?
When you face situations where your QuickBooks Migration Tool Not Working, undertake the following actions:
1. Your tool should be installed on the new computer, not the old one.
2. The tool and the QB application must be up-to-date for seamless functioning. You can check this information by accessing the QB file and verifying the data status at the bottom.
3. All your files should be at the same location as the backup. If they are not, you should copy and paste them into that location.
How can we utilize the Migration Tool in the QB application?
You can use the QB Migration Tool in the following ways to prevent the any issues during the QuickBooks migration process:
1. Go to the Utility section in the File menu of QuickBooks on the new computer. Now, move your files from one location to another.
2. Tap the I’m Ready option and enter the one-time password you created on the old computer.
3. Choose the USB flash disc used for migration. Execute the steps and let the files copy.
While the USB disc copies and pastes your files into the new computer, the Migrator Tool handles the technical aspects of migration.
Which Windows and QuickBooks versions have faced problems with the QuickBooks Migration Tool not working?
The Windows and QuickBooks versions affected by problems in Migrator Tool’s operations are as follows:
1. Windows 10
2. QB Desktop 2022
3. QB Desktop Pro 2017
4. Windows 10 Pro
5. Windows 11
6. QB 2023
What do I do when the Move.QuickBooks.bat file stops working during migration?
If this file stops working, you’ll have to turn to a manual migration process involving creating backups on the old PC and restoring the new one.
From where can I access my product details and login information?
You can press F2 in QB to open the Product Information window and extract details like license and product numbers. On the other hand, the Customer Accounts Management Portal (CAMPs) can help get login information.

Erica Watson is writing about accounting and bookkeeping for over 7+ years, making even the difficult technical topics easy to understand. She is skilled at creating content about popular accounting and tax softwares such as QuickBooks, Sage, Xero, Quicken, etc. Erica’s knowledge of such softwares allows her to create articles and guides that are both informative and easy to follow. Her writing builds trust with readers, thanks to her ability to explain things clearly while showing a real understanding of the industry.