QuickBooks Data Migration Services enable users to switch from one location to another without worrying about data loss or more. It is a technical procedure that requires utmost caution. One misstep can lead to data loss and other issues in running QuickBooks. Users may have to switch from QB Desktop to another version, from an old computer to a new one, or from different software to QuickBooks.
Whatever the reason behind the conversion, QuickBooks Desktop Migration Services become necessary to accomplish the task under professional guidance from QuickBooks Data Migration Services. Since QuickBooks is a widely-used and well-known accounting application, users may be prompted to utilize its various versions depending on their needs. Currently, QuickBooks desktop to online migration is prevalent, especially with the discontinuation of QuickBooks 2020 services from May 31, 2023.
Thus, we have curated this guide to let you understand and analyze the migration process with the help of QuickBooks Data Migration Services from the beginning to the end. It will help you ensure seamlessness and a hassle-free approach.
Do you have any queries regarding QuickBooks Data Migration Services? Are you finding it challenging to transfer your data without glitches? Here’s the toll-free support number 1.855.888.3080 of our Proadvisor solutions Desktop specialists. Contact them and get immediate responses for all your problems
Table of Contents
What are QuickBooks Data Migration Services?
The QuickBooks migration services involve transferring your crucial QuickBooks files from one accounting system to another. For example, you may want to switch to a different QuickBooks version, like from Desktop to Online, or migrate to a new, updated, and better computer with the latest functionalities and larger file size.
Depending upon your inherent needs and purpose of acquiring the accounting application, you might migrate from desktop to online. Thus, users need to know the proper procedure implementing QuickBooks Data Migration Services so that losing anything doesn’t appear as a risk.
Recommended To Read – Fix QuickBooks Subscription has Lapsed Error
When do QuickBooks Migration Services become a necessity?
Before we jump into the process of migrating from QuickBooks desktop to QuickBooks online, let’s consider the situations where you will need these services:
Expanding file size
You may need more space to accommodate your QuickBooks company files and more. If your previous computer is maxed out of the room, you will have to get a new one to ensure seamless functioning and usability. Thus, moving from one computer to another will require data services QuickBooks.
Switching between versions
QuickBooks comes in different versions, including Enterprise, Pro, Premier, Accountant, etc. Further, the cloud-based QB application, also known as QB Online, is also available to users for anytime, anywhere access. In such cases, users may weigh the pros and cons of each edition and determine the one that closely aligns with their goals. It may prompt them to search for QuickBooks data conversion services.
Migration to/ from another program
You may be using another accounting application like Sage. Now you wish to migrate to QuickBooks to meet the changing user needs. It would push users to consider QuickBooks Data Migration Services. Further, users might want to shift their data from QuickBooks to another application. You may get expert assistance in such transfers too.
Various other reasons can lead users to consider migration from QuickBooks desktop to online. This post will guide you through the migration steps and facilitate seamless transfers.
Should you Migrate from QuickBooks Desktop to QuickBooks Online?
While considering QuickBooks online migration from desktop, compare the two versions and see if it is the right fit. Since QB migration is a lengthy process, you need to know its consequences. Your setup will get altered entirely due to the switch. So, ensure to strengthen your decision with complete facts or proceed after consulting QuickBooks Data Migration Services.
QuickBooks Desktop and QuickBooks Online are robust applications assisting companies through various stages. Here are the features between the two versions that will help you check which is adept:
Number of users
While using QuickBooks Desktop, you can only add one user, but QB Online facilitates having more than one user.
Accessibility
QuickBooks Desktop will run on specified computers in an office or a fixed location. It means you can’t access your files at some other location i.e., on a different device. On the other hand, QuickBooks Online uses cloud storage, making it accessible everywhere. You only need the application, login credentials, and an internet connection to view, edit, or use your files.
Data Storage Security
QuickBooks Desktop stores your files on local storage. Although the general secure connections do not cause interruptions, any corruption, damage, or virus attack here can cause your files to become inaccessible. In QB Online, you can enjoy high-grade protection servers to protect and secure your data.
Add-ons
Limited add-on options are available in QB Desktop. Numerous add-ons are available in cloud-based applications as they develop over time.
Hosting cost and access
You’ll need to bear the cost of hosting and backup files in QB Desktop. Secure storage in QB Online servers prevents you from backing up your files.
These points touch on the tip of QuickBooks Migration from Desktop to Online. It will help if you consider these points in-depth to assess the suitability and basis of company files.
Read Also – Fix QuickBooks Migrator Tool Not Working Windows 11
Variations experienced in using company files in both versions
The QuickBooks Company File stores all the information regarding your business, like inventory, employees, accounting records, customer lists, banking history, etc. A large-sized company file has more complexity because of massive stocks, considerable file sizes, and lengthy histories. This makes Migrating QuickBooks Desktop to Online more complex and problematic and trigger the need of QuickBooks Data Migration Services.
However, this no way means that you cannot move your data. Instead, it just signifies that the setup and assistance necessary will be higher than what you have. Thus, small and medium-sized firms can be excellent candidates to switch from QB Desktop Pro, Premier, and other versions to online, owing to the low file complexity. Further functionality and feature comparisons occurring while you migrate from desktop to online QuickBooks are as follows:
| I use QuickBooks Desktop to | You can do this in QuickBooks Online | You can attempt to do this in QuickBooks Desktop |
| Accessing the company file and managing data | ||
| Enabling data backups | All editions | All editions* |
| Coming back to the version of my company file | Advanced | All editions, with backups |
| Working with my accountant | All editions | All editions |
| Remotely accessing my company file | All editions | All editions** |
| Letting multiple users access my company file | Essentials, Plus, Advanced | All editions |
| Multiple company files maintenance | Requires additional subscriptions | All editions |
| Working simultaneously with multiple open QuickBooks windows | All editions | All editions |
| Working with my customers | ||
| Restricting sales to customers with overdue invoices | Unavailable | Not available |
| Creating and managing estimates, sending them to customers, converting them to invoices, and using progress invoicing | All editions; progress invoicing in Plus and Advanced only | All editions |
| Tracking sales and expenses in various currencies | Essentials, Plus, Advanced | All editions |
| Tracking sales, accepting payments, and calculating sales tax | All editions, with QuickBooks Payments | Unavailable |
| Tracking projects with time expenses, pending payments, unbilled work | Plus, Advanced | All editions |
| Invoices with batch invoicing | Unavailable | All editions |
| Creating and managing invoices and billing customers | All editions | All editions |
| Working with my suppliers | ||
| Billable expenses | Plus, Advanced | All editions |
| Managing bills and paying my suppliers | Essentials, Plus, Advanced | All editions |
| Tracking and managing contractors | All editions | All editions |
| Managing employee data | ||
| Tracking employee time, including billable hours | Essentials, Plus, Advanced | All editions |
| Paying employees, e-filing payroll taxes, and printing and filing reports | All editions, with Enhanced Payroll | All editions, with Payroll subscription |
| Using online banking | ||
| Connecting to the bank, downloading transactions, and reconciling | All editions | All editions |
| Undoing past bank reconciliations | By an accountant in QuickBooks Online Accountant | All editions |
| Managing inventory | ||
| Use the FIFO method to track inventory quantities, sales revenue, and COGS | Plus, Advanced | Unavailable |
| Setting and managing inventory reorder points | All editions | All editions |
| Using the Average Costing method to track inventory | Unavailable | All editions |
| Creating and running reports | ||
| Tracking income and expenses and organizing according to tax categories | All editions | All editions |
| Forecasting sales and expenses | Plus, Advanced | Premier |
| Using Advanced Reporting | Unavailable | Unavailable |
| Creating custom reports with Intuit Statement Writer | Unavailable | Unavailable |
| Running custom, profit, and loss, expense, and balance sheet reports | All editions | All editions |
*signifies that Intuit Data Protect subscription is necessary for online backups.
**You’ll require an online desktop app, a hosting provider, and a terminal server setup.
In case of any problems, QuickBooks online to desktop migration might not suit you and you will need to contact QuickBooks Data Migration Services.
Preparation for QuickBooks Desktop to Online Migration
Here’s everything you must know when you consider migrating to QuickBooks Online:
Things that will and won’t move from QB Desktop to Online
Users usually use the QuickBooks migration tool to transfer files from one version to another. The tool can send every piece of information without requiring manual entries. However, some aspects will require additional actions as the tool won’t work in their transfer. Further, the information migrated might need adjustments and alterations because of mismatched data. Thus, you’ll have to consider manual entries for such transactions.
Here’s a sneak peek at how different files behave when you migrate from QuickBooks desktop to QuickBooks online:
- Inventory: You’ll find that QuickBooks Online uses the FIFO method to track inventory in QB Online Plus only.
- Audit Trail: You cannot convert QB Desktop’s audit trail to the online version.
- Credit Card Charges: These will be included in the expenses section after QBO Migration.
- Estimates: There’s a difference in how QBO treats active and inactive estimates. The former convert and get the closed marking in QBO. However, the inactive estimates do not get converted.
- Suppliers or Vendors: While undertaking QuickBooks Desktop Migration, the information regarding supplier contacts, alternate details, their type, credit limit, etc., don’t convert.
- Journal Entries: Except for the billable status, everything gets converted.
- Chart of accounts: Although the chart of accounts gets converted entirely, it has an additional column named ‘Detail Type’ that can get messed up. It will require manual editing later. Further, notes and bank account numbers don’t convert.
This list is extensive and doesn’t end here. So, it’s crucial to assess this information prior and make your decision accordingly.
Create a backup of your company file
When you migrate QuickBooks online to desktop, you must back up your data for security and protection. You won’t need manual backups in QuickBooks Online as everything stays on cloud servers. However, migration from the desktop prompts this action. So, take the following steps:
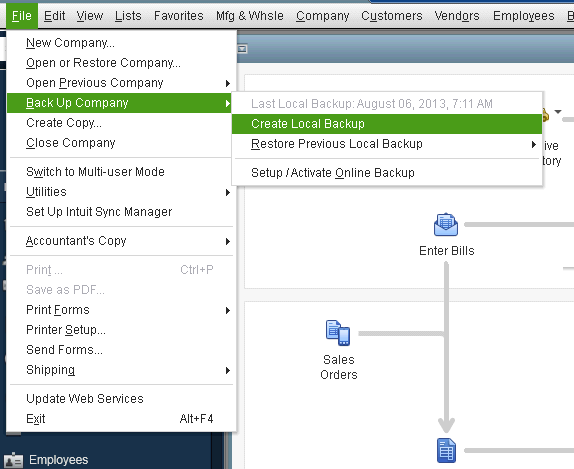
- Firstly, if you are in the multi-user mode, you need to get back to the single-user mode. Do so by going to the File menu and choosing the Switch to Single-user mode option.
- Now, again access the File menu in the QuickBooks Desktop and choose the Create Backup Option.
- Next, select the Local Backup option. A window will appear where you should opt for Local Backup and then Next.
- Move to the Local Backup Only section and tap Browse. Now, look for the place where you wish to save the backup file.
- Create as many backups as you need and run a test to ensure the process goes smoothly. Next, see if any troubleshooting errors arise while you attempt to back up your files for QuickBooks data migration.
- Tap OK to move further, hit the Save it now button, and choose Next.
- Get a confirmation message after taking these steps and finishing your backup.
This is how you can also take manual backups and follow other steps for automatic backups.
Keep your QB Desktop Updated to the Latest Release
The next thing you should do is to update your QuickBooks Desktop. You can download, install, and run them in QB Desktop as follows:
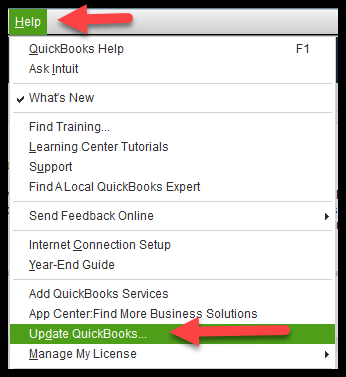
- First, switch to the single-user mode for this solution.
- Next, tap the Help menu in QB Desktop.
- Select the option stating Update QuickBooks Desktop.
- Now, tap the Update Now option.
- Further, click Get Updates, followed by Next.
- Let the update download and then exit the program.
- Reopen your QB Desktop app and payroll and migrate QuickBooks desktop to online.
Print and Store your Sales Tax Liability Reports
When you migrate your QB files, ensure to print and save your sales tax liability reports. They will help enter the adjusting entries later after migrating from QuickBooks desktop to online. You’ll need to follow the steps below:
- Head to the Reports menu in the QuickBooks Desktop.
- Select Suppliers and Payables > Sales tax liability.
- Choose all in the date drop-down.
- Opt for the Save as PDF icon in the print drop-down menu at the top.
- Choose the folder where you wish to save the report. Name it and hit Save.
- Get a hard copy of this file by printing it after you save it.
Check the total targets
The next step is to verify information regarding the total targets. Visit the Product information Window in QB Desktop by pressing Ctrl + 1 or the F2 key. Here, access the File Information section, wherein you will get the details regarding the total number of targets.
The target numbers are an essential consideration when you migrate from QuickBooks desktop to online. They make you eligible for converting lists and balances when you convert. Here’s the total targets number you must notice:
- 750,000 for the United States
- 700,000 for Canada
- 500,000 for the United Kingdom
- 500,000 for South Africa
Export your reports and lists
This step is necessary when you exceed the total target value. However, you can proceed to the next step if it is within limits.
When you migrate to QuickBooks online, exporting the lists saves you a lot of time. It eliminates the need to set up the item lists one at a time. Here are the steps you need to take as per the QuickBooks data migration services:
- Navigate to the Reports section in QuickBooks Desktop.
- Access the Report Center.
- Locate and choose any report to open.
- Go to the dates drop-down menu and select a favorable date range.
- Now, tap Excel on the toolbar. You can also save the report as PDF by choosing the Print or Email option.
- Select Create a new worksheet for a new excel workbook from the Excel drop-down menu. Alternatively, you can click the Update Existing Worksheet option and update the existing workbook with the available report.
- Now, tap Export and find your workbook on the computer.
- It is optional, but if you want to format your data in a particular way, choose Advanced.
- Tap Advanced if a message appears stating that the report has excessive columns. Click to unmark the space between the columns checkbox. Tap OK.
- Before you migrate QuickBooks to new computer, tap OK and be ready for the migration procedure.
Conduct these steps for all the reports and lists you wish to export in desktop migration services.
Create your QuickBooks Online Account
Forming your QuickBooks Online subscription is crucial to becoming ready for migration. Select a suitable plan from the list of options available. Further, whatever QuickBooks version you choose must meet the system’s compatibility requirements. It will help facilitate a smooth QB experience.
would help if you got your QB Online subscription when you’re ready to Migrate to QuickBooks. It is because you only have a 60-day window of signing up for QuickBooks Online to move your company file.
The sign-in credentials will be the same as those used for QuickBooks Desktop. However, it would help if you waited for your QuickBooks Online company setup. Further QuickBooks Online Migration steps are given further.
QuickBooks Migration Process
A simple three-step process of migrating from QuickBooks desktop to QuickBooks online is as follows:
Select a plan-
You need to choose a plan to sign up. It can be QuickBooks Online Simple Start, Essentials, or Plus editions.
Undertake to upload your data-
Now, conduct QuickBooks Online to QuickBooks desktop migration by importing the bank data, chart of accounts, products, services, customers, suppliers, invoices, and bills in CSV format.
Review
Monitor and revise the imported data, reconcile transactions, and finish QuickBooks Migration.
Learn to import data using the QuickBooks Migration Tool. Download QuickBooks migration tool for seamless data transfer from one version to another without hassle. You can use the migration tool from browsers for a simplified and streamlined migration or can take help from QuickBooks Data Migration Services.
Apart from the QuickBooks online migration tool, you can use QuickBooks data switcher, Intuit’s migration supplier. It is instrumental in moving your data without any interruptions. Your data can move anywhere between 24- 72 hours.
Now, take the following steps to learn how to migrate from QuickBooks desktop to online:
For QuickBooks Desktop Pro or Premier
- Sign in to the company file you want to import as an admin in QuickBooks Desktop.
- Visit the Company menu. Now, choose the option to Export Company File to QuickBooks Online.
- Tap Get Started.
- Hit Select Destination.
- Now, sign in to your QB Online account. Let the QuickBooks desktop migration to online accomplish.
For QuickBooks Desktop Enterprise
- Open the company file you want to import with administrator privileges in QuickBooks Desktop.
- Tap F2 to launch the Product Information window.
- Press Ctrl + B + Q keys on the keyboard while the product information window is on the screen. Begin the desktop to online migration by clicking OK at the bottom of the product information page.
As a user, if you track inventory in QuickBooks Desktop, take the following steps:
- Choose Yes to bring it over after specifying the particular dates.
- Tap No if you wish to set up new items later in QB Online.
- After the online data migration is complete, you’ll receive an email. Choose the Complete your Setup button in the email.
- Now, sign in to the QB Online account.
- Select the company file you wish to open.
You will see the QB Online dashboard open when you attempt to Migrate Data from QuickBooks Desktop to Online.
Moving the lists
The steps to export your lists and reports from QuickBooks Desktop will be followed by importing them to QuickBooks Online. The steps vary for each point mentioned below. You should follow them thoroughly while learning how to migrate data from QuickBooks desktop to online.
- Chart of Accounts
- Customer
- Supplier
- Products and Services
Inventory Setup and Tracking
The following actions will enable inventory setup and tracking when QuickBooks migrate to online:
- Tap the Settings icon in QB and choose the Account and Settings option.
- Click Sales, followed by the pencil icon next to Edit in the Products and Services section.
- Now, enable the Show Product/ Service Column on sales forms.
- Further, turn on the Track quantity and price rate box and the Track inventory quantity on hand option.
- Hit Save and Done.
QuickBooks desktop to QuickBooks online migration calculates the inventory costs from the beginning date of inventory through the First-In-First-Out method. The existing transactions on or after this date also get recalculated under FIFO. That is why experts suggest using the first day after your company’s last tax filing period to avoid filing amended forms.
Add inventory products to QB Online through the QuickBooks desktop to online migration tool. After setting up, inventory tracking in QuickBooks becomes easier. You can add products to sales forms. The quantity on hand gets updated in QuickBooks as you function, so you don’t have to do it manually.
You May Also Like To Read – Fix QuickBooks Error 6000 301
Post-Migration Process
Before you begin using QuickBooks Online, you’ll need to perform specific actions after using the QuickBooks migration tool online to desktop. Then, before modifying your data or entering new transactions, you need to complete these tasks.
The checklist to consider that is not a part of QuickBooks online to desktop migration tool is as follows:
Compare reports to verify your data
You should compare the reports given below in QuickBooks Online and in QuickBooks Desktop to ensure accurate data transfer. See if the QuickBooks migrator tool download works properly.
- Balance Sheet Report
- Customer Balance Summary – All Dates
- Sales Tax Summary Report for the latest period
- Supplier Balance Summary – All Dates
- Trial Balance – All Dates
- Any other reports you’d like to verify
If you wish to verify your reports, run them by pressing the All dates option and setting the Accrual accounting method in QB Online and Desktop. Hopefully, the QuickBooks migration tool download and functioning will finish successfully with the help of QuickBooks Data Migration Services.
Validate Company Settings
The QuickBooks data migration tool moves the accounting figures to QB Online. However, it doesn’t take information related to a company name, address, email details, etc. Thus, you will require to enter it in the system manually.
Undertake the following actions to understand what is the migration utility in QuickBooks:
- Tap the gear icon or the Settings menu, followed by Account and Settings.
- Enter the company and contact information on the Company tab.
- Now, type the email address in the Company email box where you’d like to receive updates and monthly invoices from Intuit regarding your QB Online subscription and migration tool QuickBooks.
- You can enter an email address in the customer-facing email box if you do not wish to use the company email address to let the customers reach out to you.
- Tap Save.
Configure the sales tax settings
After the QuickBooks desktop migration tool download, set up your QB Online with an accurate CRA Business Number and filing frequency before using it. Don’t use these steps if your firm isn’t registered for sales tax:
- Tap Taxes > Sales taxes.
- Click Set up sales tax.
- Outline the province or territory of your business and tap Save.
- Enter the necessary information on the following screen and hit Next.
- Click OK on the next screen.
- Return and edit the settings any time you want.
Link the credit card and bank accounts
The bank and credit card information doesn’t transfer when you use the migrator tool QuickBooks desktop. It is done to ensure your safety. Take the following steps in QB Online to link your accounts:
- Move to Bookkeeping, followed by Transactions and Bank Transactions.
- Tap the Connect Account from the landing page or choose Add account if a new account hasn’t been formed already.
- Look for your bank and click continue once you find it. After using the QuickBooks data migration tool, enter the username and password used for the bank’s website in the pop-up window.
- Choose the accounts to connect and select the account type for each of them from the dropdown menu. They will be posted on your chart of accounts.
- Choose the date range for downloading after using the QuickBooks desktop migration tool.
- Tap Connect.
Clear your bank reconciliations
Because you haven’t done any reconciliation yet in QB Online, you need to assume that no bank transactions have gotten reconciled. So, instruct QB to mark all transactions up to the conversion date as reconciled. It will only consider future transactions for reconciliation after migrating QuickBooks desktop to online.
- Go to Settings, then Reconcile.
- Select the relevant bank account from the dropdown menu. Then, add the Ending Balance and Ending Date, followed by Reconcile Now.
- You’ll see a list of transactions. Tap the top checkmark boxes to choose all transactions in the list. Ensure to select the data in both columns after using the QuickBooks Desktop Migration Tool.
- Find and unmark the transactions that haven’t yet cleared. The reconciliation will be successful once the difference is zero.
- Tap Finish Now. Repeat the steps for all accounts in QB Online.
Winding Up
Hopefully, this guide will support you through the QuickBooks Migrator Tool services. We have covered all potential information to help you in your decision-making and migration steps. However, if you still have queries, contact our Proadvisor solutions Desktop specialists at the 1.855.888.3080 and undertake reliable and secure QuickBooks Data Migration Services.
FAQs
What is the migration utility QuickBooks?
The migration utility, also known as QuickBooks Migrator Tool, helps users move their files from one place to another without the support from QuickBooks Data Migration Services. For example, it can be to a new computer, another QB version, or from Desktop to Online.
How to download QuickBooks on another computer?
You can download QuickBooks on a new computer from authentic links like Intuit or a CD. The download and installation are relatively straightforward. Your system should comply with the requirements for QB.
How to migrate from QuickBooks desktop to online?
You can move from QuickBooks Desktop to Online through the Migrator Tool or with the help of QuickBooks Data Migration Services. You can also use the QuickBooks data switcher by Intuit to migrate. These steps will help you move seamlessly.

Erica Watson is writing about accounting and bookkeeping for over 7+ years, making even the difficult technical topics easy to understand. She is skilled at creating content about popular accounting and tax softwares such as QuickBooks, Sage, Xero, Quicken, etc. Erica’s knowledge of such softwares allows her to create articles and guides that are both informative and easy to follow. Her writing builds trust with readers, thanks to her ability to explain things clearly while showing a real understanding of the industry.