QuickBooks Point of Sale is an amazing tool for small to mid-size business owners to get the maximum sales and inventory management done online. With its real-time inventory tracking, no manual entries are needed to be done and it also help the user maintain a bird-eye view of online and in-store data. Like QuickBooks, multiple users can use the tool and boost overall productivity with no time loss. Multi-user access allows up to 19 clients to connect with the company file with all other features like creating and holding company file at the server, back up and restoration of data, importing data to Excel and Word, etc. But first, you need to straighten out the QuickBooks Point of Sale network configuration.
“If you are facing any errors during the QuickBooks Point of Sale network configuration, installation, or while backing up the data file, call on the Proadvisor Solutions Helpline Number 1.855.888.3080 and get expert assistance on the line”
You may also see: create QuickBooks period copy
Table of Contents
Things to do before QuickBooks POS Network Configuration
Before setting up the POS configuration on your server, you must install the QuickBooks Point of Sale on both the server and the workstation. Starting with the installation process, below given are the system prerequisites required to install the latest version of the QB POS on your system.
Operating Systems
- All of the editions of Windows 10, including 64-bit, pre-installed
- All of the editions of Windows 8.1 (Update 1), including 64-bit, pre-installed
- All of the editions of Windows 7 SP1, including 64-bit, pre-installed (only supported until January 2020)
- Windows Server 2016
- Windows Server 2012 R2
- Windows Server 2011 SP1
- Windows Server 2008 R2 SP1 and SP2 (only supported until January 2020)
Hardware and OS Requirements
Processor-
- Single user: 2GHz minimum, 2.8 GHz recommended
- Multiple Users: 2.8 GHz processor, 3.5 GHz recommended
RAM
4 GB minimum, 8 GB recommended
Disk Space
1 GB of disk space, excluding the company data file storage requirements
Windows
- US version
- Supports regional settings when set to English
- Installed on a particular system or environment for which it was designed. No need to run in a virtual environment or using an emulation software
Optical Drive
4X DVD-ROM for CD installations (not required if the software is downloaded from Intuit web servers)
Screen Resolution
Optimized display for 1280 x 768 screen resolution or higher
Software Compatibility (For Data Import/Export)
- Microsoft Excel 2010, 2013, 2016, Office 365 (includes 64-bit)
- Microsoft Word 2010, 2013, 2016, Office 365 (includes 64-bit)
QuickBooks Software Compatibility
- QuickBooks Desktop Pro and Premier 2016-2019
- QuickBooks Desktop Enterprise 16.0-19.0
Important- Internet access is required for the functioning of QB POS.
If your workstation and server meet the requirements mentioned above, follow the steps below to install the QuickBooks Point of Sale.
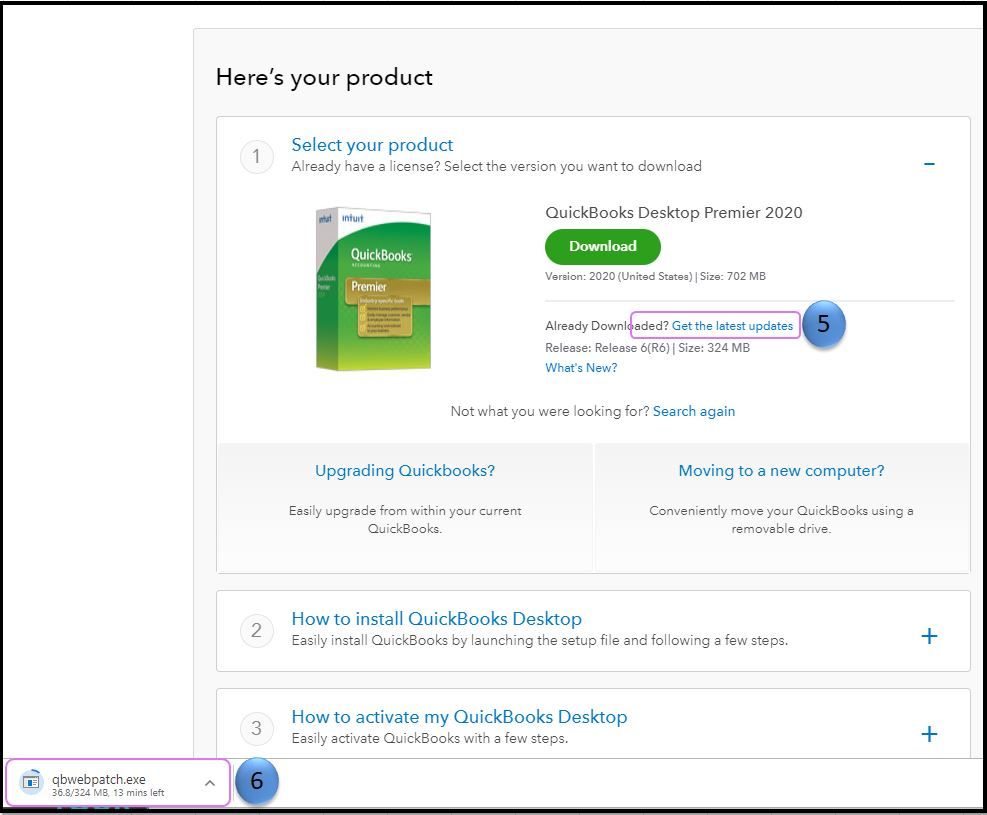
- Download the latest version of QuickBooks Point of Sale from the Downloads & Updates page of Intuit.

- Open the downloaded QuickBooks installation file and select Yes to All to the prompt asking to overwrite the existing extracted files.
- Click on Next to start the installation process.
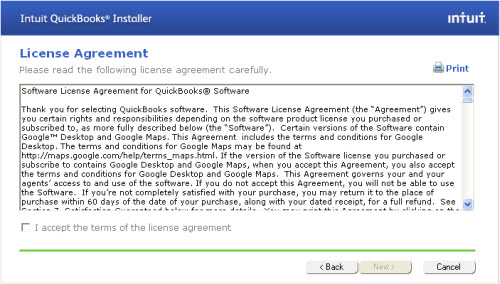
- Under the License Agreement, click on the box of I accept the terms in the license agreement and choose Next.

- Provide the license and product number and choose Next.
- Under the Installation type, choose Two or more computers.

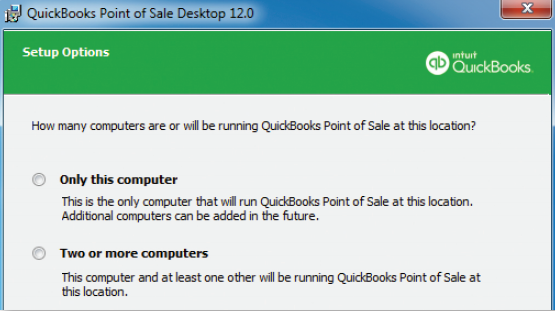
Important- You can also select Only this computer if you plan to use the software as a single user.
In the next window, choose the Server workstation to create and store company data on the system.
Important- You can also select the Client workstation if you want to use this workstation as a cash register to help customers in their daily sales and access the program.
Click on Install and after the installation process completes, restart your computer.
How to Complete the QuickBooks Point of Sale Network Configuration?
In order to use QuickBooks Point of Sale in multi-user mode, you need to follow the steps given below and complete the QB POS network configuration.
Step 1: Customize the Folder Permissions
Setting up the folder permissions would allow all the workstations to access the company file.
- On the
server, Open My Computer and go to the Users. - Under
the Public folder, double-click on the Public Documents folder. - Open Intuit
folder and enter the QuickBooks Point of SaleXX folder. - Right-click
on the Data folder and choose Properties. - Click on
the Sharing tab and choose Advanced Sharing. - Select Share
this folder and click on Permissions. - Select Add
and type QBPOSdbsrvuser. - Hit OK
and click on QBPOSdbsrvuser. - Choose Full
Control and make sure that the permission of Everyone and Services user
groups are configured to Full Control as well. - Click on
Apply and select OK.
Step 2: Complete “Quickbooks pos firewall settings”
To process smooth electronic funds transfer and uninterrupted database server management, the user must manually configure QuickBooks Point of Sale Firewall exceptions. Make sure to log in as Windows Administrator before you try the given steps.
- Open the run command by pressing Windows + R on the keyboard.
- Enter Control in the search bar and press Enter.
- In the Control Panel window, set the “View by” settings to Small Icons and choose Windows Firewall.
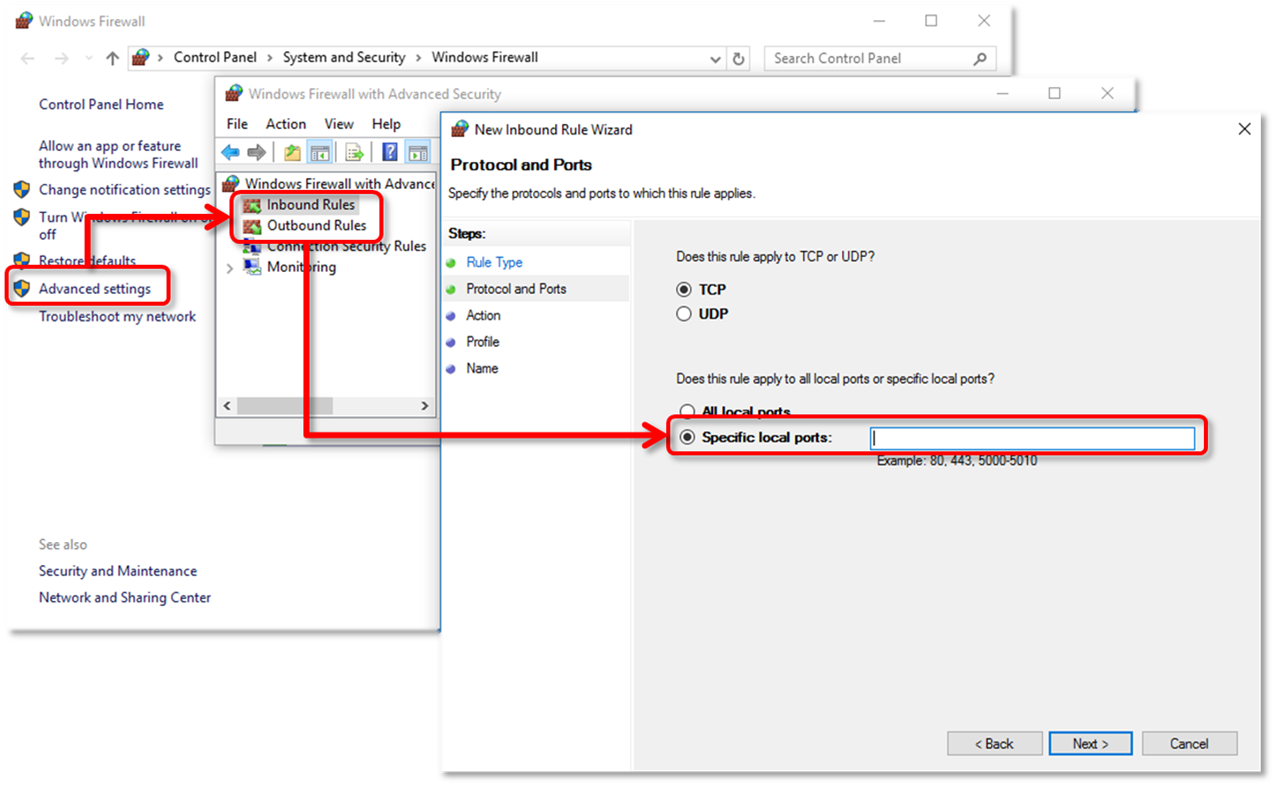
- Click on Advanced Settings and select Inbound.

- Select New Rule and click on Port.
- Select Next and type the Port numbers.
- Choose Next and select Allow Connection.
- Click on Next and type a name for the firewall rule.
- Select Finish and follow steps 5-8 to create the Outbound Rule as well.
Important- In case of a third-party security program or firewall, add the Firewall Ports and Executable Files required by QuickBooks Desktop Point of Sales.
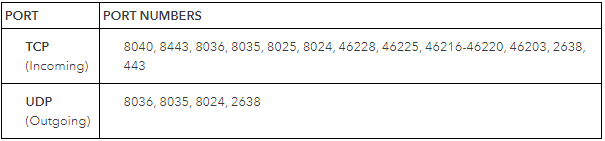
POS Firewall Ports
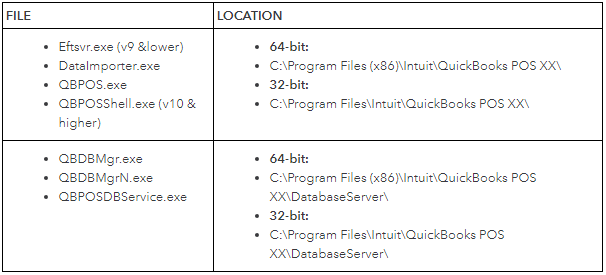
Executable files and their required ports

File Locations
Step 3: Switch to Multi User Mode and Configure the workstation number
Assigning each workstation a number will prevent any confusion in the future.
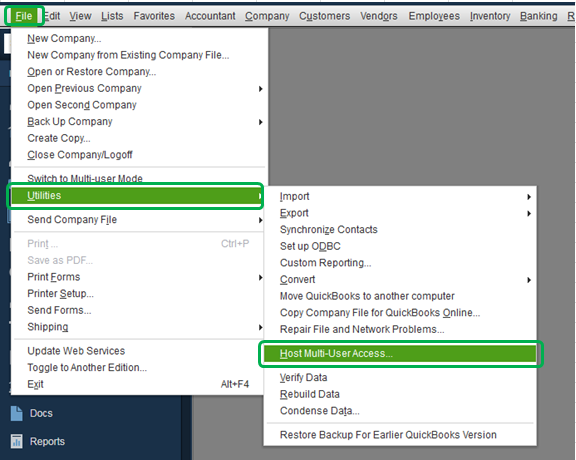
- Go to the server and open the QuickBooks Desktop Point of Sale.
- Choose the File menu and click on Switch Company File to Multi-User Mode.

- Move to the workstation and open QuickBooks Desktop Point of Sale.
- Under the File menu, click on Preferences and select Workstation.
- Under General, type the number you want to assign to the workstation under the Please enter the number for this workstation field.
- Click on Save.
You may also read: QuickBooks Statement Writer Error
At this point, we would like to conclude this blog on the process of QuickBooks Point of Sale Network Configuration. We hope that the information listed above helps you with your searched query. On a different note, if you require additional assistance, dial Proadvisor Solutions Helpline Number 1.855.888.3080 anytime.

Erica Watson is writing about accounting and bookkeeping for over 7+ years, making even the difficult technical topics easy to understand. She is skilled at creating content about popular accounting and tax softwares such as QuickBooks, Sage, Xero, Quicken, etc. Erica’s knowledge of such softwares allows her to create articles and guides that are both informative and easy to follow. Her writing builds trust with readers, thanks to her ability to explain things clearly while showing a real understanding of the industry.