QuickBooks is a great accounting help for small and midsize businesses to keep up with their bookkeeping needs. Its features tend to procure the urgency of its users, and one of the best examples of intuitive development is the option to create QuickBooks period copy. There are times when organizations need to share their data in compliance with state or legal authorities like IRS. Besides that, most banks and accountants often demand files for a certain period of time to review the company’s health. Condensing the whole company file and sending it to such third-parties could sprout problems along the way. But with the period file, the users can trim down the period of the data file as per the requirements and send the condensed version to the concerned party.
“When you create QuickBooks period copy, there are certain errors and blockades that could happen in the process. For a smooth and quick conversion of the file, get in touch with ProAdvisor Solutions Support at 1.855.888.3080 and get efficient assistance on the line”
You may also see: QuickBooks Statement Writer Error
Table of Contents
How to Make a Period Copy in QuickBooks Desktop?
Before you start the process, make sure that your records are complete and clean for the period you want to make the copy. Below are given the steps to make a period copy for QuickBooks Desktop.
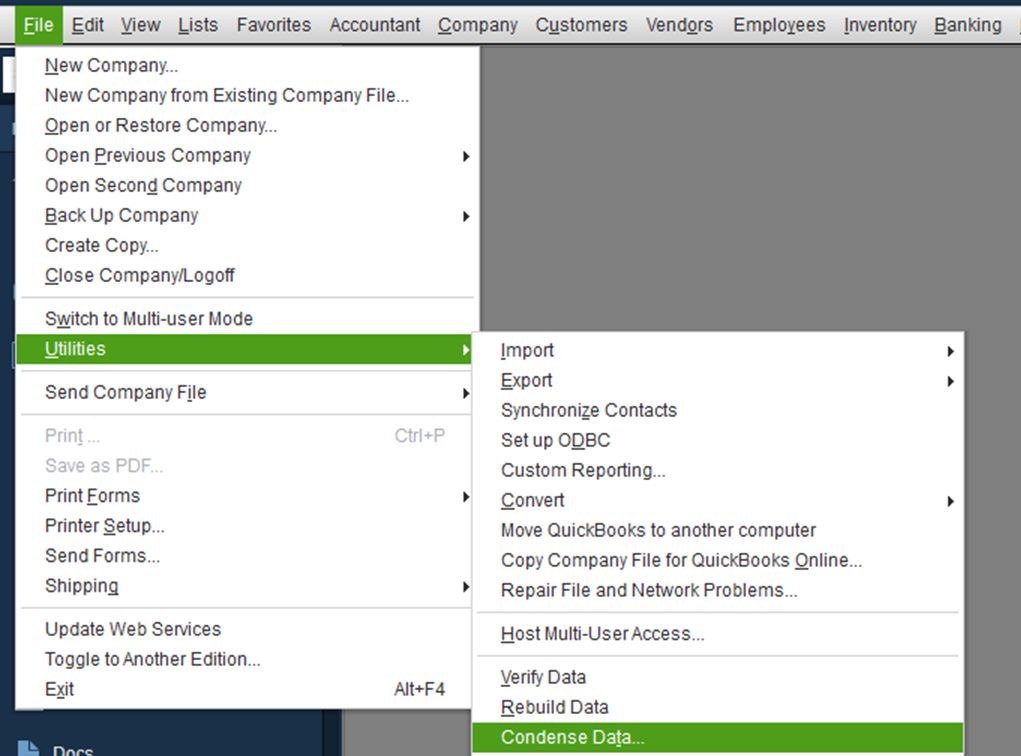
- Open QuickBooks and click on the File menu at the top menu bar.
- Choose Utilities and select Condense Data utility.

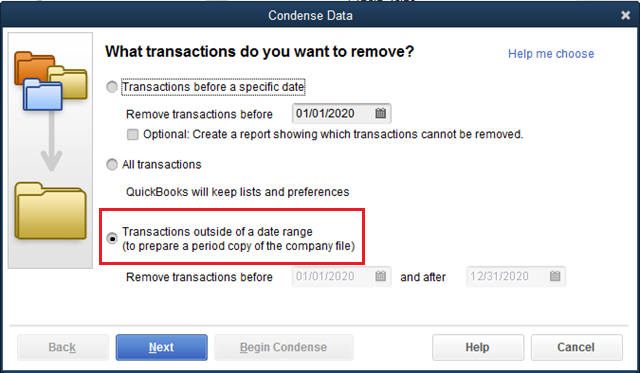
- In the next window, select Transactions outside of a date range (to prepare a period copy of the company file).

- Select the dates of the applicable time period under the Remove transactions before and after filter.
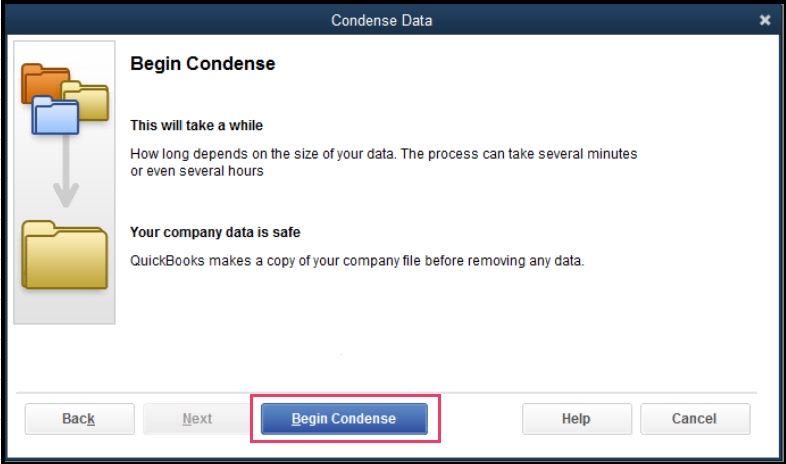
- Click on Next and choose any of the Summary Journal Entry format as per your need.
- Select Summarize Inventory Transaction and click on Next.
- Select all the listed records and choose Begin Condense.

- In case for any assistance, click on Help.
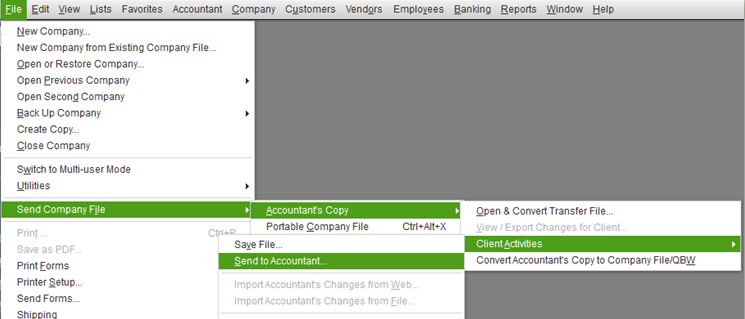
Important– If you need to send the period copy to your accountant, then there is an alternative ladder of better and safer steps.
- Open QuickBooks and click on the File menu.
- Choose Accountant’s copy and click on Client Activities.

- Select Send to Accountant and confirm that you want to create an Accountant’s Copy.
- Select Next and select the time period of the file you want to send.
- Submit the accountant’s email address and enter your information as well.
- Select Next and make a file transfer password for file encryption.
- Make sure to send the password you enter to your accountant as well.
- Select Send.
What to do if I can’t make a QuickBooks Desktop Period copy?
There are roughly two reasons that could affect the QuickBooks period copy creation process. They are:
Reason 1: The company file is damaged or corrupted.
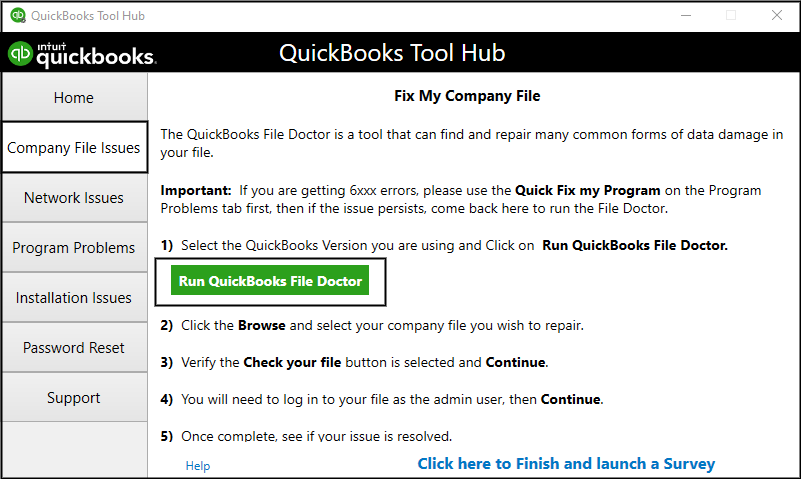
Solution: Run QuickBooks File Doctor utility from the QuickBooks Tool Hub
The condense data utility cannot run until the company file is issue-free. Any company file issues can be solved with the QB File doctor utility.
- Install the tool hub by downloading it from Intuit website or click HERE to download it.
- Open the tool hub and choose Company File Issues from the left pane.
- Click on Run QuickBooks File Doctor and wait for some time as it could take over a minute to open.

- Now, choose your company file under the dropdown menu.
- Click on Check your file and select Continue.
- Enter your QB admin credentials to continue and choose Next.
- After the scan, try the condense data tool again to make the period copy.
Reason 2: There are QuickBooks files with negative inventory on hand.
Solution: Repair the negative quantity in the inventory
Negative inventory calls for an incorrect Cost of Goods Sold on Profit and Loss report, leading to further issues in account reconciliation. With such discrepancies, company file can’t be condensed and sent to the concerned analytic.
- Open QuickBooks
and go to the Reports menu. - Click on
Inventory and choose Inventory Valuation Summary. - Double-click
on any item showing incorrect values to open the Inventory Valuation detail
report of the item. - Double-click
on the first bill on the list. - The Enter
Bills window will open. Replace the date on the bill with a date earlier
than the first invoice listed on the Inventory Valuation Detail report. - Select Save
& Close to save the adjustment. - Repeat
the last four steps for each incorrect value on the report.
You may also read: QuickBooks record deposit without invoice
In conclusion, we would like to end the blog on the steps to create QuickBooks period copy and hope that the content above is easy to understand and answer all of your queries. While the information is foolproof, there is always the variable of human error to complicate the equation. If you need additional assistance on the matter, dial Proadvisor solutions Direct Support Helpline Number 1.855.888.3080 anytime.

Erica Watson is writing about accounting and bookkeeping for over 7+ years, making even the difficult technical topics easy to understand. She is skilled at creating content about popular accounting and tax softwares such as QuickBooks, Sage, Xero, Quicken, etc. Erica’s knowledge of such softwares allows her to create articles and guides that are both informative and easy to follow. Her writing builds trust with readers, thanks to her ability to explain things clearly while showing a real understanding of the industry.