Users encounter QuickBooks Error 7300 when accessing their company file or syncing it with Intuit servers. Read this blog till the end to get in-depth details about the error.
QuickBooks has indeed revolutionized the accounting industry by offering a reliable financial management system to business owners, accountants, freelancers, etc. You can perform several essential tasks in seconds. However, being a QB user also involves facing different errors that randomly develop while using it for day-to-day financial activities. While some errors are easy to tackle, some may create severe complexities for you. In that case, identifying the exact root cause and then implementing an appropriate solution accordingly help fix errors effortlessly.
Keeping that in mind, we have created this blog to help you with the exact triggers for QuickBooks error code 7300 on your system and the effective solutions to go through it. Keep reading the blog to acknowledge the intricate details of the issue along with the do’s and don’ts during the troubleshooting.
Getting error messages while opening or syncing the data files with the servers can affect your QB accounting tasks. Ring a bell at 1.855.888.3080 to prevent the error from escalating and fix it effectively with our team of professionals at your disposal.
Table of Contents
What is QuickBooks Error Message 7300?
After regular intervals, QuickBooks updates all the changes in the company file on the server and vice versa. Intuit Sync Manager acts as a medium of data exchange and ensures QuickBooks is in sync with the servers at any given time. QuickBooks error message 7300 coming up while opening the data file or syncing its data indicates that the connection between the software and server has been hindered. This can cause you a lot of trouble as accessing the company file also becomes impossible due to recurring error messages coming up on your screen.
You need not worry about your financial data, as it remains secure even after QuickBooks gets infected with the Sync Manager error. Also, you might face random crashes or software lag when you make continuous attempts to access your data file. We recommend that you stop wasting your time in unsuccessful attempts to sync your data file and learn about the error better through the blog, including its causes and effective countermeasures.
Root Causes for the Occurrence of QuickBooks Error Code 7300
The main reason why you face this Intuit Sync Manager error is a hindrance in the software’s connection to the server or the company file stored on your system. This hindrance may result from software irregularities or misconfigured settings on your system. We have explained all the circumstances below that can lead to the development of Sync Manager issues while using QuickBooks-
- A low Internet speed on your system can cause data loss during the sync, leading to discrepancies in the data.
- QuickBooks won’t be able to sync data if it isn’t allowed to connect with the Intuit servers or the Internet due to Windows Firewall Restrictions.
- QuickBooks cannot sync data with the servers if incorrect TLS or SSL settings on your Windows have revoked the applications’ internet access.
- Intuit Sync Manager faces problems running due to outdated Windows, antivirus restrictions, or other applications blocking its background processes.
- You’ll face problems opening/syncing your data files if the Sync Manager can’t integrate with QuickBooks Desktop due to missing updates.
- QuickBooks error message 7300 might come up during data sync if the company file is damaged, stored on the network, or the folder containing it requires admin permissions to access.
- A damaged or corrupt QBUSER.ini file might cause problems during User authentication, which in turn generates issues during data sync.
- QuickBooks cannot connect to a company file if some folders are missing from the file path.
These are the potential conditions that trigger QuickBooks error 7300 while syncing your company file with the Intuit servers. They’ll help you determine why the issue developed in your system, and you can apply the suitable troubleshooting technique accordingly.
Tested Techniques to Resolve QuickBooks Error Code 7300
We hope the reasons mentioned in the previous section clarify the occurrence of data syncing issues in your QuickBooks. You need to get rid of the error quickly to avoid problems while opening the data file or syncing it with the servers. In this section, we have listed all the possible techniques that are easy to execute and profound in eliminating the error 7300 QuickBooks from your system. Start applying them in the given order if you have a vague idea about the cause of the error or choose the exact technique if you know the exact reason-
Solution 1- Configure Windows Defender Firewall Settings
QuickBooks functions get entirely blocked if the Windows Firewall restricts the application, which is a major problem while syncing the data file. Windows Firewall restrictions can also stop QB from accessing the data file or connecting with the Internet to sync its data. You can add Firewall ports for QB Desktop as discussed in the following steps to ensure it bypasses the restrictions-
Note: If you use multiple QB versions, you’ll have to perform these steps for each version individually.
Step 1- Adding New Firewall Exceptions for QB
This procedure will help you add new firewall ports for QuickBooks Desktop-
- Type ‘Windows Firewall’ in the search panel and open the Windows Defender Firewall window from the results.
- Tap the Advanced Settings option and right-click Inbound Rule in the following tab.
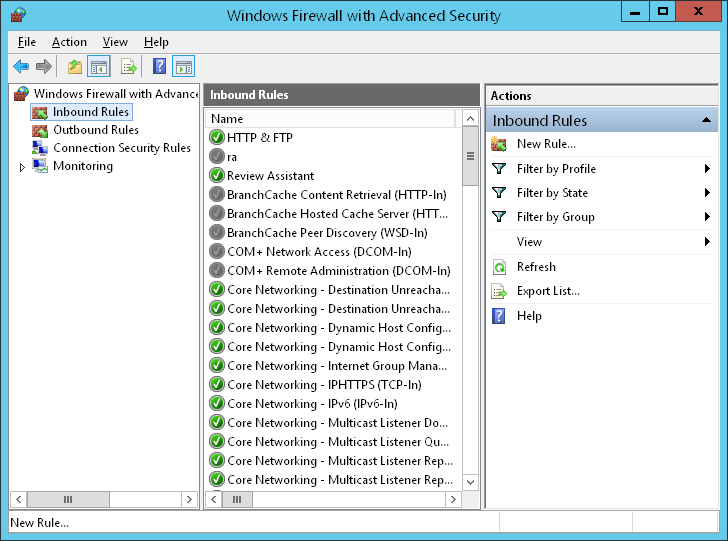
- Select New Rule, click Port, and then Next.
- You’ll see TCP/UDP in the next window. Choose TCP and move to the Specific Local Ports option.
- Choose the Firewall Ports for your QB product using the following list and enter them accurately-
- QuickBooks Desktop 2017: 8019, 56727, 55373-55377
- QuickBooks Desktop 2018: 8019, 56728, 55378-55382
- QuickBooks Desktop 2019: 8019, XXXXX
- QuickBooks Desktop 2020 and newer version: 8019, XXXXX
- Get the Dynamic Port Number from the QBDBSM
- Move to the Windows Start menu, type QuickBooks Database Server Manager in the search panel and double-tap to open it.
- Further, move to the Port Monitor tab, find your version of QBDT and note down the port number to be used for your firewall port exceptions.
- Tap Next after entering the correct port number and click Allow the connection in the next window.
- Mark all the user profiles in the software prompt and tap Next.
- Create a new rule with a name of your choice and click Finish when done.
- Select Outbound Rules instead of Inbound Rules in Step 2 and execute all the steps again.
Step 2- Add Firewall Exceptions for QB Executable Files Separately
The accounting tasks in QuickBooks are possible due to its executable files that run in the background. Add Windows Firewall exceptions for them as shown below-
- In the Windows Defender Firewall settings tab, click Advanced Settings and right-click Inbound Rules later.
- Click the New Rule option and tap Program.
- Choose Next and click This Program Path.
- Tap Browse and choose one of the executable files listed in the following table:
| Executable files | Location |
| AutoBackupExe.exe | C:\Program Files\Intuit\QUICKBOOKS YEAR |
| Dbmlsync.exe | C:\Program Files\Intuit\QUICKBOOKS YEAR |
| DBManagerExe.exe | C:\Program Files\Intuit\QUICKBOOKS YEAR |
| FileManagement.exe | C:\Program Files\Intuit\QUICKBOOKS YEAR |
| FileMovementExe.exe | C:\Program Files\Intuit\QUICKBOOKS YEAR |
| QuickBooksMessaging.exe | C:\Program Files\Intuit\QUICKBOOKS YEAR |
| QBW32.exe | C:\Program Files\Intuit\QUICKBOOKS YEAR |
| QBDBMgrN.exe | C:\Program Files\Intuit\QUICKBOOKS YEAR |
| QBServerUtilityMgr.exe | C:\Program Files\Common Files\Intuit\QuickBooks |
| QBCFMonitorService.exe | C:\Program Files\Common Files\Intuit\QuickBooks |
| QBLaunch.exe | C:\Program Files\Common Files\Intuit\QuickBooks |
| QBUpdate.exe | C:\Program Files\Common Files\Intuit\QuickBooks\QBUpdate |
| IntuitSyncManager.exe | C:\Program Files\Common Files\Intuit\Sync |
| OnlineBackup.exe | C:\Program Files\QuickBooks Online Backup |
- Click Allow the Connection option and hit Next.
- Mark all the User Profiles if the software prompts and tap Next.
- Create a new rule with any preferred name.
- Repeat all these steps after selecting Outbound Rules instead of Inbound Rules.
Step 3- Configure the Antiviruses on Your PC
Antiviruses also play a major role in limiting QB functions or stopping it from using the Internet. In fact, antiviruses can also block the Intuit Sync Manager from running, after which it won’t be able to sync your company files. To overcome this, we advise you to check the quarantined or blacklisted programs list in the antivirus settings and remove all the QB/Sync Manager files. Disabling your antivirus programs when you sync company files or download the latest QB updates would be much better.
If QuickBooks still faces problems syncing your data file, move to the next solution.
Also Read: How to fix QuickBooks Error Message 15204
Solution 2- Resolve Intuit Sync Manager Issues
QuickBooks also fails to sync data using Intuit Sync Manager if the latter program stops running due to internal glitches. You might also encounter an ‘An update is available’ message whenever the data sync fails, or you open QuickBooks with Sync Manager running in the background. This can become a problem while executing other tasks involving the data file and needs to be addressed quickly. You must begin by removing the Intuit Sync Manager from your computer to resolve QuickBooks error 7300, as shown in these steps-
Step 1- Stop Company Files from Syncing
You must first stop the company files from syncing data to prevent random error messages from recurring-
- Open up the system tray by clicking the arrow pointing upwards.
- Right-click the Intuit Sync Manager icon to open a list of all the company files.
- Right-click the company files individually and navigate to the Sync Enabled menu.
- Click Disable in the drop-down to stop the company file from syncing data.
Step 2- Clear the Sync Settings
Once the company files stop syncing, you need to clear the sync settings as described in the following steps-
- Launch your QB Desktop and go to its Help menu.
- Select the Manage Data Sync option and click Clear Sync Settings.
- Confirm by clicking Yes and tap OK to continue.
Step 3- Stop Automatic Updates and Remove Intuit Sync Manager from QB Preferences
All the sync settings will be cleared after applying the above steps, and the company files will no longer sync. As a final step, you must remove Intuit Sync Manager from QB preferences and stop its automatic updates, as shown in the following steps-
- Single-click QB’s Edit menu and select Preferences in the drop-down.
- Click Integrated Applications and select the Company Preferences option.
- Highlight Intuit Sync Manager with a single click and tap Remove.
- Access your QB’s Help menu and click the Update QuickBooks Desktop option.
- Go to the Options tab and tap Turn off automatic updates.
- Reboot your system and perform the QB task initially, leading to this error.
If you still encounter error messages when adding a new entry to the data file, proceed to the next solution.
Solution 3- Rectify Network Connectivity Issues on Your Windows
QuickBooks Desktop requires a stable Internet connection throughout data sync to ensure a smooth data exchange with the Intuit servers. In case this connection gets interrupted, QuickBooks straightway casts error messages on the screen indicating the failure in data sync. Network Connectivity issues can develop due to incorrect TLS or SSL settings on your Windows or if the Internet speed delivered by your service provider is too low to support a stable Internet connection. Let’s fix the network issues stepwise, as shown below-
Step 1- Check the Internet Speed
You must begin by checking the Internet speed of your network connection, as it is a basic necessity for data sync. Here’s the correct way-
- Access Google’s homepage on your web browser and type ‘internet speed test.’
- Click Google Search and open the first link you find in the search results.
- Run the Internet Speed Test and verify that the speed lies in the range (or above) of 1.5Mbps minimum and 3.5Mbps on average, as required by QuickBooks.
If the Internet Speed is lower than QB requirements, you must try plugging out and plugging in your router again. You should also check the wire cables for damage or upgrade your network service provider.
Move to the next step if the Internet Speed is satisfactory on your computer.
Step 2- Arrange the TLS and SSL Settings
Transport Layer Security (TLS) and Secure Sockets Layer (SSL) are Windows OS protocols that ensure the Internet connection is safe and the data transferred through the connection is secure and free from harmful entities like Malware. However, incorrect arrangement of these settings can result in internet connectivity issues on the applications. Configure the TLS & SSL settings using the following steps to prevent them from interrupting QB’s connection to the servers-
- Open the Run command by pressing Windows + R and type ‘inetcpl.cpl’ in the text box.
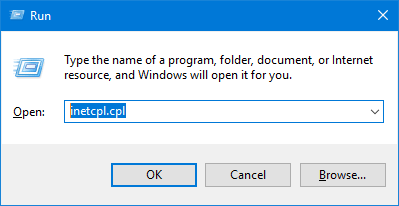
- Press Enter and move to the Advanced tab in the Internet Properties window.
- Move to the bottom of the settings list and mark the Use TLS 1.2 and Use SSL 3.0 checkboxes.
- Leave all the other SSL and TLS checkboxes unmarked and close the Internet Properties window.
- Relaunch QuickBooks Desktop
If the Error 7300 QuickBooks persists, check out the next solution.
Solution 4- Download the Latest Windows and QuickBooks Desktop Updates
Updating your QuickBooks Desktop and Windows OS is also included in the steps to fix QuickBooks error 7300. We do this to prevent compatibility issues when Intuit Sync Manager integrates with QB Desktop or runs on your Windows OS. Obsolete versions of any of the two can interrupt the data sync and trigger errors on your QB. Refer to these steps-
Updating Windows OS
The following steps will help you install the latest Windows OS updates on your system-
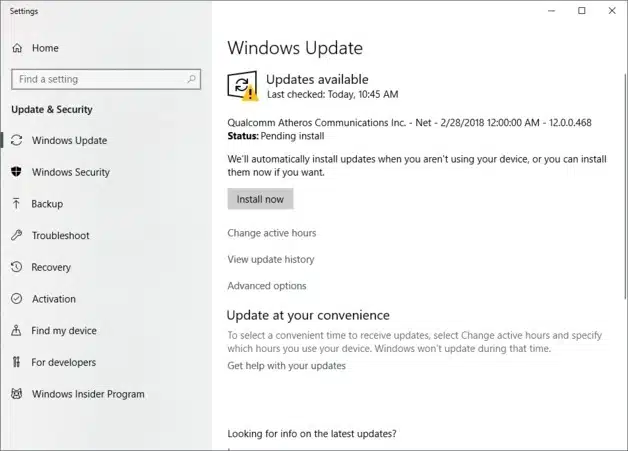
- Type ‘Windows Update’ in the search panel and click on its icon in the results to view it in the control panel.
- Click the Check for Updates on the right panel to search for new available updates.
- Tap Download and Install when you see a new Windows version and let it install on your system.
- Wait until the system reboots automatically after the Windows Update.
Updating QuickBooks Desktop

After Windows OS is updated, you must download the latest QB updates as shown in the following steps-
- Open your QuickBooks Desktop and switch it to single-user mode using the Stop hosting multi-user access option in the File menu.
- Go to the Help menu and click Update QuickBooks Desktop in the drop-down.
- Verify that the Shared Download location in the Options tab is correct and go to the Update Now tab.
- Click Reset Update to delete the previous update packages and hit Get Updates to download the latest updates.
- Wait until the updates are completely downloaded and reopen your QB.
- Click Install Now when the software prompts and wait until QB installs the latest updates.
- Perform the accounting task that initially caused this error.
If updating QuickBooks and Windows doesn’t fix QuickBooks error code 7300, move to the next solution.
Recommended to read : What is QuickBooks Payroll Error PS032
Solution 5- Recreate the Damaged QBWUSER.ini
QBWUSER.ini stores the data of users allowed to use the software and runs during the launch for authentication. If this file gets damaged or corrupt and QuickBooks fails to run it during launch, you might face a sudden crash or issues while syncing the company file later. You need to recreate the QBWUSER.ini file to ensure the software doesn’t struggle due to authentication issues. These are the steps to fix QuickBooks error code 7300 by recreating the QBWUSER.ini file-
- Navigate to C: Users\Username\AppData\Local\Intuit\QuickBooks20XX.
- Right-click the QBWUSER.ini file inside and select Rename in the options.
- Type ‘.old’ at the end of the file name and save it as ‘QBWUSER.ini.old.’
- Reopen your QuickBooks and try syncing the company files.
If the error is still not fixed, move to the next solution.
Solution 6- Repair Company File
You won’t be able to open or sync your company files in QuickBooks if they get damaged or corrupt due to a virus attack or any other reason. The best way to repair your data file is to use the File Doctor Tool, which automatically fetches and fixes the issues. You must have the latest QB Tool Hub version on your system to troubleshoot QuickBooks error 7300 if it occurs due to issues in the data file. Refer to these steps-
- Access the official website of QuickBooks on your system’s web browser and go to the Downloads and Updates page.
- Fill in the details of your QB product asked on the page and download the latest QB Tool Hub version (1.6.0.3) on your computer.
- Open the QuickBooksToolHub.exe file after downloading and install the application on your computer with the on-screen instructions.
After the QB Tool Hub is installed, you must begin the company file repair using the following steps-
Run Quick Fix My File
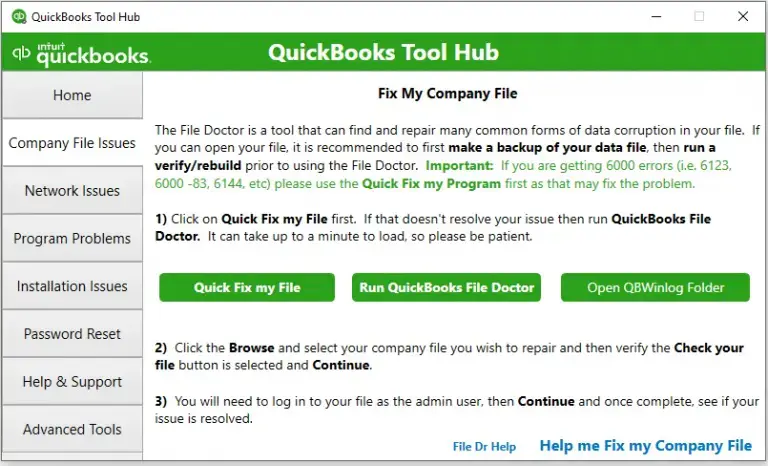
Before running the File Doctor Tool, you must run the Quick Fix My File tool using these steps-
- Launch the QB Tool Hub and click the Company File Issues menu.
- Select Quick Fix My File in the options list and give the tool the appropriate time to run.
Run File Doctor Tool
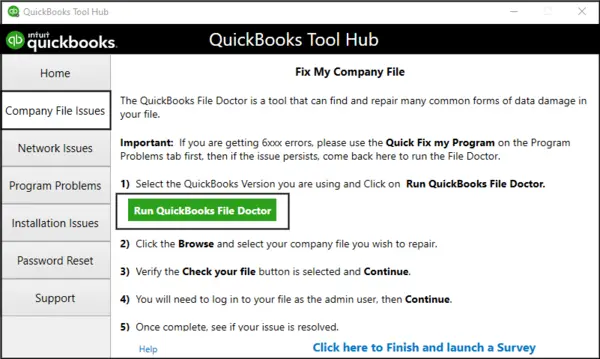
After the Quick Fix My File Tool stops, run the File Doctor Tool as shown in these steps-
- Go to the Company File Issues menu in the Tool Hub and click Run File Doctor Tool in the drop-down.
- Tap Browse to locate your corrupt data file and select the Check your file (Middle) option.
- Enter your Admin account credentials if required and let the tool run until the company file is completely fixed.
All the above-mentioned techniques are well tried and tested to fix QuickBooks error 7300. We hope it is easy for you to execute them on your system and that they help you conclusively tackle the issue from your system.
Wrapping Up!
This blog is our comprehensive effort to help you understand QuickBooks Error 7300 and the conditions that trigger it on your system. We included accurate techniques suggested by industry experts to make the troubleshooting easier for you. Still, it is feasible to face issues while using the methods if you belong to a non-IT background or due to any other unforeseen reasons. In that case, you can approach our team of Proadvisor solutions’ professionals at 1.855.888.3080 to rectify this error as quickly as possible with their troubleshooting assistance.
FAQs
What is Error 7300?
Error 7300 in QuickBooks signifies that the software has failed to establish a stable connection with the Intuit servers. This causes problems when you sync the company files and also stops you from performing other accounting tasks. In rare cases, the error code can also emerge while opening or accessing the company file from the server. This error doesn’t harm your company file data and can be quickly resolved by fixing the network connectivity issues.
What causes Error code 7300?
QuickBooks error code 7300 is primarily the result of internet connectivity issues on your system. This issue interrupts or does not allow the Intuit Sync Manager’s connection to the servers, which causes problems while syncing the data file. However, you can also run into this error if Intuit Sync Manager cannot run properly or fails to access the data file without admin permissions.
Can Clean install of QuickBooks fix QuickBooks Error 7300?
We would say yes, but only if QuickBooks error 7300 occurs due to partial or damaged QB installation on your PC. A damaged QuickBooks Desktop is bound to malfunction while accessing the Internet, integrating with other applications, or performing accounting tasks. Re-installing QuickBooks helps to fix internal glitches and resets its accessibility to the system resources or files.
How to fix QuickBooks Error Code 7300?
You must begin by removing all the network connectivity issues on your system and fixing the Windows Firewall settings. Updating QuickBooks Desktop and Windows can also help as it helps you tackle compatibility issues. Then, you must stop Intuit Sync Manager from syncing and change its folder name as shown below-
1. Go to C:\Users\AppData\Local\intuit\SyncManager on the File Explorer.
2. Right-click on the folder name and select Rename.
3. Type ‘OLD’ at the end of the folder name and save it on your system.

Erica Watson is writing about accounting and bookkeeping for over 7+ years, making even the difficult technical topics easy to understand. She is skilled at creating content about popular accounting and tax softwares such as QuickBooks, Sage, Xero, Quicken, etc. Erica’s knowledge of such softwares allows her to create articles and guides that are both informative and easy to follow. Her writing builds trust with readers, thanks to her ability to explain things clearly while showing a real understanding of the industry.