QuickBooks error PS032 is one of the PSXXX series errors that arise while downloading the QB payroll updates. If you have become annoyed dealing with this error, keep exploring this article to learn about the best solutions for payroll update issues.
QuickBooks payroll is one of the most essential services in QuickBooks. It is used to perform various payroll operations, including payroll processing, tax calculation, direct deposit, managing W2 forms, and much more. However, you must update QB payroll regularly in order to continue enjoying these features seamlessly. Unfortunately, QuickBooks error code PS032 is such an error that hinders the payroll update process, preventing users from the latest payroll features. This error usually comes with an error message stating, “QuickBooks is having trouble installing your payroll updates.”
Below, we have provided a comprehensive guide with reasons and practical solutions to guide you through the troubleshooting process. So, let’s read further and fix the error code swiftly.
The working solutions given below in this blog will effectively help you address this update error. However, if you aren’t tech-savvy or do not want to undertake the resolution process on your own, you can reach out to our team of Proadvisor solutions’ experts at 1.855.888.3080 to get the best guidance in fixing the error code.
Table of Contents
Major Reasons for QuickBooks Payroll Error PS032
There are distinct reasons for each error in QuickBooks, and once you learn about the reasons behind a particular error code, the resolution process becomes easier to undertake. Below, we have provided all the causes behind the QuickBooks error code PS032 to help you deal with this update error in a better way –
- Your QuickBooks might not be updated to the latest release before running the payroll updates.
- The CPS folder in QuickBooks Desktop might contain damaged or corrupted files.
- The internet connection settings might be misconfigured while downloading the payroll updates.
- Your QuickBooks payroll service subscription might be outdated, and the service status might be inactive or expired.
- The billing details and credit card info in QuickBooks payroll may be incorrect, invalid, or outdated.
- Essential QB program files or company data files might be damaged, corrupted, or facing data integrity issues.
- The Windows Firewall or an antivirus app might be incorrectly set to create blockages and obstructions while running the updates in QB payroll.
- The user account control setup might be incorrect, which can interfere with the update process.
- Your QuickBooks Desktop might not be running correctly, and the program might be damaged or facing installation problems.
These are the main reasons behind the error code PS032 in QuickBooks. Now, let’s move to the next section to learn about troubleshooting solutions.
Recommended to read : Fix QuickBooks Migration Failed Unexpectedly Windows 11
Working Solutions to Deal with QuickBooks Update Error PS032
It is crucial to resolve the payroll update issues to ensure that the update process runs seamlessly. Once you have understood the triggers behind the error, you can undertake the solutions given below to address QuickBooks error code PS032 –
Solution 1 – Register and Update QuickBooks Desktop
An outdated QB Desktop can cause problems while updating QB payroll. Thus, you must register and update the software to resolve error PS032 in QuickBooks in the following manner –
- Open the Product Information window by pressing F2 on the keyboard.
- Beside the License Number, check if it says Activated. This is to ensure that your QB software is registered.
- If it doesn’t say activated, then your QuickBooks is not registered. To register QuickBooks, go to the Help menu.
- Select the Activate QuickBooks Desktop option, then follow the on-screen steps, enter the Product and License details, and verify your info.
- After QB is registered, update QuickBooks by accessing the Help tab.
- From the Help tab, select Update QuickBooks Desktop, and click the Update Now option.

- Select the Reset Update checkbox and click the Get Updates button.
- When the updates are downloaded, close and reopen QuickBooks.
- Click Install Now to install the updates in the software, and once done, restart the system.

The next step is to try updating the QuickBooks Payroll Tax Tables by following the instructions below.
Update QuickBooks Payroll Tax Tables
You can update the QB payroll tax tables in the following manner –
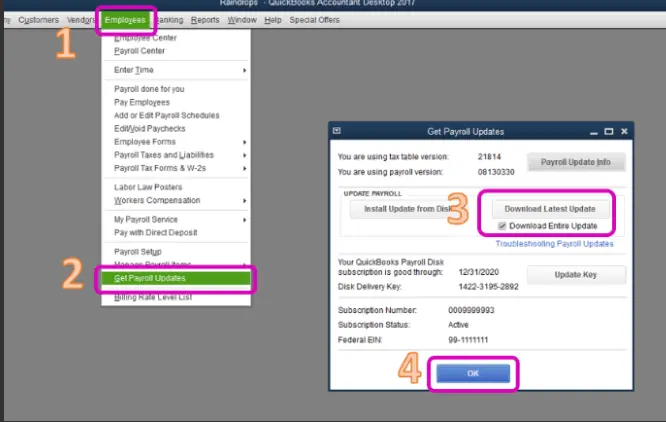
- Open the QuickBooks Employee menu, select Get Payroll Updates, and click the Download Entire Update option.

- Hit Update and wait for the informational window to appear, which will confirm that the update was successful.
Once done, check the status of QuickBooks error PS032. If it persists, move to the next solution and rename the CPS Folder.
Solution 2 – Rename the CPS Folder
If updating QuickBooks doesn’t work, you can try renaming the CPS folder. This will help you fix the damaged CPS folder, which is one of the main causes of the payroll update error. You can edit the folder name and address the damage by following the steps below-
- Press the Windows + E keys to open the Windows File Explorer, then click on This PC.
- Navigate to the Local Disk C, run Program Files (x86), then select the Intuit folder.
- Next, access the QuickBooks Desktop folder that matches your current QB version, click Components, and select the Payroll folder.
- Right-click the CPS folder, choose Rename, then enter a new folder name and hit Enter to save the changes.
Once the folder is renamed, re-run the payroll update process and check if the update error persists. If it does, go to the next solution and review the payroll subscription status.
Solution 3 – Review the Payroll Subscription
You need to ensure that the payroll subscription is active; otherwise, it can cause problems in the update process. In order to review the payroll subscription status in QB, follow these steps below-
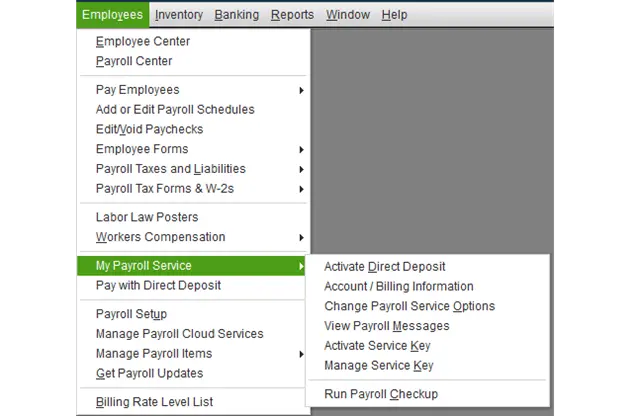
- Close all your company files and restart your PC, then open QuickBooks and go to the Employees menu.
- Further, select My Payroll Service, then choose the Manage Service Key option.

- Ensure that your Service Name and Status are correct and displaying as Active, then hit Edit.
- Verify the service key number, and if it is incorrect, enter the correct service key and hit Next.
- Uncheck the Open Payroll Setup checkbox, then hit Finish to complete the process.
Now, try to download the payroll updates again to check if QuickBooks update error PS032 continues to appear. If yes, move to the next solution.
Solution 4 – Disable the UAC Settings
UAC improves security for all users, and its main purpose is to reduce the exposure and attack surface of the operating system. Turning UAC off is sometimes important while resolving QB Desktop errors. But, it is highly advised to turn it on again to prevent security risks on your PC. In order to disable the UAC settings, follow the steps below.
- On your keyboard, press Windows + R to open the Run window, then type Control Panel.
- Select OK, click User Accounts, and then select the User Accounts (Classic View) option.
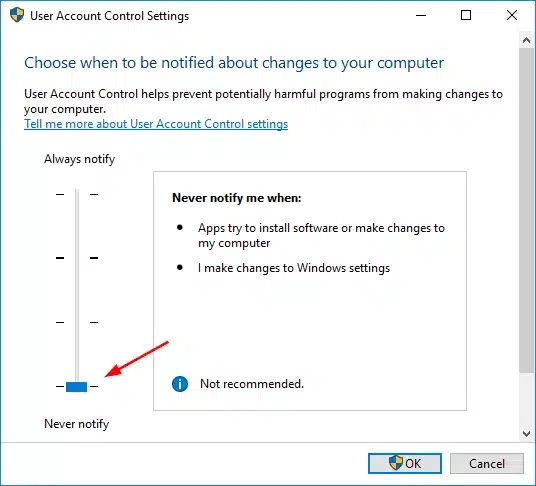
- Select Change user account control settings, and if prompted by UAC, hit Yes to continue.

- Now, move the slider to Never Notify, then select OK to turn UAC OFF.
- Next, rerun the payroll update process to check whether you are able to update the Payroll tax table. If yes, turn on the UAC settings again by setting the slider to Always Notify.
- Lastly, select OK to confirm the action, then restart your PC.
If payroll update issues still occur, you can try editing the billing info in the next step.
Also Read : How do I fix PS038 error in QuickBooks
Solution 5 – Edit the Credit Card/Billing Info
Since incorrect billing information in QuickBooks payroll can cause QuickBooks error code PS032, you need to ensure that the billing info is valid. For this, you must review the billing info and make changes( if necessary) in the following manner –
- Sign in to QuickBooks Desktop, go to the Employees tab, then select My Payroll Service.
Note: Remember, only authorized users can update the billing info in QB payroll, so ensure you are an authorized user from the CAMPs login page. - Click Account/Billing Information, sign in using your Intuit Account login, and then verify your information (if you don’t see your name on the list, contact support).
- Select Billing Detail, and if you don’t see any information under the Billing Details box, you might not be the current billing contact.
Note: The level of information depends on your contract role, but in case info is not available, You can change the holder or the billing contact by containing Support. - If info is available but incorrect, select Edit billing info and enter your new billing information, then select I Agree.
Once the billing info is updated in QuickBooks payroll, update it again to check whether the error has been fixed. If it hasn’t been fixed, move to the below-mentioned solution.
Solution 6 – Configure Windows Firewall & Antivirus Settings
Your Windows Firewall or the antivirus program may cause blockages and restrictions while downloading payroll updates. In such cases, you need to configure the firewall and antivirus settings to allow QuickBooks to pass through them. You can undertake the troubleshooting steps below to remove blockages and resolve the QuickBooks Payroll Error PS032 –
Step 1 – Download QB Tool Hub
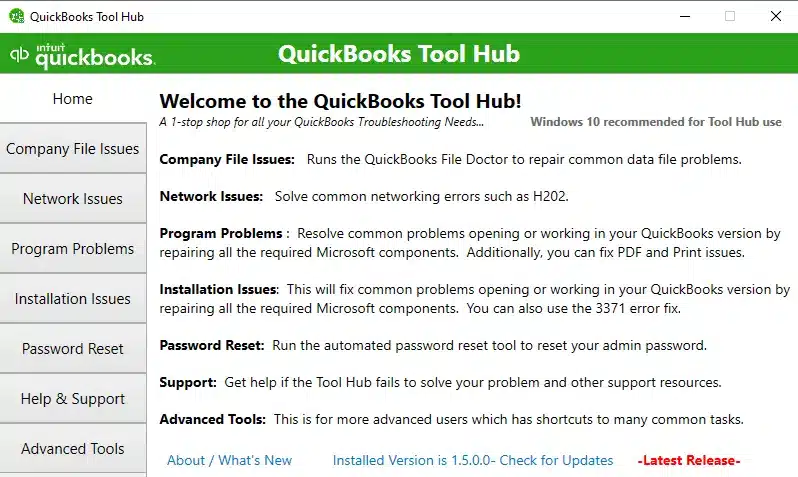
The QuickBooks Tool Hub is designed to resolve common issues and errors in the software, including network problems. You can install this utility by following the steps below to utilize the tools offered by Intuit.
- Close QuickBooks and download the latest QB Tool Hub version from Intuit (click here), then save the downloaded file at an easily accessible location on the desktop.
Note: If you’ve installed the QB Tool Hub utility before, you can go to the Home menu and find your current version at the bottom of the tab. - Double-click to open the downloaded QuickBooksToolHub.exe setup file, then follow the on-screen prompts to install and accept the License Agreement.
- Once the utility is installed, double-click the QB Tool Hub icon to launch it. However, if you are unable to find the QB Tool Hub icon, manually search “QuickBooks Tool Hub” in Windows and access the utility.
Once the QB Tool Hub is installed, run the QB File Doctor Tool in the next section.
Step 2 – Run the QB File Doctor Utility
You can access the QuickBooks Tool Hub to utilize the QuickBooks File Doctor Tool. The File Doctor tool is used to address QB data damage and network problems. Follow the detailed steps below to run the tool –
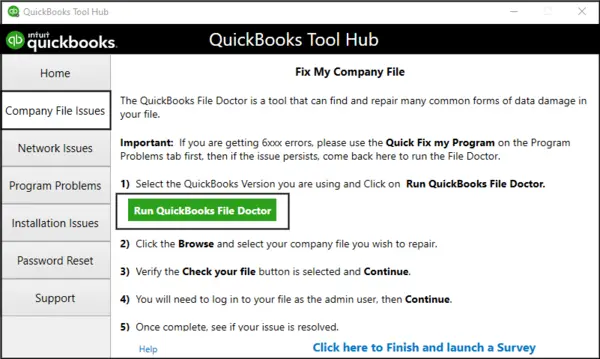
- Open the QuickBooks Tool Hub, go to the Company File Issues tab, then select QuickBooks File Doctor and wait for the tool to open.

Note: It might take a minute for the File Doctor to open; however, if the tool remains inaccessible, you can manually search for “QuickBooks Desktop File Doc” in the Windows search bar and open the tool. - Next, choose your company file from the dropdown menu, and if you can’t see it, select Browse to find and select the company file you wish to repair.
- Now, choose the Check your file and Network option, hit Continue, and enter the QB admin credentials.
- Select Next to run the scan and the repair process, and once the process is complete, rerun QuickBooks and open the company file.
The file scanning time might take up to 5 minutes, depending on your file size, so ensure that you don’t close the tool or interrupt the process. Another key point is that sometimes the scan may indicate that the process was unsuccessful, even if the data and network issues are fixed.
Now, ensure whether the issue persists or not. If the issue persists, move to the next step and manually configure the Windows firewall.
Step 3 – Manually Configure Firewall Settings to Create Exceptions
If QB File Doctor doesn’t help in fixing the firewall blockage issues, you can manually configure the Windows firewall to create exceptions for QB in the following manner –
Add Firewall Port Exceptions for QB
The Windows firewall can be manually configured to remove blockages. For this, you need to create new firewall exceptions in the following manner –
Note: If you use multiple QB Desktop versions on the same computer, these configuration steps need to be performed for each version.
- Firstly, go to the Windows Start button and type “Windows Firewall” in the search panel.
- Open the utility and move to the Advanced Settings tab, then locate and right-click Inbound Rules.
- Choose New Rule, select Port, then click Next, and ensure that the TCP option is selected.
- Now, find the specific ports as per your QB Desktop version by referring to the list below, then enter the port number in the Specific Local Ports field.
- QuickBooks Desktop 2020 and later: 8019, XXXXX.
- QuickBooks Desktop 2019: 8019, XXXXX.
- QuickBooks Desktop 2018: 8019, 56728, 55378-55382.
- QuickBooks Desktop 2017: 8019, 56727, 55373-55377.
Note: Remember, if you have multiple QB versions, you need to add each year’s (versions) port numbers to the list. Another key point is that QuickBooks Desktop 2019 and later versions use dynamic ports, which are specific ports assigned during installation to ensure that the software gets exclusive use of a particular port. - Follow the steps below to find the Dynamic Port Number according to your QB Desktop version, then enter the port number to the list –
- Open the Start menu, enter “QuickBooks Database Server Manager” in the Windows search panel, then open the QB Database Server Manager.
- Navigate to the Port Monitor tab, locate your QuickBooks Desktop version, note down the Port Number, and include it in the port exceptions list.
Note: You can modify the assigned port number (for QuickBooks Desktop 2019 and later versions) by clicking Renew. If you choose to renew the port number, you will have to go to the Scan Folder tab to reset the firewall permissions, then select the Scan Now button.
- After you enter the port number, select Next, choose Allow the Connection, and then hit Next again.
- Ensure that all the profiles are marked (if prompted), then hit Next and create a new rule named “QBPorts(year).”
- Once done, select Finish and repeat the steps above in the same manner to create Outbound Rules for QuickBooks.
Note: To create Outbound Rules, follow steps 1 to 7 as they are, but make sure that you select Outbound Rules instead of Inbound Rules in Step 2.
Add Firewall Exceptions for QB Executable Files
QuickBooks Desktop uses executable files (.exe) to perform various tasks and functions. You need to add exceptions to these files to prevent firewall blockages by using the steps below –
- Open the Windows Start menu, type “Windows Firewall” in the search bar, search the utility, and then access it.
- Go to the Advanced Settings menu, right-click Inbound Rules, then select the New Rule option and click Program.
- Hit Next, click This Program Path, then click Browse to choose an executable file.
- Find and choose one of the executable files from the file list below, then hit Next and click Allow the Connection.
- AutoBackupExe.exe
- Dbmlsync.exe
- DBManagerExe.exe
- FileManagement.exe
- FileMovementExe.exe
- IntuitSyncManager.exe
- QBCFMonitorService.exe
- QBDBMgr.exe
- QBDBMgrN.exe
- QBGDSPlugin.exe
- QBLaunch.exe
- QBServerUtilityMgr.exe
- QBW32.exe
- QuickBooksMessaging.exe
- Hit Next, and ensure that all the profiles are selected (if prompted), then click Next again.
- Create a rule and name it “QBFirewallException(name.exe), then follow the same steps above (steps 1 to 5) to create Outbound Rules for QB. When you create Outbound Rules, make sure to select Outbound Rules rather than Inbound Rules in step 2.
Once the exception rules are successfully created, reopen QuickBooks Desktop and check if the firewall blockages are removed. If not, restart your PC to make sure the changes are saved, and if the firewall obstructions continue, review the antivirus program settings in the next step.
Step 4 – Review the Antivirus App Setup
If you configured your Windows firewall but still have issues while running the QB updates, you must review your antivirus settings to ensure QuickBooks has general permissions. The steps may vary depending on your antivirus program, and you need to perform the specific steps for your particular antivirus software by following their guidelines and instructions.
Once Windows firewall and antivirus obstructions are eliminated, run the payroll update process and check the status of the QuickBooks payroll error PS032. If the error code isn’t fixed, you can try repairing QuickBooks in the next step.
Solution 7 – Repair QuickBooks Desktop with QuickBooks Tool Hub
Issues with the QuickBooks program or the installation process can be another trigger for QuickBooks error code PS032. This scenario can be addressed by using the QuickBooks Tool Hub features and repairing the program. For this, you need to ensure that the QB Tool Hub is installed (see step 1 of solution 6 above), and then follow the steps below to run the repair process –
Step 1 – Use the Quick Fix My Program Tool
This tool is used to terminate background processes that are being used by QB. It helps repair general program issues by running quick repairs. You can run the program repair by using the Quick Fix My Program tool in the following way –
- Open QuickBooks Tool Hub, select the Program Problems tab, then locate and select the Quick Fix My Program tool.
- Initiate the program repair process, and once the process ends, restart QuickBooks Desktop and open your data file.
Now, try installing your QB payroll and tax table updates, and if the same error still persists, delete the QB components by using the following steps and download the updates again –
- Close QuickBooks Desktop, and follow this navigation path – C:\ProgramData\Intuit\QuickBooks XX\Components, wherein XX stands for your QB Desktop version.
- Right-click Components and hit Delete, and once the components are deleted, rerun the update process (to update QB and payroll, see solution 1).
Now, check whether the error code has been rectified. If the error code keeps appearing even after running this tool, you can follow the next step to run the QB Install Diagnostic Tool.
You may also read: Fix QuickBooks Payroll Error PS060
Step 2 – Utilize the QuickBooks Install Diagnostic Tool
If the Quick Fix My Program tool is unable to fix the program problems that are interfering with the update process, you can run the QuickBooks Install Diagnostic Tool to repair installation problems in the application by using these steps –
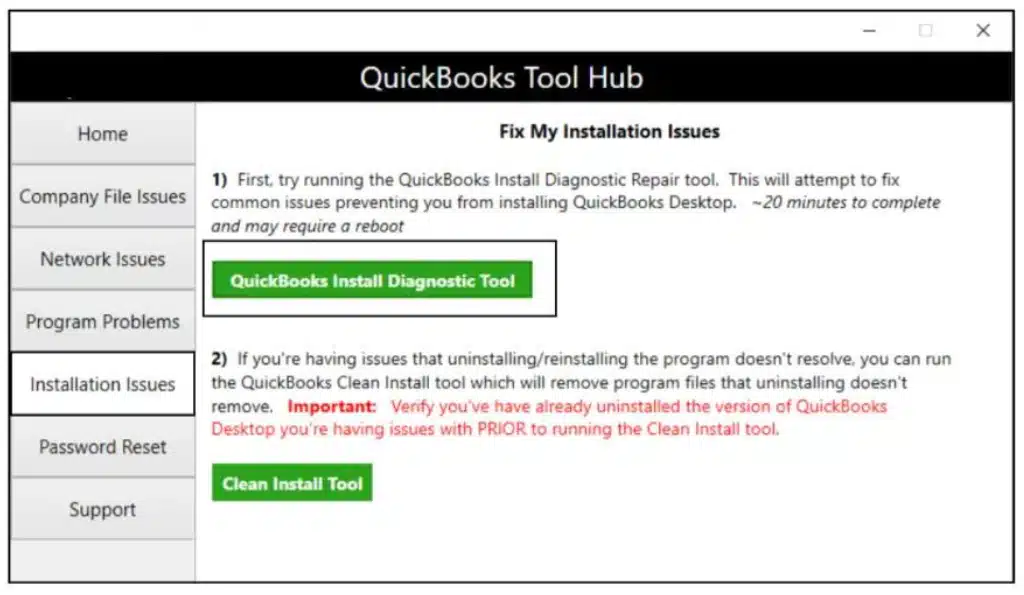
- Open the QuickBooks Tool Hub, go to the Installation Issues menu, and choose the QuickBooks Install Diagnostic Tool to initiate the installation repair process.

- Let the tool run, which can take up to 20 minutes, and once the process is finished, restart your PC.
- Open QuickBooks Desktop, access your data file, and then update QuickBooks and the payroll function again (see solution 1 above to update QB).
Now, check the status of the QuickBooks update error PS032. If the issue still persists, move to solution 8.
Solution 8: Reinstall QuickBooks Desktop
If running the QuickBooks Tool Hub utilities does not help fix the program and installation issues, you can try reinstalling QB Desktop and then running the payroll updates. Reinstallation QuickBooks can help fix the general issues with the current version, and you can run the process in the following manner –
Prerequisites
Before undertaking the reinstallation process, ensure that the QuickBooks installer for your QB version is downloaded. Apart from this, make sure that your product and license details are handy. It is done to ensure that the installation and activation process runs seamlessly.
Once done, follow the next step to remove QuickBooks Desktop from the PC.
Step 1 – Uninstall QuickBooks
First, you need to remove the current QuickBooks program from your PC by using these steps –
- Open the Windows Start menu, then search for “Control Panel” in the search panel and open it.
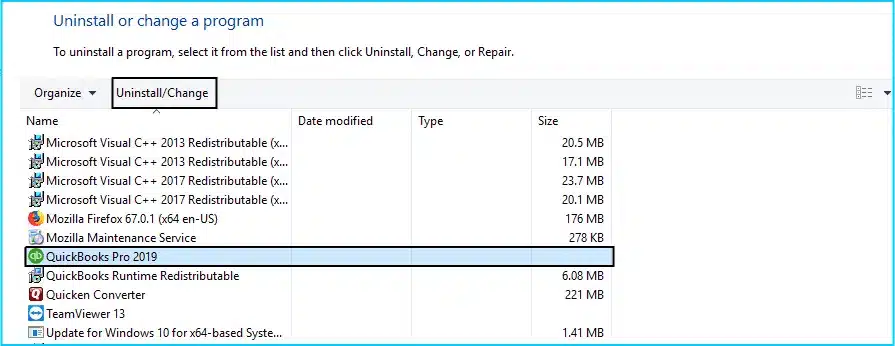
- Select Programs and Features or Uninstall a Program, then access the program list.
- From the list of programs, select the QB version that you want to remove, and hit Uninstall/Change, Remove.
Note: If you don’t see the “Uninstall/Change, Remove” option, sign back into Windows as an admin user. - Click Next and complete the uninstallation process.
Once done, move to the next step, which is to reinstall QB Desktop.
Step 2 – Install QuickBooks
Now, you need to install QuickBooks Desktop again in the following manner –
- First, download the QuickBooks.exe file from Intuit, then save the file on your desktop so you can easily access it.
- Open the .exe file, follow the on-screen prompts, then accept the License Agreement and hit Next.
- Now, enter the Product and License Details, then hit Next. Ensure that you have an active internet connection, then move to the Installation Type section.
- Select Express Install as the Installation Type, then hit Next and click Install.
Once the process finishes, move to the next step to activate QuickBooks again.
Step 3 – Activate QuickBooks
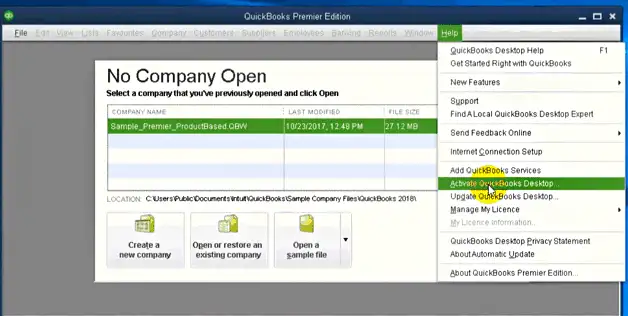
The last step after installing QuickBooks is to activate the app. To do this, you need to go to the Help menu and select Activate QuickBooks. Then, you need to follow the on-screen steps and verify your info as required to complete the process.
Once done, rerun the QuickBooks and payroll update process and check if QuickBooks error PS032 is fixed. If not, move to solution 9 to fix the data integrity issues.
Solution 9: Utilize the Verify/Rebuild Data Tool in QuickBooks
Sometimes, problems with the QB data and company files can also cause issues while updating the app or the payroll feature. If you have followed all the solutions mentioned above, and the update error still exists, you can try fixing the data integrity issues with the QuickBooks Verify and Rebuild Data utility in the following manner –
- Close all the background programs, then open QuickBooks and access the File tab.
- Select Utilities and click the Verify Data tool. Let the Verify Data tool run the data verification process.

- If you get the “QuickBooks detected no problems in the data” message after the tool stops running, your data is clean, and you don’t need to undertake any further steps.
- If you get an error message stating that there are data integrity problems, you must use the Rebuild Data utility by following these steps –
- Choose Utilities from the QuickBooks File tab, then select the Rebuild Data option.

- Select OK when QuickBooks asks you to create a backup, then create a backup file and save it, followed by hitting OK.
- Run the process till the Rebuild has Completed message pops up.
- Choose Utilities from the QuickBooks File tab, then select the Rebuild Data option.
- Next, go back to the File tab and click the Verify Data tool from the Utilities section to check for additional data damage.
- If more issues are found in the QB data, you might need expert assistance.
- If no data damage is detected, restore the recent file backup by selecting Open or Restore Company from the QB File menu.
Note: Remember not to replace the existing data file, and you will need to enter the required information into the file again since the backup is created. - Lastly, rerun QuickBooks and download the payroll updates from the QB Employees tab to check the status of the QuickBooks payroll error PS032.


Once the data integrity issues are resolved, you will be able to run the payroll update process successfully.
Conclusion
We hope this detailed guide helped you navigate through QuickBooks Error PS032 successfully. However, if you are stuck in the troubleshooting process or these solutions seem ineffective in fixing the issues, you can call our Proadvisor solutions’ team at 1.855.888.3080 to get direct help in fixing the update issues.
Read more related articles :-
How to Fix QuickBooks Error PS038 (when paychecks get stuck)
Resolving QuickBooks Error PS033 with this Comprehensive Guide
QuickBooks Error PS036: Cannot verify the payroll subscription
QuickBooks Payroll Not Updating? Let’s Fix it
FAQs
What is QuickBooks error PS032?
QuickBooks error code PS032 is a common PSXXX series error code that can arise while users try to download recent payroll updates. This error can make the update process unsuccessful and prevent users from downloading the latest payroll features and tax table updates.
How can I fix QuickBooks error code PS032?
QuickBooks error PS032 can be resolved by following these troubleshooting steps –
1. Rename the CPS folder to fix the damage.
2. Activate the payroll subscription in QuickBooks.
3. Turn off the UAC settings to download the payroll updates.
4. Register and update QuickBooks Desktop.
5. Repair QuickBooks with the QB Tool Hub.
6. Reconfigure the Windows firewall and the antivirus programs.
7. Run the Verify and Rebuild Data tool to fix data integrity problems in QB.

Peter is a Certified Public Accountant (CPA) with a strong background in public accounting and accounting technology. After starting his career as an audit senior, he worked with organizations across various industries and gained hands-on experience with complex accounting standards. At ProAdvisor Solutions, Peter helps clients navigate new accounting requirements. His goal is to simplify processes, improve accuracy, and boost confidence in finance reporting.