The QuickBooks hosting mode is off message flashes on your screen when you attempt to use the multi-user setup in QB. It can be confusing and panic-inducing why you cannot access this mode and function seamlessly. In this in-depth troubleshooting guide, we have eliminated all your doubts and queries regarding the hosting mode off or inaccessible error. So, read till the end and know how to enable the multi-user mode without glitches.
QuickBooks is software that has been designed to integrate various tools and features that enable business organizations to maintain and track their financial activities. Since a single person does not run a business, multiple people need to access the data held inside the company. In order to stimulate this activity, QuickBooks introduced an excellent feature of multi-user mode hosting so that the company file data can be shared amongst a network of workstations. However, there can be some bugs in the device that might hinder this hosting process.
Many users are forced to tackle the “QuickBooks Hosting Mode is Off” error when suddenly QB stops responding to their request while they are working on the multi-user mode. As a result, no workstation is able to access or edit the data file. A misconfiguration in the hosting settings is the most significant booster to this error. But, if the workstations and the server lose connection in between due to any internal glitch, then also this error might come up. So, how does one resolve the problem? Read the complete blog to find out.
Are you unable to figure out about how to proceed when QuickBooks Hosting Mode is Off? Clarify all your doubts by consulting Proadvisor solutions at +1.855.888.3080 right away.
Table of Contents
What does QuickBooks Hosting Mode is Off Error Mean?
The QuickBooks hosting mode allows QB users to access and use company files stored on another server or computer. However, working on the files together when this mode is disabled is not possible. So, when QB users attempt to turn on the hosting mode in QuickBooks from the File menu, they get disappointed with the hosting mode being off error. The error may appear abruptly and interrupt multi-user arrangements. Further, learning how to turn on hosting mode in QuickBooks can be an enormous challenge when this error is present.
The QuickBooks hosting mode is off error may arise due to incorrect hosting configuration or network problems. So, knowing why this error erupts is significant to rectifying the situation. Secondly, you must know every detail and the order in which you must take steps towards fixing the hosting mode off error. So, let’s dive into these aspects and recognize ways of avoiding the hosting mode error in QuickBooks.
How Do I Turn On QuickBooks Hosting Mode?
Turning on QuickBooks file hosting isn’t a tedious task. Instead, a few steps will help you host and access your company file in multi-user mode. We have detailed the procedure for enabling QB hosting below:
- Launch QuickBooks on the system that will act as the host for the company file.
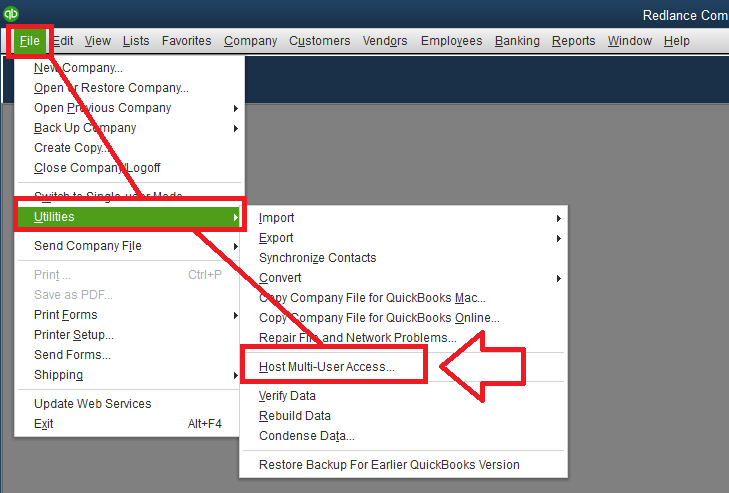
- From the QuickBooks main menu, select File. In the File menu drop-down, click Utilities.
- If you see the option “Stop Hosting Multi-User Access,” it indicates an already enabled hosting mode. You can skip to step 6 in such circumstances.
- However, getting the option “Host Multi-User Access” signifies your hosting mode is currently disabled.
- When the hosting mode is disabled, return to the “File” menu and opt for “Utilities” again.
- Hit the “Host Multi-User Access” button. It will start the hosting mode on your computer.
- QuickBooks will display a message requesting to confirm enabling hosting mode. If you want to turn the hosting mode on, click “Yes” and proceed.
- QuickBooks will now prepare the computer as the host and configure the mandatory settings.
- Once the process ends, you should see a message that the hosting mode is turned on.
- Exit QuickBooks on the hosting computer.
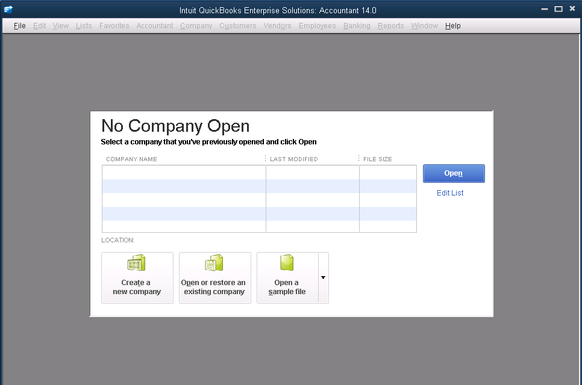
After enabling the hosting mode, other users on the network should be able to access the company file in multi-user mode. For example, they can open QuickBooks on their respective computers, pick the “Open or restore an existing company” button, and locate the company file on the hosting computer. Remember, all computers accessing the company file must be linked to the same network.
Insights into the Not Hosting (Hosting Mode Turned Off) Mode
When QuickBooks is in the Not Hosting/ Hosting Mode is Off mode, the following things happen:
- QuickBooks Database Server Manager operates as a regular service, a critical Windows user functioning on QuickBooks Desktop.
- The multi-user mode setup receives no support from the Not Hosting mode. This mode utilizes shared memory to establish communication ties with QuickBooks Desktop. Thus, this mode enables only the QB Desktop user running the program on the local computer to use a database server and open the file.
You May also read – How to resolve QuickBooks install Error 1648
Reasons Why You Can’t Enable QuickBooks Hosting
There are multiple factors that influence the “QuickBooks multi-user hosting not working” error. This listicle mentions some of the most standard causes that trigger the same –
- Incorrect hosting settings are saved in the server computer.
- If the QuickBooks Database Server Manager is unable to fetch data from the company data file.
- Insufficient permission access is provided to the folder in which the QuickBooks files are stored.
- A disruption caused by inappropriate settings in the system security and firewall.
- The company file may not be within the reach of QuickBooks Database Server Manager.
- The computer where you have hosted the multi-user setup may have issues reaching out to the system’s IP address.
- When the network data file (.nd) is damaged, users experience QuickBooks company file hosting errors.
- If you don’t have the QuickBooks Database Server Manager installed, you’ll face this error on your device.
- When the QuickBooks DBXX services don’t start, hosting errors arise.
- Windows registry may have invalid entries due to failed QuickBooks installation or software modifications/ updates. It may cause QuickBooks hosting errors on your device.
- Abrupt system shutdowns due to power failure or more can lead to hosting problems.
- If your files have been deleted accidentally, getting hosting mode errors will trouble you.
Identify the reasons that are triggering problems hosting QuickBooks company file on a server. Then, you can quickly eliminate this issue from the root.
Symptoms of Before Facing Issues with the Multi-User Hosting in QuickBooks
If your QuickBooks hosting mode is off, the following signs suggest the error’s presence in your device:
“QuickBooks Hosting Mode is Off” error message
It is the primary error message when attempting to access a company file in multi-user mode and explicitly states that the hosting mode is turned off.
Inability to access the company file from multiple computers
Only one user can open the QB company file when the hosting mode is disabled. So, if other users try to access the file from their computers, they will encounter errors or be unable to connect.
Slow performance or freezing
Multiple users accessing the company file simultaneously without proper hosting mode can lead to performance issues. For example, QuickBooks may freeze or become unresponsive when performing tasks in multi-user mode.
Inconsistent or conflicting data changes
Without hosting mode, users can make changes to the company file simultaneously, resulting in conflicting data or discrepancies. In addition, it can lead to data integrity issues and make it challenging to reconcile differences.
Inability to switch to multi-user mode
If the hosting mode is off, you won’t be able to switch to multi-user mode within QuickBooks. Instead, the option to switch to multi-user mode may be grayed out or unavailable.
These signs may prompt you to find a solution as quickly as possible and prevent errors relating to hosting QuickBooks on a server.
Pre-considerations for QuickBooks Hosting Mode Off Error
Before beginning with the QuickBooks Hosting Mode Off resolutions, ensure to follow the following points:
- System configurations and requirements must be met to ensure the hosting occurs seamlessly.
- The shared folder must possess your QuickBooks company file.
- All workstations must be easily accessible if the host computer contains the network drive.
- The QuickBooks application and Database Server Manager must be the same version and compatible with each other.
Now that we have sufficient information about the host QuickBooks file on server error, let’s delve into the resolution methods.
What to Do when QuickBooks Hosting Mode is Disabled?
If you have not disabled the settings in QB, and the QuickBooks Desktop hosting mode is off, you must immediately follow the procedures mentioned below to enable the hosting mode –
Method 1 – Verify that QuickBooks Database Server Manager is Active

The correct configuration in QuickBooks Database Server Manager is important to ensure that it allows you to share your company data file with other workstations on the network-
- Tap on the Windows key + R on your keyboard. This will bring up the Run dialog box.
- In the search space, type SERVICES.SC and hit the OK button.
- When directed to a new window, search for QuickBooksDBXX (XX is the year version) and double-click on it.
- Now, click on Startup Type and select Automatic from the given options.
- Check if the Service Status shows RUNNING or STARTED. If not, you need to choose the Start option.
- Move to the Logon tab and choose the Local System Account option.
- Go to the Recovery section and set “Restart the Service” as the status for the below fields–
a. First failure
b. Second failure
c. Subsequent failures - Tap on Apply button and hit the OK button to confirm the action.
- Save the changes by clicking OK and repeat the procedure for QBCFMonitorService.
- Finally, open QuickBooks Desktop on all the workstations.
- Click on the File tab and select the “Switch to the Multi-user Mode” option. The error should stop existing now.
Method 2 – Run a Quick Scan on your Folders in the Server Computer
In order to facilitate the file-sharing feature, the folders in which these files are stored must be proven to be error-free; or else, it can lead to a situation where QuickBooks Desktop company file hosting not working-
- Close QuickBooks Desktop on all the workstations and access it on the server device.
- Click on the Windows icon, type Database, and select QuickBooks Database Server Manager from the given list of options.
- Tap on the Scan Folders button in the following window and hit Browse.
- You must now carefully choose the folder/s in which your QuickBooks company data files are stored (with the .QBW extension).
- Click on OK and hit the Start Scan button to initiate the process.
- Wait for a short while until the scan runs.
- After this, you will notice the folders displayed in the “QuickBooks company files found” section.
- You should be able to access the files held in these folders through other workstations also.
Method 3 – Allow the Required Windows Permission Access to the QuickBooks Folder
Inadequate access may restrict the activities of the files stored inside a folder. Follow the below instructions to provide the necessary permissions to allow QuickBooks to operate interrupted –
- Click on the Windows icon and open the Start menu.
- Go to the search panel, type File Explorer and select the File Explorer option.
- In the following window, look for the folder in which the QuickBooks files are stored.
- Right-click on the folder and select Properties.
- Tap on the Security tab in the Properties window and choose the Advanced option.
- Here, you need to click on QBDataServiceUserXX, where XX is the year version.
- Press the Edit button, and if the following options reflect ALLOWED –
a. Traverse Folder/Execute File
b. List Folder/Read Data
c. Read Attributes
d. Read Extended Attributes
e. Create Files/Write Data
f. Create Folders/Append Data
g. Write Attributes
h. Write Extended Attributes
i. Read Permissions - If not, you must Edit the settings to allow access to these activities.
- After selecting QBDataServiceUserXX, click on Full Control and hit the Allow button.
- Save the settings and reboot your computer device.
Related article to read – I am getting QuickBooks Unrecoverable Error
Method 4 – Verify the QuickBooks Multi-user Settings
Configure QuickBooks multi-user settings to turn on hosting mode QuickBooks:
- Log into your QuickBooks application and Windows Operating System with admin login credentials.
- Ensure your internet connection speed is robust, then launch the QuickBooks application.
- Tap the File tab from the main menu panel in QB.
- Click the “Switch to multi-user mode” option from the File menu in QB.
- If permission dialog boxes emerge on your screen, click Yes and respond accordingly.
- Press OK in the multi-user window.
- Now, head to the Company tab in QuickBooks.
- Tap the Set up Users and Passwords button.
- Navigate to the Set up Users tab.
- Opt for the Add Users button and permit all users to open QuickBooks.
Check if the hosting mode in QuickBooks is still off, and proceed to the next solution if the error persists.
Method 5 – Turn On Network Discovery
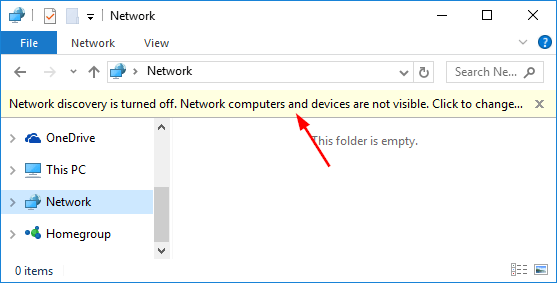
You must ensure all the servers and workstations are on the network while configuring hosting mode settings:
- On your keyboard, locate and press the Windows icon, which will launch the Start menu.
- Browse to the Control Panel in the Start menu’s search pane and hit Enter once you find it.
- Now, from the Control Panel window, choose the Network Sharing Center.
- Opt for the Change Advanced Sharing button.
- Locate the profile you are currently using and zoom in on it.
- Navigate to the Network Discovery section, then click the Turn On Network Discovery option to enable it.
- Move to the password-protected sharing settings.
- Find the option to disable the network discovery feature.
- Tap the Save Changes option and repeat these steps on all the workstations.
Verify the hosting mode off error, and if it’s present, resolve it through the following solutions.
Method 6 – Launch your Company File
Follow the steps below to open your company file and eliminate the QuickBooks hosting mode error:
- Tap the File tab in the QuickBooks application.
- Hold the Open or Restore A Company File option and browse the location where your company file is stored.
- Once you find the .qbw file, double-click it to open.
- Opt for the Open button and authorize the action by logging in through your admin details.
If you’re still confused about how to host QuickBooks file on server without glitches, attempt the next solution.
Method 7 – Disable QuickBooks Multi-user Hosting on Client Computers/ Workstations
QuickBooks multi-user hosting should only be on the server computer, not client workstations. Here’s how you can disable the multi-user hosting feature on other workstations:
- Launch the QB program on your client workstations.
- Open the File menu from the menu panel in QuickBooks.
- Pick Utilities under the File drop-down menu.
- See what option you get: If Host multi-user access is seen, you can skip this computer as it has no problem.
- However, if you get the Stop Hosting multi-user access option on a client computer, you should tap it to turn it off.
- Repeat all these steps to disable multi-user in your workstations.
You may read also : How to fix QuickBooks Error 1612
Method 8 – Rename .ND and .TLG Files
Renaming the .ND (Network Data) and .TLG (Transaction Log) files in QuickBooks can help rectify specific problems related to multi-user access, hosting mode, or company file performance. Here are the steps to rename the network data and transaction log files:
- Shut down QuickBooks on all computers having access to the company file on the server computer.
- Access the folder where the company file is placed. The default location is typically:
- QuickBooks Desktop 2021: C:\Users\Public\Documents\Intuit\QuickBooks\Company Files
- QuickBooks Desktop 2020: C:\Users\Public\Documents\Intuit\QuickBooks\Company Files
- QuickBooks Desktop 2019: C:\Users\Public\Documents\Intuit\QuickBooks\Company Files
Note: The exact location may vary depending on your QuickBooks version and installation settings.
- In the company file folder, browse for the company files with the same names but varying extensions, like .ND and .TLG. For example, if your company file has the name “MyCompany.QBW,” you will find files named “MyCompany.QBW.ND” and “MyCompany.QBW.TLG.”
- Right-click the .ND file connected with your company file and select “Rename.”
- Alter the file extension from “.ND” to something like “.ND_OLD.” For example, rename “MyCompany.QBW.ND” to “MyCompany.QBW.ND_OLD.”
- Right-click the .TLG file linked to your company file and select “Rename.”
- Change the file extension from “.TLG” to something like “.TLG_OLD.” For example, rename “MyCompany.QBW.TLG” to “MyCompany.QBW.TLG_OLD”.
- After finishing renaming, you are free to launch QuickBooks.
When QuickBooks opens, it will automatically formulate new .ND and .TLG files. These new files help facilitate multi-user access and maintain the transaction log for the company file. Renaming the old .ND and .TLG files enable QuickBooks to rebuild them, resolving certain issues related to hosting and performance.
Method 9 – Undertake Firewall Configurations
The next procedure involves verifying your firewall settings and ensuring QuickBooks is added as an exception to the port so that the hosting mode is off error doesn’t arise. We have detailed these steps below for your complete understanding:
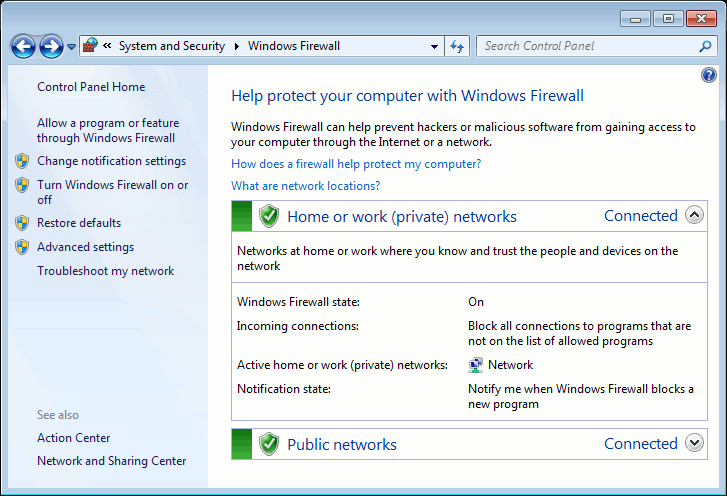
- Open the Start menu in your Windows and type Windows Firewall in the search pane.
- Hit Enter and locate Windows Firewall window results. When you find it, open it to start arranging firewall settings in QB’s favor.
- In the Windows Firewall window, you’ll find the Advanced Settings option.
- Click it and head to the next firewall window, where you must right-tap Inbound Rules. Further, create a New Rule by tapping the New Rule option.
- Press the Port button, then Next.
- You must ensure to select TCP while managing the firewall.
- Note the ports you need for your QuickBooks application (year and version). Then, enter them into the Specified Local Ports space.
- 8019, XXXXX ports are necessary for QuickBooks Desktop 2020 and later QB versions.
- 8019, XXXXX ports for QuickBooks Desktop 2019.
- QuickBooks Desktop 2018 requires 8019, 56728, 55378-55382 ports.
- QuickBooks Desktop 2017 needs 8019, 56727, 55373-55377 port numbers.
- After locating your port number, entering it into the specific field, and saving it by clicking Next, hit the Allow the Connection button.
- Again, tap Next in the dialog box and mark the requested profiles. Follow this stage by hitting Next.
- It’s time you develop the new rule and assign it a name like QBPorts(year).
- Pick the Finish button after the firewall process ends and do the same for Outbound Rules (step 4).
You must also create exceptions for QuickBooks programs and executable files, which facilitate numerous tasks as follows:
- Again, search for Windows Firewall in the Start menu to access its settings.
- In the Windows Firewall dialog box, opt for the Advanced Settings button.
- Right-tap the Inbound Rules option and follow it by clicking New Rule to create a new rule.
- Opt for Program, then Next, click This Program Path, and finally, Browse.
- Search for the executable files you need to open firewall ports for from the table, then hit the Next option.
- Pick Allow the Connection > Next, mark all profiles in the following window if requested, then tap Next.
- Finally, create the latest rule and name it QBFirewallException(name.exe).
| QB Executable (.exe) files | Location |
| FileManagement.exe | C:\Program Files\Intuit\QUICKBOOKS YEAR |
| QBW32.exe | C:\Program Files\Intuit\QUICKBOOKS YEAR |
| DBManagerExe.exe | C:\Program Files\Intuit\QUICKBOOKS YEAR |
| Dbmlsync.exe | C:\Program Files\Intuit\QUICKBOOKS YEAR |
| FileMovementExe.exe | C:\Program Files\Intuit\QUICKBOOKS YEAR |
| QuickBooksMessaging.exe | C:\Program Files\Intuit\QUICKBOOKS YEAR |
| AutoBackupExe.exe | C:\Program Files\Intuit\QUICKBOOKS YEAR |
| QBDBMgrN.exe | C:\Program Files\Intuit\QUICKBOOKS YEAR |
| QBLaunch.exe | C:\Program Files\Common Files\Intuit\QuickBooks |
| QBServerUtilityMgr.exe | C:\Program Files\Common Files\Intuit\QuickBooks |
| QBCFMonitorService.exe | C:\Program Files\Common Files\Intuit\QuickBooks |
| IntuitSyncManager.exe | C:\Program Files\Common Files\Intuit\Sync |
| OnlineBackup.exe | C:\Program Files\QuickBooks Online Backup |
| QBUpdate.exe | C:\Program Files\Common Files\Intuit\QuickBooks\QBUpdate |
Method 10 – Ping Server from the Workstations to Ensure a Connection between the Server and the Workstations
To ensure the link between the server and workstations is strong, ping the server through the IP address. For this solution, you’ll need to take a few steps as follows:
Step 1: Enable Network Discovery on the Server and Workstations Encountering Hosting Mode Off error
Begin by turning network discovery on the server and workstation computers getting errors in multi-user access and hosting:
- Head to the server and workstation computers’ Start menu.
- Type Network in the browsing field and launch the Network and Sharing Center.
- Pick the Change Advanced Sharing Settings button.
- The Network Discovery, File, and Printer Sharing sections must have the Turn on Network Discovery option chosen.
Step 2: Receive Your Server Name From The Server
Here are the steps you can take to get your server name from the server:
- Access the Start menu in Windows, then search for Run in the Start command.
- When the Run dialog box flashes on the screen, type CMD and hit Enter.
- Further, the command prompt window will emerge, where you need to type ipconfig/all.
- Look into the Windows IP Configuration Section and search for your hostname here. Further, locate the server name on the right.
- Copy and paste the hostname into the Word document for immediate access when needed.
Step 3: Test your Connection
After knowing your server name, head to your workstations and test the server connection. Hire a technician if these steps get too complex for you:
- Your Windows Start menu is your friend while trying to test the server.
- Open the Run dialog box via the Start menu by searching for ‘Run’ in the blank field.
- Launch the Command prompt dialog box after typing CMD in the Run dialog box.
- Write “ping [your server name]” from the peripheral keyboard and press Enter. Ensure not to type brackets with the server name.
- Do all these steps for every workstation where QuickBooks Hosting Mode Off Error is visible.
When every packet replies with no loss, there are no issues with the server.
A sluggish reply or packet loss signifies issues to be handled by IT professionals.
You may read also : Getting qbmapi64 out of memory error on windows 11
Method 11 – Repair QuickBooks Program
Fixing your QuickBooks program is one way to resolve hosting mode errors. However, before proceeding with the repair, you must form a backup file that ensures your data remains secure and safe.
- Shut down Quickbooks along with all the active and running programs and processes on your device.
- Access the Start menu on your desktop and open the Control panel from here.
- Depending on your Windows version, click Programs or Programs and Features in the Control panel command.
- The number of programs installed on your device will appear in a list form. Choose QuickBooks from among them.
- Further, opt for the Uninstall/ Change (Repair) a Program button.
- The QuickBooks Installation window will appear, where you must opt for the “Repair” option.
- Let the repair procedure finish by responding to the on-screen instructions as required.
- Restarting your device is recommended after QB installation repair finishes.
- After rebooting, launch QuickBooks and verify if the application is functioning correctly and the hosting mode off error persists.
If the repair process doesn’t resolve the issues you’re experiencing, consider uninstalling QuickBooks entirely and reinstalling it using a new installation file. Remember to have a company file backup before uninstalling QB to resolve the hosting mode is off error.
To sum up the above blog, we understood that the QuickBooks Hosting Mode is Off when the QB folder does not have sufficient permission access, and an effective way to deal with it is to provide this access to the folder. We hope that the information presented previously helped you thoroughly in understanding the error and eradicating it effectively. Sometimes, even after performing all the troubleshooting, the hosting mode might get disabled again. In such scenarios, it is best that you speak to Proadvisor solutions Teams for an in-depth consultation.
FAQs
What are the various hosting modes in QB through which users can open their company files?
The numerous hosting modes in QuickBooks are as follows:
1. Not hosting/ hosting mode is off
2. Only local company file hosting
3. Local and remote file hosting
Any of these modes can help users per their needs.
More Useful Articles :
QuickBooks takes forever to open over network
Quickbook Desktop 2025 Crashing and stops working
Company file is missing or cannot be found in QuickBooks
QuickBooks is unable to send emails due to network connection failure
How to Update Payroll in QuickBooks Desktop

Erica Watson is writing about accounting and bookkeeping for over 7+ years, making even the difficult technical topics easy to understand. She is skilled at creating content about popular accounting and tax softwares such as QuickBooks, Sage, Xero, Quicken, etc. Erica’s knowledge of such softwares allows her to create articles and guides that are both informative and easy to follow. Her writing builds trust with readers, thanks to her ability to explain things clearly while showing a real understanding of the industry.