QuickBooks error 6120 is a setback for users as they can’t open or host their company file once it develops, halting the workflow of the entire software. Since its launch, QuickBooks has been ruling the accounting industry by assisting worldwide users with effective bookkeeping, monitoring cash flow, timely employee payroll processing, tax deductions and calculations, e-filing state and federal tax forms, and many more.
Even with all the extensive features, QuickBooks always remains at risk of developing internal errors, which might sometimes put you in tricky situations. QuickBooks error 6120 0 is one such error that doesn’t let users access their business data or share it with other authorized users over a multi-user network. If you have also become a victim of this QB error, you are in the right place to learn why it occurs and the methods to deal with it professionally. Give this blog a read till the end to know everything about this error and the preventive measures you must take to avoid facing it in the future.
QuickBooks company file errors are hazardous to your business performance as they prevent you from recording new transactions and sharing financial data with other users. Bring your business back on track by contacting our team of Proadvisor solutions’ experts at 1.855.888.3080 for troubleshooting assistance to eliminate the issue ASAP!
Table of Contents
What is QuickBooks Error 6120 0?
All the 6XXX series errors are known to create problems when opening a company file or sharing it with other users over a multi-user network. However, in some instances, you can encounter this error code while updating new transactions in the data file or restoring its backup copy stored on the server. Be it as it may, you won’t be able to access the company file shared over the multi-user network after this error develops. The software might also turn sluggish or freeze when you try switching the server to multi-user mode for hosting the data file.
Despite everything, you don’t need to worry a bit, as your financial data is intact, and the error can be resolved by configuring settings and running some automated tools. But before you reach that point, it is recommended that you go through the potential causes of this error mentioned in the next section.
Root Causes of Error Code 6120 in QuickBooks Desktop
Knowing the possible conditions in which QuickBooks error code 6120 can emerge helps you identify what exactly triggered this error on your system. This makes it easier to choose and execute the troubleshooting techniques accordingly. We consulted with industry experts and came up with a list of the most influential reasons for this company file error to occur on your QB Desktop. Read them thoroughly below-
- One or multiple workstations host the company file, which indicates an incorrect QB hosting setup on your systems.
- Windows Firewall port (8019) is blocked for QuickBooks, which is why the software fails to exchange data with other systems connected to the network.
- Database Server Manager is affected by damaged .tlg and .nd files, or its background processes are interrupted by security programs on your system.
- QuickBooks cannot access your financial records due to the unreadable format of the company file, which mostly happens if the file gets damaged or corrupted.
- QuickBooks does not have sufficient folder permissions to access the company file format, or the file exists in encrypted or compressed format.
- Compatibility issues due to obsolete Windows OS or QuickBooks Desktop version cause problems while accessing a company file.
The company file error you are currently dealing with results from one or more of the above conditions developing on your system. Now, let’s proceed to the troubleshooting methods you must use to eliminate the data file error and avoid problems while accessing your data file in the future.
Recommended to read : How do I fix error 6000 83 in QuickBooks desktop?
Simple Ways to Tackle QuickBooks Company File Error 6120 0
By learning the reasons that can provoke the QuickBooks company file error 6120 0, we hope you get an idea of the troubleshooting methods that must be applied against them. You must remove the error as soon as possible to access your financial records and use the company file to execute the accounting tasks in QuickBooks. Here are the ways you can terminate QB error 6120 from your PC-
Method 1- Download the Latest QuickBooks and Windows Updates
You must avoid compatibility issues while running QuickBooks as they can limit the software functions and prevent it from running at total efficiency. To ensure that, we recommend downloading the latest updates for your OS and QuickBooks Desktop using the following steps-
Install the Latest QB Desktop Updates for Windows
The following steps will help you install the latest QB updates in Windows OS-
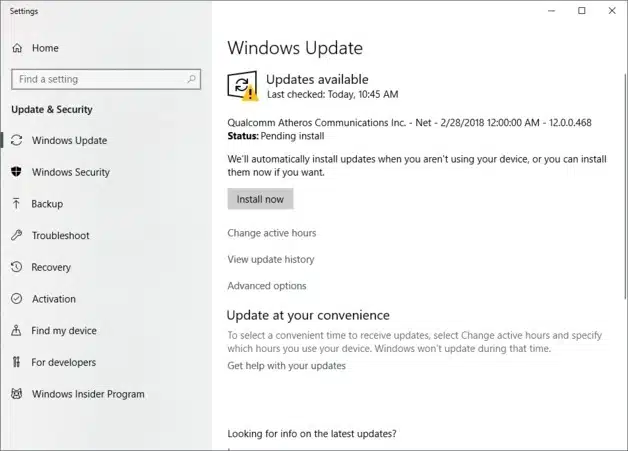
- Launch your QB Desktop and see if an Update Available option is present on the Status Bar.
- If yes, click it and select Install Now to update your QB desktop.
- If you can’t locate the Update Available option, move to the QB’s Help menu and click Update QuickBooks Desktop.

- Tap Update Now, click the Reset Update option to remove the previous updates, and select the Mark All checkbox.
- Click Get Updates and wait until the latest QB updates are downloaded on your system.
- Reopen QuickBooks and click Install Now in the software prompt to begin installing the updates.
Install the Latest QB Desktop Updates for Mac
The following steps will help you install the latest QB updates in Mac-
- Launch your QB Desktop for Mac and click the Check for QuickBooks updates option.
- Click Install and relaunch.
- Repeat these steps to counter issues during the update or if the release number doesn’t change.
Note: You also have the option to download QB updates directly from the official website. Here’s how-
Download QB Updates Directly from the Official Website
- Go to the QB website on a web browser and navigate to the Downloads and Updates page.
- Select Standard Setup and enter Country, Product, Version, along with any other info asked on the website.
- Tap Search to find the latest software update available and click Get the latest updates to download the updates file on your system.
- Open the file and follow the on-screen instructions to install the latest QB updates.
Install the Latest Windows OS Updates
QuickBooks Desktop’s efficiency might take a hit if the OS you run it on lacks the latest updates. You must download the latest Windows OS updates to avoid issues while opening the data file. Refer to these steps-
- Press the Windows + X keys simultaneously and click the Settings option to launch the Control Panel.
- Proceed with the Windows Update option on the left and tap Check for updates in the next window.
- Click Download and Install when the latest Windows OS update version available for your system shows up.
- Wait for the system to reboot after the Windows is fully updated.
- Try opening the data file after both QuickBooks Desktop and Windows OS are updated.
If the company file error emerges again on your updated QuickBooks Desktop, move to the next solution.
Method 2- Rectify Your Company File Issues
QuickBooks error code 6120, 0 can also emerge if the company file is damaged or its location is inaccessible to the software. QuickBooks won’t be able to connect with the file, and you’ll face error messages when opening a data file or executing an accounting task involving it. You must repair your data file (if damaged) and ensure its folder permissions are set in favour of QuickBooks. The following steps will resolve all the issues in your company file-
Run the Verify-Rebuild Utility
The Verify-Rebuild utility is an integral component of QuickBooks Desktop offered by Intuit to fix your company file in case it gets damaged. You can also rebuild your company file using the utility to remove data discrepancies, which is a reason you face problems accessing the financial records. Run the Verify-Rebuild utility using the following steps-
- Launch your QB Desktop and access its File menu.
- Go to the Utilities option and select Verify Data to scan the data file for any issues.

- If you see:
- QuickBooks detected no problems with your data- Your company file isn’t damaged, and you need not take any further action.
- Your data has lost integrity- The utility found issues in your data file. Continue with the steps to rebuild your data file.
- Access QB’s File menu again and click the Utilities option.
- Tap Rebuild Data and click OK if the software asks you to create a backup before proceeding.

- Data rebuilding automatically starts after the backup is created, and all you can do is wait patiently until the process is complete.
- Run the Verify utility again to check if all the issues are removed, and click Rebuild Now if they persist.
Utilize QuickBooks Tool Hub
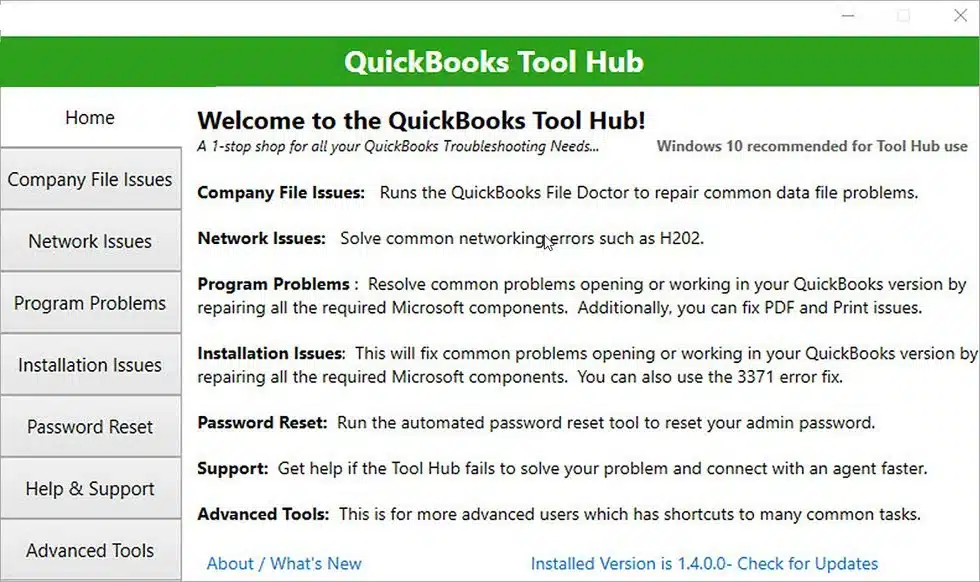
QuickBooks Tool Hub consists of various automated tools designed to tackle day-to-day errors in the software. File Doctor Tool is essential for repairing your data file in case it gets damaged by a virus attack on your system or any other reason. If you don’t have the latest QB Tool Hub version, download it using these steps-
- Go to the Downloads and Updates page of the QB website on a browser and enter the asked info.
- Select your QB product and download the latest QB Tool Hub version (1.6.0.3) associated with it.
- Launch the QuickBooksToolHub.exe file and do as per the on-screen instructions to install the application on your computer.
Repair Company File using Quick Fix My File and File Doctor Tool-
Apply the following steps after QB Tool Hub is fully installed on your PC-
- Run the QB Tool Hub and access its Company File Issues menu.
- Click the Quick Fix My File option on the right and wait until the tool stops running after fixing the data file.
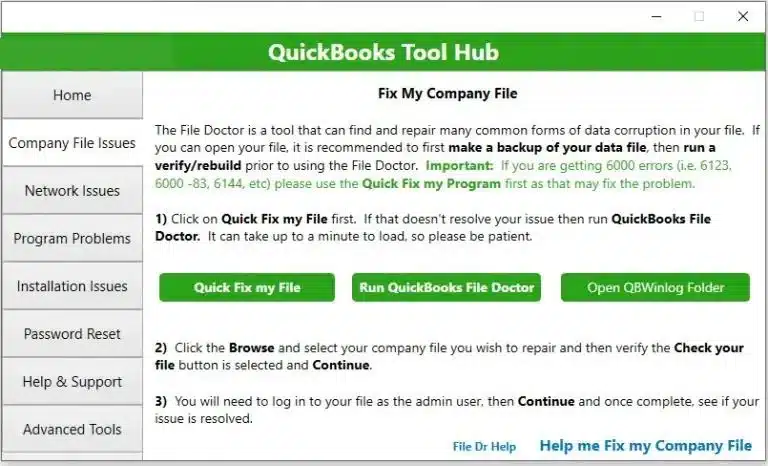
- Now click the Run QuickBooks File Doctor option and use Browse to specify the location of the data file you want to fix.
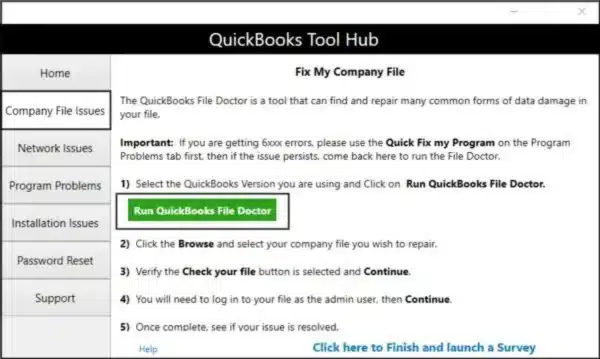
- Ensure the Check your file option is selected and tap Continue.
- Enter your admin credentials to sign in to the data file and click Continue once the tool stops.
Rename your Company File
QuickBooks won’t open a company file if it has invalid characters in its name or if the file is encrypted/compressed. You must apply the following steps to fix the issues with your data file-
- Go to C: Users\Public\PublicDocuments\Intuit\QuickBooks20XX on a File Explorer.
- Right-click the company file and select Rename.
- Erase invalid characters like $, %, &, #, etc., from the file name and save it.
- Right-click the data file again and select Properties.
- Go under the Advanced tab and unmark the Encrypt/Compress checkboxes.
Set up QuickBooks Folder Permissions
QuickBooks can also develop errors while opening a company file if the software doesn’t have the appropriate permissions to access the data file folder. This can be due to misconfigured Windows permissions or your non-admin Windows account. You must configure the folder permissions using the following steps to ensure QB doesn’t face problems accessing it-
- Use the File Explorer to go to C: Users\Public\PublicDocuments\Intuit\QuickBooks20XX.
- Right-click the QB folder and tap Properties in the options.
- Go to the Security tab and select your User Account in the list below.
- Tap Change and mark the Full Control checkbox to allow all the permissions.
- Save the changes you made by clicking Apply and close the Properties window.
- Run your QB Desktop and try opening the company file again.
If you are interrupted by the data file error code again, check out the next solution.
Also Read : What is error code 6000 77 in QuickBooks
Method 3- Resolve Database Server Manager Issues
The QuickBooks Database Server Manager is responsible for the multi-user network setup and smooth data flow over it. You’ll straightaway run into issues while hosting the data file if DBSM doesn’t run in the background while switching the server to multi-user mode for hosting the data file. You’ll have to get rid of the DBSM issues to ensure QuickBooks Desktop error 6120 0 doesn’t come up again. Use these steps-
Step 1- Rename the Damaged .TLG & .ND Files
Transaction Log (.tlg) file holds the recent transactions as your company file, and the Network Descriptor (.nd) contains the file paths to the data source and the workstations. These files are essentially required for multi-user network setup, as DBSM won’t start if the files are damaged. An easy way to go through the issue is by renaming both the files, as shown below-
- Press Windows + E and visit C: Users\Public\PublicDocuments\Intuit\QuickBooks20XX on the File Explorer.
- Right-click the .tlg and .nd files (individually) you see inside the QB folder and select Rename.
- Type ‘.OLD’ as an extension at the end of the file names and save both files.
- Launch your QB Database Server Manager and move under the Scan Folders tab.
- Tap Browse and enter the location of the folder where you renamed the .tlg and .nd files.
- Tap Start Scan and wait until the DBSM scans all the QB folder contents.
Step 2- Restart DBSM Processes
QuickBooks can also struggle to set up a network if security programs or other applications on your system do not allow the DBSM processes to run in the background. DBSM can also malfunction due to minor glitches stopping its background processes. Restart DBSM processes using these steps to fix the issue-
- Open the Task Manager (Windows + Shift + Esc) on your PC and go to the Processes tab.
- Search for all the QB-related processes like QBDBMgrN.exe, QBDBMgr.exe, QBW32.exe, etc.
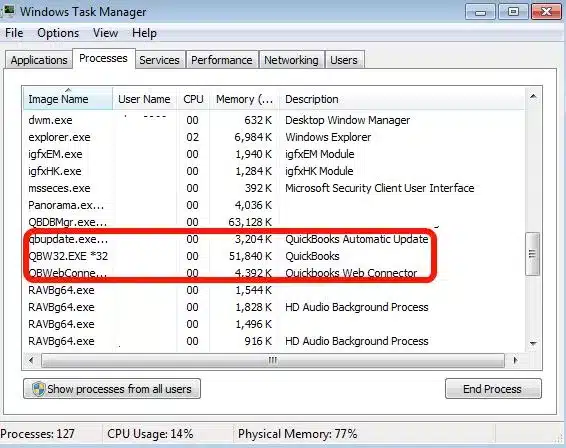
- Right-click all the QB processes individually and click End Task to stop them all.
- Reboot your system and try setting up a multi-user network on your QB again.
If the company file error still emerges on your QB Desktop, check out the next solution.
Method 4- Ensure the QB Hosting Settings are Correct
A significant cause for the occurrence of QuickBooks Error code 6120, 0 is workstations running in multi-user mode to host the company file. Only the server computer is allowed to run in multi-user mode for sharing the company files, and even a single workstation running in multi-user mode can trigger the company file error on your system. Arrange the QB hosting settings correctly using the following steps-
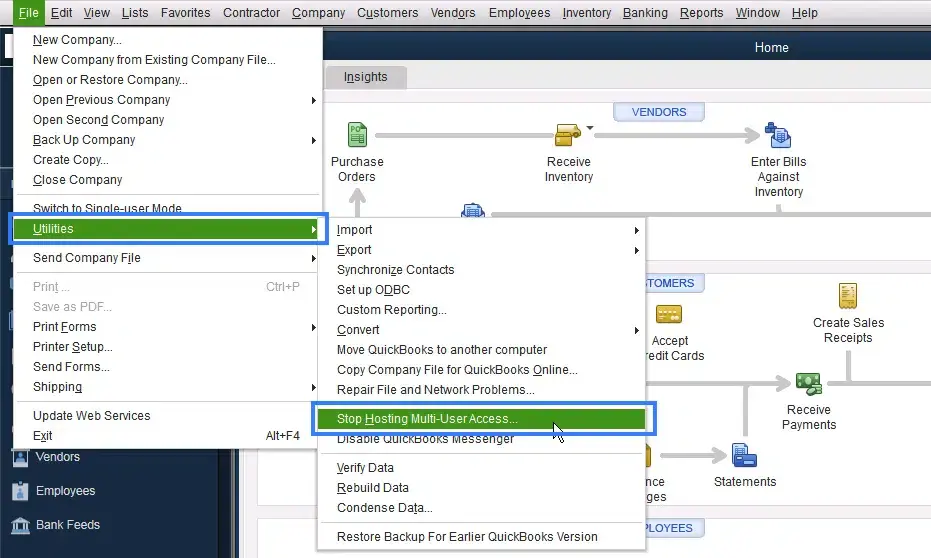
- Launch QB Desktop on the workstation that displays this error code and access the File menu.
- Select Utilities in the drop-down menu and click Stop hosting multi-user access.
- Turn all the workstations to single-user mode using the above steps and approach the server.
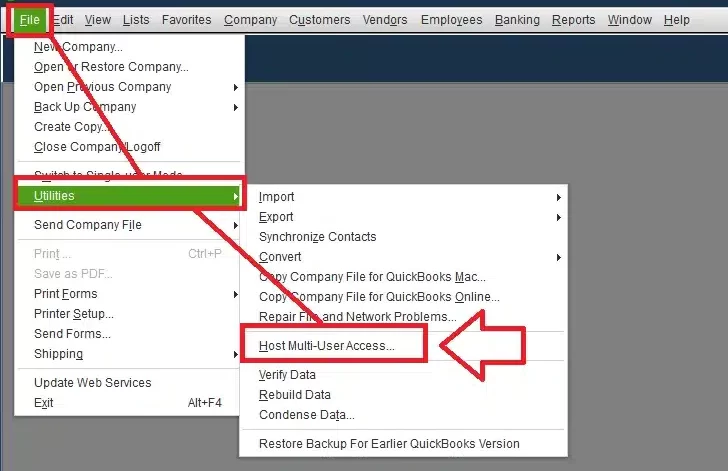
- Go to QB’s File menu and select Utilities.
- Tap Host multi-user access to switch the server to multi-user mode.
- Reboot all the systems and open the company file on the server in multi-user mode.
If QuickBooks runs into the company file error again, jump to the next solution.
You may also read : Fix QuickBooks Error Code 6012 1061
Method 5- Ensure QB is Allowed to Bypass the Windows Firewall
A primary reason for QuickBooks error 6120 stopping you from accessing the company file can be restrictions imposed by the Windows Firewall on your PC. QuickBooks won’t be able to access the system drives or exchange data using the multi-user network if the firewall port (8019) is blocked. In this condition, you must add firewall exceptions for QuickBooks to ensure its functions aren’t restricted. Here’s how-
Step 1- Creating Firewall Ports for QB Desktop
In case you have multiple QB versions installed on your system, apply the following steps to add firewall ports for each of them-
- Go to the Control Panel using the Settings (gear icon) option in the Windows Start menu.
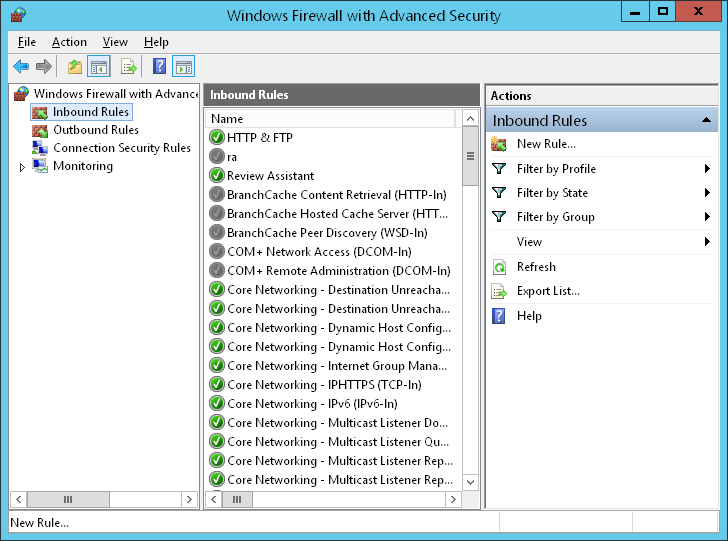
- Open the Windows Defender Firewall settings window and select the Advanced Settings option.
- Right-click Inbound Rules and select the New Rule option.
- Tap Port, click Next, and choose TCP in the following window.
- Single-click the text column adjacent to Specific Local Ports and use the following list to fill in the firewall ports according to your QB product-
- QuickBooks 2017: 8019, 56727, 55373-55377.
- QuickBooks 2018: 8019, 56728, 55378-55382.
- QuickBooks 2019: 8019, XXXXX.
- QuickBooks 2020 and above: 8019, XXXX.
Tip: QuickBooks Desktop 2019 or newer versions use Dynamic Ports, assigned when you install the software on your computer. You can easily find the port number in the Database Server Manager using these steps-
- Run the QuickBooks DBSM and go to the Port Monitor tab.
- Specify your QB version to find the Port Number you’ll use as a Firewall exception.
Although the Dynamic Port number is automatically allocated during installation, you can use the Renew option to change it. If you choose to change the port number, click Start Scan in the Scan Folders tab afterwards to reset the firewall permissions.
- Enter the port numbers precisely and click Next.
- Select Allow the connection option and tap Next again.
- Make sure to select all the profiles mentioned in the software prompt and provide any desirable name for the new rule you create.
- Click Finish and execute all the steps again after choosing Outbound Rules in place of Inbound Rules.
Step 2- Creating Firewall Exceptions for QB Executable (.exe) Files
QuickBooks Desktop has a set of executable files that run in the background to ensure the software runs smoothly and gives the desired output. You must also prevent them from getting blocked by the Windows Firewall by adding exceptions as shown below-
- Open the Windows Defender Firewall settings window from the search bar or the Control Panel as you did earlier.
- Click the Inbound Rules option and tap New Rule in the next window.
- Select Program and click Next.
- Choose This Program Path option and use the below table to enter one or more of QB files-
| Executable files | Location |
| AutoBackupExe.exe | C:\Program Files\Intuit\QUICKBOOKS YEAR |
| Dbmlsync.exe | C:\Program Files\Intuit\QUICKBOOKS YEAR |
| DBManagerExe.exe | C:\Program Files\Intuit\QUICKBOOKS YEAR |
| FileManagement.exe | C:\Program Files\Intuit\QUICKBOOKS YEAR |
| FileMovementExe.exe | C:\Program Files\Intuit\QUICKBOOKS YEAR |
| QuickBooksMessaging.exe | C:\Program Files\Intuit\QUICKBOOKS YEAR |
| QBW32.exe | C:\Program Files\Intuit\QUICKBOOKS YEAR |
| QBDBMgrN.exe | C:\Program Files\Intuit\QUICKBOOKS YEAR |
| QBServerUtilityMgr.exe | C:\Program Files\Common Files\Intuit\QuickBooks |
| QBCFMonitorService.exe | C:\Program Files\Common Files\Intuit\QuickBooks |
| QBLaunch.exe | C:\Program Files\Common Files\Intuit\QuickBooks |
| QBUpdate.exe | C:\Program Files\Common Files\Intuit\QuickBooks\QBUpdate |
| IntuitSyncManager.exe | C:\Program Files\Common Files\Intuit\Sync |
| OnlineBackup.exe | C:\Program Files\QuickBooks Online Backup |
- After entering the QB executable file, click Allow the connection and select all the profiles mentioned in the software prompt.
- Name the new rule you create and repeat the steps after choosing Outbound Rules instead of Inbound Rules.
Step 3- Prevent QB and DBSM Files from Getting Blocked by the Antiviruses
After configuring the Windows Defender Firewall settings, it is also necessary to make sure that QuickBooks or Database Server Manager files aren’t blocked by the antiviruses on your system. For this, you’ll have to open your antivirus and check its blacklisted programs list to find QB files. Then, remove any of the QB executable files (mentioned in the table above) from the quarantined programs list of the antivirus. Disabling antivirus while setting up the multi-user network is another way you can safeguard QB files.
We tried simplifying all the troubleshooting methods to the extent that you can easily execute them to remove QuickBooks error code 6120, 0. It is expected that you apply all the methods precisely, and the company file error is terminated from your QuickBooks.
Wrapping Up!
This blog provides a quick rundown of QuickBooks error 6120, which makes it impossible for you to open or host a company file. Going through the blog will help you discover the potential causes for the data file error to develop and the approaches you must follow to rectify it in the quickest time possible. In the event you struggle to apply the methods or the error persists after using them, contact our team of Proadvisor solutions professionals at 1.855.888.3080 for round-the-clock troubleshooting assistance.
FAQs
What is QuickBooks error 6120?
QuickBooks error 6120 is a runtime issue involving your company file. It shows up while accessing financial data or sharing it with workstations over a network. The error won’t let you open the company file, and you’ll start receiving recurring error messages if you make continuous attempts to access the file. If you don’t get rid of the error quickly, be ready to face random crashes in your QB.
Why do I get blocked by error 6120 in QuickBooks Desktop while trying to open a company file?
QuickBooks error 6120 0 develops due to incorrect hosting settings in the software or blocked firewall ports. This means one or more workstations run in multi-user mode, trying to host the company. This situation leads to issues in the Database Server Manager, which fails to set up the multi-user network. Outdated QuickBooks or OS versions and damaged company files are some other reasons you encounter problems while opening a data file.
What are the techniques suggested to rectify QuickBooks error code 6120, 0?
We recommend updating your QuickBooks and Windows/Mac OS to begin with the troubleshooting. Thereafter, you must-
1. Run the QuickBooks File Doctor Tool to fix the file.
2. Ensure only the server runs in multi-user mode.
3. Set Windows Firewall settings in favour of QB Desktop.
4. Recreate the transaction log (.tlg) and network descriptor (.nd) files by renaming them.

Erica Watson is writing about accounting and bookkeeping for over 7+ years, making even the difficult technical topics easy to understand. She is skilled at creating content about popular accounting and tax softwares such as QuickBooks, Sage, Xero, Quicken, etc. Erica’s knowledge of such softwares allows her to create articles and guides that are both informative and easy to follow. Her writing builds trust with readers, thanks to her ability to explain things clearly while showing a real understanding of the industry.