QuickBooks error 6012 1061 occurs while opening a company file or hosting it on a multi-user network. We all know that QB offers the convenience of sharing the company file with multiple users (known as a multi-user network), allowing them to add new transactions and perform accounting tasks on the workstations using the data file. However, you become liable to face errors while opening the company file if QuickBooks cannot set up a multi-user network on your system.
You’ll see QuickBooks error code 6012 1061 mainly in a network setup, but in rare cases, the error code can also appear when the software fails to access the company file from a local drive. Whatever the case, this informative blog includes all the possible reasons for the company file error to emerge and the rectification methods you can use to get rid of it. Continue reading to learn the intricate details of the issue and its effects on your business accounting.
Failure to open a company file is the root of many QuickBooks errors, which escalate and cause more significant problems in bookkeeping. Our team of Proadvisor solutions experts is always available at 1.855.888.3080 to lend you a helping hand in troubleshooting the error and put a stop to the consequences that you might face in the future.
Table of Contents
What is QuickBooks Desktop Error 6012 1061?
As you can see, the error belongs to the 6XXX series, which emerges while opening the company file or restoring its backup on your system. This particular error stops QB from connecting to the company file due to incorrect multi-user network setup, and an error message ‘QuickBooks can’t open your company file’ appears on the screen after accounting tasks are terminated. The software starts freezing and sometimes crashes when you try to open a company file, and hence you won’t be able to execute any accounting task using the data file.
Encountering QuickBooks error 6012, 1061 is a panicky situation for any QB user, as the software failing to open a company file is unsuitable for financial management and leaves them with no option. To ensure you don’t go through the trouble, let’s start by learning the circumstances in which QB fails to open a company file.
Reasons Why You Encounter QuickBooks Error Code 6012 1061
After QuickBooks error code 6012 comes up on your screen, the software won’t be able to connect to the data file, so there’s no use in making continuous attempts to open the file. You must know why the company file error develops in QuickBooks to take accurate countermeasures and avoid it in the future. Here’s a list of all the possible conditions favourable for the data file error to develop & stop QB from establishing a connection with the company file-
- One or more of your workstations is running in multi-user mode, which isn’t the correct network setup and causes problems when opening a company file.
- Database Server Manager fails to start due to a corrupt or damaged Transaction Log (.tlg) or Network Descriptor (.nd) file.
- Your QB Desktop is missing its latest updates, which raises compatibility issues while integrating with Windows OS applications.
- QuickBooks does not have admin permissions to access the company file location, which is a problem when hosting the data file.
- Windows Firewall may cause problems connecting to other systems or running the DBSM processes in the background.
- A corrupt or damaged company file becomes unreadable for QuickBooks and can be a significant reason for 6XXX series errors.
- One or more QB processes running in the background are stopped by other applications running on your system or internal issues in the software.
If you are able to figure out what triggered the data file error in your case, it’ll be easier to choose the troubleshooting technique that you must opt for. There is no need to worry if you can’t find the exact reason, as the methods given in the next section of the blog are all aimed at fixing the issue and applying them all in the given order will be beneficial anyway.
Practical Techniques to Get Rid of QuickBooks Error Message 6012 1061
All your accounting tasks in QuickBooks start terminating abruptly after this error emerges, as the software isn’t able to connect with the company file or update its data. This error indicates an incorrect network setup, which means you might suffer greatly if you use a server to share the company files with multiple workstations. Without further delay, let’s get into troubleshooting the error by applying the effective techniques mentioned below-
Method 1- Download and Install the Newest QB Updates
An outdated QuickBooks Desktop is sure to develop compatibility issues while running on Windows and integrating with the OS applications. This can straightway lead you to QuickBooks Desktop error 6012, as many OS components are also involved when systems are connected for data exchange in the form of company files. Enrich QB’s efficiency and fix its existing flaws by downloading the latest software updates using the following steps-
Updating QB Desktop for Windows
- Launch QuickBooks Desktop and check if you see an Update available option (top-right) on the status bar.
- Tap Update Available and click Install Now to initiate the installation.
- In case the Update Available isn’t available, go to QB’s Help menu and select Update QuickBooks Desktop.
- Select Update Now and tap Get Updates to download the update package on your system.
- Reopen your QB Desktop and follow the on-screen directions in the software prompt to install the updates.
Updating QB Desktop for Mac
- Open your QuickBooks and click the Check for QuickBooks Updates option.
- Tap Install and Relaunch and wait until your QB Desktop for Mac reboots after installing the updates.
- Repeat the above steps if issues develop during the updates or the release number doesn’t advances.
Alternative: If you encounter problems updating QB Desktop from within, you can also download the latest updates directly from the official site using the following steps-
- Visit the Downloads & Updates page of the official QuickBooks website and select Standard Setup.
- Enter your Country, Product, Version, and other required info, and tap Search.
- Click Get the latest updates and wait for the download to finish.
- Open the installation file and install the updates using the on-screen instructions.
If you can’t access the company file on an updated QB Desktop, check out the next solution.
Method 2- Resolve Company File Issues
There’s a big possibility that QuickBooks error 6012 1061 appeared on your system due to a damaged or corrupt company file. The best way to repair the company file and make it accessible for the software is to run it through the File Doctor Tool and ensure it has a valid name (without special characters). Perform the following steps –
Step 1- Download QB Tool Hub
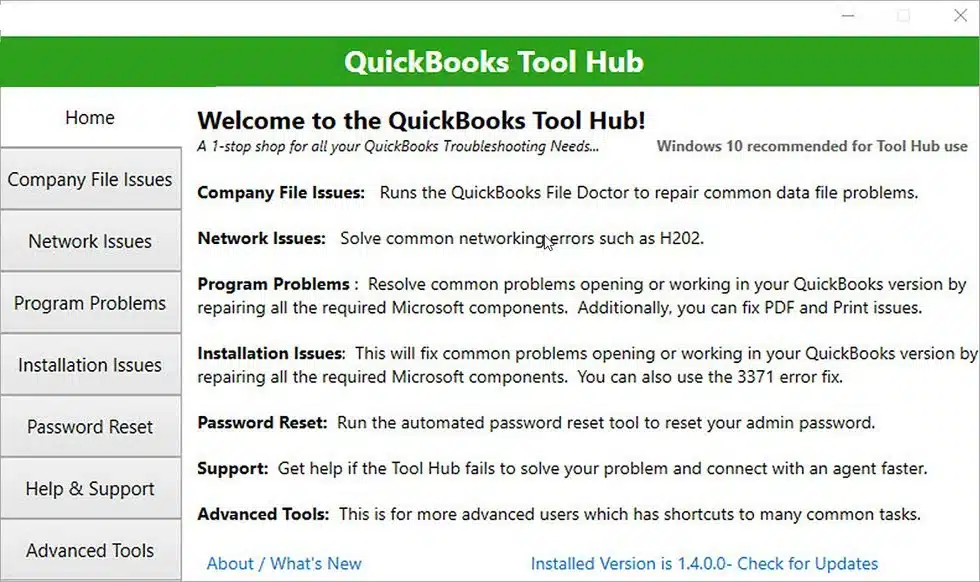
You must have the latest QB Tool hub (1.6.0.3) on your system to make sure the File Doctor Tool is most effective. Refer to these steps-
- Go to the Downloads and Updates page on the QB website and enter your software info as asked.
- Download the QB Tool Hub installation file and open it after it is entirely downloaded on your system.
- Click Accept on the Software License Agreement and use the on-screen instructions to install it on your system.
Step 2- Run Quick Fix My File and File Doctor Tool
Once QB Tool Hub is installed, run the File Doctor Tool using these steps-
- Access the Company File Issues menu in the QB Tool Hub and click the Quick Fix My File option.
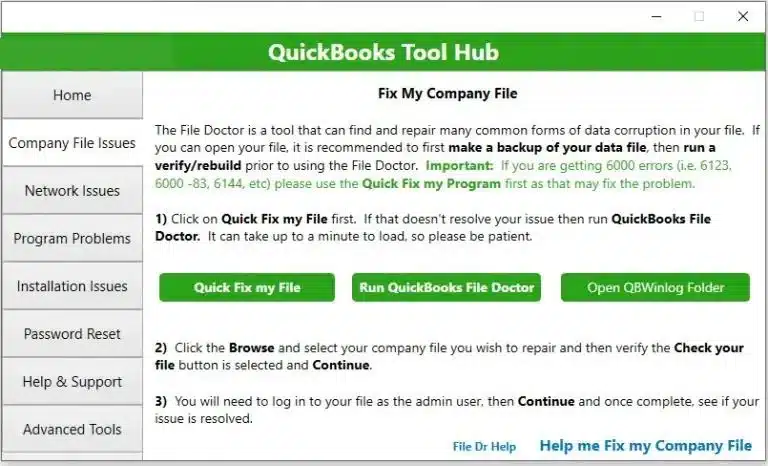
- Wait for the tool to finish and go to the Company File Issues menu again.
- Tap Run File Doctor Tool and enter your company file location by clicking Browse.
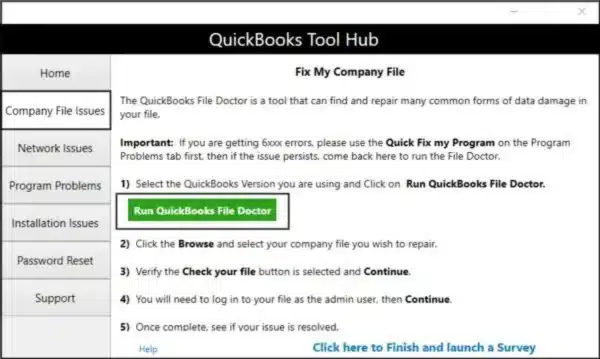
- If needed, fill in your QB admin credentials and wait until your data file is completely repaired.
Step 3- Ensure There are No Special Symbols in the Company File Name
QuickBooks can fail to access a company file if its name has special characters or invalid spaces in its name. You’ll need to rename the data file as shown in these steps-
- Open the File Explorer (Windows + E) and go to C: Users\Public\PublicDocuments\Intuit\QuickBooks20XX.
- Right-click the company file (.qbw) and select Rename.
- Remove all special symbols like <, >, #, @, etc., and ensure no space exists before the file extension.
If you still encounter the QB error after repairing the data file, move to the next method.
Method 3- Configure QB Hosting Settings for Correct Multi-User Network Setup
A QB Desktop company file can only be shared by running the server in multi-user mode and workstations in single-user mode. This is the only setup for a successful multi-user network, but problems arise when these aren’t the hosting settings in QB Desktop. One or more workstations running in multi-user mode contribute to QuickBooks Desktop error 6012 1061 and stop the server from hosting the company file. Ensure your QB has the correct multi-user arrangement by applying these steps-
- Go to all the systems and sign out of your company files on each of them.
- Approach the workstations that initially developed this error and access QB’s File menu.
- Select Utilities and click Stop hosting multi-user access.
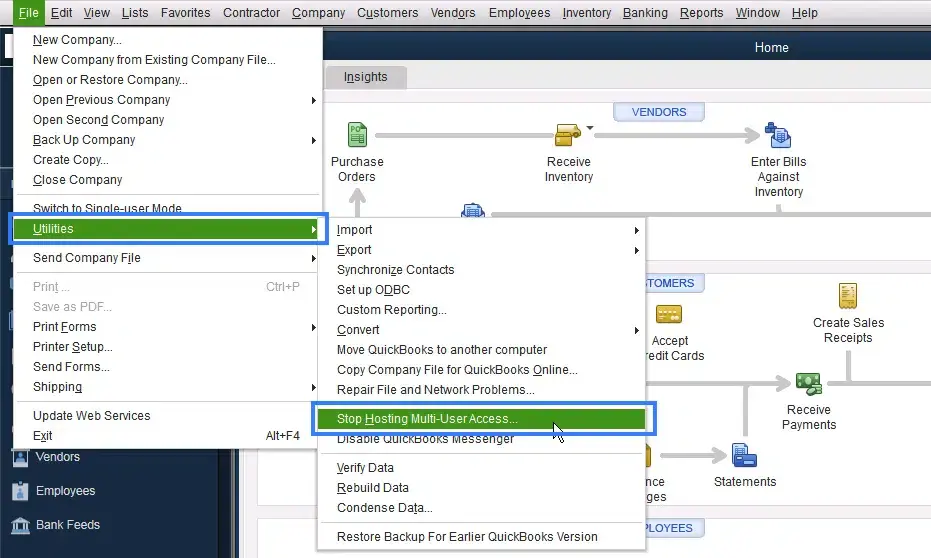
- Go to all the workstations and switch them all to single-user mode.
- Access QuickBooks Desktop on the server and click File at the top.
- Select Utilities and tap Host multi-user access in the options list.
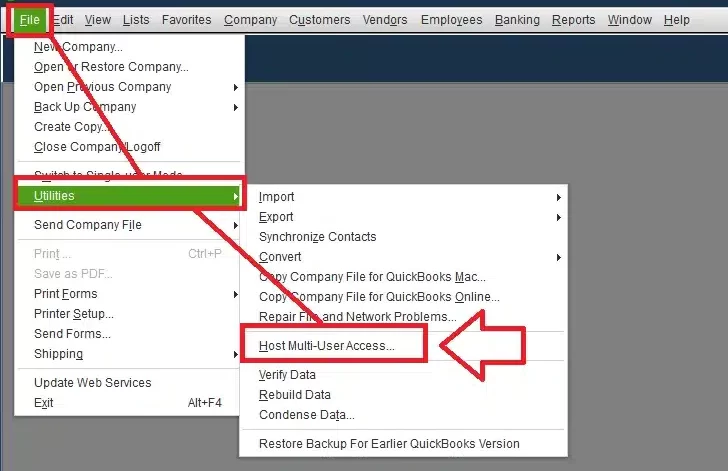
- Restart all the systems and open the company file in multi-user mode on the server.
If QuickBooks displays the same error code and stops you from accessing/hosting the data file, jump to the next solution.
Method 4- Recreate the Damaged Transaction Log (.tlg) and Network Descriptor (.nd) Files
Transaction Log and Network Descriptor files are essential QB components that ensure Database Server Manager is able to access the data files and share them on the multi-user network. The .tlg files contain recent QB transactions, whereas the .nd file connects all the systems to the data source in the network. QuickBooks instantly develops issues if either the .tlg or .nd files get damaged and fail to run. You must recreate the files to ensure QuickBooks DBSM is able to operate seamlessly on your PC. Here’s how-
- Launch File Explorer (Windows + E) and go to C: Users\Public\PublicDocuments\Intuit\QuickBooks20XX.
- Right-click on both the .TLG and .ND files inside the QB folder individually, and click Rename.
- Add the extension ‘.old’ to both file names and save them on your system. The file will look like CompanyFileName.qbw.tlg.old or CompanyFileName.qbw.nd.old.
Run QuickBooks Database Server Manager
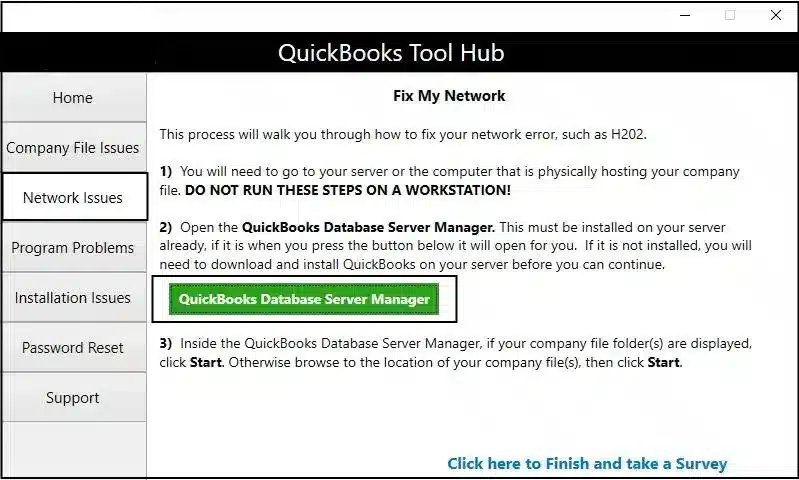
After you rename the Transaction Log and Network Descriptor file, you must run QuickBooks DBSM to scan the folder and register the files on the network again. You either launch DBSM independently or use the Network Issues menu in the QB Tool Hub. Refer to these steps after DBSM starts running on your system-
- Go to the Scan Folders tab and click the Start Scan option if the company files are pre-available.
- If you don’t see your company files, click Browse to locate them on your system drive.
- Click Start Scan and wait until DBSM completes the scan.
- Launch QB and try to open your data file again.
If the data file fails to open after renaming the .tlg & .nd files, move to the next solution.
Method 5- Configure the Company File Folder Permissions
QuickBooks won’t be able to open the company file if the folder permissions restrict the software from doing so. The company file location can also trigger problems if QuickBooks isn’t able to access it due to non-admin permissions or if the file path has too many folders exceeding the file system path limitation. Adjust the folder permissions using the following steps-
- Go to the company file folder stored in C: Users\Public\PublicData\Intuit\QuickBooks20XX.
- Select the Properties option and move to the Security tab.
- Click Advanced and select QBDataServiceUserXX in the account list.
- Tap Edit and mark the Full Control checkbox with a single click to allow all the permissions.
- Click Apply and tap OK after the changes are saved.
- Reopen QB and try accessing/sharing your company file.
Note: You can also move your company file to the desktop and open it from there to resolve the issue of a damaged file path. Use these steps-
- Right-click the company file and select Copy.
- Go to the desktop and Paste (Ctrl + V) the file there.
- Press and hold the Ctrl key and launch QB Desktop.
- Click Open or Restore an existing company in the No Company Open window and open your data file from the Desktop.
If you still can’t open your QB company file, apply the following method.
Method 6- Restart all the Background Processes of QuickBooks Desktop
QuickBooks can undergo a malfunction if other applications interfere with its background process or they get blocked by the security programs. The background processes can sometimes get affected due to technical glitches in the software; all that is required to fix them is a simple reset. For this, you’ll have to sign in as a Windows admin user and close QB processes as mentioned below-
- Once you are signed in as a Windows admin, press Ctrl + Shift + Esc to launch the Task Manager.
- Go to the Background Processes section in Windows 11 or the Processes tab in Windows 10 and click Users to view all the processes.
- Single-click all the QB processes like QBUpdate.exe, QBW32.exe, QBDBMgr.exe, QBDBMgrN.exe, etc.)
- Relaunch QB Desktop and open your data file in multi-user mode.
If the error pops up again while opening the data file, move to the next solution.
Method 7- Prevent QB Desktop from Windows Firewall Restrictions
You can also encounter error 6012 while opening the company file if the Windows Firewall restricts the software functions and does not allow it to share data with other systems. You can tackle the problem by adding new firewall port exceptions for QuickBooks Desktop to ensure it doesn’t struggle to access the company file from a network. Refer to these steps-
Step 1- Add New Firewall Ports for Your QB Desktop
If you run multiple QB versions on your system simultaneously, apply the following steps for each of them to add new firewall ports-
- Go to the Control Panel and open the Windows Defender Firewall window.
- Select the Advanced Settings option and right-click Inbound Rules to create a new rule.
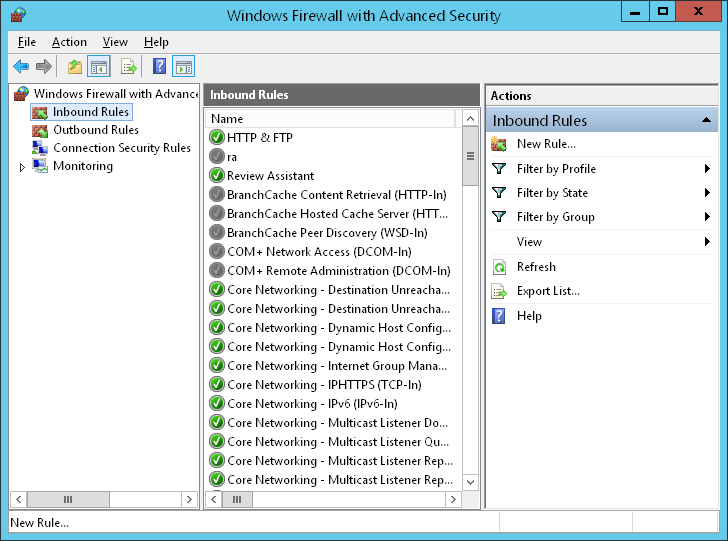
- Tap New Rule and click the Port option in the next window.
- Hit Next and select TCP out of TCP/UDP mentioned in the next window.
- Go to the Specific Local Ports section and specify the Firewall ports for your QB product with the help of this list-
- QuickBooks 2017: 8019, 56727, 55373-55377.
- QuickBooks 2018: 8019, 56728, 55378-55382.
- QuickBooks 2019: 8019, XXXXX.
- QuickBooks 2020 and above: 8019, XXXX.
Tip: If you have QuickBooks Desktop 2019 or later versions, they use dynamic ports allocated during software installation. Find your Firewall port exceptions by launching Database Server Manager and applying the following steps-
- Access the Port Monitor tab and mention the QB version you use.
- The Port Number you see on the screen will be used as Firewall port exceptions.
You can use the Renew option to change the Dynamic Port number. However, in case you change them do not forget to access the Scan Folders tab and click Start Scan to reset the Windows Firewall permissions.
- Click Next once the port numbers are filled up, and tap Allow the connection in the next window.
- Hit Next again and select all the user profiles in the software prompt.
- Give any preferable name to the rule you create and tap Finish.
- Repeat the entire procedure after selecting Outbound Rules instead of Inbound Rules.
Step 2- Add Firewall Exceptions for QB Desktop’s executable files
QuickBooks Desktop executable files are what make the software execute its functions seamlessly. You can prevent them from getting blocked by adding firewall exceptions using the following steps-
- Access the Windows Defender Firewall window again and click the Advanced Settings option again.
- Tap Inbound Rules and hit the New Rule option in the following window.
- Click the Program option and tap Next.
- Select This Program Path and enter one or more QB files from the list below after clicking Browse.
| Executable files | Location |
| AutoBackupExe.exe | C:\Program Files\Intuit\QUICKBOOKS YEAR |
| Dbmlsync.exe | C:\Program Files\Intuit\QUICKBOOKS YEAR |
| DBManagerExe.exe | C:\Program Files\Intuit\QUICKBOOKS YEAR |
| FileManagement.exe | C:\Program Files\Intuit\QUICKBOOKS YEAR |
| FileMovementExe.exe | C:\Program Files\Intuit\QUICKBOOKS YEAR |
| QuickBooksMessaging.exe | C:\Program Files\Intuit\QUICKBOOKS YEAR |
| QBW32.exe | C:\Program Files\Intuit\QUICKBOOKS YEAR |
| QBDBMgrN.exe | C:\Program Files\Intuit\QUICKBOOKS YEAR |
| QBServerUtilityMgr.exe | C:\Program Files\Common Files\Intuit\QuickBooks |
| QBCFMonitorService.exe | C:\Program Files\Common Files\Intuit\QuickBooks |
| QBLaunch.exe | C:\Program Files\Common Files\Intuit\QuickBooks |
| QBUpdate.exe | C:\Program Files\Common Files\Intuit\QuickBooks\QBUpdate |
| IntuitSyncManager.exe | C:\Program Files\Common Files\Intuit\Sync |
| OnlineBackup.exe | C:\Program Files\QuickBooks Online Backup |
- Select Allow the connection and tap Next once you select the QB executable file.
- Check the software prompt and ensure all the profiles are selected.
- Assign a unique name to the rule you create.
- Perform all these steps again after selecting Outbound Rules in place of Inbound Rules.
Step 3- Arrange the Antivirus Settings
QuickBooks can sometimes crash or stop responding when you try opening the company file. The next moment you relaunch the software, you might see error messages flashing on the screen. These are the symptoms when QB files get blacklisted or isolated by third-party antiviruses installed on your system. You must arrange the antivirus settings in favour of QB and ensure none of the program files (mentioned in the table above) are in its quarantine list. We advise you to disable the antivirus programs while setting up a multi-user network to prevent interruptions.
All the techniques mentioned above have helped countless users fix QuickBooks error 6012 1061. We hope you were able to apply them conveniently on your PC, and the QB doesn’t struggle to open the company file anymore.
Conclusion
This blog details QuickBooks error 6012 1061, which prevents you from accessing the company file due to an incorrect multi-network setup on your system. The blog also discusses some other triggers associated with this company file error and offers the best elimination techniques available on the internet. But things don’t go as expected every time, so we have a dedicated team of professionals to help you tackle unforeseen circumstances. Consult them at 1.855.888.3080 to clarify any remaining queries or for troubleshooting assistance if the error persists after using the techniques.
FAQs
What is QuickBooks error 6012 1061?
QuickBooks error 6012 1061 comes from the family of 6XXX errors that develop when the software cannot open or host a company file. This error code signifies that problems with your multi-user network prevent the workstations from accessing the company file located on the server. Still, your company file remains safe even after QuickBooks is affected by the error.
Why do I encounter error 6012 while opening the company file in QuickBooks Desktop?
Apart from incorrect hosting settings in QuickBooks Desktop, connection issues between the server and workstations are a prime reason for the occurrence of QuickBooks Desktop error 6012. These issues can be due to Windows Firewall restrictions or Database Serve Manager failing to start during multi-user network setup. Some other reasons include corrupt data file, lack of folder permissions, damaged folder path to the company file, or obsolete QB version.
How to fix QuickBooks error 6012 1061?
These are some quick ways to deal with error 6012 in QuickBooks Desktop-
1. Update QB Desktop.
2. Repair the data file if it is damaged and ensure it isn’t encrypted/compressed.
3. Rename the .tlg and .nd files before scanning them in DBSM.
4. Assign QB with admin permissions or sign in with your Windows Admin account.
5. Ensure none of the workstations run in multi-user mode.

Erica Watson is writing about accounting and bookkeeping for over 7+ years, making even the difficult technical topics easy to understand. She is skilled at creating content about popular accounting and tax softwares such as QuickBooks, Sage, Xero, Quicken, etc. Erica’s knowledge of such softwares allows her to create articles and guides that are both informative and easy to follow. Her writing builds trust with readers, thanks to her ability to explain things clearly while showing a real understanding of the industry.