QuickBooks Error 12029 is a part of the 12XXX error series that occurs when downloading QuickBooks or payroll updates. An error message appears on the screen that states, “[Error 12029]: QuickBooks failed to receive the IP address or servers.” Update errors in QuickBooks mostly occur when QuickBooks is unable to connect to the Internet. Besides that, an antivirus or firewall program may interfere with the update, resulting in failure to update the same. Consequently, you won’t be able to avail the latest features, maintenance releases, tax table calculations, and security fixes included in the newest update of the software.
Another key point is that an outdated payroll or QB is always prone to errors. Therefore, you must resolve the error to run the update process seamlessly. In this detailed guide, we have covered the primary reasons for and proven solutions to the error code 12029 in QB. So, let’s go through this blog till the end.
This comprehensive blog will help you resolve the update issues in QuickBooks Desktop effortlessly. But, if you don’t want to resolve the error on your own or don’t have enough time to perform these solutions, you can reach out to our Proadvisor solutions’ experts at 1.855.888.3080 to get immediate assistance in terminating QB error 12029.
Table of Contents
Primary Triggers for QuickBooks Error Code 12029
There could be a number of reasons behind the occurrence of QuickBooks error code 12029. Like solutions, it’s equally important to pay attention to the reasons that cause the error. Understanding the reasons will give you a better insight into the error; hence, you will be able to evaluate which solution can best resolve the error in your case.
- QuickBooks might not be able to connect to the Internet while running the update process.
- The browser and security settings might be incorrect.
- The antivirus app or Windows firewall might be interfering with the update process.
- Your QuickBooks version might be discontinued by Intuit, and you are no longer eligible for updates for minor fixes.
- There are internet connectivity issues in the system, or the connection might be down or disconnected.
- You are not running the QuickBooks update with Internet Explorer as the preferred browser.
- Your QuickBooks Desktop might not be correctly installed on the PC, and the process might be faulty, incomplete, or improper.
- The SSL certificate in QuickBooks might be outdated, invalid, or missing from the PC.
- QuickBooks Desktop might not have sufficient permissions to run the update process, and the current user account might lack admin rights.
- The SSL settings might be misconfigured or incorrect, which can be another reason for the update error.
Now that we understand the reasons that may trigger QuickBooks error message 12029. Let’s learn the detailed solutions to resolve this issue.
Troubleshooting Solutions to Tackle Error Code 12029 in QB
Error 12029 QuickBooks needs to be addressed on priority to run the update successfully. Here are the recommended solutions to resolve the error 12029 when updating QuickBooks Payroll or QBDT.
Solution 1: Test Settings and Connectivity
Since problems while connecting to the Internet are one of the top reasons for update issues in QB, the first solution to resolve QuickBooks error 12029 is testing and modifying specific connection settings.
Action 1: Set Internet Explorer as your Default Browser
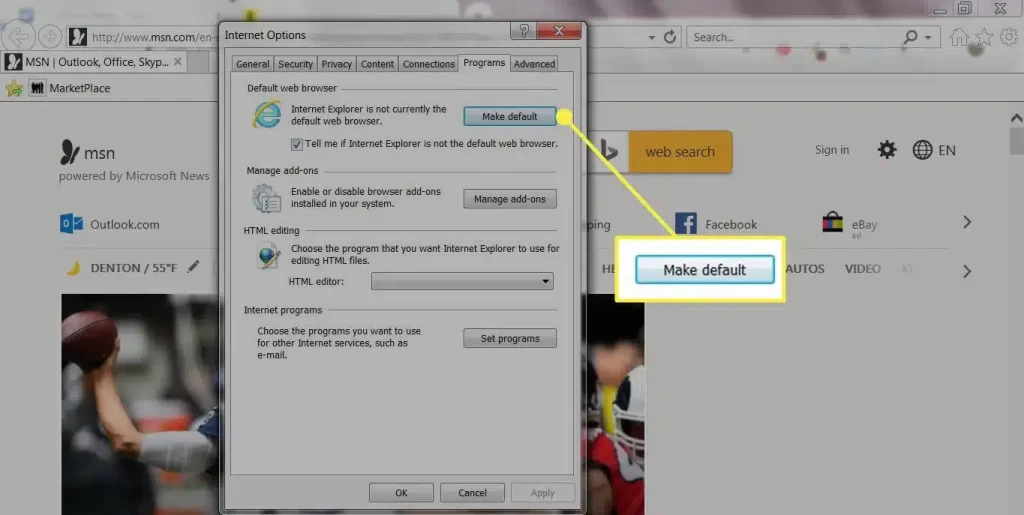
QuickBooks (older than QB 2022 versions) rely on Internet Explorer to access the internet. So, making it your default browser is an obvious option. The process involves:
- Open Internet Explorer and select the Tools button or the Gear icon from the top-right corner.
- Choose Internet Options, then go to the Programs tab and select Make Default.
- Hit OK to save the changes and rerun the QB Desktop update process.
Recommended to read : How to fix QuickBooks Error PS077
Action 2: Download and Run the TLS 1.2 Utility
All connections used by QuickBooks to access Intuit services need to meet certain system requirements, which is why proper TLS settings are required. You can update your operating system and make it TLS 1.2 compliant by running the TLS 1.2 Utility in the following manner –
- Download the latest QuickBooks Tool Hub and save it in an accessible folder or desktop.
- Double-click the QuickBooksToolHub.exe file and follow the given prompts, then accept the License Agreement.
- Finish installing the QuickBooks Tool Hub and double-click its icon to open it, then tap Installation Issues.
- Choose QuickBooks TLS 1.2 Tool from the bottom-right corner and hit OK to access the TLS tool.
- Tap Yes to the EULA agreement, then click Run and choose Exit after the tool completes the repair process.
Action 3: Check Internet Connectivity
Try accessing secure websites outside of QuickBooks Desktop, like your bank’s sign-in page, and see if you can carry out this operation easily. If the pages are inaccessible, you need to contact an IT expert.
If this solution doesn’t fix QuickBooks update error 12029, move to solution 2.
Solution 2: Modify Internet Explorer Settings
Improper Internet Explorer settings might sometimes lead to problems while downloading updates. You can try modifying the Internet Explorer settings to prevent update problems.
- Close QuickBooks Desktop and launch Internet Explorer.

- Choose Tools and then Internet Options.
Note: Press the keyboard’s Alt key if you can’t find Tools. - Go to the Security tab, click the Globe icon, and ensure the security level is no higher than Medium-High.
- Visit the Connections tab, select Never Dial a Connection if you don’t use the dial-up node (DUN) on the system, or choose the correct ISP if you do.
- Click OK and hit LAN Settings, then confirm that the Automatically Detect Settings option is selected.
- Review that the Use a Proxy Server checkbox is clear, and if you’ve chosen to Use a Proxy Server, document the complete address and port.
- If the port is other than port 80, don’t unmark the Use a Proxy Server option.
- If it is port 80, you can erase the checkbox for testing purposes.
- Click OK and move to the Advanced tab, then select Restore Advanced Settings.
- Find the Use TLS 1.2 option under the Settings menu and ensure that it is selected.
Note: Your current IE version may/ may not have these options - Click OK, close Internet Explorer, and restart your PC.
- Now, open QuickBooks Desktop and re-attempt the update.
Are you still unable to resolve the 12029 error in QuickBooks? Don’t worry; follow the next solution to edit the firewall settings.
Read Also : I am getting QuickBooks Error 12002
Solution 3: Configure Firewall and Antivirus App Settings
If the solutions above don’t work, check if antivirus or firewall restrictions are leading to QuickBooks error 12029 while running the updates. Follow the steps below to make sure that the firewall security settings are favorable for QB:
Action 1: Use QB File Doctor
Running one of the commonly used QB Tool Hub utilities, QuickBooks File Doctor, resolves data damage and network issues in QB. Follow the steps below to run the File Doctor tool:
- Open QuickBooks Tool Hub and choose Company File Issues, then select the QuickBooks File Doctor tool to initiate the repair.

- The tool may take up to a minute or two to open; let the tool open. When it does, choose your company file from the drop-down list. In case you can’t find the company file you want to scan, hit Browse and Search to search the file.
- Hit the Check your File and Network option, then click Continue.
- Enter your QB admin password and tap Next.
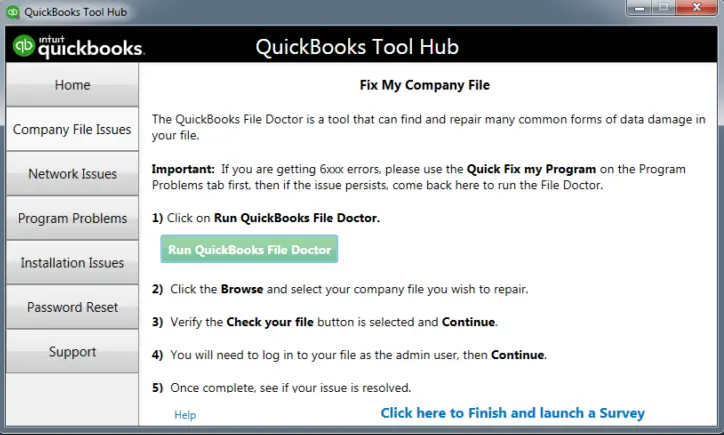
The file size determines how much time the File Doctor tool will take to scan the company file. Open your company file after the scan and check if the issue has been resolved. If not, move to the next solution below.
Action 2: Manual Firewall Configuration
If you can’t resolve QuickBooks error 12029 with the help of the QuickBooks File Doctor tool, you can try manually configuring the firewall to add QB port exceptions:
- Press the Windows Start menu and input “Windows Firewall” in the search box, and then open it.
- Select Advanced Settings, then right-click Inbound Rules.
- Tap New Rule and click Port, then hit Next.
- Ensure TCP is selected, and in the specific local ports field arises, enter the port number for your QB version from the list –
- QuickBooks Desktop 2020 and later: 8019, XXXXX.
- QuickBooks Desktop 2019: 8019, XXXXX.
- QuickBooks Desktop 2018: 8019, 56728, 55378-55382.
- QuickBooks Desktop 2017: 8019, 56727, 55373-55377.
- QuickBooks Desktop 2019 and later versions use dynamic ports. Follow the steps below to get the Dynamic Port Number with these steps:
- Open QuickBooks Database Server Manager from the Start menu and navigate to the Port Monitor tab.
- Find your QB version and note down the Port Number to add in the Firewall Port Exceptions list.
- Click Next after entering the Port Number and tap Allow the Connection.
- Select Next, mark all profiles, then hit Next again and create a new exception rule.
- Name the rule that is easy to identify, such as “QBPorts(year).” Select Finish, then repeat all the steps for Outbound Rules.
Similarly, add firewall port exceptions to QB Programs as follows:
- Click the Windows icon to access the Start menu and input Windows Firewall.
- Navigate to the Advanced Settings, then right-click the Inbound Rules and select New Rule.
- Choose Program, hit Next, and click This Program Path, then hit Browse.
- Choose one of the executable files mentioned in this list and hit Next.
- AutoBackupExe.exe
- Dbmlsync.exe
- DBManagerExe.exe
- FileManagement.exe
- FileMovementExe.exe
- IntuitSyncManager.exe
- QBCFMonitorService.exe
- QBDBMgr.exe
- QBDBMgrN.exe
- QBGDSPlugin.exe
- QBLaunch.exe
- QBServerUtilityMgr.exe
- QBW32.exe
- QuickBooksMessaging.exe
- Click the Allow the Connection option, then hit Next and mark all the profiles.
- Hit Next, then create and name a new rule and give it a name that is easy to identify, like”QBPorts(year).
It must be remembered that you have to follow the same steps for creating Outbound Rules.
Action 3: Remove Antivirus Restrictions
You can add QB to antivirus port exceptions to remove blockages and obstructions leading to QuickBooks error sending data 12029.
If you are using AVG Antivirus, you can follow these steps to add QuickBooks as an exception –
- Exit QuickBooks and open the AVG antivirus program, then double-click Resident Shield.
- Select Manage Exceptions and click Add Path, then navigate to this path – C:\Program Files\Intuit.
- Click OK and hit Save Changes, then rerun the QuickBooks update process.
For other antivirus software, follow their specific instructions to remove restrictions and give general permissions that QB needs. If the update issues persist, you can try running the update process in Windows safe mode in solution 4.
Action 4: Use Safe Mode with Networking
If nothing else works, run Windows in safe mode with networking and rerun the QB updates.
- Press the Windows logo key + I to access Settings. If this doesn’t work, click the Start button and choose Settings.
- Navigate to System and select Recovery, then select Restart Now from the Recovery Settings menu.
- Restart your PC restarting and go to the Choose an Option screen, then select Troubleshoot.
- Click Advanced options and select Startup Settings, then click Restart. You may have to enter your BitLocker recovery key.
- Once your PC restarts, a list of options will emerge. Choose option 4 or press F4 to start your PC in Safe Mode. Alternatively, opt for option 5 or press F5 for Safe Mode with Networking if internet access is required.
- Now, open QuickBooks and run the update process to check if the QuickBooks error 12029 on Windows 10 is removed.
Once QuickBooks is updated in safe mode, you can switch back to the normal mode in the following manner –
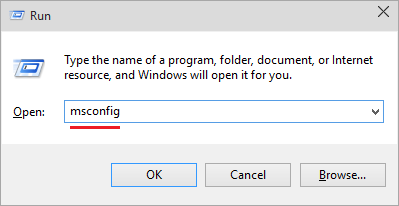
- Click Windows + R to access the Run tab and enter msconfig, then hit OK.

- Hit the Boot tab and erase the Safe Boot checkbox under Boot Options.
Now, restart your PC and try resetting the updates in the next solution if the update error code still occurs.
Read Also : Getting QuickBooks Error 15107
Solution 5: Manually Reset QB Desktop Updates
Manually resetting QuickBooks Desktop updates can help with QB error code 12029. For this, you can reboot your PC, keep it in single-user mode, and follow these steps :
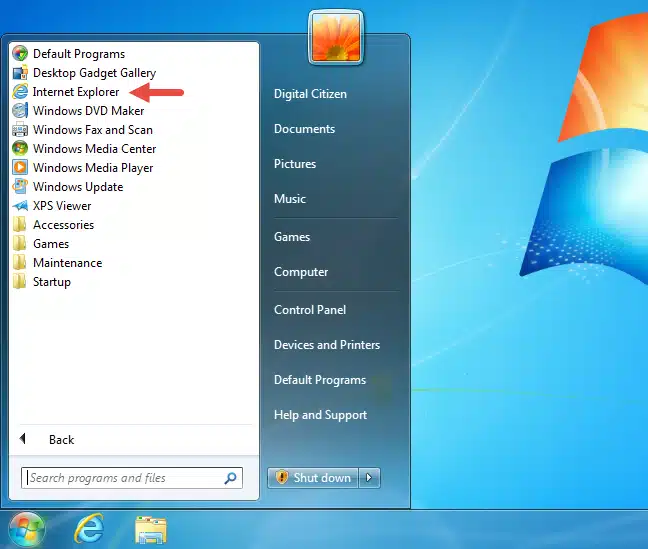
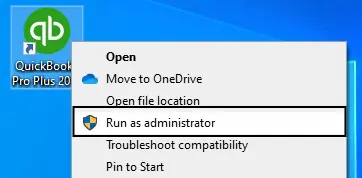
- Close company files and QB, then click the Windows Start menu.
- Open and right-click QB Desktop, and then hit Run as administrator.

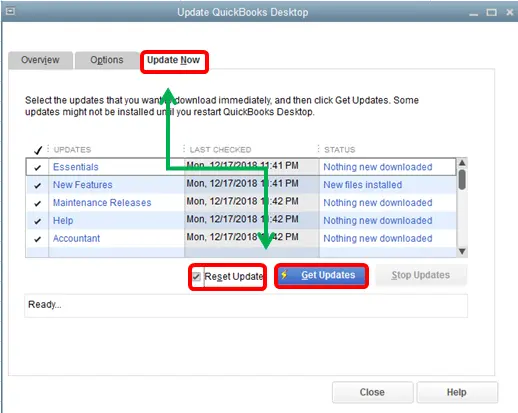
- Go to the Help menu on the No Company Open screen, then tap Update QuickBooks Desktop.
- Move to the Options tab, choose Mark All, and then click Save.
- Hit the Update Now tab, then check the Reset Update checkbox.

- Click Get Updates when you’re ready, then close and reopen QB after the update ends.
- Click Yes to install the updates and reboot your PC when the installation ends.
Resetting QB updates will help you fix the update error code. In case the error occurs, reinstall QuickBooks in the next solution.
Solution 6: Reinstall QB Desktop in Windows Selective Startup Mode
Use the Selective Startup mode to resolve the installation issues that might lead to update errors, like QuickBooks error 12029.
Before initiating the process, ensure you:
- Create a backup of your company file.
- Retain a copy of your QuickBooks Desktop product and license information.
Action 1: Switch to Selective Startup Mode
To prevent any interference from other applications, switch to Selective startup mode. If you find the steps challenging, seek assistance from your computer’s manufacturer or a Windows expert.
- Press Windows + R for the Run command, enter msconfig in the Run command box, then hit OK.
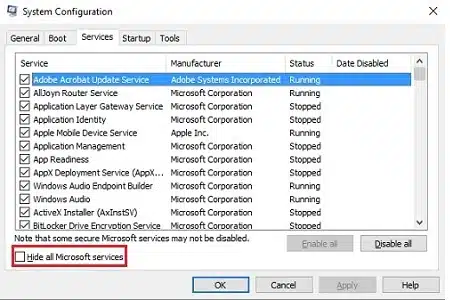
- Select Selective Startup and choose Load System Services in the General tab, then go to the Services tab.
- Choose Hide All Microsoft Services, click Disable All, and uncheck Hide All Microsoft Services.

- Select Windows Installer from the services list and click OK, then reboot the system from the System Configuration window.
Action 2: Reinstall QuickBooks Desktop
Once the Windows opens in the Selective Startup Mode, reinstall QuickBooks Desktop in the following manner –
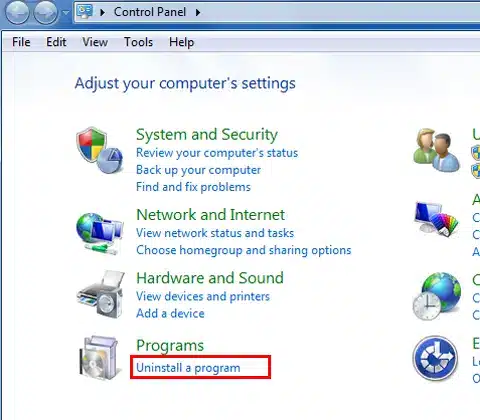
- Press the Windows Start button, enter Control Panel in the search bar, and then click to open it.
- Select Programs and Features or Uninstall a Program and choose QuickBooks.

- Select Uninstall/Change, Remove, hit Next, and wait for the uninstallation process to end.
- Next, download the QuickBooks.exe file from Intuit and save it on your PC, then open the file.
- Follow the given prompts and accept the license agreement, then hit Next and enter the Product and License Info as prompted.
- Hit Next and choose Express Install for the Installation Type option, then hit Next and click Install.
Action 3: Switch Back to Windows Normal Mode
Once you have reinstalled QuickBooks, you must switch back to Normal Mode by performing these steps –
- Press Windows + R for the Run command and type msconfig, then tap OK.
- In the General tab, select Normal Startup and click OK.
- Select Reboot on the System Configuration window, then open your PC and rerun QuickBooks.
Is the payroll update error 12029 on Windows 11 still troubling you? If yes, then you can repair your QB app in the next solution.
You may read also : How to resolve QuickBooks Error 12031
Solution 7 – Install the QB Desktop Security Certificate
If none of the above steps are able to resolve QB error code 12029, you can try installing the QuickBooks security certificate. The app can only download the updates from the server with a valid certificate, and you can install the certificate in the following manner –
- Right-click the QB Desktop icon and choose Properties, then go to the Shortcut tab.
- Select Open File Location, hit OK, and locate the EXE file.
- Right-click the EXE file and select Properties, then go to the Digital Signature tab.
- Select QuickBooks from the list, hit Details, and click View Certificate.
- Navigate to the General menu and click Install Certificate.
- Select Current User as the Store Location from the Certificate Import Wizard window.
- Lastly, hit Next and Finish, and once the import successful window appears, select OK.
Run the update process in QB, and if the issues persist, try correcting the date and time settings in the next solution.
Solution 8 – Modify the Date and Time Settings on the PC
Incorrect date and time settings can prevent you from running the updates successfully. The date and time can be correctly set by following these steps –
- Go to your desktop and right-click the system clock, then choose Adjust Date/Time.
- Select Change Date and Time and specify the current date and time, then hit OK twice.

- Lastly, reopen QuickBooks and run the update process to ensure that the update error is fixed.

Bottom Line
The solutions mentioned in this guide would have helped you rectify QuickBooks Error 12029 with ease. However, if the process seems too complicated to undertake or you are stuck at any step, you can reach out to our Proadvisor solutions support team at 1.855.888.3080 to get professional help.
FAQs
What is QuickBooks error 12029?
QuickBooks Error 12029 is a network timeout error and a common part of the 12XXX error series, which can occur while downloading QuickBooks and payroll updates. The error can occur when QuickBooks is unable to connect to the internet and can make the update process unsuccessful.
What are the main causes of QuickBooks Desktop error 12029?
QuickBooks error 12029 on Windows 10 can occur due to the following reasons –
1. Internet connection issues.
2. Incorrect or misconfigured browser settings.
3. Windows firewall or antivirus obstructions.
4. An incorrect or outdated QuickBooks security certificate.
Which QB and Windows OS encounter QuickBooks error 12029?
The QB error 12029 may arise in the following QB versions:
1. Discontinued QuickBooks versions.
2. QB Desktop Pro 2020 on Windows 8.
3. 64-bit PC.
How do I fix the QuickBooks error 12029?
The following solutions can help resolve the QB error 12029:
1. Set IE as the default browser for QuickBooks
2. Utilize the TLS 1.2 tool from the QuickBooks Tool Hub.
3. Verify internet connectivity and reset internet settings.
4. Undertake firewall configurations
5. Use Safe Mode with Networking to run the updates.
6. Manually reset QB updates.
7. Switch to selective startup.
8. Repair QB.

Erica Watson is writing about accounting and bookkeeping for over 7+ years, making even the difficult technical topics easy to understand. She is skilled at creating content about popular accounting and tax softwares such as QuickBooks, Sage, Xero, Quicken, etc. Erica’s knowledge of such softwares allows her to create articles and guides that are both informative and easy to follow. Her writing builds trust with readers, thanks to her ability to explain things clearly while showing a real understanding of the industry.