QuickBooks is a widely used accounting software among small and medium-sized businesses. It provides various tools and features to make accounting easier for its users. You need to import your bank transaction in QuickBooks to manage your accounts and create important reports. You can also import more than 90 days of bank transactions in QuickBooks Online. Through this article, we will explain to you the detailed process to import bank transactions that are more than three months old to QuickBooks.
“If you face any issues while trying to import old bank transactions in QuickBooks and you need assistance from an expert, then contact ProAdvisor Solutions’ Online Support at 1.855.888.3080”
You may also see: QuickBooks Desktop 2020
Table of Contents
Why to Import Bank Transaction into QuickBooks more than 90 Days?
QuickBooks Online can connect most of the prominent banks and financial institutions to download the transactions directly to QuickBooks. When the user connects their bank account to QuickBooks for the first time, then transactions from last 90 days gets automatically downloaded to QuickBooks. Companies prepare crucial business reports quarterly and annually. Data from previous years is required to analyse the growth and compare the changes. Annual data is also required for tax purposes; thus, it gets important to import bank transactions into QuickBooks more than 90 days. Importing bank transactions prove to be very helpful as manually entering all the data will take a lot of effort and time. You can easily bring bank transactions into QuickBooks Online if your bank provides the option to download the transactions in specific formats. The applicable formats are as follows:
- QFX file
- QBO file
- CSV (comma-separated value) file
- OFX file
If these files are less than 350 Kb in size, then they can be downloaded directly to QuickBooks. You can select a smaller date range to reduce the file size. It is suggested to use a business account to connect to QuickBooks for convenient accounting and taxation purposes.
Points to Remember before you Import more than 3 Months of Transaction in QuickBooks
There are various points that you should keep in mind before you try to import more than 3 months of transactions in QuickBooks. These have been mentioned below for you:
- The file size should be less than 300 Kb.
- The files should be in CSV, QFX, QBO, OFX formats as these are the only
supported file formats in QuickBooks. - If a transaction contains more than 11 digits, then you would need to
enter it manually. - The Company file should not contain any special characters in its name.
Once you have ensured that all the above requirements have been fulfilled, you can move on to import your transaction in QuickBooks.
How to Import Transactions of Last 6 Months in QuickBooks Online
If you are wondering how to import transactions of last 6 months in QuickBooks Online, then we have provided the detailed steps for that. You should have your Online banking User Id and password to get access to your account. Follow the steps listed below to import transactions in QuickBooks.
Step -1: Finding your Bank Account
Visit QuickBooks Online and then follow the steps as mentioned below:
- Go to the ‘Transactions’ menu on the Home Page.
- Click on the ‘Banking’ section.
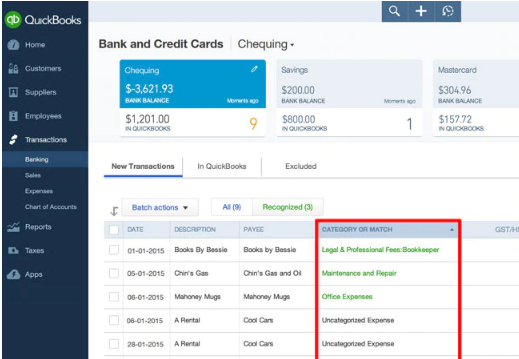
- Search your bank’s name and then select it from the list of results.
You do not need to worry if you could not find your bank’s name through search or in the list. You would still be able to import your transactions to QuickBooks through the CSV file. We have dealt with its detailed procedure later in the article.
Step -2: Login to your Bank Account
After you select your bank, a new page will open up. You need to enter your login credentials on this page to get access to your account. It may take a while for QuickBooks to connect to your bank account depending on the speed of your internet connection and the number of accounts that you have.
Step -3: Selecting the Bank Account
QuickBooks Online Account selection window will appear before you select all your accounts in the bank that you have selected above. You should mark all the accounts that you want to connect to QuickBooks. If you have not set up the account yet in QuickBooks, then you need to add it first from the ‘Add Account’ option. You would need to enter the following details to set it up:
- Account type such as a Bank account or Credit Card account.
- Detail type to furnish more information about the account.
- Assign the name of Account.
- Description.
After entering all these details, click on the ‘Save and Close’ button to save the account that you have set up.
Step -4: Downloading the CSV File
After connecting your account, the transactions of last 90 days get downloaded automatically. To import more than 90 days of bank transactions in QuickBooks Online, you need to download the CSV file from the bank’s website. You need to select the date range for which you want to import. Some banks also provide CSV file through the email, which can be downloaded and used.
Step – 5: Upload Bank Transaction CSV File More than 90 Days
Once you have the CSV file downloaded, you can easily upload bank transaction CSV file of more than 90 days. The stepwise guide has been provided below for you:
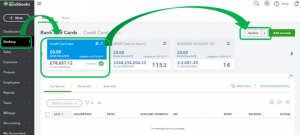
- Reach your QuickBooks Online and then go to its ‘Banking’ section.
- Click on the ‘Update’ option and then select ‘File Upload’ from the drop-down menu that appears.
- You can also opt for ‘Upload Transactions
Manually’ if no accounts are connected. - Click on the ‘Browse’ button in the new window that appears to find the file for import.
- Select the file from the location where you had saved it after the
download. - Click on the ‘Next’ button and then open the QuickBooks Account drop-down list.
- You need to select the account where the transactions are to be added.
- There is an ‘Add New Account’ option here too, if you have not connected any account yet.
- Select the required column from the CSV file to import in
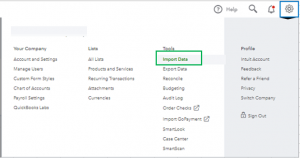
QuickBooks Online. - Go to the Import Data page and then click on the ‘Gear’ icon in it.
- Reach the ‘Tools’ tab and click on the ‘Import Data’ option.
- Select your bank from the list and then click on the ‘Next’ button.
- The process to import will get completed when you click on the ‘Let’s Go’ button.
You may also read: QuickBooks Printing Problems with Invoices
Through this article, we discussed the detailed process to import more than 90 days of bank transactions in QuickBooks Online. You should be able to import transactions that are more than 3 months old easily through the above-mentioned steps. If you are still struggling and need help from an expert to resolve the error, then contact ProAdvisor Solutions’ Online Customer Support at 1.855.888.3080.

Erica Watson is writing about accounting and bookkeeping for over 7+ years, making even the difficult technical topics easy to understand. She is skilled at creating content about popular accounting and tax softwares such as QuickBooks, Sage, Xero, Quicken, etc. Erica’s knowledge of such softwares allows her to create articles and guides that are both informative and easy to follow. Her writing builds trust with readers, thanks to her ability to explain things clearly while showing a real understanding of the industry.