Most business owners prefer QuickBooks over any other accounting platform because it can host company data so multiple users can work on it simultaneously. This helps collaborate, improves productivity, and instantly boosts business performance. However, hurdles exist everywhere, and QuickBooks is no exception. In QuickBooks, you can face several errors during different operations; one such operation is hosting the company file, and the error restricting hosting is QuickBooks error H505.
Error H505 is one of several H-series errors you might get in QuickBooks, severely impacting multi-user access. With the appearance of error H505 in QuickBooks, enabling the multi-user mode becomes impossible. This comprehensive guide will first discover the causes of this dreaded error and solutions to fix it with the least effort possible.
“Troubleshooting For Error H505 Requires Good Hands-on Technical knowledge. However, If you don’t possess enough technical skills, We recommend contacting Proadvisor solutions support number at +1.855.888.3080 and Letting the experts Identify and Resolve it swiftly ”
Table of Contents
What is QuickBooks Error H505
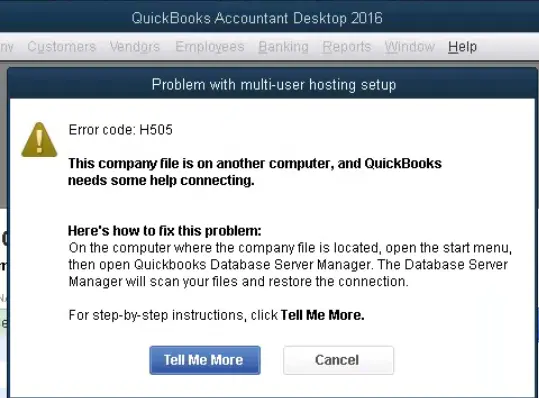
The QuickBooks H505 error is a perplexing technical issue when accessing the company file. When the error occurs, you may see an error message on your screen: “You are trying to work with a company file that is located on another computer, but that computer needs additional installation and setup (H505).” Furthermore, the error message also prompts users to verify that QuickBooks is set up to host multi-user access.
H-series errors are standard in QuickBooks and can occur whenever a user tries to establish a multi-user connection. Workstations face problems connecting to the server (the computer hosting the company file), which causes these errors to arise. QuickBooks error Code H505 displays on the user’s computer when connecting it to the one hosting the company file. Technical glitches in the network are the primary causes of these errors.
Although QuickBooks allows multi-user access, issues can arise while establishing a connection between the two host servers and the workstation, which may result in an H505 error in QuickBooks. These issues can arise for multiple reasons, which are essential to know so that appropriate troubleshooting can be applied.
Reasons for Getting QuickBooks Error Code H505
H505 QuickBooks can take place due to several reasons described in the below-given steps:
- When the network data (.ND) is damaged, it can prevent QuickBooks from accessing the server.
- If the QuickBooks Database Server Manager is turned off, such errors might emerge.
- Sometimes, QuickBooks fails to communicate with the company file located on the server due to incorrect hosting configuration settings.
- This problem can occur when you are unable to obtain the IP address of the Host computer.
- Wrong DNS settings are also apparent reasons behind the error.
- Restrictive Firewall settings are preventing QuickBooks from accessing the server.
- Multiple workstations acting as the host server can cause issues, leading to errors.
- If the server is unreachable or down, it can lead to an error.
- The services required by QuickBooks to establish a connection between server and workstations like QuickBooks DBXX might not work, causing H-series errors to pop up.
- When users haven’t updated their QuickBooks Desktop application.
- Users will face hosting errors if the system files are damaged or corrupted.
When you detect one or more of these reasons in your system, you must implement troubleshooting immediately to resolve the problem. However, before you do, let’s confirm the presence of QuickBooks error code H505 with the evident signs.
You may also see: How to Resolve the QuickBooks Error 1920
Essentials to Remember Before Resolution
Take a look at the following crucial points before proceeding with the resolution of the QB H505 error:
- Ensure appropriate installation of the QB application on the system.
- The full QB Desktop version should have only database or license manager hosting.
- Do install the QB application on the server. Otherwise, the multi-user mode won’t work.
- Download QB from the official website to avoid damage, virus, or corruption in the server system.
- Enter your QuickBooks application with administrator details while you practice fixing QuickBooks error H505.
- Prevent data loss by forming a backup of your files beforehand.
- Make sure you download the latest tax tables and payroll app updates.
- Use the tools by QB Tool Hub, including Quick Fix My Program, to repair performance issues.
- Ensure your QuickBooks Database Server Manager is active.
- Look at the firewall restrictions and lift them before resolving error code H505 QuickBooks.
Now, you can proceed with the QuickBooks H505 Error fix.
Recommended to read: How to fix QuickBooks Abort Error
How To Erase QuickBooks Error Code H505 From QB?
If you’re wondering how to fix QuickBooks error code H505, follow the steps. Follow the below-described solutions to get rid of it:
Solution 1: Fix the Damaged .ND File
Network Data (.ND) is a configuration file in the same folder as the QuickBooks company file. QuickBooks uses this file to access the file located on the network. To rename.ND file, follow the below-given steps:
- Go to the folder containing the QuickBooks company file.
- Next, locate and right-click the network data file with an extension .ND.
- Select Rename and add .OLD at the end of the file name.
Check if the QuickBooks H505 error message is resolved. If not, try the next troubleshooting solution.
Solution 2: Fix the firewall using QuickBooks Database Server Manager
QuickBooks Database Server Manager helps QuickBooks to communicate with the network server. When the service is disabled, you may receive error H505 in QuickBooks Desktop when opening the company file. To resolve the error:
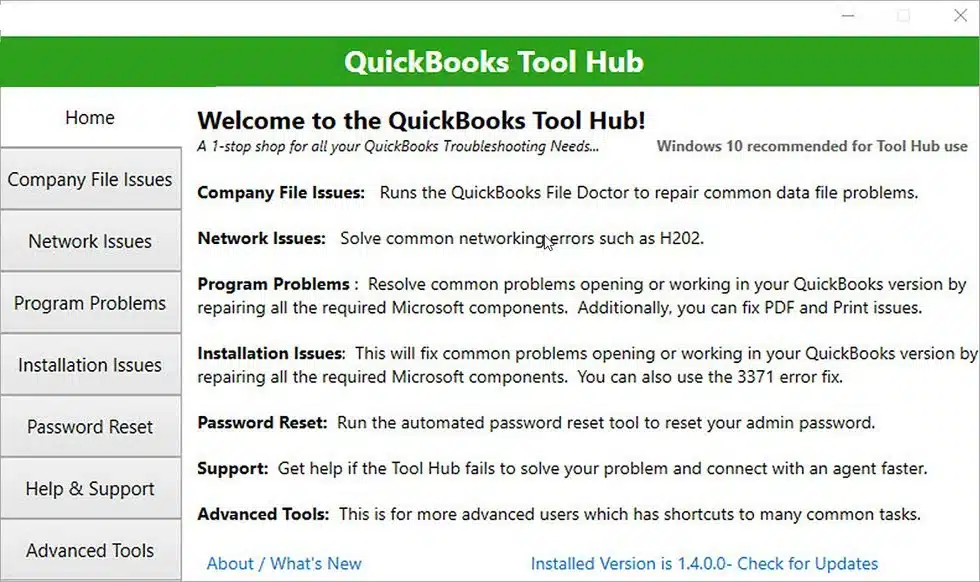
- Download QuickBooks Tool Hub from a legitimate source.
- Save the downloaded file to a suitable location.
- Next, click on the downloaded QuickBooksToolHub.exe file.
- Follow the on-screen instructions to install the tool.
- Once the installation is done, open QuickBooks Tool Hub.

- Now, from within the tool, select Network Issues and select QuickBooks Database Server Manager.
- Use the Browse option to select the company file folder and click Start Scan.
- It will make QuickBooks Database Server Manager repair your Firewall and provide efficient permissions to access all workstations.
- Hit Close once you are done.
If the Intuit error message H505 appears again on your screen, move to the next procedure.
You may also read: How to Fix QuickBooks Error 163
Solution 3: Check the Host multi-user mode settings (if it is on or off)
Host multi-user mode lets QuickBooks Host the Company file for multiple users. However, If it is on in any workstation, So that may cause the Error H505 QuickBooks 2023 and stop hosting mode in the workstation steps mentioned below:
For workstations
- Open the QuickBooks Program, on Which workstation you’re encountering, QuickBooks Error code H505, H202, H101, H303.
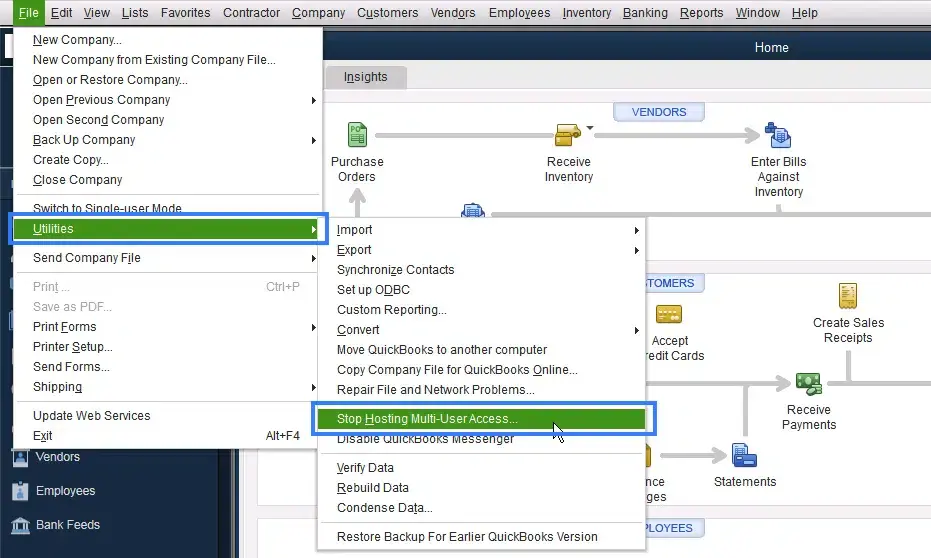
- Now, in the QuickBooks Program’s Home window, Click “File,” then drag the mouse over the “Utilities.”
- If you notice “Stop hosting multi-user access.” click on the button to stop the multi-user access for that workstation.

- Restart the computer and use multi-user mode.
For server computer
- Open QuickBooks as usual, but don’t open the company file.
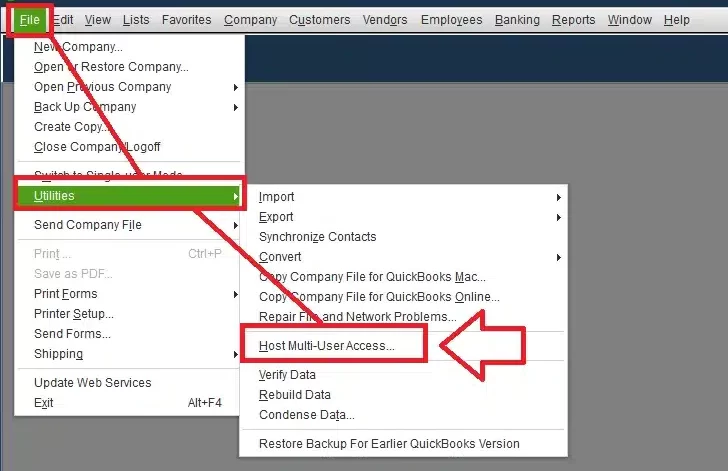
- Click “File” and drag the mouse to the Utility option.
- If you see the Option “Host multi-user access,” click on it. But if you found “Stop multi-user access,” then Don’t click on the button. See if QuickBooks enterprise error H505 is gone.

Solution 4: Edit the Windows host file
Implement this action as follows to get rid of error H505 in QuickBooks Desktop:
- Access the Run window by pressing the Windows and R keys together.
- Type cmd and press Enter to get to the command prompt window.
- Further, type the command ipconfig/all and press Enter.
- Now, note the Hostname and IP address somewhere accessible. Repeat these steps for the system with the multi-user setup.
Now, let’s proceed to edit the Windows host file as follows:
- Close QuickBooks and hit the Start menu.
- Go to This PC or My Computer and follow the paths: “C:\Windows \ System32 \ Drivers\ Etc OR C:\Windows \ Syswow64\ Drivers\Etc.”
- If the Windows folder isn’t available on the PC, you can try finding it by unhiding the hidden folders as follows:
- Tap the View tab and click the hidden items option to see the folders.
- Now, click the host file and choose to open it through a notepad.
- Next, enter the IP address and computer name. Use the Tab key instead of the space bar while entering these details and putting a space between the information.
- Save all these changes; you can now use QB in multi-user mode.
Solution 5: Verify the Services on the Server
See if QBCFMonitorService and QBDBXX services are working correctly as follows:
- Launch the Run window from either the Start menu or through the shortcut ‘Windows + R’ keys.
- Type and enter the command services.msc here.
- Now, double-click QuickBooksDBXX from the list, and for the Startup type, choose Automatic.
- Next, check if the status is Running or Started.
- Hit Start and then the Recovery tab.
- Also, select restarting the services from the drop-down menu for First, Second, and Subsequent failure.
- Hit the Apply tab and OK to confirm the changes.
- End everything and now repeat them for QBCFMonitor services.
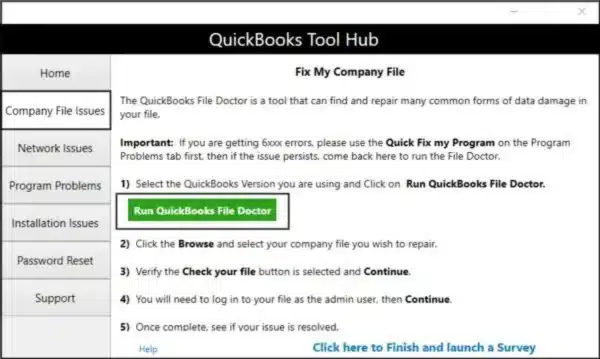
Solution 6: Run the QuickBooks File Doctor Tool
QuickBooks File Doctor is a utility available in the QB tool hub that fixes network and company file issues. It can be implemented as follows:
- Firstly, you need to initiate the download and installation of the QuickBooks Tool Hub on your system. The steps for the same are available in Solution 2.
- Once this procedure is over and you successfully set up the tool hub, visit the Company file issues section.
- Here, select the QuickBooks File Doctor option.

- If the first option doesn’t work, locate the company file automatically or manually. Then, browse the desired company file in a second way.
- Now, click and let the tool detect and fix errors. It might take some time.
- Once done, you can close and reboot your system to check the error.
You may also read: How to resolve QuickBooks Error 6176
Solution 7: Update the Outdated QuickBooks Desktop
Undertake the following steps to update your out-of-date QuickBooks Desktop application and resolve error H505 QuickBooks:
- Launch QuickBooks Desktop and navigate to the Help menu. Here, click About QuickBooks to check your current version.
- Opt for the Update QuickBooks Desktop option.
- Tap the Update Now option.
- Mark the New Features, Maintenance Releases, and Reset Updates checkboxes.
- Hit the Get Update option.
- Reboot QuickBooks, and if you’re asked to install updates, tap the Install Now option.
- After installing the updates, reboot your computer and retry accessing the company file.
Now, see if you’re still seeing QB error H505. If yes, proceed with other methods.
Solution 8: Create a New Company File Folder
Change your company file location by creating a new folder. This method is beneficial when your QuickBooks company file folder is corrupted and causing QuickBooks H505 error:
- Go to the company file folder on your server and copy your company file (Ctrl + C or right-click > Copy).
- Form a new folder on your desktop by right-tapping and clicking New > Folder.
- Further, paste (Ctrl + V) or right-click and select Paste the company file into the new folder you created.
- Now, right-click this folder and opt for the Properties option.
- Hit the Advanced Sharing option under the Share section to resolve error H505 in QuickBooks desktop.
- Tickmark the Share this Folder checkbox and hit the Permissions option.
- Ensure to click the Full Control box for Everyone group. Then, click Apply and OK.
- Again, tap Apply and OK based on the prompts you receive on the screen.
- Now, try accessing your company file from the workstations and check if the QuickBooks enterprise error H505 persists.
Solution 9: Ping the Server from the Workstation
Verify the server and workstation connection by pinging your server from the workstation. Do it from each workstation getting QuickBooks H505 error.
Initiate this solution by turning Network Discovery ON on your server computer and workstations, getting QB error code H505:
- Launch the Windows Start menu on both your server and workstations.
- Type network in the search field and launch the Network and Sharing Center.
- Pick the Change Advanced Sharing Settings option.
- Be sure to turn on network discovery by choosing it in the Network Discovery and File and Printer sharing sections.
Now, learn your server name from the server to eliminate the symptoms of QuickBooks error H505:
- Click the Windows icon to open the Start menu on the server computer.
- Type Run in the search field to launch the Run window.
- Write CMD in the run box and press Enter.
- Type ipconfig /all and hit Enter in the CMD window.
- Look for the Hostname in the Windows IP configuration tab. The server name will be available on the right side.
- Note the hostname and copy it to Notepad or Word doc for prompt access.
Now, return to the workstation to test the server. As these steps get complex, you may require professional help. Consider experts who know how to fix QuickBooks error code H505:
- Click the Windows Start menu from the workstation.
- Type Run in the search field and enter to launch the Run window.
- Further, type CMD in the run window and hit Enter.
- Type “ping [your server name],” without the brackets, and click Enter.
- Follow these steps for every workstation requiring QuickBooks error H505 fix.
Your server works fine if you get a response for each packet without losses. However, stop and consult a professional if you encounter packet loss or a sluggish reply.
Solution 10: Configure Security and Firewall Settings for QB Desktop
Restrictive firewall settings must be configured to eliminate H505 QuickBooks. Here are the steps to add a firewall port exception to QB:
- Hit the Windows icon to access the Start menu and search for Windows Firewall here.

- Open the Windows Firewall window and choose Advanced Settings.
- Right-click Inbound Rules (Follow the same steps except change Inbound to Outbound Rules once done). Now, click New Rule.
- Tap Port, followed by Next.
- Make sure you choose TCP while rectifying the H505 QuickBooks desktop error.
- Now, mention the specific ports required for your QB year version in the Specific Local Ports field:
- QuickBooks Desktop 2020 and later have 8019, XXXXX ports.
- QuickBooks Desktop 2019 contains 8019, XXXXX ports.
- QuickBooks Desktop 2018 follows 8019, 56728, 55378-55382 ports.
- QuickBooks Desktop 2017 has 8019, 56727, 55373-55377 ports.
- Click Next once you enter the Port number.
- Hit the Allow the Connection option and tap Next.
- Mark all the profiles if the prompt appears and tap Next.
- Form a rule and assign a name like “QBPorts(year).”

Repeat these steps for Outbound Rules, then switch to multi-user mode. See if you still get the H505 error QuickBooks:
Further, create Windows firewall exceptions for QuickBooks Desktop on your system:
- Tap the Start menu icon, type Windows Firewall, and open the Firewall window.
- Opt for Advanced Settings, followed by right-tapping Inbound Rules.
- Click New Rule.
- Pick Program, then Next.
- Select the This Program Path option and click Browse.
- Locate the executable field required to resolve error code H505 QuickBooks 2024 from the table below. Hit Next.
- Tap Allow the Connection > Next.
- Verify all the profiles are marked when prompted, then tap Next.
- Form a rule and name something as follows: “QBFirewallException(name.exe).”
- Repeat all the steps for Outbound Rules.
| Executable files (.exe) | Location |
| OnlineBackup.exe | C:\Program Files\QuickBooks Online Backup |
| QBCFMonitorService.exe | C:\Program Files\Common Files\Intuit\QuickBooks |
| DBManagerExe.exe | C:\Program Files\Intuit\QUICKBOOKS YEAR |
| FileManagement.exe | C:\Program Files\Common Files\Intuit\QuickBooks\QBUpdate |
| QBUpdate.exe | C:\Program Files\Intuit\QUICKBOOKS YEAR |
| QuickBooksMessaging.exe | C:\Program Files\Intuit\QUICKBOOKS YEAR |
| AutoBackupExe.exe | C:\Program Files\Intuit\QUICKBOOKS YEAR |
| QBDBMgrN.exe | C:\Program Files\Intuit\QUICKBOOKS YEAR |
| QBServerUtilityMgr.exe | C:\Program Files\Common Files\Intuit\QuickBooks |
| Dbmlsync.exe | C:\Program Files\Intuit\QUICKBOOKS YEAR |
| FileMovementExe.exe | C:\Program Files\Intuit\QUICKBOOKS YEAR |
| IntuitSyncManager.exe | C:\Program Files\Common Files\Intuit\Sync |
| QBW32.exe | C:\Program Files\Intuit\QUICKBOOKS YEAR |
Solution 11: Ensure Accurate Permission for Folders
Restrict unauthorized access to your critical QuickBooks data by ensuring all folders have sufficient permissions. Users should offer permissions only to the needed groups and limit it to keep as much as necessary. Regularly reviewing and updating folder permissions ensures seamless functioning and prevents error code H505 QuickBooks 2023.
Here are the steps taken to set up folder permissions in QuickBooks:
- Launch the folder containing your company file from the File menu, followed by File Explorer.
- When the company file folder appears, right-click it and choose Properties.
- Hit the Security tab, then Advanced.
- Select QBDataServiceUserXX and set the following settings to Allowed:
- Traverse Folder/Execute File
- Read Extended Attributes
- Create Files/Write Data
- Write Attributes
- Create Folders/Append Data
- List Folder/Read Data
- Read Permissions
- Write Extended Attributes
- Read Attributes
- Select Properties and go to the Security tab. Opt to edit QBDataServiceUserXX for H505 in QuickBooks desktop.
- Tap the Add option, type the user or group name you wish to add, and offer access to the folder.
- Check all the names and ensure everything’s correct.
- Pick the user or group from the list after adding them.
- Choose the permissions you wish to permit to the user or group in the Permissions for Users or Groups section. For instance, click Full Control to give them complete control and access.
- Hit Apply and OK to validate the changes.
Now, you can check if the error code H505 QuickBooks 2024 persists.
Further, check the folder permissions as follows:
- Hit the Start icon to open this menu and click File Explorer.
- Look for the folder you wish to alter the permissions for and right-click it:
- C:\Program Data\Intuit\Entitlement Client\v8
- C:\Program Data\COMMON FILES\INTUIT\QUICKBOOKS
- C:\Users\Public\Public Documents\Intuit\QuickBooks\Sample Company Files\QuickBooks Enterprise Solutions X.0 (X = version) or C:\Users\Public\Public Documents\Intuit\QuickBooks\Sample Company Files\QuickBooks 20XX (XX = year)
- C:\Program Data\Intuit\Entitlement Client\v6.0
- C:\Users\Public\Public Documents\Intuit\QuickBooks\Company Files
- C:\Program Data\Intuit\Entitlement Client\v3
- C:\Program Data\Intuit\QuickBooks Enterprise Solutions X.0 (X = version) or C:\Program Data\Intuit\QuickBooks 20XX (XX = year)
- C:\Program Data\COMMON FILES\INTUIT
- C:\Program Data\Intuit\Entitlement Client\v5
- C:\Users\Public\Public Documents\Intuit\QuickBooks\FAMXX (XX = year)
- C:\Program Data\Intuit\Entitlement Client
Your QuickBooks version states whether you have all these folders or not. Now, it’s time to take the following actions and rectify the QuickBooks H505 error message:
- Click Properties after right-clicking these folders.
- Select Everyone in the Security section. (Tap Add, type Everyone, and click OK if Everyone is not an option.)
- Click Full Control, followed by Apply and OK, and check the presence of QuickBooks error H505 on the server.
Solution 12: Repair the QuickBooks Application
Now, it’s time to fix problems with your QB app that are causing the H505 QuickBooks error. Follow these steps for repair:
- Opt for Control Panel from the Start menu or Run window.
- Open it and opt for the Programs and Features tab.
- Select Uninstall a program and reach the list of apps currently installed on the device.
- Locate and pick QuickBooks from the list.
- Tap the Repair option and execute the prompts allowing you to do so.
- Finish the procedure, reboot your device, and see whether the QuickBooks H505 error fix worked.
Do you need any help in fixing error H505?
Now that you are here after reading this full post, you would have fixed the error code H505 in QuickBooks. However, if you need help from qualified QuickBooks experts in the error resolution, call on Proadvisor solutions number 1.855.888.3080. When connected, you can get hassle-free assistance in troubleshooting QuickBooks error H505.
FAQ’s
How do I Fix QuickBooks Desktop Error H505?
The Best way to fix Error H505 in QuickBooks is to Run the QuickBooks Database server manager on the server. This will automatically configure the Server.
What are the reasons for the Error H505 in QuickBooks?
The Reasons for Error H505 can be various, but the most prevalent reason is more than one computer acting as a server.

Peter is a Certified Public Accountant (CPA) with a strong background in public accounting and accounting technology. After starting his career as an audit senior, he worked with organizations across various industries and gained hands-on experience with complex accounting standards. At ProAdvisor Solutions, Peter helps clients navigate new accounting requirements. His goal is to simplify processes, improve accuracy, and boost confidence in finance reporting.