QuickBooks error 1920 is a challenging bug causing trouble installing or updating the program. The error message indicates problems with QB Database Server Manager, an essential service for QB to run smoothly. If you’re troubled with this annoying snag and require complete information, this blog is your friendly assistant with all details regarding error 1920.
Error 1920 in QB occurs when you try to install or update the QuickBooks application. When the error occurs, it gives an error message on your screen that states, “Error 1920: Service QuickBooks Database Manager (QBCFMonitorService) failed to start.” The error can be cited when the QuickBooks Database Manager can’t access the hard drive on your Desktop to connect to your company file. In this post, we will discuss some common reasons behind the QuickBooks error 1920 and troubleshoot them using the most suitable solutions.
“Has QuickBooks Error 1920 made it troublesome to enjoy the latest updates or install QuickBooks on your device seamlessly? Let our Proadvisor solutions support team look into the issue by contacting them at the toll-free number +1.855.888.3080. They will offer immediate and effective resolution so you don’t get burdened.”
Table of Contents
What Does Error 1920 QuickBooks Mean?
Users may get “error 1920.service QuickBooks database manager failed to start” when trying to install or update their favorite accounting application (QuickBooks). When an otherwise active program starts throwing bugs and glitches like 1920, finding faults with it becomes critical. QB error 1920 is a consequence of the database server manager failing or finding it challenging to connect with the company file.
The error message associated with error 1920 may vary, but it usually indicates that the service failed to start or could not interact with the desktop. Difficulties in scanning or reading the hard drive with the installation files, a damaged, missing, or corrupt QBCF Monitor Service, and other reasons may prompt this error to emerge. Therefore, let’s understand these triggers in detail and consider the quick and effective fixes for smooth running.
What Are The Primary Reasons Behind The QuickBooks Error Code 1920?
QuickBooks error 1920 can be promoted due to several reasons described in the below-given list:
- When your computer’s operating system shows unusual behavior.
- Invalid registry entry of your window is also one of the apparent reasons behind the QB error message 1920 to appear.
- Malicious attack from virus or malware.
- Accidental deletion of the important system files or registry entry.
- Improper shutdown of the system due to an abrupt power cut or some other reasons.
- Error 1920 can come into sight due to improper installation or uninstallation of the QuickBooks software.
- When the user doesn’t possess admin-level rights to install or update QuickBooks Desktop on Windows, the error 1920.service QuickBooks database manager will arise.
- Damaged QuickBooks installation is another contributor to 1920 error QB.
- A user with a corrupt, damaged, or missing QuickBooks Company File Monitoring Service from the installation directory can experience error 1920.
- Improper installation of QuickBooks Database Server Manager can also result in this error.
- QuickBooks Database Server Manager may face conflicts when multiple services run in the background, leading to error 1920.
- Antivirus and firewall interferences may result in 1920 error QB desktop.
- The QB database server manager may face issues in starting or interacting due to misconfigured or conflicting Windows User Account Control settings.
- Database problems with QB company files, like incompatibility and corruption, may cause QB error 1920.
The triggers mentioned above result in unwanted consequences that delay a user’s productive functioning. We have mentioned these as signs/ symptoms/indications of QuickBooks error code 1920 in the section below.
Signs/ Symptoms/ Indications of QB Error 1920
QuickBooks error 1920 may come into view through various signs and symptoms. Here are some typical signs you may encounter when experiencing Error 1920 QB:
Error message
You may receive an error message that explicitly mentions QuickBooks error message 1920. For example, it might signal a failed QuickBooks Database Manager service and indicate problems interacting with the company file.
Installation failure
The installation process may abruptly halt when installing QuickBooks, and you may receive an error message related to error 1920. It happened because the service required for the installation was unable to start.
QuickBooks Database Manager service issues
You may notice problems with the QuickBooks Database Manager service. It may not start or stop unexpectedly, or you may get error messages like 1920 when trying to start the service manually.
Sluggish performance
If the QuickBooks Database Manager service is experiencing issues, it can impact the overall performance of QuickBooks. For example, you may notice slow response times, freezing, or system crashes while using QuickBooks.
Inability to access company files
QuickBooks error 1920 can obstruct you from accessing your company files. For example, when attempting to open a company file, you may experience an error signaling the failure of QB Database Server Manager in smooth running.
Interference with other services or software
The error 1920 may cause conflicts with other services or software on your computer, leading to issues beyond QuickBooks. For instance, you may experience troubles with other applications, network connectivity, or system stability.
If you face any of these signs, it’s vital to promptly diagnose and resolve QuickBooks error 1920. Proper QB functioning is mandatory to avoid any data-related complications.
You may also see: How to Resolve the QuickBooks Error 163
Different Scenarios When QB Error 1920 Can Arise and Resolutions
The different cases when users can encounter QuickBooks error 1920 are explained below. You can learn how to fix QuickBooks error 1920 by understanding your scenario and implementing resolutions accordingly:
Circumstance 1: First Time Installing QuickBooks Application
If you’re a first-time installer of the QuickBooks program and get QuickBooks error 1920, you must add a new Windows user with sufficient permissions to change QB Desktop.
Set up the program and change settings in Windows by creating a Windows user with admin rights as follows:
First Step: Form a Local User Account
- Press the Start menu button and head to Settings.
- Click Accounts, then choose the Family & Other Users button.
- The Add Account button will be available next to Add another user. Tap it.
- Resolve QuickBooks error 1920 by clicking “I don’t have this person’s sign-in information” and then “Add a user without a Microsoft account,” available on the subsequent page.
- Create a new Windows user to install QuickBooks by adding a unique username, password, hints, security questions, etc. Hit Next and end the creation process.
Second Step: Modify a Local User Account to an Administrator Account
- Again, follow the same path of the Start menu, Settings, and Accounts.
- Pick the Account Owner’s name (the local account will be mentioned under the name) under the Family & Other Users section. Note: If you opt for an account that doesn’t have a Local account mentioned by the side or displays an email address instead, it means you’re giving Microsoft account permissions rather than a local account.
- Move to the Account Type section and hit the Administrator option.
- Click OK and log into the system with the admin account details.
Third Step: Offer Admin Access to QB Programs
- Shut down QB Desktop and access the Start menu by clicking the Windows icon.
- Search for Control Panel and open it, then click User Accounts.
- Know your QB Desktop version, then search for QBDataServiceUserXX accordingly.
- Pick the Change the Account Type option, then Administrator.
- Now, click Change Account Type and hit Apply to validate the changes.
- Do these steps for all QuickBooks Database Server Manager versions.
The QB Database Server Manager has received all permissions to run on the network.
Circumstance 2: While Attempting to Install or Update QuickBooks
When you keep getting QuickBooks error 1920 while installing a new QB version or attempting to update the current program, try the following solutions:
Step 1: Delete the QB Desktop Program
Follow the steps mentioned below to remove the QuickBooks program from your system:
- Hold the Windows and S keys together on the keyboard to launch the search window. Here, type and Enter Control Panel to open it.
- Pick the Programs and Features button in the Control panel window, followed by selecting the Uninstall a program option.
- When you see a complete list of programs currently saved in your system, locate the recent QuickBooks Desktop version.
- Tap the Uninstall/ Change button and follow the on-screen commands to finish the uninstallation process.
Step 2: Alter the Name of The Installation Folders
Undertake name change of installation folders to assist the program in considering new ones for relief from QB error 1920. Before that, note the following essentials for QB error 1920 resolution:
- Display hidden files and folders or locate files through Windows if the Application or Program Data folder is not visible.
- When you have other Intuit programs also installed on your device, you should only consider renaming or uninstalling your QB Desktop version folders from the C:\Program Data\Intuit Intuit folder.
Now, let’s consider the steps to rename the installation folders:
- Navigate to the QB Installation folders on your device through the following chart:
| Windows 10/8/7 | Windows Vista |
| 1. C:\Program Data\Intuit 2. C:\Program Files\Intuit 3. C:\Users[Username]\AppData\Local\Intuit 4. C:\Program Data\Common Files\Intuit 5. C:\Program Files\Common Files\Intuit | 1. C:\Program Data\Intuit 2. C:\Program Files\Common Files\Intuit 3. C:\Users\AppData\Local\Intuit 4. C:\Program Data\Common Files\Intuit 5. C:\Program Files\Intuit |
- Access the Run command by pressing the Windows and R keys together for 1920 resolution.
- Copy the location folder from this chart and paste it into the Run window, then hit Enter.
- When the folder opens, right-click it and hit Rename.
- Add .OLD to the QB Intuit folder name to alter the installation folders.
Step 3: Undertake QuickBooks Installation
Begin by preparing for QuickBooks installation to ensure QuickBooks error 1920 facilitates smoothly:
- The computer must meet the system’s needs for compatibility checks.
- Keep your QB Desktop version’s product and license information in your hand for seamless installation.
Now, take the following QuickBooks installation steps to remove error 1920 QB:
- Ensure you have the QuickBooks installation media or the downloaded installer file. You can download the installer package from the Intuit website if you don’t have it.
- Exit all other programs and applications running on your device.
- Insert the QuickBooks installation media into your CD/DVD drive or double-click the downloaded installer file.
- Keep responding to the on-screen prompts to start the installation process.
- Make sure you read and accept the license agreement to know the terms and conditions.
- Opt for the installation type of your preference, like Express or Custom. If you’re unsure, choose Express for a standard installation.
- Pick the installation location or use the default downloads folder suggested by the installer.
- Please select whether you want QuickBooks to show an icon on your desktop and/or allow it to update automatically.
- Enter your license and product information when requested. If you’re reinstalling QuickBooks, you may need to offer your license and product details again.
- Now, pick the type of installation you want, like a typical or network installation, based on your needs.
- Let the installation finish, and wait a few minutes if you have to.
- Once the installation is over, launch QuickBooks Desktop and execute the initial setup prompts to set up your company file or restore a backup.
Read Also : Why Intuit Data Protect Has Stopped Working
Circumstance 3: When You’re Trying To Update QB Database Server Manager On The Server
When you don’t have the QB program on the server but use QB Database Server Manager to share your file over the network, these steps will assist in removing QuickBooks Error 1920.
Step 1: Remove the Current QuickBooks Database Server Manager
The primary thing you must do to rectify QB error 1920 in such situations is as follows:
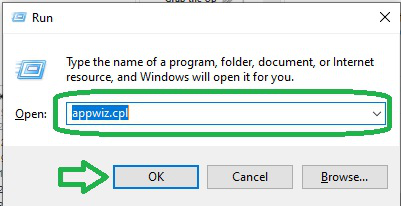
- Use your keyboard to press Windows and R keys and open the Run window on your screen.
- When the Run dialog box launches, type appwiz.cpl in the space and hit OK.
- Further, opt for the QuickBooks Database Server Manager.
- Now, pick the Uninstall/ Change option to delete the QB Database Server Manager from your device.
Step 2: Alter the Installation Folders Name
Take the following notes when you begin altering the name of your installation folders:
- Look for your files in Windows or display the hidden files and folders if the Application and Program Data folders are not visible.
- Undertake the uninstallation and removal of only the QuickBooks version in the Intuit folder on the path C:\Program Data\Intuit. It is when numerous Intuit products are saved on your device.
Now, let’s consider the resolutions for error 1920:
- Head to the installation folders available in the following chart:
| Windows 10/8/7 | Windows Vista |
| 1. C:\Program Data\Common Files\Intuit 2. C:\Program Files\Intuit 3. C:\Program Data\Intuit 4. C:\Program Files\Common Files\Intuit 5. C:\Users[Username]\AppData\Local\Intuit | 1. C:\Users\AppData\Local\Intuit 2. C:\Program Data\Intuit 3. C:\Program Files\Intuit 4. C:\Program Data\Common Files\Intuit 5. C:\Program Files\Common Files\Intuit |
- It would help if you tried accessing the Run command by holding Windows + R keys on your keyboard.
- Enter the folder location from this chart by copying and pasting it to the Run space.
- Right-tap the QB Intuit folders and select the Rename button.
- Modify the folder name by adding .OLD to the end.
Step 3: Attempt to Install QuickBooks Database Server Manager Again
The QuickBooks Database Server Manager is a part of the QuickBooks setup file, so you need not download it separately. Instead, download and update the QB program, and the Database Server Manager will update automatically.
Now, you need to take steps to install QB database server manager on the server device (the one hosting company files). Know that if you’re an accountant or someone with multiple QB Desktop versions on the network, you must begin with the oldest version, then end with the last one.
- Exit all the open programs on your device, including the QB app.
- Head to the install location and launch the install file Setup_QuickBooks.exe.
- Finish the instructions on the screen and know your product and license numbers too.
- When QB requests an install type, opt for Custom or Network Options, then hit the Next option. Ensure not to choose Express.
- Ensure to choose the most suitable option for your network setup, then click Next. QuickBooks Database Server Manager gets installed through both options. Your existing company data won’t be overwritten even if you already have QB Database Server Manager installed on your server system.
- Choose the option that says “I’ll be using QuickBooks Desktop on this computer, AND I’ll be storing our company file here so it can be shared over our network” when both QB Desktop and Database Server Manager are required on your server device.
- On the other hand, opt for the “I will NOT be using QuickBooks Desktop on this computer” option if having the Database Server Manager is your only requirement.
- End the process by executing the instructions on the screen. Once ready, you can click Install, and if Windows asks for permissions, grant them.
Ensure to give QBDataServiceUserXX complete permissions to access the folders. Further, undertake database server manager configuration as follows:
- Access the Windows Start menu, search for Services, then open the Services tab.
- Launch the QuickBooksDBXX service from this section.
- Navigate to the General tab and opt for the Service status section.
- If the Service status is set to Started or Running, ensure to Stop it.
- Next, click Automatic from the Startup Type tab.
- Further, move to Logon and pick the Local System Account option.
- Move to Recovery and pick the Restart this service option for the first failure, second failure, and subsequent failure.
- Return to the General tab and tap the Start option to restart QB Database Server Manager.
How To Troubleshoot QuickBooks Install Error 1920?
QuickBooks error 1920 can be resolved by suppressing the root causes behind the error. Follow the below-given solutions carefully to get the error removed.
Solution 1: Ensure That Your Windows Is Updated To The Latest Version
In the first place, check if the Windows is updated to the latest release. If not, follow the below-given steps:
- Remove the security software installed on your computer.
- Next, you need to turn off your Firewall if it is enabled.
- Terminate all the programs running in the background while troubleshooting the QuickBooks error 1920.
- If the application was working well with the security previously, you need to check if the security application is up to date or not.
- For more detailed instructions read Windows Update: FAQ.
When you are done, check if the QuickBooks database server manager failed error 1920 is fixed. If not, try the next procedure.
Solution 2: Rename Your QuickBooks Desktop Company File
To rename the QuickBooks Desktop company file, follow the below-given steps:
- First t of all, launch the QuickBooks software.
- Next, you need to open the company file.
- After that, press F2 key on your keyboard and it will open the Product Information window.
- Take a note of the location of the company file and close QuickBooks.
- Move to the folder containing the QuickBooks company file. For this, press the Windows + E button from your keyboard and move to the drive and folder where the file is stored.
- Once you reached the location, right-click on the file and select the Rename option from the drop-down menu.
- Give a suitable name to the company file and hit Enter. Click Yes in the confirmation window to finish the task.
If the QuickBooks error 1920 remains unsolved, follow the next method to resolve the issue.
Solution 3: Set Up QuickBooks Desktop To Use The New Company File Name
Follow the below-described steps to get the task accomplished:
- Launch QuickBooks and go to the QuickBooks file menu.
- Next, you need to click Open or restore an existing company.
- Once you are done, open a company file and hit Next.
- Select a new name for the company file.
- Hit Open.
These steps can help you in troubleshooting Intuit QB error code 1920.
You may also read: How to Fix QuickBooks Error 213
Solution 4: Configure the Antivirus and Firewall Ports
If you find your firewall and antivirus settings restricting, you must open them to rectify problems relating to QB error 1920. Here are the steps you must take to allow QB through firewall ports as an exception:
- Initiate the firewall configuration procedure by opening the Windows Firewall settings from the Start menu.
- After searching and opening Windows Firewall, hit the Advanced Settings option.
- Further, right-tap Inbound Settings and proceed to create a New Rule. Also, repeat these steps for Outbound Rules after all the steps.
- Click Port, then Next, and make sure you’ve selected TCP.
- Further, you’ll arrive at the Specified Local Ports field. Here, fill in the ports required for your QB version in this field.
- The QuickBooks Desktop 2020 and later versions utilize 8019, XXXXX ports.
- QuickBooks Desktop 2019 follows ports 8019 and XXXXX.
- QuickBooks Desktop 2018 uses 8019, 56728, 55378-55382 ports.
- QuickBooks Desktop 2017 executes functioning through 8019, 56727, 55373-55377 ports.
- Once the port numbers are entered, tap Next.
- Tap the Allow the Connection button, then Next.
- Now, if you get requested, mark all the profiles or verify them.
- Hit Next, then form a rule, and name it QBPorts(year).
- Complete this procedure, click Finish, then do the same for Outbound Rules.
Once you have given permission to QB, it’s time to grant exceptions to QB programs and executable files to rectify error 1920. The following sequence will assist you in this:
- Type Windows Firewall in the Windows Start menu that you open by pressing the Windows icon.
- Hit Enter and launch the Windows Firewall window.
- Visit the Advanced Settings option, followed by right-tapping Inbound Rules.
- It’s time to form a New Rule by clicking this option.
- Follow the trail Program > Next > This Program Path > Browse.
- The table below gives insights into the executable files you can choose and configure. Tap Next.
- Click Allow the Connection > Next.
- Verify the marked profiles and tick if any remain unmarked.
- Hit Next, develop a rule, and name it QBFirewallException(name.exe).
- Do all of this for Outbound Rules also and resolve QuickBooks Error 1920.
| Executable files | Path |
| AutoBackupExe.exe | C:\Program Files\Intuit\QUICKBOOKS YEAR |
| QBUpdate.exe | C:\Program Files\Common Files\Intuit\QuickBooks\QBUpdate |
| DBManagerExe.exe | C:\Program Files\Intuit\QUICKBOOKS YEAR |
| OnlineBackup.exe | C:\Program Files\QuickBooks Online Backup |
| FileMovementExe.exe | C:\Program Files\Intuit\QUICKBOOKS YEAR |
| QBServerUtilityMgr.exe | C:\Program Files\Common Files\Intuit\QuickBooks |
| Dbmlsync.exe | C:\Program Files\Intuit\QUICKBOOKS YEAR |
| QBDBMgrN.exe | C:\Program Files\Intuit\QUICKBOOKS YEAR |
| QuickBooksMessaging.exe | C:\Program Files\Intuit\QUICKBOOKS YEAR |
| QBCFMonitorService.exe | C:\Program Files\Common Files\Intuit\QuickBooks |
| QBLaunch.exe | C:\Program Files\Common Files\Intuit\QuickBooks |
| QBW32.exe | C:\Program Files\Intuit\QUICKBOOKS YEAR |
| IntuitSyncManager.exe | C:\Program Files\Common Files\Intuit\Sync |
| FileManagement.exe | C:\Program Files\Intuit\QUICKBOOKS YEAR |
Solution 5: Download and Install QB Tool Hub
Resolve common QuickBooks errors like 1920 QB with a one-stop shop called QuickBooks Tool Hub. Here is how you can download, install, and utilize the tool hub with the best practices:
- Access your system’s web browser and move to open the QuickBooks official website.
- Browse the QuickBooks Tool Hub download link, find it, click Download Now, and finish storing it in your system.
- Once downloaded in the preferred place (default folder or custom location), visit it and double-tap the QuickBooksToolHub.exe installer file.
- The installation prompts will begin flashing on the screen in a sequence, where you must respond correctly, read the agreement and license terms, etc.
- After finishing this process, the QuickBooks Tool Hub launch will be successful and emerge as a shortcut icon on the desktop.
Once you set up QB on your system, you can utilize the numerous tools that assist you in fixing QuickBooks Error 1920. These are as follows:
Installation Issues
Under the Installation Issues option in QB Tool Hub’s menu, you’ll get the QuickBooks Install Diagnostic Tool. This tool will scan and diagnose your system for installation problems and fix QB problems.
Program Problems
Now, visit the Program Problems tab if your system lags, crashes, or freezes. The performance issues in QB get rectified through the Quick Fix My Program tool in this section.
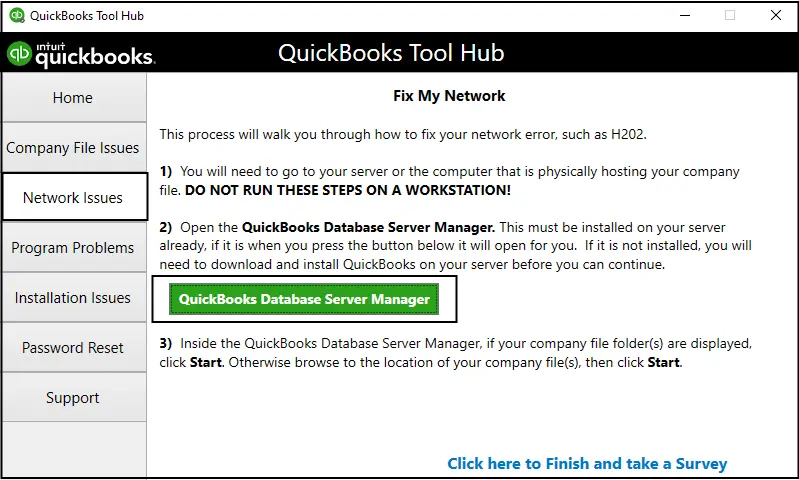
Network Issues
QuickBooks Network Diagnostic Tool and QuickBooks Database Server Manager can help fix issues related to multi-user and network problems.
Company File Issues
Do you have a damaged or corrupt company file in QB? Use the tools available in the company file issues section, named QuickBooks File Doctor and Quick Fix My File, to fix your problems.
Get Help!
The troubleshooting procedures described in this post can help you in troubleshooting QuickBooks Error 1920 service failed to start. If you need to talk to an expert regarding the same issue, give us a call on our Proadvisor solutions Error Support helpline number 1.855.888.3080. It will connect you with our expert’s team who will guide you in troubleshooting the QuickBooks error 1920 in a prompt yet hassle-free manner.
FAQs
Why do I keep seeing QuickBooks error 1920: database failed to start?
Conflicting services, third-party software interference, corrupt QuickBooks installation, incomplete installation or uninstallation, Windows User Account Control (UAC) settings, insufficient permissions, or database-related issues can lead to QuickBooks error 1920.
How do I remove QuickBooks Error 1920 from my system?
To resolve QuickBooks error 1920, you can try restarting your computer, running the QuickBooks Install Diagnostic Tool, verifying that the QuickBooks Database Manager service is running, disabling conflicting services or programs, repairing the QuickBooks installation, or undertaking a clean installation of QuickBooks. You may also need to contact QuickBooks support for further assistance.

Erica Watson is writing about accounting and bookkeeping for over 7+ years, making even the difficult technical topics easy to understand. She is skilled at creating content about popular accounting and tax softwares such as QuickBooks, Sage, Xero, Quicken, etc. Erica’s knowledge of such softwares allows her to create articles and guides that are both informative and easy to follow. Her writing builds trust with readers, thanks to her ability to explain things clearly while showing a real understanding of the industry.