QuickBooks is the go-to software for small business owners to reconcile statements, manage payrolls, and send automated invoices. And to ensure a smooth run of these activities, you require an uninterrupted network supply. But sometimes, your internet connection might not be as strong as regular, which could disrupt your QuickBooks operations. Many users have reported QuickBooks Error 12031 as a result of incorrect browser settings. We have gathered some relevant information for you in case your device has a similar technical glitch. Read the blog till the end.
You can follow this guide to fix the update issues in QB Desktop. However, if self-resolving this error seems overwhelming, you can take outside help. Also, if the below solutions do not help, your computer may require additional troubleshooting. For this, you can contact Proadvisor solutions Support at 1.855.888.3080 and talk to our experts for further assistance.
Table of Contents
Why am I Getting QuickBooks Error 12031?
Before you troubleshoot QuickBooks error code 12031, you must learn the reasons why it occurs. A weak internet connection is a primary reason for QuickBooks Error 12031. Let us look at some secondary reasons also-
- Your QuickBooks Desktop might be outdated, which can cause issues while updating the payroll function.
- You are not running QB Desktop with proper admin rights while performing the update process.
- Using a browser that is not your default browser.
- Interference by Internet and Firewall Settings.
- There is a network time-out issue or other connectivity problems between QB and the internet.
- Improper Secure Socket Layer (SSL) Settings.
- The digital signature certificate in QuickBooks is not verified, missing, or outdated.
- If your QB Desktop program is damaged, corrupted, or incorrectly installed, it can lead to QuickBooks error message 12031.
- Your PC’s date and time settings might be incorrect while running the QB updates.
- There is data damage in your QB company file, or the file lacks data integrity.
- Your Windows OS is outdated, or essential Windows system files might be damaged.
These are the leading reasons why you are facing this update error. Now, let’s learn how to fix the error with practical solutions in the next section.
How can I fix the QuickBooks Error Code 12031?
Until this error code is removed, you won’t be able to download QuickBooks Desktop and payroll updates on your PC. There are multiple ways in which you can erase QuickBooks Error Code 12031 from your system. Follow the steps below-
Solution 1: Reset Updates in QuickBooks
If your QuickBooks Desktop isn’t updated to the latest release, you must first update it before updating the payroll service. To download and install the latest QBDT updates, implement the following steps –
Note: Before updating QB, right-click the QB Desktop icon and select Run as Admin to run the application with admin rights.
- Open QuickBooks Desktop.
- Click on Update Now.
- Tap on Reset Update.
- Click on the Get Updates button.

- Relaunch QuickBooks Desktop.

After QBDT is updated, try to download the payroll and tax table updates. If you are still facing the update issues and the error code persists, move to the next solution.
Solution 2: Test the Network Connection and Settings
You might encounter QuickBooks Desktop error 12031 when QB is unable to connect to the internet. Thus, you must test the network connectivity and review the settings in the following manner to fix this error –
Step 1 – Set IE as the Default Browser
If Internet Explorer is not the default browser for downloading QB updates, it can cause update issues. To set IE as the default browser for QB, implement the following steps –
- Open Internet Explorer, move to the Tools menu or click the Gear icon on the top-right corner.
- Now, choose Internet Options, then go to the Programs tab and select Make Default.
- Hit OK to save the changes, then reopen QB Desktop and try to download the updates.
However, if you can’t download the updates and error 12031 in QuickBooks persists, follow the next step.
Step 2 – Use the TLS 1.2 Utility
TLS 1.2 is an essential internet security protocol that requires compliance. All the connections used by QBDT to access Intuit services must meet specific system requirements for security and stability.
If the requirements aren’t met, various services, like QB payroll, will be affected. You must use the TLS 1.2 Readiness tool to update your system and make it TLS 1.2 compliant by following the steps below –
- Firstly, download and install the recent QuickBooks Tool Hub on your PC and launch the program.
- Open the Installation Issues section, select the QuickBooks TLS 1.2 tool from the bottom-right corner, and hit OK.
- Open the TLS tool, hit Yes to accept the EULA agreement, and click Run.
- Finally, once the TLS tool stops, click Exit to end the process.
Once done, follow step 3 and check if secure websites are accessible.
Step 3 – Try to Access Secure Websites
To ensure a stable and reliable connection, access secure websites other than QuickBooks Desktop, like your bank’s log-in page. If you can’t access these pages, the connection isn’t working, and you need to contact a computer or an IT expert for assistance in fixing the connectivity problems. After the connectivity issues are fixed, you must run the QB updates again. However, if you still encounter QuickBooks error 12031, move to the next solution.
Solution 3: Install QuickBooks Updates in Safe Mode
Even if you have reliable protection software on your computer, you may require to install a few programs a bit more safely-
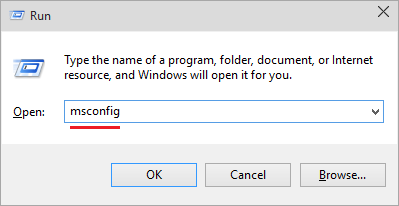
- Close QuickBooks.
- Press Windows key + R.
- The Run window will pop up on your screen.
- Enter “MSCONFIG” in the search bar.

- Select OK.
- The Windows System Configuration window will be displayed.
- Click on the Boot button.
- Tap on Boot Options.
- Check Safe Boot.
- Hit Apply.
- Click on OK.
- You can now reboot your device in Safe Mode.
- Update QuickBooks Payroll.
- Once the update is complete, you can Uncheck the Safe Boot option following the steps above.
Solution 4: Allow QuickBooks to sync with your system network
It is essential that your QuickBooks application accesses the same network that you are using on your system-
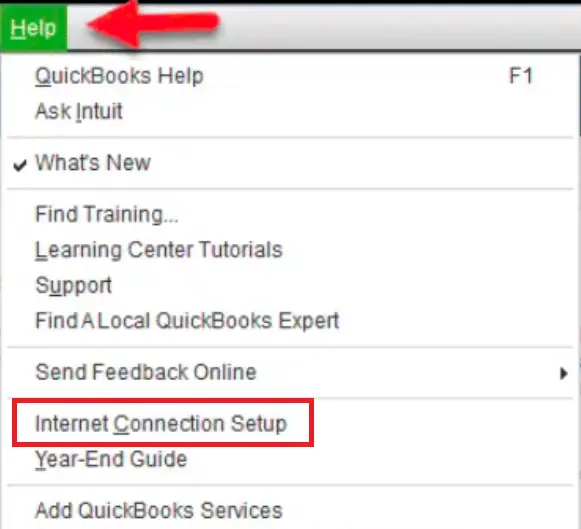
- Open QuickBooks.
- Click the Help button.
- Tap on Internet Connection Setup.

- Select: Use my computer’s settings Internet connection to establish a connection when this application accesses the Internet.
- Click on Next.
- Hit Done.
Solution 5: Verify Security and Firewall Settings
The motive of the Windows Firewall is to protect your computer from potential threats, viruses and malware that can enter your computer when you access suspicious websites or documents. The Firewall may recognize QuickBooks as a threat; therefore, you need to rectify it-
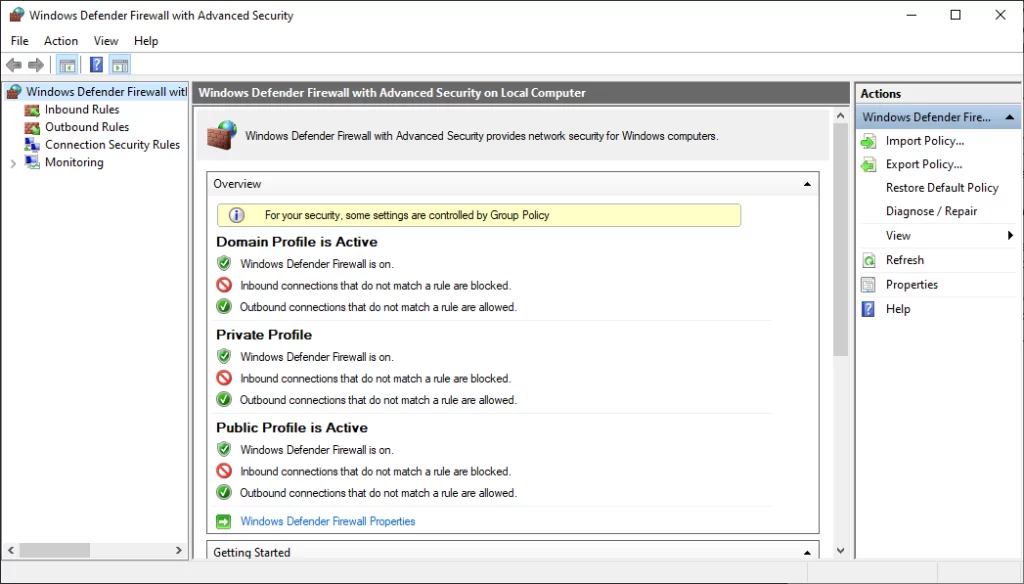
- Click on the Windows icon.
- Type Firewall in the search bar.
- Tap on Windows Defender Firewall.
- Select the tab which says: Allow an app or feature through Windows Defender Firewall.
- Locate QuickBooks Desktop in the list of applications.
- Uncheck the boxes on the left side of the QuickBooks Desktop.
- Check the boxes on the right side of the QuickBooks Desktop.
- Tap OK.
- Restart your PC.
Recommended to read: Fix QuickBooks Vacation accrual error
Solution 6: Re-check Internet Explorer Settings
Some technical hacks need to be in line with your device’s settings so that your application runs smoothly. Here is how you can enable them-
- Close QuickBooks Desktop.
- Open Internet Explorer.
- Click on Tools from the top-right corner.
- Tap on Tools.
- Select Internet Options.
- Click on the Tools option.
- Next, select the Internet Options button.
- Navigate to Security.
- Click on the Globe button.
- Select the Content option.
- Now you need to disable Content Advisor. Use your credentials to do so.
- Hit the Connections button.
- Click on Never Dial a Connection.
- Choose the accurate ISP.
- Hit OK.
- Move to the LAN Settings.
- Check the option which says Automatically Detect Settings.
- Uncheck the option which says Use a Proxy Server.
- Hit OK.
- Navigate to the Advanced button.
- Tap on Restore Advanced Settings.
- Move to Settings.
- Uncheck Use TLS 1.1 and Use TLS 1.2
- Check Use TLS 1.0.
- Hit OK.
- Close Internet Explorer.
- Reboot your system.
Solution 7: Install a Fresh QB Digital Signature Certificate
If your digital signature certificate is unverified or outdated, it can cause update issues in QB. Thus, you can fix QB error code 12031 by installing a new digital signature certificate in the following manner –
- Open the C Drive of your PC and follow this navigation path – Program Files \ Intuit \ QuickBooks folder.
- Now, find and right-click the QBW32.EXE file, then select Properties and go to the Digital Signature tab.
- Verify that Intuit is specified in the signature list, then select Details and open the Digital Signature Certificate window.
- Choose View Certificate and select Install Certificate from the Certificate window.
- Further, click Next until Finish comes up, then press Finish and restart your PC.
Once the PC restarts, try to download the QuickBooks and payroll updates again. However, if QuickBooks error 12031 persists, move to the next solution.
Solution 8: Repair QB Desktop
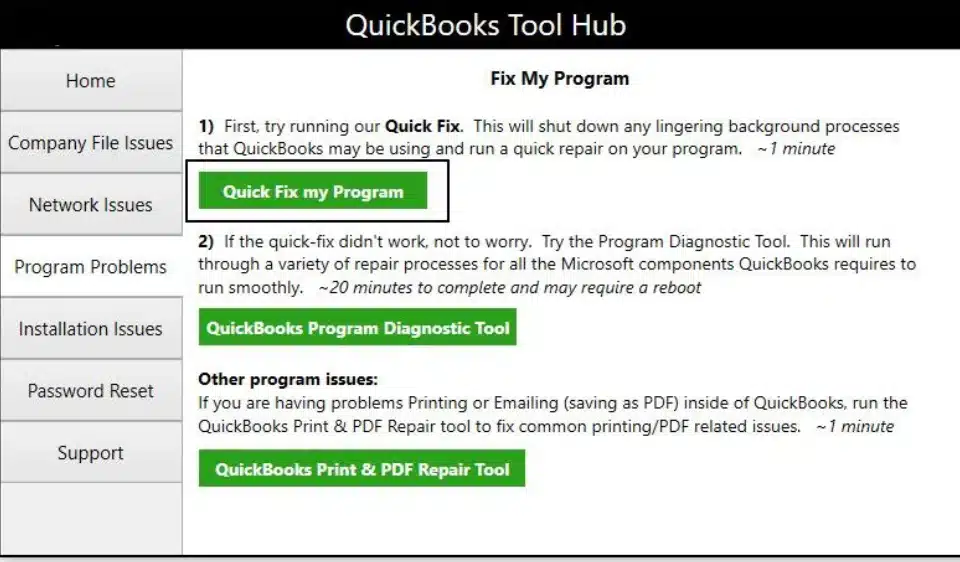
A damaged or incorrectly installed QuickBooks Desktop program can lead to an update error. To fix the error, you must repair QuickBooks using the QB Tool Hub features by following the steps mentioned below –
- Open the QuickBooks Tool Hub program, go to the Program Problems section, and select the Quick Fix My Program tool to initiate a program repair.

- Let the tool fix the program issues, and once the tool stops, check if the update problems are resolved.
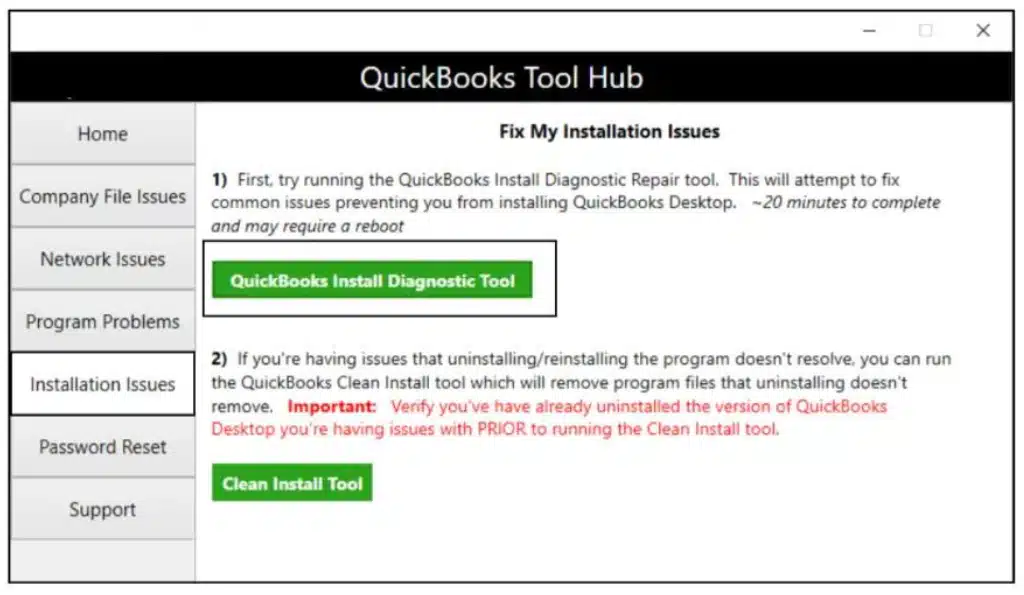
- If QuickBooks update error 12031 persists, go to the Installation Issues section and run the QuickBooks Install Diagnostic tool.

Once the tool stops running, retry downloading QB and payroll updates. If you still encounter the update error code, move to the next solution to eliminate it.
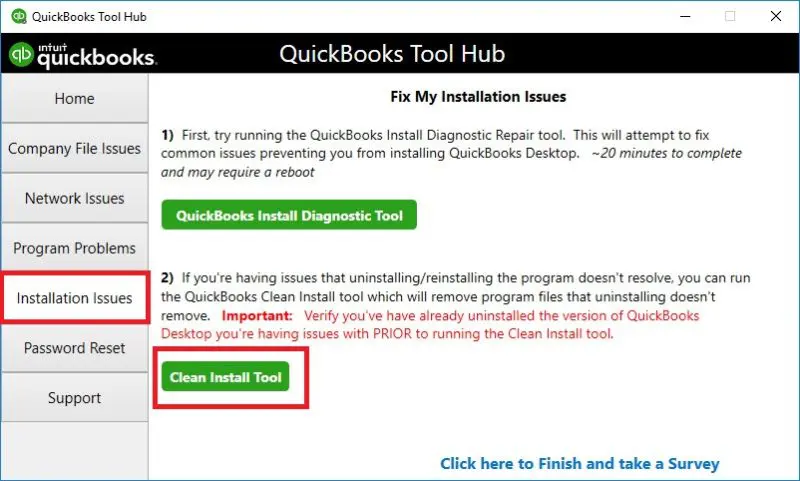
Solution 9: Clean Install QuickBooks
If you can’t repair QuickBooks with the above solution, you must reinstall the application as an alternative. Use the QB Clean Install tool to install a fresh QuickBooks Desktop version free of the errors and issues encountered in the current version.
After QBDT is successfully reinstalled, activate it from the Help menu. Then, rerun the QB and payroll update process and check if QuickBooks payroll update error 12031 is fixed. If the error keeps appearing, follow the next solution to resolve it.
Solution 10: Run the Verify/Rebuild Data Tool
Data damage in your company file or data integrity problems can be responsible for the QB update error. You can use the Verify and Rebuild Data tool to identify the data integrity problems and rebuild your data.

After the tool stops, go back to the Help menu and try updating QuickBooks again. However, if error code 12031 in QuickBooks keeps appearing, move to the next solution.
Solution 11: Correct the PC’s Date and Time Settings
Incorrect date and time settings can prevent users from downloading the latest QB and payroll updates. Thus, you must set the correct date and time on your PC in the following manner –
- Open the Windows Start menu, then select Time & Language from the Settings tab.
- Now, select Date & Time, set the right date and time, and save the changes.
After setting the date and time, check if you can download the QB updates without issues. However, if QuickBooks Desktop error 12031 keeps appearing, move to the next solution.
Solution 12: Run the System File Checker Utility
The QuickBooks update error in Windows 10 can arise if the Windows system files are corrupted or damaged. To resolve this error, run a scan with the System File Check tool as follows –
- Select Settings from the Windows Start menu and click Windows Update.
- Select Check for Updates, then install the available Windows OS updates and restart the PC.
- Enter ‘command prompt’ in the Windows search bar, and right-click or press and hold the Command Prompt (Desktop app) option.
- Select Run as Administrator, hit Yes, and type “DISM.exe /Online /Cleanup-image /Restorehealth.”
- Press Enter, and after the “The operation completed successfully” message appears, type sfc /scannow and hit Enter.
- Run the scan, and once the “Verification 100% complete” message pops up, type Exit and click Enter.
Once the Windows system files are scanned, rerun QB and try downloading the updates to ensure the error is fixed.
Closure
We bet that now you are aware that a poor internet connection or improper internet settings could pave the way for the QuickBooks Error 12031 on your computer and what you need to do to rectify this issue. Our team acknowledges the fact that not everyone is tech-savvy and might require simple step by step guidance by a technical expert. Proadvisor solutions Support Team is available to serve you at 1.855.888.3080.
FAQs
What Is QuickBooks Update Error Code 12031?
QuickBooks error 12031 is a part of QuickBooks Error series 12XXX. This error generally shows up when downloading the payroll or QuickBooks desktop updates. Sometimes QuickBooks is unable to connect to the internet, which causes errors when updating. It may be because of the incompatible browser and security settings or when the firewall interferes with the QuickBooks update.
Can I automatically update my QuickBooks Desktop?
Yes, you can enable automatic updates in QuickBooks Desktop by implementing the following steps –
1. Open QB Desktop, then go to the Help section and click the Update QuickBooks Desktop option.
2. Now, move to the Overview tab and check if the automatic updates have already been selected. If not, go to the Options tab and turn on the automatic updates for QuickBooks.
Can incorrect hosting settings prevent QuickBooks from updating?
Yes, the QuickBooks and payroll updates can only be downloaded in the single-user mode. If you host the QB company files over the network while trying to download the updates, the process will fail.
How can I install the latest QuickBooks payroll tax table updates?
You can update the payroll tax tables in QuickBooks Desktop by following the steps mentioned below –
1. Open the Employees section of QBDT, select Get Payroll Updates, and click the Download Entire Update option.
2. Now, select Update to initiate the process, and an information window will appear once the download is successful.
Why does QuickBooks Error Code 12031 occur?
QuickBooks Error 12031 often appears on the screen during the payroll or QuickBooks update process. Usually occurs if windows firewall, anti-virus software or third party applications block QuickBooks, Internet connectivity issues, Improper or incorrect SSL settings or due to network timeout.

Erica Watson is writing about accounting and bookkeeping for over 7+ years, making even the difficult technical topics easy to understand. She is skilled at creating content about popular accounting and tax softwares such as QuickBooks, Sage, Xero, Quicken, etc. Erica’s knowledge of such softwares allows her to create articles and guides that are both informative and easy to follow. Her writing builds trust with readers, thanks to her ability to explain things clearly while showing a real understanding of the industry.