QuickBooks cannot communicate with the company file error is a general server communication error that is caused when Windows firewall obstructs user’s connection with the company file. In general, when QuickBooks is set to run in multi-user mode, the company file is saved on the Server computer also referred to as the Host computer which users need to access from their workstations. The server is like a giant workstation with high configuration and blazing speed, and it also holds the most crucial data of the organization.
In large organizations where security is a key concern, a firewall plays a significant role in protecting the business’s critical data from external threats. To keep data safe and intact, strict rules are applied by the firewall on the server that sometimes prevents QuickBooks on the user’s workstation to access the company file stored on the server. This is the exact reason why QuickBooks displays the following QuickBooks cannot connect to company file message:
The solutions steps mentioned in the following article is sufficient to fix the QuickBooks firewall error. If you feel off the mark, In order to comprehend the technical steps mentioned in the article, we’d suggest you reach out to the Expert’s Team through Proadvisor solutions Support Number +1.855.888.3080.
You may see also: QuickBooks Error 80040408
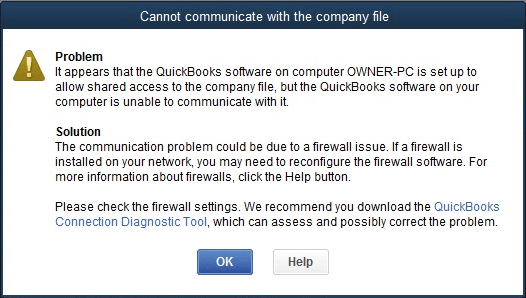
Table of Contents
What is Error: Cannot communicate with the company file?
Error: Cannot communicate with the company file
Problem
It appears that the QuickBooks software on the USER’S-PC is
set up to allow shared access to the company file, but the QuickBooks software
on your computer is unable to communicate with it.
Solution
The communication problem could be due to a QuickBooks firewall problem.
If a firewall is installed on your network, you may need to reconfigure the
firewall software. For more information about firewalls, click the Help button.
Please check the firewall settings. We recommend you
download the QuickBooks Connection
Diagnostic Tool, which can assess and possibly correct the problem.
General Reasons for QuickBooks Firewall Error and Company File Connection Problems
Now let’s discuss due to what reasons QuickBooks Desktop can’t establish a connection with the company file. Apart from the QuickBooks firewall problem, several other reasons can trigger QuickBooks company file connection issues due to which the client’s PC cannot connect to the company file on the server.
(Outdated QuickBooks Version) –
If you are using an outdated QuickBooks Desktop, then Windows Firewall can identify QuickBooks as a potential security threat and forbid its access to the company file.
(Company File Folder not having Share Permission) –
If the folder that has the company file in it is set to Read-Only. Windows folder that holds the company file must be set to Full Control for QBDataServiceUserXX.
(QuickBooks Database Server Manager is not Installed/Running) –
QuickBooks Database Server Manager is used to verify and create a connection with the company file on the server and if qbdbmgrn not running or installed, then you might see a “QuickBooks cannot connect to server” error on your workstation.
(Incorrect Hosting Set up on Workstation and /or Server) –
In the multi-user environment, only the QuickBooks that are installed on the server must be set to host the company file in Multi-user Mode and multi-user mode not working, and all other workstations must be set to run in Single-user Mode.
(Common Company File Issues) –
Some common company file issues might cause communication problems with QuickBooks Desktop. These issues can easily be resolved using QuickBooks Desktop File Doctor.
How to Allow QuickBooks through Firewall and Fix Company File Error: Cannot Communicate with the Company File due to Firewall
If your QuickBooks won’t open the company file or is unable to communicate with the server, following the solutions mentioned below in the given sequence can get rid of QuickBooks multi-user not connecting to company file error with little time and efforts.
Solution 1: Fix Company File and Network Issues using QuickBooks Desktop File Doctor Tool
QuickBooks File Doctor is a tool developed by Intuit to rectify general network connectivity issues between the server and the workstation and is also efficient in repairing damage in the company file. Follow the steps below to download and run QuickBooks File Doctor using QuickBooks Tool Hub.
- Download QuickBooks Tool Hub from Here.
- Go to the downloads of your computer or press Ctrl + J to open the downloads folder directly from within the browser.
- Right-click the QuickBooksToolHub.exe file and select Open.
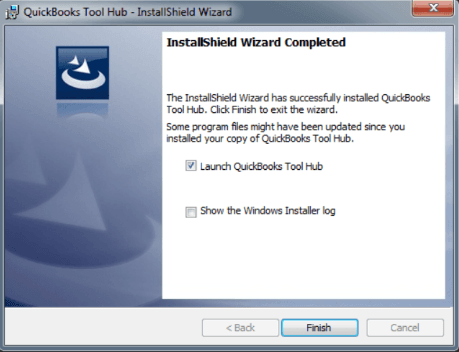
- Agree to the Terms and Conditions and proceed with the steps to complete the installation.

- Once the installation is completed, run QuickBooks Tool Hub using the Desktop icon.
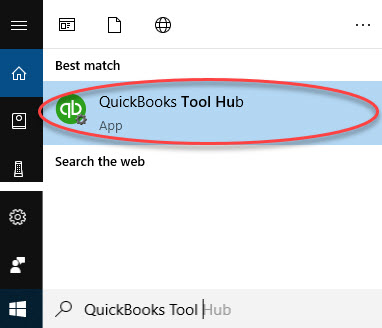
- If you can’t find the QuickBooks Tool Hub icon on your Desktop, then search for it from the Start/Search option.

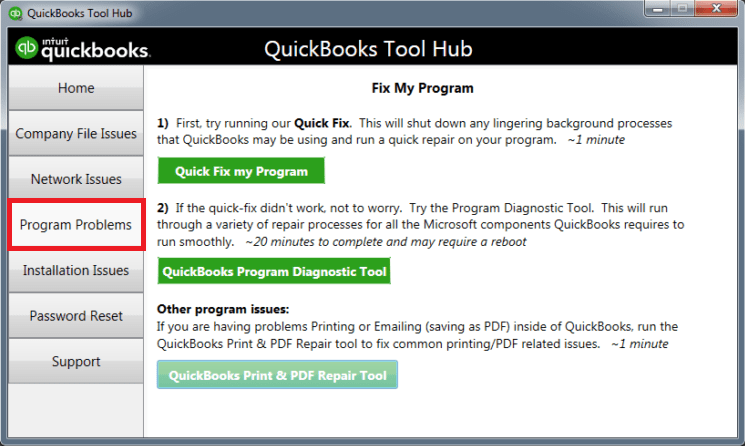
- Go to the Company File Issues tab, and click Quick Fix My Program.

- After repair completes, click OK and try to access the company file once again in QuickBooks Desktop.
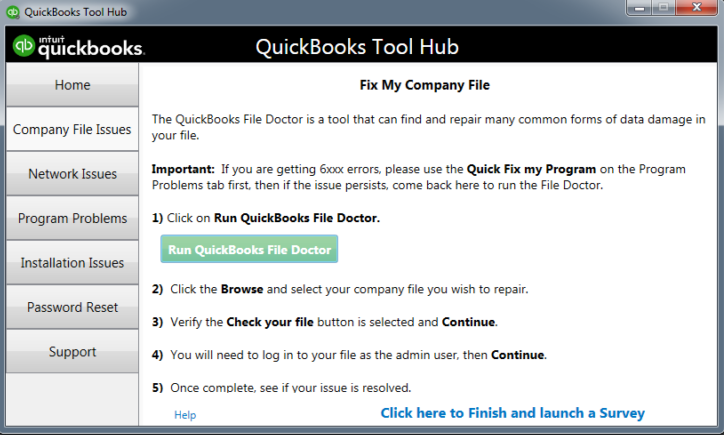
- If the previous step brings no luck, then go to the Company File Issues tab and click Run QuickBooks File Doctor.

- Select the options to repair both the damaged network and company files and let the tool automatically fix the identified issues.
If QuickBooks Desktop is still unable to communicate with the company file, then follow the next troubleshooting step.
Solution 2: Update QuickBooks Desktop to the Latest Released Update
- Open QuickBooks Desktop press F2 key to open the Product Information window.
- From the links given below, check if you have the newest version installed, and if you don’t have it, then follow the steps listed further to get the latest QuickBooks updates.
- QuickBooks Desktop 2020
- QB Desktop 2019
- QuickBooks Desktop 2018
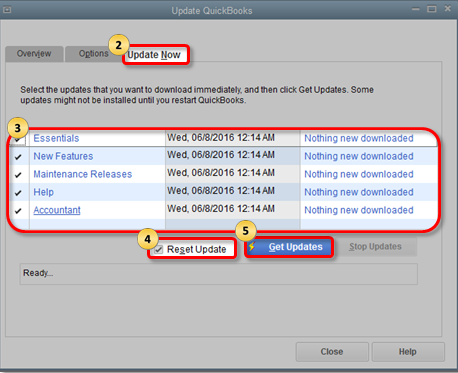
- If you don’t have the latest version of QuickBooks installed, then open QuickBooks and click Update QuickBooks Desktop from under the Help tab.

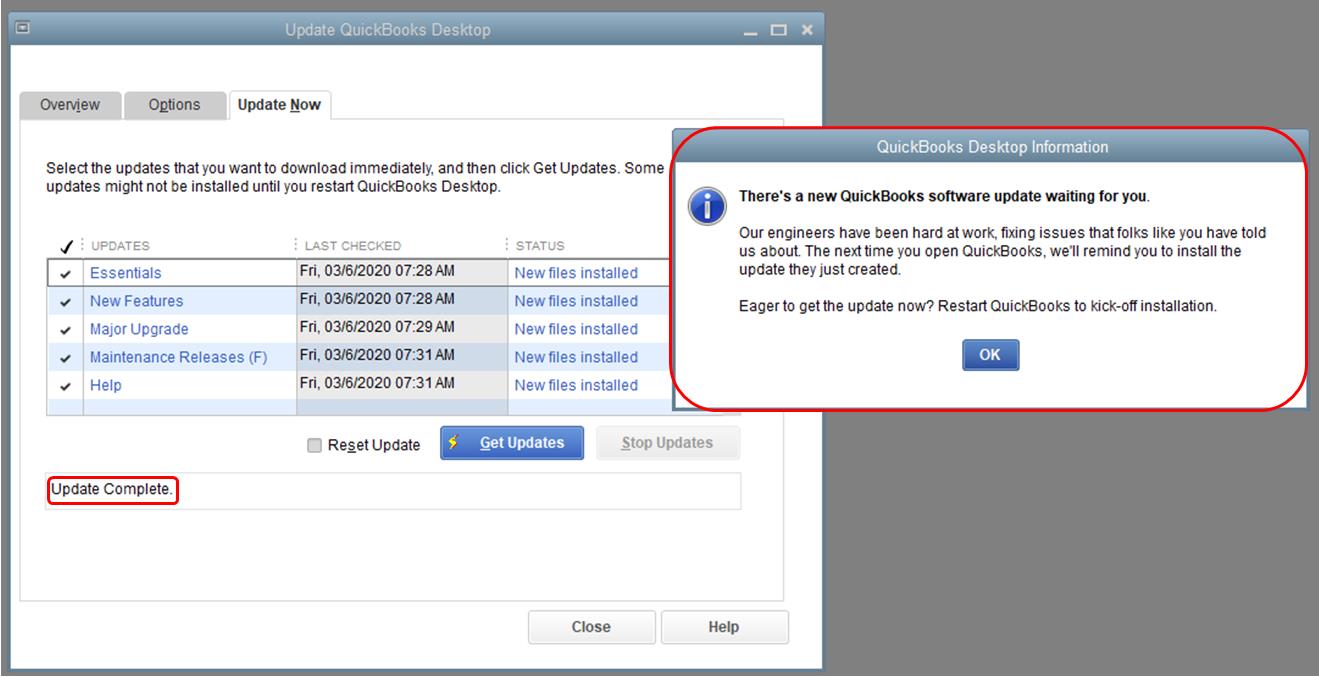
- Navigate to the Update Now tab and click Get Updates.

- Once QuickBooks downloads all the updates, restart it and agree to install the latest QB application updates.

If your workstation is still unable to communicate with the company file, then follow the next step and reconfigure the Firewall to allow QuickBooks to access the company file.
Solution 3: Add Exceptions to Windows Firewall Ports for QuickBooks
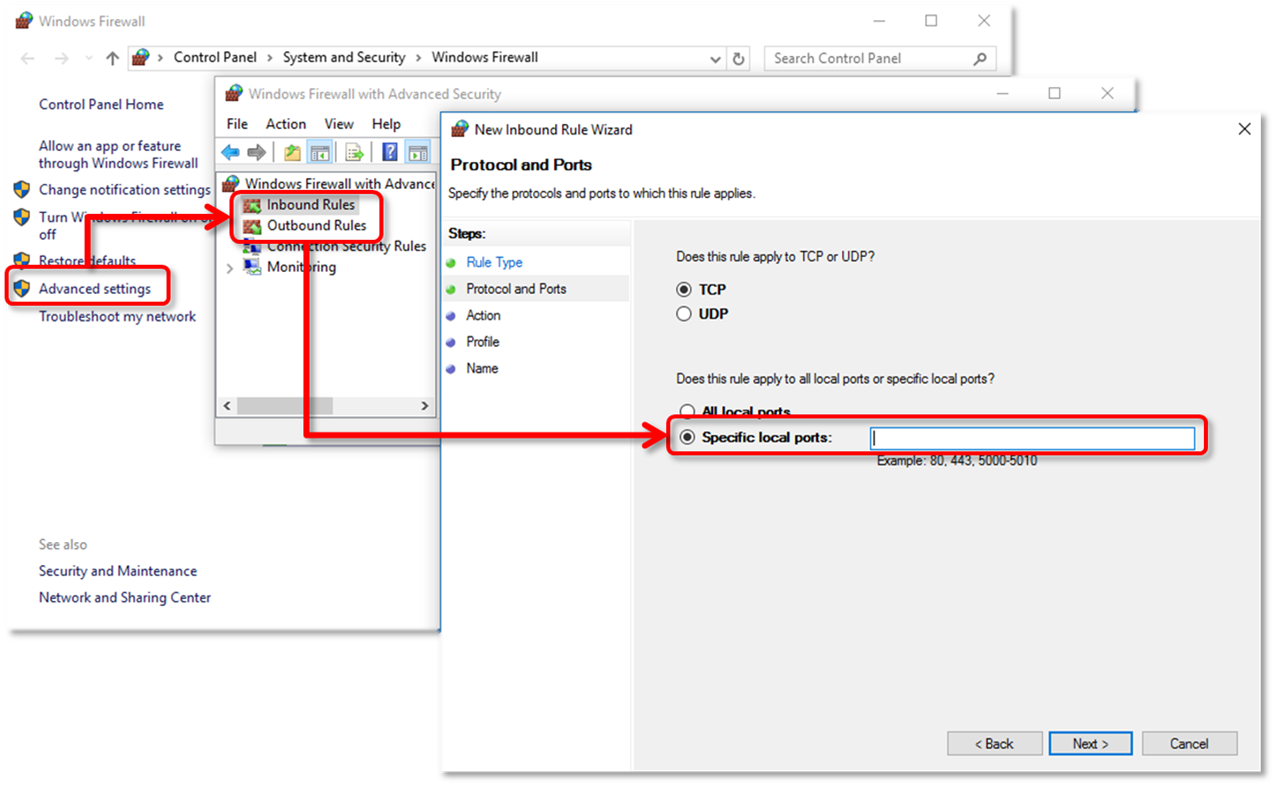
- Using the Windows Search option, search and open Windows Firewall.
- Now from under the Advanced Settings, right-click Inbound Rules.
- Click Port and then hit Next.
- Select TCP from the “Does this rule apply to TCP or UDP?” option.
- Now enter the port-specific to your QuickBooks Desktop version.

- For QuickBooks 2018 Enter “8019, 56728, 55378-55382” as the port.
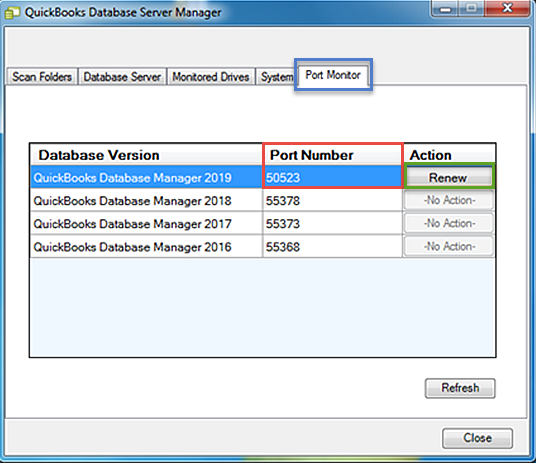
- For QuickBooks 2019 Enter “8019, (You can find the specific port number using QuickBooks Database Server Manager)”

- The same applies for QuickBooks 2020, run QuickBooks Database Server Manager, and search for the specific port assigned to it.
- Click Next after entering the port information and choose to Allow the Connection option.
- Hit Next and ensure no profiles are unchecked.
- Click Next once again and enter a name for the new rule created.
- After creating the new rules, click Finish.
Now you will need to follow the same steps to create Outbound Rules. Right-click Outbound Rules from Windows Firewall and Advanced Security window and select New Rule, then follow the exact instructions as while creating Inbound Rules to finish the task.
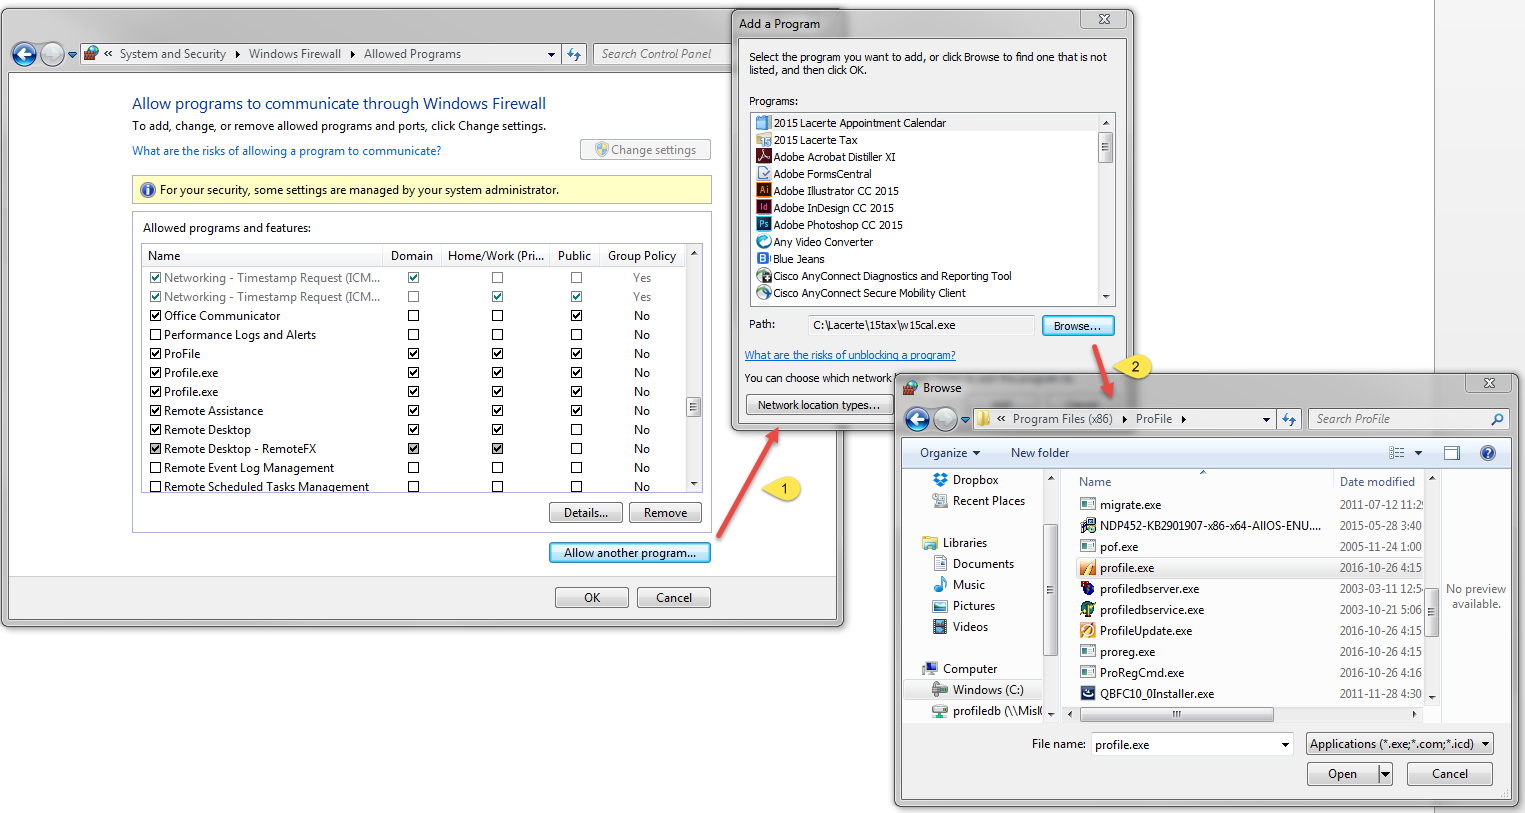
Solution 4: Allow QuickBooks Desktop Program to go through the Firewall
There are certain QuickBooks components that you need to add to the Windows Firewall exception to completely allow QuickBooks to go through the firewall. Follow the steps listed below and add the following files to Windows Firewall Exception to fix the ” QuickBooks cannot communicate with the company file” error.
- OnlineBackup.exe,
- QBUpdate.exe,
- IntuitSyncManager.exe,
- QBLaunch.exe,
- QBServerUtilityMgr.exe,
- QBCFMonitorService.exe,
- QBDBMgrN.exe,
- QuickBooksMessaging.exe,
- QBW32.exe,
- FileManagement.exe,
- FileMovementExe.exe,
- AutoBackupExe.exe,
- DBManagerExe.exe,
- Dbmlsync.exe
- Go to the Windows Firewall Advanced Settings once again and right-click the Inbound Rules.
- Choose Programs this time and then click Next.
- Choose the option that says “This Program Path” and proceed further to Browse the file.

- Locate each file listed above and click Next.
- Hit Allow the Connection and then click Next.
- Make sure that all the profiles are selected and then click Next once again.
- Type a name for the newly created rule and finish the task.
You will require to follow the same instructions as stated above to create the outbound rules for the QuickBooks program. All you need to do is to right-click the Outbound Rules and select the New Rule option. Once QuickBooks is set to go through the Windows Firewall, check if the error “QuickBooks cannot communicate with the company file” still appears, if not, then follow the next troubleshooting solution.
Solution 5: Set Permissions to Access Windows Folder
For detailed instructions on setting Windows Folder Access Permission, follow the instructions listed in This Article by Microsoft.
Solution 6: Utilize QuickBooks Database Server Manager to Fix Company File Connection Issues
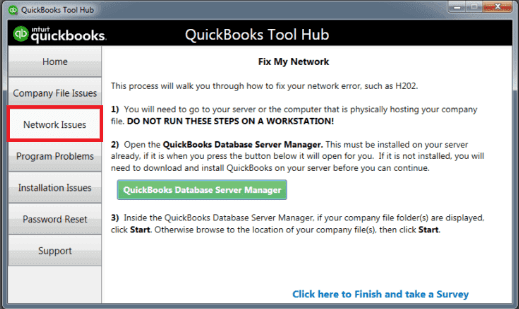
- Open QuickBooks Tool Hub from the Desktop icon or from the Start menu.
- Click QuickBooks Database Server Manager from under the Network Issues tab.

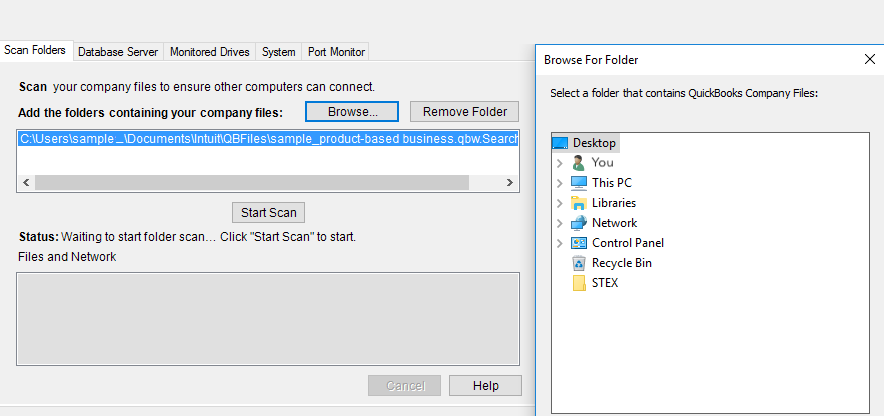
- Now choose the option to Start Scan and in case if the option is not available, then first Browse the company file to make the Start Scan option available.

- Once QuickBooks Database Server Manager repairs the issues with the Windows Firewall, try to create a connection with the company file once again.
In case, QuickBooks is still trying to access the company file but cannot contact the database server, you need to set up the hosting settings on both server and the workstation computers.
Solution 7: Recheck Hosting Settings on the Server and Workstations
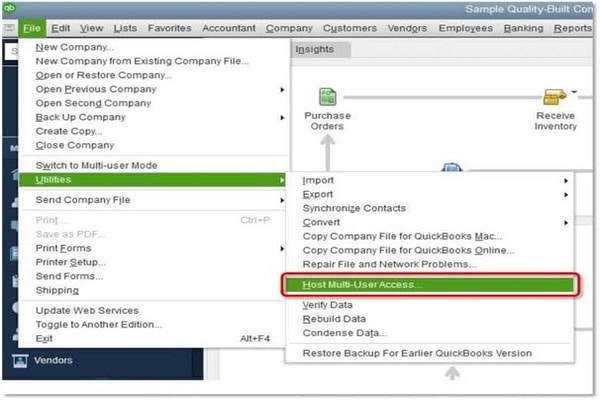
- First, open QuickBooks on the Server machine and click the File tab.
- Keep your mouse cursor over the Utility option and check the hosting setup.
- If the “Stop Hosting Multi-User Access” option is pops up, then this indicates the server is in the right configuration state, and you can move to the other workstations for further troubleshooting.

- If the hosting settings displays, “Host Multi-User Access”, then you need to select the option and change it to “Stop Hosting Multi-User Access”.
- Now go to each workstation and make sure none of them is showing the option “Stop Multi-User Access”.
- After making the changes to the hosting setup, try to access the company file once again from the workstation that was experiencing the “QuickBooks cannot communicate with the company file” error earlier.
Solution 8. Change network-related settings for Windows 10
Changing the network settings will allow Windows to share the QuickBooks company file over the network:
- Click on the Windows Start menu.
- In the search, type ‘sharing’ and select Manage advanced sharing settings.
- Next, click on the Turn off password protected sharing option.
- To save the changes, click on Apply and Save.
- Open QuickBooks and try to open the company file again.
If you still get the same error message, proceed to the next solution.
Solution 9. Verify QBDBMgrn.exe process is running
- First, tap on Ctrl + Alt + Del keys together to open the task manager.
- Find the QBDBMrgn under the Process option.
- If you can’t see the same, give QBDataServiceUser admin rights. Here’s how:
- Close QuickBooks.
- Open Control Panel and select the User Accounts option.
- Select Manage another account.
- Click twice on the QBDataServiceUser.
- Next, choose Change Account Type and then select administrator.
- Save the changes and close Control Panel.
If QuickBooks it appears that the QuickBooks software on the computer persists, move to the next solution.
Solution 10. Create QuickBooks Network Data File
- Click on the Start menu.
- Within the search field, type QuickBooks Database Server Manager.
- Select the QuickBooks Database Server Manager.
- On the QuickBooks Database Server Manager page, click on Add Folder.
- Next, locate the company file folder.
- Select the folder containing the company file and choose Scan.
- The scan will list all the company files under the QuickBooks Company Files Found list.
- Now, search for the Network Data (.ND) file in the same folder.
You may read also: QuickBooks Error 181016
Solution 11: Perform a System Restore and Switch your System to the Previous Settings
If you have recently updated your system and the error occurred post that, some update issues might be causing the QuickBooks cannot communicate with the company file error. You need to restore your previous settings to resolve the error and resume working on the application seamlessly.
- Sign in with your admin account and select All Programs from the Windows Start menu.
- Select the System Restore settings option to revert the changes and restore your PC to an earlier point.
- Open the list of modernized reductions and hit Next to complete the restore process.
- Once done, restart your system and re-access QuickBooks to check the status of the error.
Hopefully, you have now successfully resolved the error “QuickBooks won’t open my company file” that made you search “QuickBooks won’t open my company file” online. We understand that troubleshooting such an error is an immense task, and you might feel puzzled during the troubleshooting procedure. If you have tried all the solutions listed in this article and the error is still not resolved, or you are seeking help from someone who can walk you through the troubleshooting procedure, you can dial Proadvisor solutions Desktop Helpline Number 1.855.888.3080 for immediate help and assistance resolving “QuickBooks cannot communicate with the company file” error in QuickBooks Desktop.
FAQs
What are Some Early Signs to Identify the QB Cannot Communicate with the Company File Issue?
A few symptoms of QuickBooks cannot communicate with the company file issue are –
– Your system might become sluggish, and you might experience slow performance.
– The interface might be unable to receive data input.
– You might not be able to install or update your QuickBooks Desktop.
– You might be unable to complete your accounting tasks using the QB program.
What are Less Common Reasons due to which QuickBooks can’t Connect to the Company File?
Here are some of the lesser-known reasons sue to which sometimes QuickBooks can’t connect to the company file:
– Essential Microsoft components like the .Net framework are damaged or corrupted.
– There are issues with QuickBooks installation and the installation process might be faulty.

Erica Watson is writing about accounting and bookkeeping for over 7+ years, making even the difficult technical topics easy to understand. She is skilled at creating content about popular accounting and tax softwares such as QuickBooks, Sage, Xero, Quicken, etc. Erica’s knowledge of such softwares allows her to create articles and guides that are both informative and easy to follow. Her writing builds trust with readers, thanks to her ability to explain things clearly while showing a real understanding of the industry.


