QuickBooks is a functional accounting application that is increasing its user base on a daily basis. However, there are certain loopholes in its backend coding that resist its users from continuing with the application. For example, QuickBooks Error 50004 is one of them. This error arises when users are either trying to set up, activate or send their direct deposit. The most common reason behind the occurrence of this problem is when the user performs the above in the multi-user mode. Therefore, it is recommended that you switch to the single-user mode when trying to do the same. But what happens when the user faces the same issue in the single-user mode? How should one proceed in such a scenario? Study the whole blog to find out.
Looking for a way to get rid of QuickBooks Error 50004 but unable to succeed? Get in touch with our team of certified professionals, and fix the matter right away. Hurry, dial Proadvisor solutions Helpline Number +1-8556-856-0042.
Table of Contents
What is QuickBooks Desktop Error 50004?
Error Code 50004 QuickBooks Desktop is a common error appearing while working with the direct deposit feature that QuickBooks offers. The issue may appear suddenly, interrupting the ongoing process. However, you need not worry about overcoming it as we provide this handy and detailed troubleshooting guide.
What Reasons Trigger the QuickBooks Desktop Error 50004?
After understanding the concept of QuickBooks Payroll Error 50004, let us have a look at the factors that could possibly lead to the same –
- Sending the Direct Deposit in the multi-user mode.
- If the system does not display the correct date and time.
- When QBDT loses connectivity with the server, error 50004 comes into the picture.
- Unsuitable settings in the system security and firewall.
- Outdated versions of QuickBooks Payroll or the Windows operating system.
Recommended article to read – How to fix Payroll Error 15276
Easy Hacks to Eliminate QuickBooks Error Code 50004?
We have now proceeded to the most crucial section of the blog, where we shall throw some light on the techniques that can troubleshoot the QuickBooks direct deposit activation error 50004 swiftly –
Resolution Way 1 – Edit the QBW.ini file in QuickBooks Desktop
The QBW.ini file stores the initialization data for QB. Altering the file can help you change the behavior of the program –
- While on the QuickBooks Desktop screen, tap on the Ctrl + 1 keys together to bring up the Product Information window.
- Now, press the Ctrl + 2 keys to view the Tech Help window and click on the Open File button.
- Look for the QBW.ini file and double-click on the file to open it.
- When the file is displayed, search for this text – “[QBLICENSE] PAYROLL_BUNDLE_STATE=Y” and edit the Y to N.
- Hit the File tab and choose Save to close it.
- Go back to QuickBooks and check if you are able to view the Payroll Activation window.
- If yes, repeat steps 1 – 4 and remove the “[QBLICENSE] PAYROLL_BUNDLE_STATE=Y]” section.
- If not, move to the next solution.
Resolution Way 2 – Try to Run QB as Admin and Activate the Direct Deposit
Running QuickBooks Desktop as an administrator can fix the issue. If you try to activate the DD after this, the error can go away. Pay attention to the upcoming steps as they may slightly differ for different payroll versions –
- Click on the Windows icon and type QuickBooks Desktop in the search bar.
- Move your cursor to the option, right-click on it and select Run as Administrator.
- Now, in QBDT, press the Employees tab and choose Employee Center.
- Choose the particular employee’s name and hit the Payroll Info button.
- Click on the Direct Deposit option to open the Direct Deposit window.
- After this, tap on “Use Direct Deposit for [employee’s name]” and choose the number of accounts.
- Type in the correct information for the employee’s bank details.
- Finally, click on OK to confirm and use your PIN to authorize the action.
Resolution Way 3 – Utilize the Verify Data and Rebuild Data Tool
Whether you are facing discrepancy issues, transactions are missing from the list, or even if you are unable to activate the direct deposit, the Verify and Rebuild Data Tool works best in such situations. Here is how to run them –
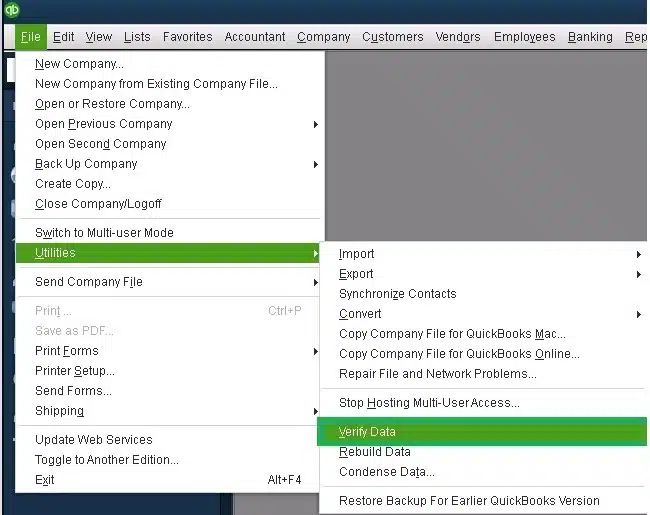
- Open QuickBooks Desktop and click on the File tab.
- Scroll down to Utilities and choose the Verify Data option. Let the tool run.

- Three possible messages may appear on your screen; proceed accordingly –
a. “QuickBooks detected no problems with your data” means no issue.
b. If any error message pops up, click on it and follow the instructions.
c. “Your data has lost integrity,” asks you to repair the damage in your data file using the Rebuild Data tool. - Press the File button again and go to Utilities. Select Rebuild Data this time.

- Create a backup file and click on OK.
- The fixation process could take a while; meanwhile, do not perform any operations on the screen.
- Once the “Rebuild has completed” message appears, tap on OK.
- It is important that you recheck if the damage has been repaired fully or not.
- For this, run the Verify Data tool again and then close the window.

Resolution Way 4 – Follow the Right Pattern to Activate the Direct Deposit
Sometimes, the user may skip performing the below steps, leading to unsuccessful DD activation. Rectify it this way –
- Use the Admin pin and password to open QuickBooks Desktop.
- Tap on the Employees tab, scroll down to My Payroll Service, and choose Activate Direct Deposit.

- Hit the Get Started button. The next steps are to be followed carefully.
- Click on the “I’m the admin, and I’m the primary person who can…” option.
- Enter the Admin credentials to authorize the action.
- Now, use your Intuit account details to Sign in to the correct account. Ensure that this is the only screen where you have signed into Intuit, or else it won’t work.
- At last, hit the Get Started button to complete.

Resolution Way 5 – Make IE your Default Browser and Add QB as a Trusted Website
QuickBooks might access the internet for specific operations. In that case, Internet Explorer should be the first browser it accesses. And in order to stimulate a smooth run, including QB as a trusted website removes any further hurdles –
- Access Internet Explorer and tap on the Tools icon located on the top-right corner.
- Select Internet Options from the given list and go to the Programs section.
- Here, you must click on the Make Default option and press OK to confirm.
- Move to the Advanced section and click on the Security tab.
- Hit the Trusted Sites tab and then press Sites.
- In the following space, type https://intuit.com, https://.intuit.net, https://*.quickbooks.com and select Add.
- Close the screen and select the Custom Level option.
- While in the Miscellaneous section, press the Enable tab and then OK in the “Access data sources across domains” field.
- Press Apply and then OK again.
Related article to read – How to fix Error 40001 in QuickBooks Desktop
Resolution Way 6: Update QuickBooks Desktop
If an outdated QuickBooks application is the cause of QuickBooks direct deposit activation error 50004, consider updating the application as follows:
- Launch the app and move the cursor to the Help tab.
- Next, choose the Update QuickBooks Desktop option in the Help section.
- Select the option Update now available at the top-right corner, and choose to Get the latest update.
- When the update finishes, close and reopen QuickBooks to see if QuickBooks error code 50004 re-appears.
Resolution Way 7: If the error appears after fixing QuickBooks
After you rebuild the data file, if the QuickBooks payroll error 50004 remains, do the following things:
- Launch the first paycheck and tap the Paycheck Detail option.
- A Review paycheck window will appear, from where you should opt for the Earnings tab.
- Find the last item in the list and make it a new item.
- QuickBooks will display a Net Pay Locked Window due to this action, and you need to click No to shut it.
- Next, you need to select the Rate Field for the item added in the 4th step.
- Ensure no changes in the Net Pay and Taxes and tap OK.
- If you see the past transaction message popping up, choose Yes.
- Save and Close and click Yes on the Recording transactions pop up.
- Open the paycheck again and tap the Paycheck Details button.
- Further, delete the item added in the fourth step.
- Again, ensure no changes in the Net pay and taxes and hit OK.
- Select Save and Close option to save the changes.
- Follow the instructions for each paycheck and see if the error has resolved.
Closure
Finally, we have reached the end of our blog on QuickBooks Error 50004. Yes, we understand it was a lengthy explanation, but if you follow the information religiously, you will surely succeed in erasing the error forever. If you wish to provide feedback, or gain additional help from our experts, get in touch with Proadvisors at Proadvisor solutions Number +1.855.888.3080 anytime, anywhere.
FAQ’s
How to Check for the Hosting status on all workstations to resolve error 50004?
This step is essential because, at times, the reason you see Error 50004 in QuickBooks is that you do not have one PC/Server that will host the company files. Hence, you must use the following steps on all the workstations to see if the hosting is on or not.
1. Open QuickBooks on the system and press the F2 key.
2. You will see The Product Information window in front of you.
3. Review the hosting status in the Local Server Information option, which must be off.
What is something that I must know while resolving the error 50004?
Our experts have listed the following quick methods that will effortlessly solve the QuickBooks Error 50004. But, before moving forward, we suggest that you should not make unwanted changes and follow the steps as instructed. Else, it can lead to data loss.

Peter is a Certified Public Accountant (CPA) with a strong background in public accounting and accounting technology. After starting his career as an audit senior, he worked with organizations across various industries and gained hands-on experience with complex accounting standards. At ProAdvisor Solutions, Peter helps clients navigate new accounting requirements. His goal is to simplify processes, improve accuracy, and boost confidence in finance reporting.