QuickBooks provides a PDF printer to its users to save financial statements, reports, and forms as a PDF file. The PDF files are comparatively smaller in size and can be viewed on any device compatible with the PDF formats. If containing sensitive information of clients or company finances, these files can also be protected with passwords and can be sent directly from QuickBooks via email. QB users can also create PDF files in third-party PDF printers such as Adobe PDF, but it’s generally time and effort consuming, and that’s why the built-in PDF printer is widely used. The users often face the error message – “QuickBooks Cannot Create PDF” stating that the QuickBooks could not save your form as a PDF file. To find out more about the issue, read the blog till the end.
“The troubleshooting process for the “QuickBooks Save as PDF not working or QuickBooks cannot create PDF” – error message requires some additional live assistance from an expert. Call on the Proadvisor Solutions Desktop Support Toll-free Number 1.855.888.3080 to connect with one anytime”
Table of Contents
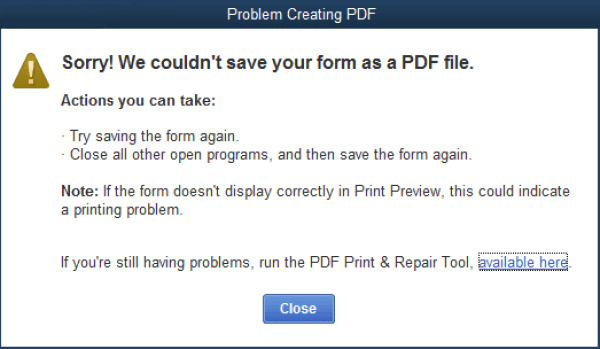
What is Error QuickBooks cannot create PDF file?
An error with the PDF file can display QuickBooks could not create the necessary PDF file issue. This error can pop up when you try to create, mail, or print a report. It can also be seen when: Microsoft XPS Document Writer (MXDW) driver is outdated, The port PORTPROMPT becomes incompatible with the current version of QuickBooks. You refresh the window and move to the PDF files
What are the Causes for the QuickBooks Form to PDF Error?
If QuickBooks could not save your form as a PDF file, then either or all of the reasons mentioned below are responsible for the command fails.
- QuickBooks cannot access the TEMP folder.
- The updated Windows 10 XPS Document Writer device is creating nuances in the system.
- The XPS Document Writer has become faulty due to unknown reasons.
You may also see: How to fix QuickBooks error 6000 77
What to Do When QuickBooks Save as PDF Not Working?
If you are getting QuickBooks could not create the necessary pdf files on your system, then the solutions mentioned below could help in rectifying the problem immediately. Follow on the solutions in the given order only.
Solution- 1: Run the QuickBooks PDF & Print Repair Tool from the QuickBooks Tool Hub
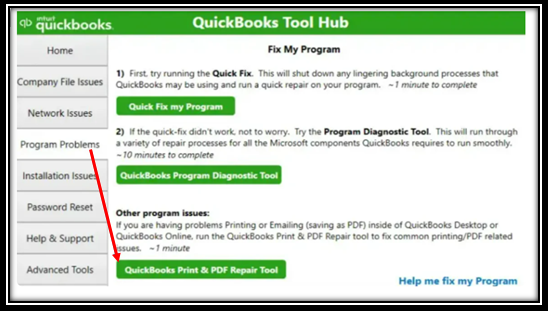
All the PDF and printing errors can be automatically fixed by running the QuickBooks PDF & print repair tool. However, to run the utility, the user must have the QuickBooks tool hub on their system. If you don’t have it, download it from Intuit’s website first.
- Open the QuickBooks tool hub and click on the Program Problems tab from the left pane of the window.
- Click on QuickBooks PDF & Print Repair Tool to run the utility.
- Let the tool complete the scan and fixture. Do not close it manually.
- After the tool closes down automatically, try to save the file as a PDF again to check if the error is gone.
Solution- 2: Change the TEMP Folder Permissions
The TEMP folder contains some important information regarding the configuration of the QuickBooks PDF tool. If QuickBooks cannot access these files in the TEMP folder, then the PDF tool won’t work, and you need to reset the permissions of the folder.
- Close QuickBooks and go to the Run window by pressing the Windows Key + R.
- Enter %TEMP% and click on OK.
- Right-click somewhere on an empty space within the temp folder and click on Properties.
- Go to the Security tab and make sure that each user name and group have Full Control.
- If not, set the permissions to Full Control and click on Save.
- Click on OK to exit from the window and try to save it as a PDF again in QuickBooks.
Solution- 3: Restore the Previous Drivers for the Microsoft XPS Document Writer (If you have recently updated to Windows 10)
As the users upgrade to Windows 10, the system adds a new Microsoft XPS document writer device into its configuration, attaching it to the default port “PORTPOMPT”. This action results in conflicts within the system and causes error while saving QuickBooks Invoice as PDF. To fix the issues, you need to delete the new Microsoft XPS document writer device and restore the drivers to the older version by following the given steps.
- Press the Windows Key to open the Start menu and enter the phrase “Print Management” in the search bar.
- Tap Enter and select the Print Management program appearing on the top result.
- On the left pane of the Print Management window, click on Print Server.
- Click on the name of your computer and select the last option – Printers.
- On the right side, select Microsoft XPS Document Writer and click on the X mark on the toolbar.
- Right-click on the empty space anywhere and click on Add Printer.
- Click on Next on the Network Printer Installation Wizard and select Create a New Port to add a new printer.
- Select Local Port from the drop-down menu of Available Port Types and enter XPS under the Port Name.
- Click on OK and select the Have Disk button on the Install the Printer Driver window.
- Insert the Windows Installation Disk and browse and select the driver’s .inf file.
- Type Microsoft XPS Document Writer under the name of the printer and click on Next to finish the task.
- Reboot your system and create a PDF in QuickBooks again to verify that the error’s gone.
Solution- 4: Remove the Logo from the Invoice Template
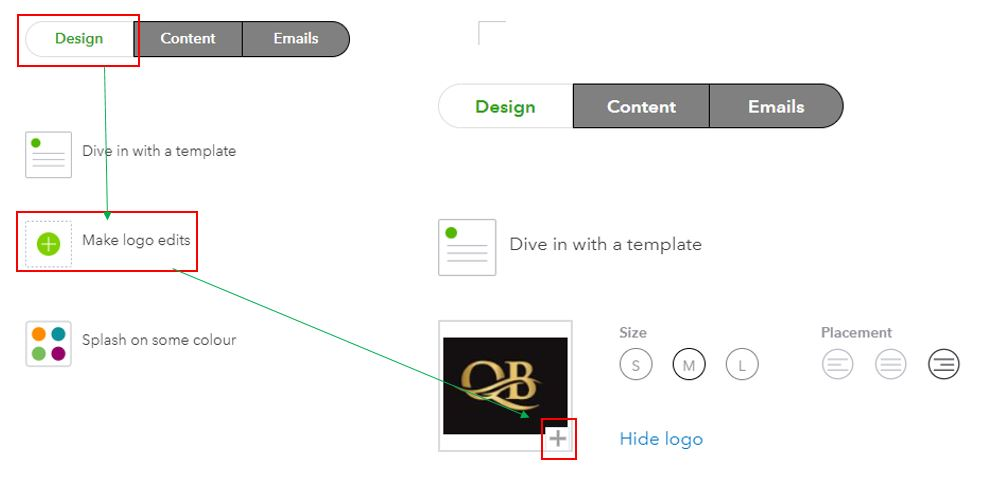
Sometimes, the .jpg format of the company logo on the invoice bugs with the PDF tool. You can either replace it with a .bmp file or delete the logo from the invoice design by following the steps given below.
- Open QuickBooks and click on the Gear icon on the toolbar.
- Click on Custom Form Styles under Your Company menu.
- Look for the template you want to make changes in.
- Go to the Action column and click on Edit.
- Navigate to the Design tab and click on Make Logo Edits.
- Choose Hide logo and select Done.
You may also read: How to solve QuickBooks error 15270
Solution- 5: Try an Alternative Way to Save the PDFs
There is an alternative way that can be employed to save the invoices or forms to PDFs. Follow the instructions given below.
- Go to QuickBooks and open the invoice you need to save as a PDF.
- Click on the File menu and instead of selecting Save as PDF, click on Print Invoice.
- Choose the Printer name as Microsoft Print to PDF.
Verify if the Error is with the XPS Document Writer
If the issue is with the Microsoft XPS Document Writer, you need to get external help from experts. Follow the steps below to check if you can save the file via the XPS Document Writer or not.
- Close QuickBooks and go to Notepad.
- Type any text and click on File.
- Select Print and choose the XPS Document Writer.
- Click on Print and enter a name for the file.
- Save the file on the desktop and open it from the desktop to check if the file is correct or not.
- If the file does not open, then the problem lies with the Microsoft XPS Document Writer.
At the end of our blog on the popular user query of error message QuickBooks save as PDF not working, we hope that the steps mentioned above are easy to understand and help the readers resolve the “QuickBooks Cannot Create PDF” Issue. However, if you face another issue while trying out the solutions, Proadvisor Solutions Desktop Helpline Number 1.855.888.3080 and seek professional assistance anytime.
FAQs
Does the “QuickBooks PDF not working” error affect emailing invoices?
Yes, the QuickBooks PDF not working error directly affects emailing invoices, as it prevents QB from generating the PDF attachment. Hence, if you are unable to generate PDFs, you can’t email them.
Why is my QuickBooks PDF not working?
Your QuickBooks PDF might not be working due to a missing or corrupted PDF component (such as the Microsoft XPS Document Writer), an outdated QB Desktop app, program problems with the QBDT application, or inherent installation issues with QBDT.
What should I do first when QuickBooks cannot save to PDF?
If your QuickBooks cannot save a PDF, you should first update the QB Desktop application, as outdated software can give rise to multiple issues. Then, if the issue still isn’t fixed, you should run the QuickBooks PDF & Print Repair Tool.
More Useful Articles:-
- How to Fix QuickBooks 12000 Series Error: Complete Fixing Guide
- Delete Duplicate Transactions in QuickBooks: A Complete Guide For You
- QuickBooks Printer Not Activated: Troubleshooting Error 20, 30, or 41
- QuickBooks Bank Account Not Updating? This Blog Will Help
- An Ultimate Guide to Help You Address QuickBooks Error 1638

Erica Watson is writing about accounting and bookkeeping for over 7+ years, making even the difficult technical topics easy to understand. She is skilled at creating content about popular accounting and tax softwares such as QuickBooks, Sage, Xero, Quicken, etc. Erica’s knowledge of such softwares allows her to create articles and guides that are both informative and easy to follow. Her writing builds trust with readers, thanks to her ability to explain things clearly while showing a real understanding of the industry.