Is your QuickBooks Multi user mode not working? If not, this guide is all you need to enable a multi-user environment in QuickBooks.
Multi-user mode is one of the built-in features of QuickBooks. The QuickBooks multi user setup allows numerous QB users to access the same company file without interfering with each other simultaneously. However, due to company file connection issues, QuickBooks Pro multi-user mode may occasionally stop working. Go through this guide until the end and learn why Quickbooks Multi-User Mode Not Working Windows 11 and how you must proceed to fix it in the shortest time possible.
Are you facing an HXXX Series Error with your QuickBooks as you trying to switch into multi-user mode? In that event, this guide will surely help you set your sail to the shore. Still, we recommend you to contact Proadvisor solutions’ Support for Help via +1.855.888.3080 to reduce the chances of failure
Table of Contents
What is the QuickBooks multi-user mode not working Issue
QuickBooks multi-user mode errors appear with error codes, such as H202, H505, and H303, due to issues with QuickBooks multi-user essential services like QBDBMgrn or QBCFMonitorService. You may notice QuickBooks stops hosting multi-user access and fails to establish a connection with company files on the network while trying to access a file saved on the server. Rectifying multi-user mode issues is a tough job. Thus, we have elaborated stepwise on the detailed troubleshooting solutions in this article.
You may also see: How To Fix QuickBooks Error 179
Why QuickBooks won’t switch to multi-user mode?
QuickBooks needs various components to run the multi-user mode smoothly and won’t switch to multi-user mode if any of these components malfunction. Inconsistent network settings can also cause issues with multi-user mode. We have mentioned below the reasons why QuickBooks stop multi-user access:
- QuickBooks not being installed on the server computer can cause the issue.
- Multi-user mode cannot work if hosting settings are not properly configured.
- If the firewall is blocking communication between computer systems in the network, QuickBooks’ multi-user server might fail.
- Folder or file permissions are not set properly.
- The database server fails to open the company file, resulting in the QuickBooks multi-user mode not working on Windows 11 error.
- Issues like DNS settings being incorrect can also be a reason.
- A corrupted .ND file can trigger QuickBooks multi user mode not working issue.
- If the server’s IP address where the company file is saved is inaccessible.
Important Steps to Take Before Fixing QuickBooks Multi-User Error
Before proceeding with the solutions for QuickBooks multi user mode not working on Windows 10, consider the following points:
- Install the QuickBooks Database Server Manager of the same version as that of QuickBooks installed on your system.
- Ask the users accessing the company file to delete it from the recently accessed list and then add it again. They will find an option that says “Open file in multi user mode” which they might have switched to single-user.
- Verify the Windows file permissions.
- Multiple QB company files opened on the same workstation may cause issues enabling the multi-user mode.
Methods to rectify the QuickBooks multi user mode error
Now that you know the various reasons that can trigger QuickBooks multi-user not syncing errors, you can fix them by addressing these issues properly. The detailed methods on how to open QuickBooks in multi user mode without interruptions have been mentioned below for you:
Method 1: Use the One-stop solution QuickBooks Tool Hub
If a user cannot switch to multi-user mode in QuickBooks, they should start the troubleshooting process using the QuickBooks File Doctor Tool. Follow the step-by-step instructions below to enable QuickBooks multi-user setup:
Step 1: Download and Install the Intuit Tool Hub
- Close your QuickBooks application.
- Download the latest version of QuickBooks Tool Hub.
- Install the Hub tool on your system by following the on-screen instructions.
Note: If you use 64 64-bit operating system, install the QuickBooks Tool Hub for the 64-bit version.
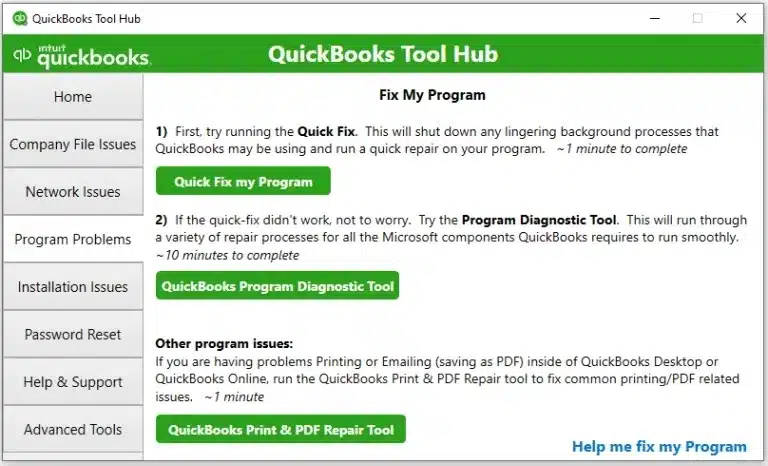
Step 2: Run Quick Fix My Program by Tool Hub
If the issues hosting multi user access emerge due to a damaged component, consider the Quick Fix My Program tool from the QB Tool Hub:
- Start the QuickBooks Tool Hub.
- Go to the ‘Program Problems’ section on the left pane.
- Select the ‘Quick Fix my Program’ option.

- Press the ‘OK’ button when the process is complete and check if the error is resolved.
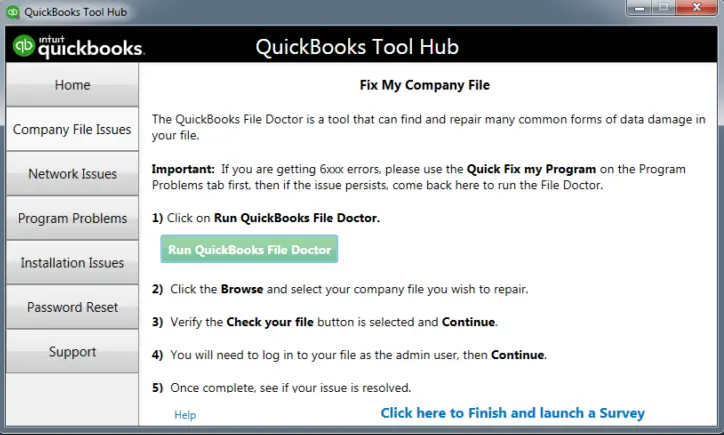
Step 3: Use File Doctor
Repair the damage in the company file using QuickBooks File Doctor to resolve multi-user issues.
- In the ‘Company File Issues’ section in Tool Hub, click on the ‘Run QuickBooks File Doctor Tool’ button.

- Click the ‘Browse and Search’ button to find your company file.
- Click on the ‘Check your file’ option and press the ‘Continue’ button.
- Type your password when asked and press the ‘Next’ button.
The scan process will begin, taking time proportionate to your file size. The tool runs to diagnose and resolve company file-related issues automatically. After the scan completes, check for the QuickBooks enterprise multi-user mode error. If the issue persists, you must set the folder permissions properly.
Method 2: Verifying the Folder Permissions on the Server Computer
The folders that host the company file should have the right permissions so that they can be accessed through other systems on the network. Follow the steps below to check that the folder permissions are set correctly and do not cause a QuickBooks database server manager multi-user mode error.
- Open Windows Explorer on your server computer.
- Go to the folder that contains the company file and right-click on it.
- Click on the ‘Properties’ option and move to the ‘Security’ tab.
- Go to the ‘Advanced’ section and then select ‘QBDataServiceUserXX’.
- Click on the ‘Edit’ option.
- Allow all the important settings.
After correcting these settings, you should also ensure that hosting is enabled on your server computer to fix the QuickBooks multi user mode server error. The steps are listed in the next troubleshooting solution.
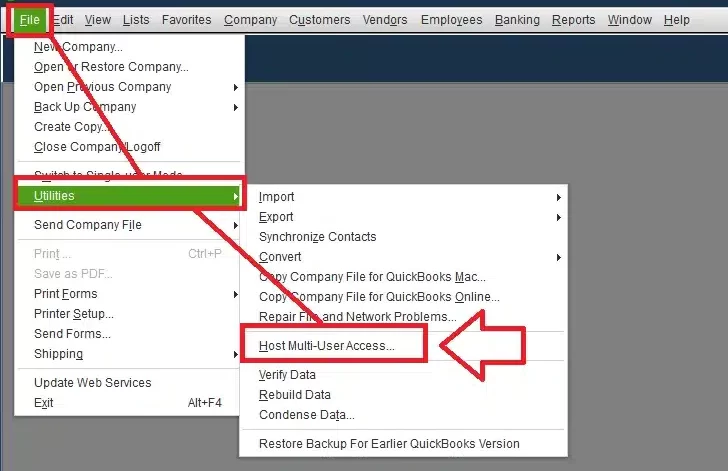
Method 3: Verify if the multi-user mode is enabled on the Server
- Go to the ‘File’ menu and move to the ‘Utilities’ section.
- Click on the ‘Host Multi-User Access’ option.

- Press the ‘Yes’ button to confirm the changes.
Note: Ensure the multi-user mode is off on all workstations; otherwise, you may experience the HXXX series error code while accessing the company file on the server.
You may also read: How to Resolve QuickBooks Keeps Crashing
Method 4 : Edit the QBWuser.ini File
If you get an error when you open QuickBooks in multi-user mode even after following the solutions above, rename the QBWUser.ini file using the instructions below.
- Move to the Appdata folder and open the QBWUser.ini file saved in it.
C: \ Users \ ( username) \ AppData \ Local \ Intuit \ (Your QuickBooks Desktop version) But if you can’t find the AppData folder in the users folder, Then you need to change Windows settings to show hidden files and folders. - Now, search for MULTIUSERMODE in the QBWuser.ini file.
- Set the value to Y ( MULTIUSERMODE=Y) in the Multiusermode line.
- Press the ‘Ctrl + S’ to save the changes made to the QBWuser.ini file.
Now check if you can access the company file in multi user mode without issues. If not, follow the next solution and rename some crucial QuickBooks program files.
Method 5: Add .OLD at the End of the ND and TLG Files
Rename the network data (ND) and transaction log (TLG) files as name.QBW.ND and name.QBW.TLG to fix issues with the multi-user in QuickBooks. To rename these files, follow the below-enlisted steps:
- Navigate to the default location of the company file.
“C: \ Users \ Public \ Public Documents \ Intuit \ QuickBooks \ Company File” - Now look for the files with .ND and .TLG extensions.
- Add .OLD at the end of both files.
- Now restart the computer, run QuickBooks in multi-user mode, and check if QuickBooks switches to multi-user mode without issues.
Method 6: Configure Firewall Exception for QuickBooks Program and Port
If the multi user mode QuickBooks not working, check the firewall restrictions as follows:
Add QuickBooks Ports to Your Firewall
- Press the Windows button.
- Now, Type “Windows Firewall” inside the search box and open the Windows Firewall setting.
- Now, select the Advanced Settings option from the left sidebar.
- You can find the inbound and outbound rules in the Advanced Settings option.
- First, select the Inbound Rules, then select the New Rules option.
- In New Rules windows, click on the Port option, then the TCP option.
- Add the Port according to your QuickBooks version.
- Repeat all the above steps and choose Outbound Rules in step 4.
QuickBooks Desktop 2020: 8019, XXXXX.
QuickBooks Desktop 2019: 8019, XXXXX.
QuickBooks Desktop 2018: 8019, 56728, 55378-55382.
QuickBooks Desktop 2017: 8019, 56727, 55373-55377.
Add QuickBooks Program to the Firewall
All the above steps are the same this time; instead of choosing the port, we’ll add QuickBooks Program in inbound and outbound firewall rules to resolve the QuickBooks 2024 multi user mode not working issue.
- In the Advanced Firewall Setting option, click on the New Rule.
- This time, select the program and then browse to the location where the below-given executable files are stored.
OnlineBackup.exe — IntuitSyncManager.exe — QBUpdate.exe — QBLaunch.exe —QBCFMonitorService.exe — QBServerUtilityMgr.exe — QBDBMgrN.exe — QBW32.exe QuickBooksMessaging.exe — FileMovementExe.exe — FileManagement.exe — DBManagerExe.exe Dbmlsync.exe — AutoBackupExe.exe - Once you added all Programs to the Inbound Rules.
- Follow the same process for the Outbound Rules.
- Finally, restart your computer and check if still QuickBooks cannot open company file in multi user mode. If yes, follow the next solution.
Method 7: Run the QuickBooks Database Server Manager
It is necessary to tackle multi-user errors in QuickBooks Desktop when using a tool such as QuickBooks Database Server Manager. You can quickly and easily access the multi-user mode when connected. However, it has many benefits as it increases productivity and reduces time to a great extent, as now users can work on the same company file together. Therefore, you must follow the simple procedure to install the database server manager for each QB desktop version. Fortunately, the QuickBooks multi-user mode not working issue can be resolved automatically when you scan for the company file on the server computer with the help of this tool.
Method 8: Ping the server from a workstation
Knowing the multi-user mode in QuickBooks and fixing its causes can give the user a smooth ride. However, issues in the network can cause failure and trigger errors. Resolve them by reading the details below:
Note: Before fixing the QuickBooks multi user mode not working error, check whether you have turned on the network discovery on the server and workstations.
- Press the Windows key on the keyboard and then type network in the search bar. You can now see the network status and system settings; click on it to open.
- Under advanced network settings, you will see the network and sharing center.
- Open it, and now, on the left, you can see the Change advanced sharing settings option. Select it to open.
- You will now be directed to the Advanced sharing settings. In the network discovery and file and printer sharing section, choose the “Turn on network discovery” and “Turn on file and printer sharing” options.
- Take note of the name of your server.
- Now press the Windows + R keys to open the Run window, type cmd in the text box, and hit the Enter key.
- Take note of the host and server name.
- If you want to test the server, go to the workstation and open the command prompt.
- Type “ping_server name” and then press the Enter key.
There are no connectivity issues if you get a reply for each packet sent to the server. However, if you notice packet loss, you must consult an IT expert to eliminate the connectivity issues.
Method 9: Add the Server to the Windows Host File
If QuickBooks single-user mode cannot switch to multi-user mode, do as follows:
- Use the notepad to open the Windows host file facing the multi-user mode error.
- The location of the host file is as follows: c:\windows\system32\drivers\etc.
- If it is required, then you shall open the notepad as admin.
- Then, you must type the server’s IP address and the last IP address.
- Type in the server name after pressing the Tab key.
- Move to the File menu and click save, followed by exit.
Method 10: Get a New Company File Folder Created
Users should create a new company file folder on the host computer to fix errors where QuickBooks will not switch to single-user mode. Set up the new folder and give Windows adequate permissions to access the new folder. It will help share company files across different systems. In the end, copy the .QBW file to the folder and verify whether the multi-user mode works. When it works uninterruptedly, you can be sure it is error-free.
Take Guidance from a QB Professional!
We have discussed many reasons and solutions throughout the blog so you can easily fix the QuickBooks multi user mode not working issue. If you are still in a dilemma and unsure whether to implement the troubleshooting solutions, contact our support team by dialing the toll-free number +1.855.888.3080.
Feel free to ask any question or query related to the QuickBooks from our Experts, as they can resolve your issue within a few minutes.
Frequently Asked Questions
Why won’t QuickBooks let me switch to multi-user mode?
You can face some issues while switching to the multi-user mode. It could be because of incorrect hosting settings, internet and firewall issues, outdated versions of applications, or your device not meeting the minimum system requirements.
How do I set up QuickBooks for multiple users?
You must update the QBDT on your device. Next, configure the QuickBooks Database Server Manager and map the network drive. Lastly, install QBDT on the workstations and turn on hosting on the server PC.
Why is QuickBooks so slow in multi-user mode?
The primary reason for QuickBooks running slow is the incorrect setup of the company files by the host computer. This will make room for latency while file sharing across the network. In such a case, you need to verify the setup to avoid any multi-user mode issues in QuickBooks.
What is the error H202 switching to multi-user mode in QuickBooks?
One of the most frequent problems consumers encounter when converting to multi-user mode is QuickBooks error H202. It usually occurs when the server machine that houses the QuickBooks files is damaged or corrupted.
What is the advantage of operating QuickBooks in a multi-user mode?
If you start using QuickBooks in a multi-user mode, you will upgrade your collaborative and productive skills. You can enjoy new options like quick file sharing, real-time data updates, and enhanced security.

Erica Watson is writing about accounting and bookkeeping for over 7+ years, making even the difficult technical topics easy to understand. She is skilled at creating content about popular accounting and tax softwares such as QuickBooks, Sage, Xero, Quicken, etc. Erica’s knowledge of such softwares allows her to create articles and guides that are both informative and easy to follow. Her writing builds trust with readers, thanks to her ability to explain things clearly while showing a real understanding of the industry.


