It’s only natural to upgrade your desktop in a few years once it gets outdated for better hardware and software options. The longer you work on QuickBooks, the more space your company file takes. This might result in less space and speed for your older system. Therefore, to transfer data from your previous PC to the updated one, you can either do it manually or with the help of the QuickBooks migration tool. It is a tool that makes your data transfer process smooth-sailing and easy. The QuickBooks migrator tool is also very good for preventing data loss during the transfer.
Now, there are occasions when you might need to migrate from the desktop application to the web or from the web version to the desktop application of QuickBooks. The migration tool can also be used to transfer the data from QuickBooks Online to Desktop and vice versa for both Windows and Mac users.
With the help of this blog, you’d learn how to operate and utilize the QB migration tool to move your important data.
Want a professional to help you move your QuickBooks data across platforms? Contact our Proadvisor Solutions professionals at 1-855-888-3080 today!
Table of Contents
Why Should I Use the QuickBooks Desktop Migration Tool?
The QuickBooks migration tool is a very convenient feature that makes transferring your data much simpler and hassle-free. Moreover:
- It provides you with data security and makes sure you don’t lose any important data
- It has an automated backup process, which backs up your data
- You have to make fewer data entries yourself while migrating
Things You Require for Running the QuickBooks Data Migration Tool
Some of the basic requirements for the QuickBooks migration tool are mentioned below:
- You have a USB Flash Drive for storing data
- Ensure that both of your systems are properly connected to the internet
- The Flash Drive you’re using should have the storage space required to move your QB data
In the next section, we will discuss about the working of the QB migration tool.
QuickBooks Migration Tool – Functioning Explained
The working process of the migration tool to transfer QuickBooks data to a new computer is listed below:
- You have to start by creating a strong password that will be used after transferring QuickBooks from one computer to another. Note your password so you don’t forget it.
- The QuickBooks Desktop migration tool will copy the last three company files opened, along with the supporting files, to the Flash Drive.
- The migrator tool QuickBooks Desktop will automatically download the compatible version of the QBDT app on your new system and set up your company files.
- After the transfer is complete, the tool doesn’t erase any data from your drive.
Note: The migrator tool can only work on similar operating systems. For reference, the migration tool won’t transfer files from a 64-bit system to a 32-bit system or vice versa.
Which Users are Eligible to Use the Migrator Tool QuickBooks
Any user who works on the QB Desktop can use this tool to transfer their valuable data. First, verify the points below:
- QuickBooks data migration is allowed for the Enterprise, Pro, and Premium versions
- Data transfer in QuickBooks can be done by your company file (.QBW), backup files (.QBB), and portable files (.QBM)
- Accountants can move data using the QuickBooks migration tool Desktop to Online
- You don’t need to have QuickBooks Desktop installed to migrate to QBO if you have a Desktop file.
- Users of QB versions prior to 2011 won’t be able to migrate without performing some additional steps. You can contact our Proadvisor Solutions experts to learn more.
Read and verify the points above for QuickBooks data migration for enterprises.
Things to Keep in Mind Before Using the QuickBooks Data Migration Tool
Before using the QuickBooks migration tool to move your file, make sure to go through the list given below:
- Make sure that your chart of accounts balances are up to date and without any errors
- Check that your balance sheet is accurate after the latest tax returns
- Reconcile your bank and credit card statements
- You should categorize any open transactions
- Pay the invoices that are outstanding in your account
- Complete all the payroll runs or payroll tax payments
Now let’s move on to setting up and downloading the QuickBooks migration tool.
The Type of Data You Can and Can’t Copy Using the QB Migration Tool
When you use the migration tool, some data won’t be able to be transferred. When that situation arises, you have to manually enter the information later. Given below is a list of both types – the data that gets copied and the data that doesn’t.
Data that Gets Copied Using the QuickBooks Migration Tool
- All the QBDT details, including the version and other data needed to install the QB workstation on your new system
- The last three company files you opened on your previous desktop
- All related files, forms, and custom templates
- QB Letters and templates
- Memorized and scheduled reports
- Any local attachments
- Settings of your printer, like PrintEng.ini, wpr.ini and QBPrint.qbp
- Financial Statement Designer (FSD Clients and Data)
- Spell Checker – UserDictionary.tlx and spell.ini
- Your Cash Flow Projecter (.cfp)
- The Loan Manager (.lmr)
- It also copies your Business Planner (.bpw)
- Statement writer for the QB Accountant
- Advanced Reports for the QB Enterprise version
Data that Doesn’t Get Copied Using the QuickBooks Migration Tool
- If you use multi-user mode, you won’t be able to copy its configuration to your new system
- Payroll and payment setup need to be repeated again in order to ensure privacy and data safety
- If you use IDP (Intuit Data Protect), you have to first uninstall it from the old system and then install and sign in again on the new one
- Any company files older than the last three opened files won’t get copied
- Any manually created backup files are subject to not being copied in the migration process
Now let’s get into migrating your data with the help of the migrator tool.
Desktop to QuickBooks Online Data Migration
You can transfer your data between QBDT and QBO using the QuickBooks Desktop to Online migration tool. Glance at the steps you see below to do the same:
Get a QuickBooks Online Subscription
- Get a QBO subscription in order to achieve the Desktop to QBO data migration.
Note: After purchasing your subscription, you’ll have a time period of 90 days for moving your data.
Set Up Your Desktop File for QuickBooks Data Migration
- Update your QB Desktop to the latest version
- Any unused customers, vendors, or accounts should be marked as inactive
- Void or delete any unbilled charges and unbilled time related to inactive customers, vendors, and accounts.
- Navigate to Vendors and, after clicking Bills, delete all the unbilled charges.
- The QuickBooks migration tool can only export a certain amount of data, so ensure that:
- The file has appropriate links or targets to their respective entries of transactions.
- The QB migration tool has a target limit of 1,500,000 for transferring data from QBDT to QBO. So, make sure to condense your data before migrating.
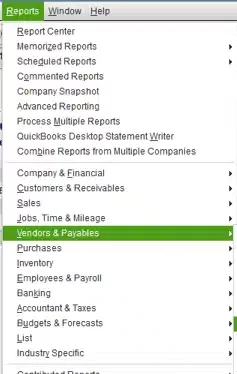
- Print your sales tax liability report with the help of the guided steps mentioned below.
- Navigate to Reports
- Select Vendors and Payables

- Choose Sales Tax Liability
- Select All in the Dates dropdown menu
- Open the Print dropdown menu
- Select Save as PDF
- Browse to the location you want to save that file in
- Hit Save
- For QBDT Payroll, do the steps given below:
- Any unpaid employees in the current year should either be terminated or deactivated.
- Employee profile information should be updated, including first and last names, SSN, hiring date, date of birth, and address. Ensure the data is correct.
- After running the payroll, wait for 2-3 days
- Then, you can transfer your data.
- Transfer your data a few days before your payroll date, so that you can get time for setting up QBO payroll
- For QuickBooks Time, contact our professionals who can assist you in setting up your account in QBO.
Transfer Your Files With the Help of One of These Tools
You can transfer your files to QBO with the help of these tools:
The Desktop QuickBooks Migration Tool
You can use the built-in migration tool in the QuickBooks Desktop app to migrate your data with the following steps:
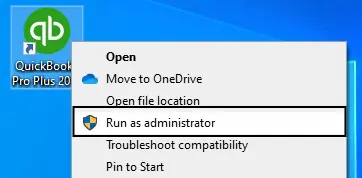
- Open your QBDT app as an admin user
- To export the QB company files
- QBDT Pro and Premier users
- Click on Company
- Select Export your Company File to QuickBooks Online
- QB Desktop Enterprise users
- Press Ctrl + 1
- This will open the Product Information window
- Press Ctrl + B + Q
- Finally, press OK
- QBDT Pro and Premier users
- Select Get Started
- You will get a pop-up screen that says “Let’s bring your data to QuickBooks Online”
- Select the process for transferring your data
- Bring all of your company data
- Bring only lists and balances (This option can come in handy if you’re working with a large data file and don’t care about every individual transaction)
- If you do have an inventory, then you can:
- Press Yes, track inventory using FIFO, and then choose a starting date
- Choose No, don’t move inventory, and you can move your inventory manually later.
- If you use multi-currency in your QBDT app, choose your home currency.
- Confirm the status of your QuickBooks Online account
- If you have a QBO account with an active subscription, choose Yes, sign me in, and then press Continue
- Create a QB Online account by choosing No, I need to create one if you don’t already have one set up. Doing this will create an Advanced Trial Company Account for QBO.
- Now, sign in with the user ID and password you set up for the Online version of QB
- Your screen will display a list of QBO company names and their corresponding subscriptions. Select the company you want to move your data to
- Select Continue
- Then, select Export, and you’ll see a progress bar that indicates the transfer of data from QBDT to Online
- If you already have some data in your QBO account, it will ask you to replace the data
- Choose Agree and press Replace
- Press Yes, go ahead and replace the data
- Choose Replace
These were the steps for the QuickBooks migration tool that is built-in to your QBDT app.
Use QuickBooks Web Based Migration Tool
Only use this method if you have QBDT version 2021 or older, or you don’t have access to QB Desktop.
- Open the online migration tool QuickBooks for your version
- Pro/Premier
- Enterprise
- Click Get Started
- Sign in with your Intuit Account
- Upload your company file
- Choose Select File and browse to the QBDT file you want to move (Only one file at a time)
- Press Open to upload the file
- After your file is uploaded, QB will auto-update it to the latest version of Desktop
- Choose Move to QuickBooks Online
- Now, just follow the instructions you see on your screen to finish this process
Then, Set Up Your QB Online Account
Follow the steps given below to set up your new QBO company:
- Connect your credit card or bank account
- Start generating and sending invoices to the customers
- Monitor your bills and learn how to pay bills in QBO
- Set up QuickBooks Online Payroll services
- You’re good to go
This was for all the Desktop versions of QB. Now, let’s take a look at transferring data from Mac to Online.
Transfer Your Data from QB Desktop for Mac to QB Online
The data from QB Mac users can only be moved to the US version of QuickBooks Online. To use the QuickBooks data transfer utility for this purpose, the file should not exceed 1,500,000 targets. If it does, then you should condense the file. After consuming and applying this information, perform the steps given below:
Users of Mac Desktop Versions 2022 Upwards:
- Open the QB app as an admin

- Select File and press Export
- Choose QuickBooks Online
- Press the Get Started button
- Now, select if you want to export your company file or only specific data (choose the latter if the company file you’re using is large in size and you don’t care about each and every transaction)
- You need to make a choice if you want to move your inventory or not (there is an option to add the inventory manually, later, if you don’t want to do that now)
- Log in to your QBO account using the appropriate credentials or create a new one
- Choose the QBO company in which you wish to transfer your data to
- Press Continue
If you had any data in your QBO account, it will be replaced with the data you transferred.
Users of Mac Desktop Versions 2021 or Prior:
- Move your Mac QB data file to Windows
- Then follow the steps mentioned above, in Section A, to move your file from QBDT Windows to Online.
Now, let’s discuss about using the QuickBooks Migration tool for moving your QB data from Mac to Windows.
Move Your Data from QB Mac to Windows Using the Migrator Tool QuickBooks
Follow the steps given below for transferring files from Mac to Windows in QB:
- Update your QB Mac
- Before you export your QB company file from Mac, you have to:
- Search and remove memos with special characters. To do so, you have to follow these steps:
- Open the Reports menu
- Navigate to Custom Transaction Detail Report
- In the Dates dropdown menu, press All Dates
- Open a transaction with a memo
- Remove any special characters you see
- Press Save
- Close the open transaction
- Repeat the steps for every transaction
- After sorting the list, open Utilities from the File menu and press Verify Data
- Search and remove memos with special characters. To do so, you have to follow these steps:
- Move the Mac company file to Windows
- Open your QB Mac and log in as an admin
- Click on the File menu
- Press Export
- Select To QuickBooks for Windows
- If asked to verify before backup, press Verify
- Name your file and save it to the location of your choice
- Make sure to not include any special characters when you name the file
- Choose Save
- Enter and confirm your password
- Click OK and press OK again
- Move the file to your Windows system with a flash drive or online storage. You can also move it through Email if the file is small enough
- Finally, you can restore the file in your QBDT workstation for Windows
After Completing the Process, Move the File from QBDT to QBO
This should migrate your files from your QB Mac to Online.
Migrating from QuickBooks Online to Desktop
The QuickBooks migration tool can also be used to move data from QB Online to Desktop. See the steps below to do so:
- Download the QuickBooks Online migration tool
- Log in to your QuickBooks Online
- Navigate to Export Overview
- Select Get Started
- Now, download the QuickBooks migrator tool
- Install the tool
- Finish installing the migrator tool by reading the instructions on your screen
- Export your QBO data
- Open the Step 1: Prepare to export page
- Press Continue
- Select Continue again in the Step 3: Request your data page
- Enter your Name and Email address
- Click Continue
- Hit Close
- Now, open the Export Overview page
- Follow the instructions on the Step 1: Prepare to export page for data migration
- Press Continue
- Then, open the Exporting from QuickBooks Online page
- Click on Continue to Download
- Choose Download QBXML file
- Save the file and press Continue
- Run your QuickBooks Desktop migration tool
- Open your QBDT migration tool
- Select Browse
- Choose your QBXML file
- Press Open
- Open your QB Desktop app
- In the No Company Open screen, choose Create a new company
- Press For myself
- Then, select Start Setup
- In the sign-in screen, select Sign in Later dropdown menu
- From the menu, select in 2 Days
- Press OK
- Select Import and name the file
- Choose a location to save it and press Save
- Choose the option saying, “Yes, always allow access even if QuickBooks is not running”
- Press Yes, followed by Continue
- Then, click on Done
- Fill in the details asked on the Update Business Info screen
- Select Save
- Choose Sign in now
- Select Start Working
- In the Intuit account menu, choose Admin
- Enter your Email address and press Continue
- In the Sign in Later menu, choose in 2 days
- Select OK
- Finally, press Done after the import is finished
- Check if the data you exported matches after running the profit and loss report in both QBDT and QBO
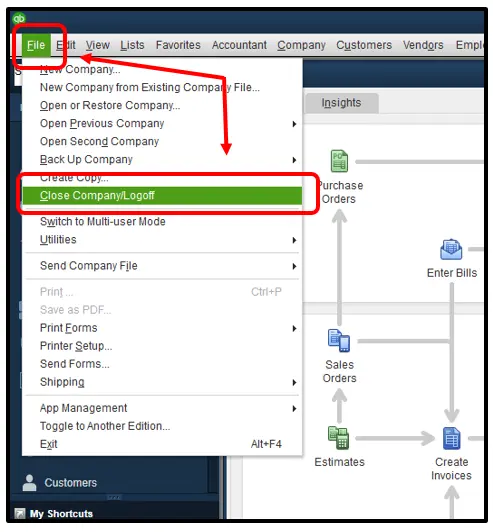
- If it doesn’t, open the QBDT app
- Choose Close company

- Using the QuickBooks migration tool, import your file again
- Run the profit and loss report again
- If the data still doesn’t match, you will need to tweak it manually.
The QuickBooks migration tool would successfully move your data from QuickBooks Online to Desktop by performing the steps above.
Data that Moves from QuickBooks Online to Desktop
Many data items don’t get copied from Online to Desktop due to their distinct features. Read the tables below to see what type of data you can and can’t move using the QuickBooks migration tool to move data from QBO to Desktop:
Features
| Copies to QuickBooks Desktop | Doesn’t Copy to QuickBooks Desktop |
| Multi-CurrencyNote: Multi-currency transactions won’t be copied to QBDT. Moreover, you need to be careful as there any transactions that are not in United States Dollars (USD) in QuickBooks Online will be converted into USD when moving to QB Desktop. | |
| PayrollImportant: To create paychecks, you need to subscribe to QBDT Payroll. If you want to proceed without a subscription, you should set up a manual payroll. | |
| Reconcile1. You will see a bold checkmark in the cleared column for all the transactions that have been reconciled.2. A check mark will appear for all the transactions that have been cleared in the cleared column. | |
| Sales Tax1. Line items will represent your sales tax in QBDT.2. Service items will represent the sales tax items and rates. | Note: ST (sales tax) payments and adjustments don’t move. |
| ProjectsMoved to QuickBooks Desktop as Customer Jobs. |
Lists
| Copies to QuickBooks Desktop | Doesn’t Copy to QuickBooks Desktop |
| Chart of Accounts1. The details of accounts are not moved to QBDT.2. If you want account numbers, switch on the account number preference.3. Inactive accounts represent deleted accounts that come along with account numbers. | Note: QBDT won’t accommodate the Inventory shrinkage amounts. |
| Class ListNote: Inactive classes represent deleted classes in QBDT. | |
| CustomersNote: Inactive customers are simply deleted customers who have been moved into QBDT. | Note: The below-listed customer info won’t move to your QBDT app:1. Customers’ credit card info is not moved.2. Customer notes3. Preferred delivery method4. Mobile and/or pager number5. Is Taxable |
| VendorsNote: Remove the 1099 vendor status in QBO before your move to QB Desktop.Inactive vendors represent vendors that have been deleted from your QBO. | Note: Listed below are the items that won’t move from the vendor’s section in QBO to QBDT:1. Vendor notes2. Mobile and/or pager number |
| EmployeesInactive employees represent the deleted employees in QBDT. | Note: QBDT won’t accommodate the employee notes. |
| Other listsThe following list shows as general items in QuickBooks Desktop:1. Customer type2. Vendor type3. Job type4. Memorized reports5. Other names6. Payroll item7. Price level8. Sales rep9. Ship via10. Templates11. To do | |
| Payment Method List | |
| TermsNote: QBDT also won’t accommodate the payment terms you set up for customers in QB Online. |
Products and Services
| Copies to QuickBooks Desktop | Doesn’t Copy to QuickBooks Desktop |
| BundlesNote: QBDT won’t accommodate the product service bundles from QBO. | |
| Inventory1. Inventory Asset account2. Cost of goods sold account3. Purchase account4. Sales account5. Quantity on hand6. Asset valuesNote: QBDT and QBO use different calculation methods. So, check the inventory accordingly. | |
| Categories1. Parent items represent categories in QBDT.2. QBO sets the same item type for categories, and products and services. |
Preferences
| Copies to QuickBooks Desktop | Doesn’t Copy to QuickBooks Desktop |
| Company info | |
| Users | |
| Location list |
Reports
| Copies to QuickBooks Desktop | Doesn’t Move |
| Audit log | |
| Reconciliation | |
| Memorized reports |
Transactions
| Copies to QuickBooks Desktop | Doesn’t Copy to QuickBooks Desktop |
| Cash purchasesNote: Moved in QuickBooks Desktop as checks. | 1. Estimates2. Purchase orders3. Recurring transactions |
| Time trackingNote: Except for locations, other all-time activities will be the same. QBDT won’t track locations. | Physical timesheets won’t be imported into QuickBooks Desktop. |
| ChecksNote: QBDT will auto-assign numbers to your checks. | |
| Bill payments | |
| Invoices | |
| Refund receipts | |
| Bills | |
| Received payments | |
| Credit memos | |
| Sales receipts | |
| General journal entriesNote: Multiple journal entries will accommodate transactions with multiple accounts receivable or accounts payable. | |
| Deposits | Note: The billable status does not appear in QBDT even if it exists in QBO. |
| Transfer fundsNote: Moved in QuickBooks Desktop as journal entries. | |
| PaychecksNote: They are moved as checks in QuickBooks Desktop. | |
| Liability adjustments | |
| Inventory adjustments | |
| Credit card payments |
Moving Your QuickBooks Data to a New System by the Migrator Tool QB
You can use the QuickBooks migration tool to transfer QuickBooks data from your old PC to the new one with the steps below:
Steps You Should Take on Your Old System
- Run the QBDT app
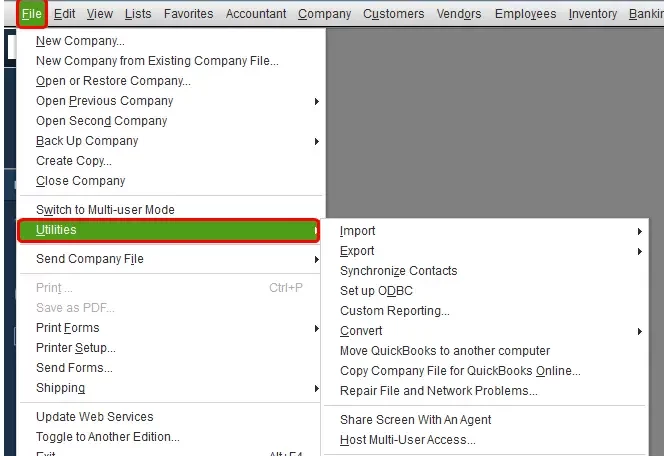
- Open the File menu
- Click on Utilities
- Press Move QuickBooks to another computer

- Press I’m ready
- Set a one-time password
- Follow the instructions presented on your screen and select your USB Flash Drive to store the files
- Wait for the files to get copied
Steps You Should Perform on Your New PC
- Insert the USB Flash Drive
- Open the QuickBooks Migration Tool
- Click on Move_QuickBooks.bat
- Enter the one-time password you set up
- Now, click on Let’s go
- Wait for the file to migrate using the QB migrator tool
How Can You Move to a New System Without Needing to Use the QuickBooks Migration Tool
If you want to manually reinstall or move your QB to a new system, follow the steps provided below:
- Have your product and license information in hand
- Uninstall the QBDT software from your old PC
- Open your new PC
- Download the installation files of QBDT
- Or insert its CD
Install QB on your new PC.
QuickBooks Data Migration Tool – A Quick View
Presented below is a summary of this blog on the QuickBooks migration tool in a tabulated format:
| QuickBooks migration tool | It is a tool offered by Intuit that can help you migrate your QuickBooks data from one system to another and also transfer data between different platforms of QB |
| Requirements to run it | USB Flash Drive with sufficient storage (at least 250 MB) and a trouble-free, high-speed internet connection. |
| Ways to download it | You can download it by opening QB Online, clicking on Get Started, and selecting Download the QuickBooks migration tool. |
| Different versions you can move to | QuickBooks Desktop to Online, Desktop for Mac to Online, Online to Desktop, and Desktop to Desktop. |
Conclusion
In this blog, we have discussed about the QuickBooks migration tool and its advantages. We also discussed how it functions and the things you should keep in mind before using the tool. Additionally, we provided you with guided steps for transferring your data using the migrator tool on different platforms. If you’re facing any errors migrating your company files and important data, speak to Proadvisor Solutions team at 1-855-888-3080 to resolve your problem today.
Frequently Asked Questions (FAQs)
How to switch quickbooks from one computer to another?
To switch your QuickBooks data from one computer to another, you can either do it manually or with the help of the QuickBooks migration tool. To migrate your data with the help of the migrator tool, open Utilities in your QB app and press Move QuickBooks to another computer. Select I’m ready and set a one-time password (OTP), and follow the guidelines on your screen to move the files to the USB Flash Drive of your choice. Then, insert the USB on your new system and open the QuickBooks migration tool. Finally, just open the Move_QuickBooks.bat file and enter the OTP you set. Select Let’s go and wait for the data to be transferred.
What is the migration utility in quickbooks?
QuickBooks migration utility/tool is a feature provided by Intuit that can help you with transferring your data from one QuickBooks platform to another. Moreover, it can also help you switch between different versions of QB. Using this tool to shift your file makes sure that information is safe and secure, with no data loss.
Why did QuickBooks migration fail?
The reasons behind your QuickBooks migration tool failing can be multiple. It can be a result of an unstable or poor internet connection, a large company file, corrupted data, or incompatible data. Moreover, an outdated system can also cause this issue.
Should I really migrate from QuickBooks Online to QuickBooks Enterprise?
It really depends on your business needs and preferences if you want to migrate to QB Enterprise from Online or not. If your business is in the growing stage, and it requires more advanced features than what the QBO offers, you can migrate to the Enterprise version using the QuickBooks migration tool. But if you’re satisfied with what the QB Online offers, we’d suggest not upgrading.
Where can I find the tool to go back to QuickBooks Desktop?
You find the QuickBooks migration tool for Online in the Export Overview page of your QBO website. You need to click ‘Get Started’ and download the tool to use for migrating your data back to QB Desktop. Steps to do so have been shared in the blog above.
Read more useful articles:
Steps to Move QuickBooks Company File to A New Computer
Solved: QuickBooks Migration Failed Unexpectedly Issue
What Is QuickBooks Data Migration Services
Fixing QuickBooks Migration Error 1009
A Detailed Guide to Import QuickBooks Desktop to Online

Erica Watson is writing about accounting and bookkeeping for over 7+ years, making even the difficult technical topics easy to understand. She is skilled at creating content about popular accounting and tax softwares such as QuickBooks, Sage, Xero, Quicken, etc. Erica’s knowledge of such softwares allows her to create articles and guides that are both informative and easy to follow. Her writing builds trust with readers, thanks to her ability to explain things clearly while showing a real understanding of the industry.