QuickBooks Error H101 arises in multi-user mode settings and makes it challenging to use this mode. So, if you’re finding it a hassle to switch, keep reading this blog till the end and implement the solutions suggested by the experts.
QuickBooks offers multi-user mode to users, where several people can work on the same company file simultaneously from different computers. A server computer hosts the company file, whereas the workstations possess access to it. Although the procedure is straightforward, interruptions and interferences may arise at any minute.
QuickBooks 2024 Error H101 arises while switching to the multi-user mode and indicates a blockage to the connection. So let’s dig into this troubleshooting guide and see how to eliminate this issue quickly and effectively.
QuickBooks Error H101 can frustrate users working in multi-user mode. If you can’t handle it yourself, contact our Proadvisor solutions specialized team at 1.855.888.3080 and resolve your issues today
Table of Contents
What is QuickBooks Error H101?
All the H-series errors in QuickBooks relate to the multi-user mode. When something blocks the multi-user connection to your server, you may face Error Code H101 QuickBooks Desktop. This technical problem causes issues in accessing company files on the server computer or another workstation. Facing this issue indicates that more than one workstation might be set as the server for QuickBooks. The multi-user mode settings state that your server (the computer hosting the company file) should be the only one hosting the multi-user mode.
It means that the host multi-user access option should be disabled on workstations. Apart from incorrect hosting settings, misconfigured QuickBooks, firewall blockages, etc., may result in the error. Other triggers for the H101 Error in QuickBooks are detailed below.
What triggers QuickBooks Error H101?
Several reasons can contribute to the forthcoming QuickBooks error H101. Let’s look into them in detail:
- QuickBooks cannot locate the IP address of your device. Further, it may be incorrect.
- The hosting settings in QuickBooks aren’t accurate.
- Windows Firewall may cause obstructions in QuickBooks functioning.
- You can’t reach your company file because the path is incorrect or the file is inaccessible. Its configuration may also be faulty, leading to errors.
- The damaged Network Data File is another reason QuickBooks Cannot Switch to Multi User Mode.
- When the system doesn’t have QuickBooks services like QuickBooks Database Server Manager and QBCF Monitor Service running, the error H101 may arise.
- QuickBooks Firewall Ports aren’t set up correctly.
- Improper DNS settings of the QB app may lead to this error.
- You may not have started the QuickBooks services correctly.
- The QB application might not have been installed correctly, causing the error to emerge.
Thus, all these reasons may lead users to face QB Error H101, pushing them to find an effective QuickBooks Error Code H101 Fix. So, let’s dive into the troubleshooting section of this blog and see how to resolve the error like pros.
Troubleshooting Methods to Fix QuickBooks Error H101
If you’re burdened by the question, “How do I Fix H101 Error in QuickBooks?” here’s a troubleshooting guide to rectify the problem.
Troubleshooting Technique #1: Stop Hosting Multi-user Access
When QuickBooks Error H101, H505, and H303 infect a system, it indicates that you have set up one or more workstations as the QuickBooks server. Your server is the only one set to host the multi-user mode, and the host multi-user access option should be disabled on the workstations. Workstations shouldn’t be set to host the company file; only the server should.
Note: The steps to follow before launching a company file.
- Go to any workstation where the error H101 arises and launch QuickBooks.
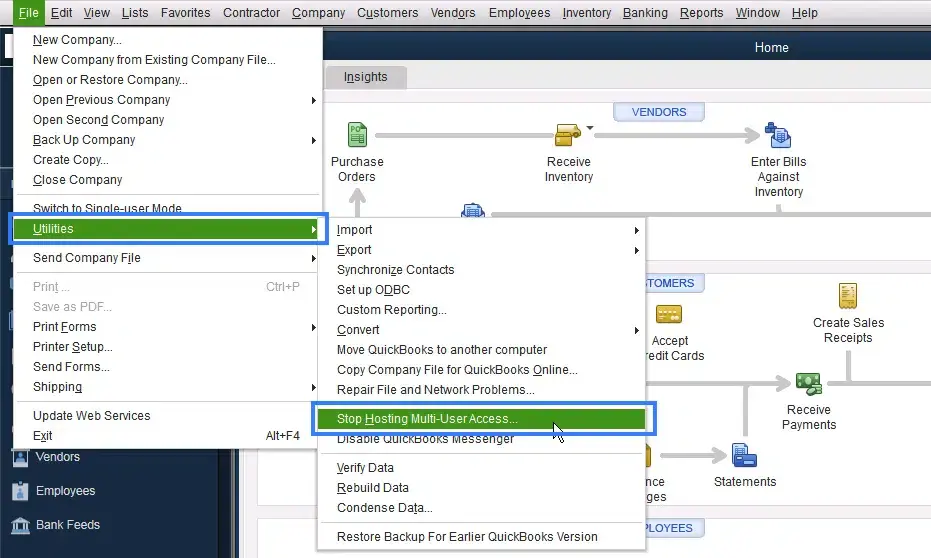
- Do not access the company file. Instead, head to the File menu and select Utilities.
- If the Host Multi-User Access option is visible, do not choose it. Head to the next workstation because this device is not causing the problem.
- However, if you see the Stop Hosting Multi-User Access option, click it.

- Follow the steps on all the workstations.
After verifying all the workstations, head to the server computer. The server computer hosts the company files.
- Launch QB on the server computer.
- Tap the File menu, followed by the Utilities option.
- If the Host Multi-User Access option is visible, tap it. If the Stop Hosting Multi-User Access option is available, do not opt for it.
Troubleshooting Technique #2: Run QuickBooks Tool Hub on the Server
QuickBooks Database Server Manager can help you fix problems with your company file access in multi-user mode. Therefore, follow the steps mentioned below to install and use it on the system:
Step 1: Download and install the QB Tool Hub on the Server
The QuickBooks Tool Hub may help you fix multiple errors with its vast collection of tools. Shut down QB before using the tool hub and get the best experience on Windows 10, 64-bit.
- Access the official Intuit website and find the latest QuickBooks Tool Hub version link. If you already have the tool hub installed on your system, you can verify its version from the Home tab. Find it at the bottom.
- Tap it and save the download file in the default downloads folder. Otherwise, click Browse to look for another location for the package.
- After the download ends, visit this location and double-click the tool hub executable file, aka QuickBooksToolHub.exe.
- Initiate the installation of the QB Tool Hub and accept the terms and conditions.
- After completing the installation process, double-tap its icon on the Windows desktop and launch the program. Else, find it through File Explorer or the Start menu.
Read Also : How To Fix QuickBooks Error 3008
Step 2: Run QB Database Manager on the Server
Your server computer stores the company file, while the other computers connected to the network are workstations. Run the QB Database Server Manager through the following actions for H101 QuickBooks Fix:
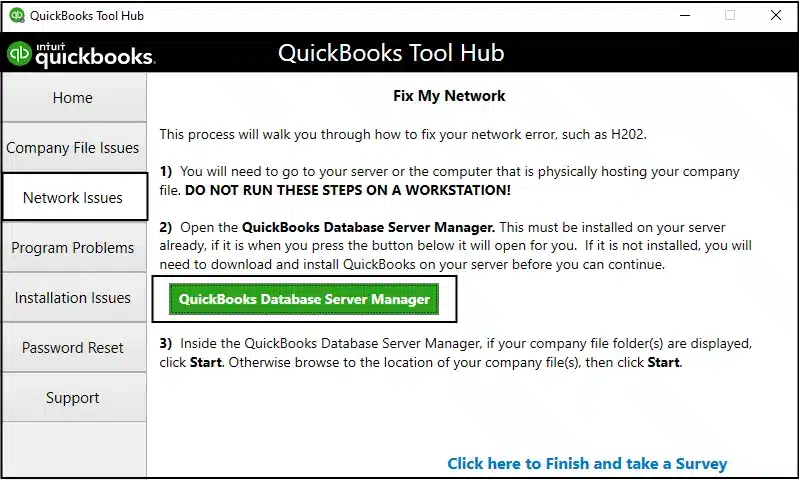
- Tap the Network issues section in the QB Tool Hub.
- Choose the QuickBooks Database Server Manager tool. If it’s not installed on your server, you’ll receive a wizard prompting you to install it.

- When the QB Database Server Manager opens, tap the Start Scan option if you see your company file folder(s). If the company file folder (s) is not visible, hit the Browse option to visit the company file location and opt for the Start Scan option.
- The firewall permissions will get rectified automatically by using QuickBooks Database Server Manager. Hit Close after the scan process ends.
- Launch QB on every workstation displaying the QuickBooks Desktop Error H101. Hit the File menu, then Switch to the Multi-User Mode. If the server computer is a workstation too, verify it too.
Step 3: Run QuickBooks File Doctor from the Tool Hub
The QuickBooks File Doctor tool from the tool hub will help rectify company file errors. Use it as follows:
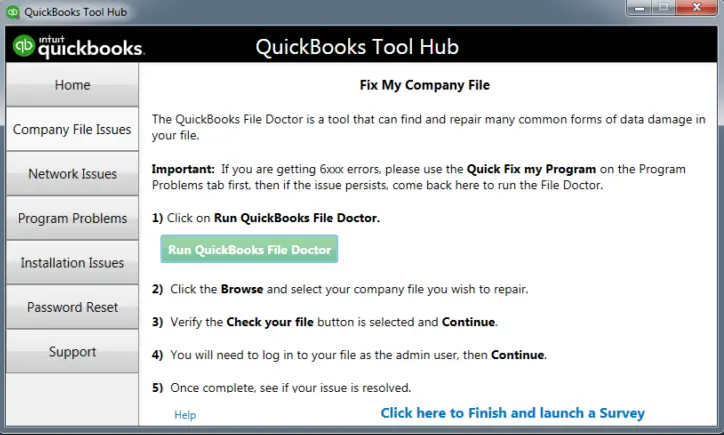
- Tap the Company File Issues section from the QB Tool Hub.
- Choose to Run QuickBooks File Doctor. It may take around a minute to open. If you can’t access it, opt for the QuickBooks Desktop File Doctor and launch it manually.

- After opening the QB File doctor, select the company file from the drop-down menu.
- Hit Check Your File (middle option only) and tap Continue.
- Enter the QB admin password and other credentials and hit Next.
If the workstations can access the company file in multi-user mode without any interruptions, the problem is resolved.
Troubleshooting Technique #3: Verify the Services on the Server
You should have QuickBooks services running on the server computer. Follow the steps below for QuickBooks Database Services and QBCF Monitor Services.
- Begin by launching the Windows Start menu on the server computer.
- Type Run in the search space and hit Enter to launch the Run command.
- Type services.msc in the Run Command Window and press Enter.
- Look for QuickBooksDBXX on the list and double-click it. XX is your QB version.
- Hit Automatic for the startup type.
- Check the service status and ensure it’s set to Running or Started. If it’s neither, click Start.
- Tap the Recovery tab.
- Choose to restart the service from the following drop-down menus: First Failure, Second Failure, and Subsequent Failures.
- Tap Apply and hit OK to save the changes.
- Repeat all the steps for QBCF Monitor Service.
Once done, visit every workstation and open QuickBooks. Head to the File menu and opt for the Switch to Multi User-Mode option. If everything is accessible, the QuickBooks Error Code H101 is resolved.
Recommended To Read – How To Resolve QuickBooks Error 40003
Troubleshooting Technique #4: Ping the Server from Every Workstation
To ensure proper connectivity between the server and workstations, ping it and verify the connection. Begin by enabling the Network Discovery on your server computer and the workstation requiring QuickBooks Error H101 Fix.
- Access the Windows Start menu on the server and workstations.
- Enter Run into the search field to launch the Run command.
- Type CMD into the Run Window and hit Enter.
- Now, type ipconfig/all into the CMD window, and hit Enter.
- Look for the hostname in the Windows IP configuration section. You’ll find the server name on the right.
- Note down the hostname or copy it to a word document for quick access.
Now, return to the workstation to test the server. Get to an IT Professional for assistance if the steps get too complex:
- Launch the Windows Start menu from the workstation.
- Open the Run command by typing Run in the search field.
- Type CMD in the run window and hit Enter.
- Type ping (your server name) and press Enter. You need not include brackets around the server name; it was for clarity purposes here.
- Repeat the steps for all the workstations until the QuickBooks Error Message H101 resolves.
Troubleshooting Technique #5: Remove QuickBooks from the Windows Firewall Defender List
When Windows Firewall blocks QuickBooks connection, you must address the issue by removing the program from the list:
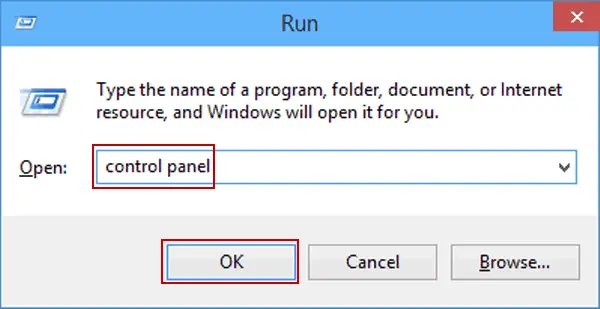
- Hit the Windows + R keys on the keyboard and type Control Panel in the run command.

- Choose the Windows Defender Firewall from the System and Security menu and choose to Allow an App through the firewall.
- Opt for QuickBooks from the programs list and tap OK to exclude it from the firewall defender list.
- Finally, run QuickBooks again and see if you can perform the functions without errors.
Troubleshooting Technique #6: Save the Company File to a New Location
Altering the company file location will change the path for QuickBooks to access the file automatically. The wrong or damaged file path issue will resolve through this method.
- Exit all QuickBooks programs currently active. Now, right-click the desktop screen and tap New Folder.
- Name the folder ‘Test.’ Now, hit the Windows icon on the keyboard to open the Start menu.
- Tap Windows Explorer in the programs list and head to the folder where QuickBooks is saved in the following window.
- Hit the Windows icon and type Windows Explorer in the search space.
- Look for the file with the .QBW extension and follow the steps to copy it (Ctrl + C or right-click > Copy).
- Head to the Test folder and paste the file you copied just now.
- Now, launch QB and the company file and see the presence of QuickBooks multi-user error H101.
- Head to the File menu in QuickBooks and select the Open or Restore a company option.
- Browse your company files from a new location.
- Select the file pasted in the new (Test) folder. Tap Open to access it from the new site.
Read Also – How To Fix Error Initializing QBPOS Application Log
Troubleshooting Technique #7: Configure Windows Hosts File
Configure the Windows host files through the following steps:
- Open My Computer and close QuickBooks.
- Head to the C Drive and open the folders named Windows, System 32, Drivers, etc.
- Navigate to the View option.
- Click Hidden Items.
- Now, right-click the host file.
- Select “Open With,” then Notepad.
- Now, enter the IP and Host Name copied earlier and save it.
The hosting settings will get configured correctly. Now, try accessing your company file and see if error code H101 in QuickBooks persists.
Troubleshooting Technique #8: Configure Firewall Port Settings
Configure Windows Firewall ports through the following steps:
- Open the Run command window by tapping Windows and R keys together.
- Here, Enter Control Panel and press Enter.
- In the Control Panel Window, head to Systems and Security.
- Choose Windows Firewall/ Defender.
- Tap Advanced settings.
- Click Inbound Rule and choose New Rule. Then, hit Port.
- Tap Next and mark TCP.
- In the end, enter the Port number.
Troubleshooting Technique #9: Allow Windows Access Permissions to Share Company Files
Ensure QB has a suitable level of access permissions to prevent future problems while working with the company files over the network. The steps in Windows 10 are as follows:
- Head to the Windows Start menu and launch File Explorer.
- Look for the folder with your company files and right-click it.
- Tap Properties, followed by Sharing.
- Now, hit the Share Add option.
- Choose the corresponding QBDataServiceUserXX for your version.
- Set appropriate permission levels of both users to Full Control. Then choose Share.
You May Also Like To Read – Resolve QuickBooks Desktop Won’t Open Issue
Troubleshooting Technique #10: Verify the Accuracy of Set Permissions
Ensure the permissions are set correctly as follows:
- From the Windows Start menu, type and open File Explorer.
- Right-click the folder containing your company files and hit the Properties option.
- Choose Advanced on the security tab.
- Opt for QBDataServiceUserXX and hit Edit.
- Configure the following settings to set as Allowed:
- Traverse Folder/Execute File
- Read Attributes
- Create Folders/Append Data
- List Folder/Read Data
- Write Extended Attributes
- Read Extended Attributes
- Create Files/Write Data
- Write Attributes
- Read Permissions
If the permissions aren’t set accurately, do the following:
- Right-click the folder with your company file and tap the properties option.
- Opt for Security, then Edit.
- Select QBDataServiceUserXX and click Full Control. Now, tap Allow.
- Click Apply and OK.
You can also alter folder permissions through the following steps:
- Hit the Start menu in Windows and open File Explorer.
- Locate and right-click the folders mentioned below:
- C:\Users\Public\Public Documents\Intuit\QuickBooks\Sample Company Files\QuickBooks Enterprise Solutions X.0 (X = version) or C:\Users\Public\Public Documents\Intuit\QuickBooks\Sample Company Files\QuickBooks 20XX (XX = year)
- C:\Program Data\Intuit\Entitlement Client\v6.0
- C:\Program Data\Intuit\Entitlement Client\v5
- C:\Users\Public\Public Documents\Intuit\QuickBooks\Company Files
- C:\Program Data\Intuit\Entitlement Client\v3
- C:\Program Data\Intuit\Entitlement Client
- C:\Program Data\Intuit\QuickBooks Enterprise Solutions X.0 (X = version) or C:\Program Data\Intuit\QuickBooks 20XX (XX = year)
- C:\Program Data\COMMON FILES\INTUIT
- C:\Program Data\Intuit\Entitlement Client\v8
- C:\Program Data\COMMON FILES\INTUIT\QUICKBOOKS
- C:\Users\Public\Public Documents\Intuit\QuickBooks\FAMXX (XX = year)
Follow the steps mentioned below for any of these folders. Based on your QB version, you may not have all these folders:
- Right-click any folder and hit the Properties option.
- Choose Everyone on the security tab.
- Hit Full Control, followed by Apply and OK.
Summing Up
Hope these detailed and step-wise solutions helped you rectify QuickBooks Error H101. However, if you still can’t eliminate the issue, you can reach out to our Proadvisor solutions specialists at 1.855.888.3080.
FAQs
What is Error H101 in QuickBooks Desktop?
Error code H101 typically arises in QuickBooks Desktop when the user on a workstation cannot connect to the server computer and access the company file. QuickBooks Error H101 is associated with a multi-user mode and can occur due to an incorrect hosting configuration, incorrect DNS settings, or if QuickBooks Database Server Manager is not running. Therefore, ensure only one computer is set to host the company file.
How does QuickBooks Error H101 affect a system?
When your system gets affected by QB Error H101, you may encounter the following issues:
– Problems accessing company files in the multi-user mode.
– Multi-user hosting and configuration won’t be helpful.
– Windows may lag in performance.
– QB application may crash or run sluggishly.
– The mouse and keyboard commands do not garner quick responses.
What does QuickBooks Error H101 say?
QuickBooks H101 error appears with the error message saying, “This company file is on another computer, and QuickBooks needs some help connecting.”

Erica Watson is writing about accounting and bookkeeping for over 7+ years, making even the difficult technical topics easy to understand. She is skilled at creating content about popular accounting and tax softwares such as QuickBooks, Sage, Xero, Quicken, etc. Erica’s knowledge of such softwares allows her to create articles and guides that are both informative and easy to follow. Her writing builds trust with readers, thanks to her ability to explain things clearly while showing a real understanding of the industry.


