QuickBooks Error 3000 series is a common occurrence while running financial exchange between QuickBooks Desktop and QuickBooks POS. If you are encountering this error series and its various status codes, keep reading this detailed guide to discover effective solutions.
QuickBooks Desktop Point of Sale is used to track inventory, customers, and other daily business transactions, like buying, receiving, and selling goods. QuickBooks Desktop, on the other hand, assists with bill payment, cash flow management, financial report generation, and customer invoicing. Hence, both these programs are used for specific tasks, and users need to share information between these programs to prevent entering the information twice. This information sharing is called a Financial Exchange, which is performed at any time or as an end-of-day routine. However, sometimes, issues might arise while running the Financial Exchange, which can give rise to QuickBooks error message 3000.
In addition, this error series can occur in the form of different status codes while performing other essential functions, like syncing data or adjusting sales tax. All things considered, users need to fix these status codes on priority to run the Financial Exchange seamlessly. However, navigating through these status codes can be a daunting task. Thus, to help you resolve the error series, we have curated this comprehensive blog. So, let’s explore further and learn why these error codes arise and what the best solutions are to address them.
The solutions provided in this blog cater to different QuickBooks error 3000 series codes to help you eliminate them with ease. However, you might not be tech-savvy or might be unwilling to undertake the troubleshooting process on your own. In such a case, you can reach out to our Proadvisor solutions’ experts at 1.855.888.3080 to get immediate guidance in resolving the error.
Table of Contents
Pre-considerations for Resolving QB Error 3000
Before you start fixing the QuickBooks 3000 error code, you need to fulfill some prerequisites. This ensures that you are prepared to perform the troubleshooting process.
Below, we have mentioned the pre-considerations that you need to fulfill before undertaking the resolution process –
Backup QuickBooks Desktop Files
Before you undertake the resolution process, you need to back up your QB data files to ensure that there is no risk of data loss in the process. Follow these steps to generate a backup for QB Desktop files:
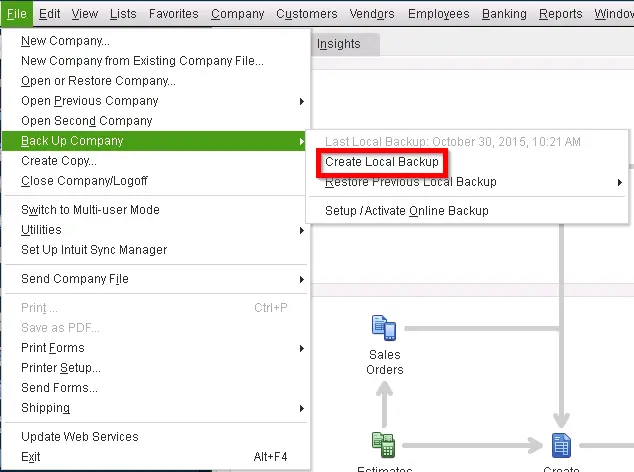
- Open the QuickBooks File menu and tap Switch to Single-user Mode, then go back to the File menu.
- Click Back up Company, hit the Create Local Backup button, and choose Local Backup in the window.
- Hit Next, then click Browse in the Local Backup Only section, and choose the location to save your company file.
- You can arrange for as many backups as required (optional), then run a test to check the company file’s condition, and once done, hit OK.
- Lastly, choose Save it now, then hit Next to complete the process.
Now, QB will create a single backup file, and once done, you will receive a confirmation message on the screen. Once complete, create a QuickBooks POS file backup in the next section.
Backup QB Point of Sale Files
Once QB Desktop files are backed up, protect your POS files from accidental damage or loss before resolving QuickBooks error message 3000 by creating a backup as follows:
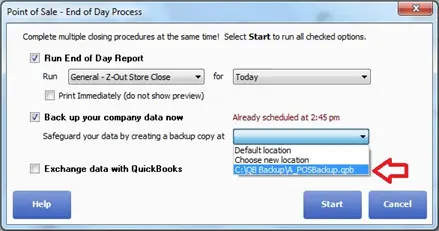
- Choose the QB File menu and tap Backup Data, then clarify your backup location in the Backup Data window.
- You can choose the default location to back up to the default folder on the local drive by hitting the Backup to Default Location option, or you can specify an alternate location to save the files to a network or removable drive.
- Once the location is confirmed, hit the Backup option, then click Finish.
Now that both QuickBooks Desktop and POS files are backed up, let’s move to the troubleshooting solutions provided in the next section to fix different status codes successfully.
Easy Solutions to Troubleshoot Different QuickBooks Error 3000 Status Codes
Since this error prevents users from running the financial exchange between QB Desktop and POS, it is crucial to resolve the error on priority. This can appear in the form of different status codes, and here are the various messages and status codes you may receive concerning QuickBooks error 3000, along with their troubleshooting steps :
Employee Hours Status code: 3000; Status message: The given object ID in the field “list id”: is invalid
The employee hours status code comes up with an error message stating that “The given object ID in the field “list id”: is invalid.” This status message might arise due to the following reasons –
- The track data might not be correctly set in QuickBooks Desktop.
- An employee might be inactive.
To resolve this status code, you can perform the following solutions –
Step 1: Use QuickBooks Financial to Set Up Track Data Time
Since incorrectly set track data is responsible for QuickBooks employee hours status code: 3000, the first step is to set up the track data time in QuickBooks financial in the following manner –
- Visit the QB Employees tab and click Employee Center, then locate the specific employee in the activity log.
- Right-click this employee’s name and select Edit Employee, then choose the Payroll Info tab.
- Select the Use time data to create paychecks checkbox, then hit OK.
Now, check if the error code is rectified and if not, move to the next solution.
Step 2: Arrange for an Inactive Employee
The next solution to fix this status code is to activate the employees by following these steps –
- Tap the Employees menu, then click Employee Center, and go to the Employees column.
- From the column, choose All Employees from the drop-down list and locate your desired employee on the activity log.
- Lastly, right-click the employee’s name, then click the Make Employee Active button.
Once the employee is made active, check if QuickBooks employee hours status code: 3000 is rectified.
Status code: 3000; Status message: The given object ID in the field “list id”: is invalid
QuickBooks error code 3000 with the status message “The given object ID in the field “list id”: is invalid” can arise due to the following reason –
- Your QuickBooks Desktop version is old or outdated.
Thus, to resolve this error, you need to ensure that QuickBooks Desktop is updated to the latest release by following these steps –
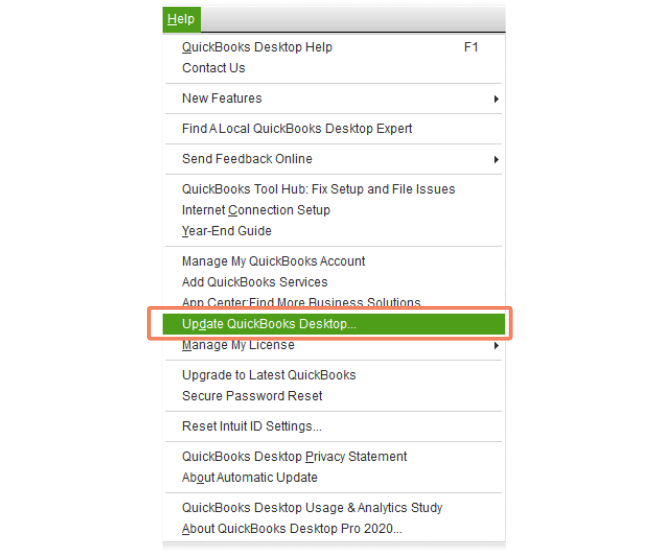
- Open the QuickBooks Help tab and choose Update Now, then select the Reset Updates checkbox.
- Click Get Updates, then close and reopen QB Desktop, and install the updates by choosing Update Now.
Once the updates are installed, check if QuickBooks error 3000 is resolved.
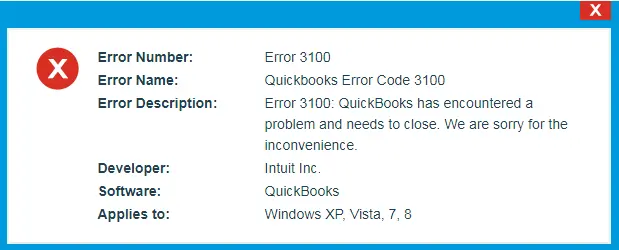
Error Status code 3100: Status message: the name “#######” of the list element is already in use
Status code 3100 can generally occur when users try to add a new customer to QuickBooks. The status code appears with a message stating, “The name “#######” of the list element is already in use.” QB error code 3100 can arise due to the following reasons –
- There is a damaged or duplicate customer or vendor in QuickBooks Desktop Point of Sale or QB Desktop.
Note: Before resolving this error, create a backup of your company files (see point 1 of the pre-considerations section) and switch to single-user mode.
Once the file is backed up and QuickBooks is in a single-user mode, try the three solutions mentioned below :
Solution 1: Locate Duplicate Names
A duplicate customer or vendor name can cause QuickBooks status code 3100. To resolve this issue, you can find the duplicate names in the following manner –
In QuickBooks Desktop
First, locate duplicate customer or vendor names in QuickBooks Desktop –
- Tap the Customers/ Vendors menu, then choose Customer/ Vendor Center.
- Locate the name indicated in the error, and if any duplicates are found, merge the duplicate names.
- If there are no duplicates, end the process and proceed to solution 2.
In QuickBooks POS
If duplicates are not found in QuickBooks Desktop, search for duplicate names in QuickBooks POS –
- Choose the Customers (Vendor) List from the Customers (Purchasing) menu.
- Enter the name that appears in the error in the search field, then look for any duplicates.
- Choose the “I want to…” drop-down menu, followed by selecting Merge.
- Choose the vendor or customer you wish to keep and remove from the Merge window, then select Merge Vendors/Customers.
Note: All transactions completed under either name will be retained under the same name that you keep.
Once duplicates are found, move to the next solution to fix the damaged customer/vendor names.
Solution 2: Resolve the Damaged Customer/ Vendor Names
You can fix the damaged customer/vendor names to tackle QuickBooks status code 3100. For this, create a new vendor or customer as follows:
- Choose Customer Center from the Customers menu, then select the New Customer & Job tab.
- Select New Customer from the drop-down list, then enter Test Customer for the name and leave the other field empty.
- Lastly, click OK once the name is created and end the process.
Now, merge the customer/vendor names as follows:
- Right-click the customer name, then select Edit customer, and replace the customer/vendor name.
Note: A blank cross will appear when you hover your mouse over any Jobs that may be listed beneath the customers. Move the cross to the new customer name by dragging it there. - Type “Type Customer”, click OK, and once the Merge window appears, click OK again.
- Re-enter the original name in the customer (vendor) field to edit it, then click OK and reopen QuickBooks.
Once the customer/vendor name is created and merged, move to the next solution to sort the lists.
Solution 3: Sort Lists again
Sorting the lists can help eliminate any odd behavior and help to make the list go back to the default order. Let’s re-sort the lists in Windows by following the steps below –
Re-sort Primary Name List
There are different ways to re-sort the primary name list in QuickBooks for Windows, which are mentioned below –
From the Banking Section
To re-sort the list from the banking menu, follow these steps –
- From the Banking menu, select Write Checks, then select the “Pay to the order of” field.
- Press Ctrl+L on your keyboard, then select the Include Inactive checkbox. If the checkbox is grayed out, there are no inactive names present.
- Select the Name dropdown, then select Re-sort List, and hit OK.
- Lastly, close and reopen your company file in QuickBooks.
Now, move to the next step to re-sort the list from the Find menu.
From the Find Window
If you do not have banking permissions, you can re-sort the list from the Find window in the following manner –
- Select Find from the Edit menu, then select the Advanced tab.
- Select Name from the Filter list, then access the Name dropdown and press Ctrl+L on your keyboard.
- Select the Include Inactive checkbox, and if the box is grayed out, there are no inactive names.
- Select the Name dropdown, select Re-sort List, hit OK, and reopen the QB company file.
Once done, go to the next section to re-sort the list from the General Journal Entry window.
From the General Journal Entry Window
Another way to re-sort the list is from the General Journal Entry window by using these steps –
- From the Company menu, select Make General Journal Entries, then select the Name column.
- Next, press Ctrl+L on your keyboard and select the Include Inactive checkbox. If you find that the box is grayed out, there are no inactive names present.
- Select the Name dropdown, select Re-sort List, then hit OK and reopen the QuickBooks company file.
You can use these three ways to re-sort the primary name list. If you want to re-sort the lists in QuickBooks Desktop for Windows, follow the next section.
Re-sort Lists in QuickBooks Desktop for Windows
To re-sort the list in QB for Windows, you can perform these steps –
- Choose the list that needs to be rearranged from the Lists menu, then check the box labeled “Include Inactive.”
- If the box is grayed out, there are no inactive names in the list.
- Next, navigate to the View menu and choose Re-sort Lists.
- Click OK, close your company file, and open it again.
Once the list is sorted, check the status of the 3100 error code in QuickBooks.
Status code 3140 or 3120: The specified account is invalid or of the wrong type
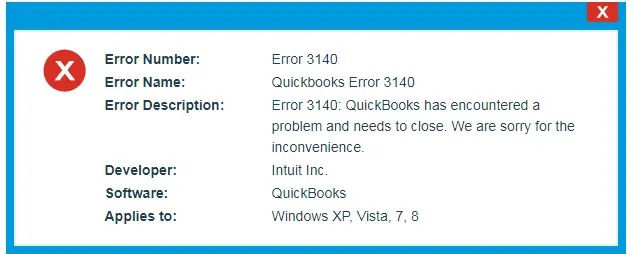
QuickBooks error status code 3140 or 3120 can arise with an error message that states, “The specified account is invalid or of the wrong type.” This status code occurs due to the following reason –
- The accounts in QuickBooks POS are not mapped correctly.
To resolve this error code, you can edit the preferences in QuickBooks POS in the following manner –
- Launch QuickBooks Desktop Point of Sale, then go to the File tab to choose Preferences.
- Tap Company, then select Accounts from the Financial tab.
- Examine the Basic and Advanced tabs, and once done, ensure the accounts are properly mapped, followed by hitting Save.
Note: If an account name appears in brackets ([ ]), it means that it hasn’t been mapped. - Lastly, run the financial exchange between QuickBooks Desktop and QuickBooks POS and review the status of the 3140 or 3120 error.
Status code 3140: There is an invalid reference to QuickBooks AR/AP Account “###### – #########” in the Receipt or Bill
Status code 3140 is another common issue that indicates an invalid reference to account receivables and payables in QB. You’ll see the incorrect setting indicated by the error you received. Error code 3140 can be a result of the following cause –
- The accounts receivable and payable in QuickBooks POS might be incorrectly mapped to the wrong accounts.
The error message for this status code entails the following information –
- “There is invalid reference to QuickBooks AR Account “###### – #########” in the Receipt. The account for this transaction must be of the type Accounts Receivable.”
- “There is invalid reference to QuickBooks AP Account “###### – #########” in the Bill. The account for this transaction must be of the type Accounts Payable.”
Here are the troubleshooting solutions to resolve this 3140 error status code:
Solution 1: Edit Preferences
You can modify the preferences in QuickBooks POS in the following manner to ensure that the accounts are correctly mapped –
- Launch the QB Point of Sale app, then choose Preferences from the File menu.
- Click Company, then go to the Financial section, and click Accounts.
- Next, ensure that the accounts are mapped to the appropriate account types – A/R and A/P, respectively, then click Save to save the changes and run the financial exchange.
If you are unable to run financial exchange and status code 3140 in QuickBooks persists, move to the next solution to resolve data integrity issues.
Solution 2: Verify and Rebuild your File
If editing the preferences didn’t work, you might be experiencing data integrity problems that can be fixed by verifying and rebuilding the data. This process scans the company files for data damage in the following manner –
- Navigate to the File menu, select the Utilities tab, then choose Verify Data.
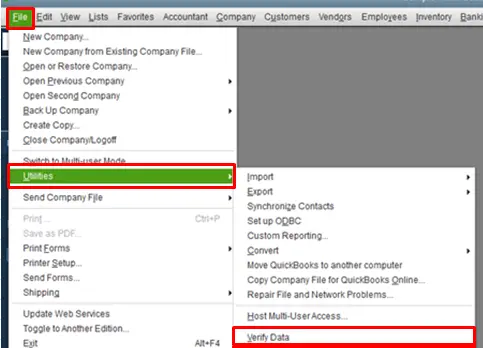
- Hold on while the Verify Data tool loads, and once the verification process ends, you might see these messages on the screen –
- “QuickBooks detected no problems with your data,” indicates that there are no data integrity problems, your data is clean, and you don’t need to undertake further steps.
- “Your data has lost integrity” – which means that damage is identified in the file, and you need to follow the next step to rebuild the data.
- If any other error message appears, search for it on the QuickBooks Desktop Support Site.
- Now, to rebuild the data, select the File section, click Utilities, and choose Rebuild Data.
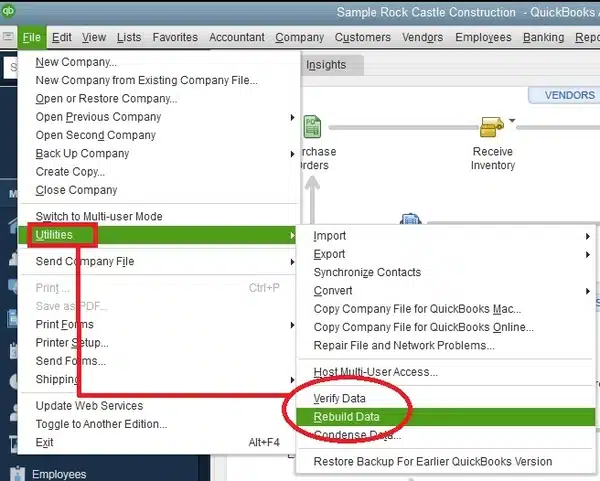
- QuickBooks might ask you to create a backup before the process starts, and you need to create a backup, then select OK. Select a location to save the backup file and don’t replace another file. Create a new file name and hit Save to save the backup on the PC.
- When you get the “Rebuild has completed” message, click OK and go back to the File tab.
- Select the Verify Data option from the Utilities tab to check for additional damage, and if no issues are found, you can restore the recent backup from the File tab.
- If additional issues are identified in the data verification process, fix them manually by searching for the errors in the QBWin.log on the QuickBooks Desktop Support Site.
If this tool isn’t able to fix the data damage problems, move to the next solution to utilize the QuickBooks Tool Hub features.
Solution 3: Use QB File Doctor
You can fix data damage in QuickBooks company files by using the QuickBooks File Doctor Tool from the QuickBooks Tool Hub. To run this tool, follow the steps below –
Step 1 – Download QuickBooks Tool Hub
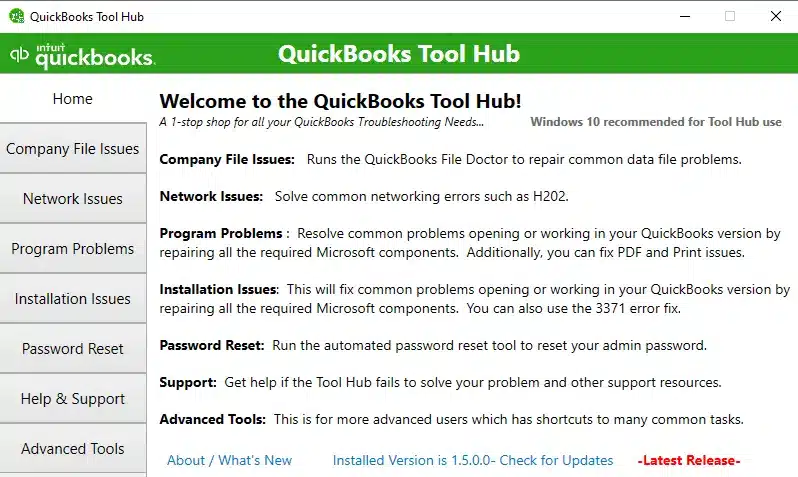
The QuickBooks Tool Hub can help you fix many common errors and issues in the software. You can download and install the utility in the following manner –
- Download the most recent version of the QuickBooks Tool Hub, then save the file at an easily accessible location on your computer.
Note: If you’ve installed QB Tool Hub before, you can go to the bottom of the Home tab to find out which version you currently have. - Open the file you downloaded (QuickBooksToolHub.exe), then follow the given instructions to run the installation process, and agree to the terms and conditions.
- When the installation process finishes, double-click the QB Tool Hub icon on your Windows desktop to access the utility.
Note: If you can’t locate the icon, do a manual search for “QuickBooks Tool Hub” in your Windows and select the program.
Once the tool hub is installed, run the Quick Fix My File tool in the next step.
Step 2 – Run Quick Fix My File
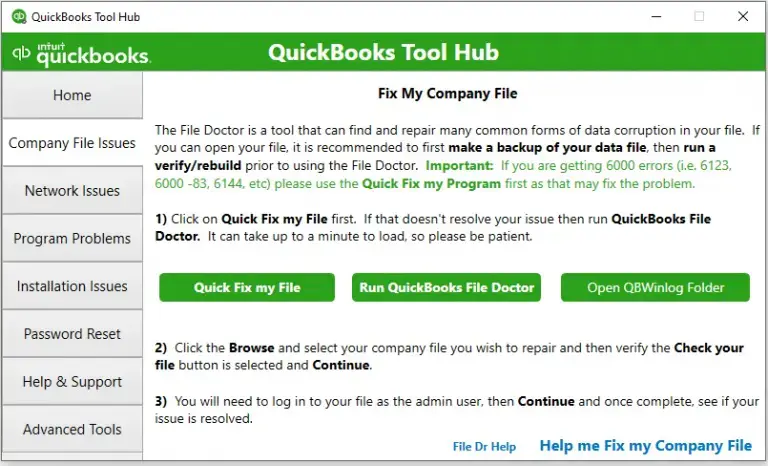
You can run the Quick Fix My File tool to fix the company file issues as follows –
- From the tool hub, select Company File Issues, then click the Quick Fix My File tool.
- Run the tool, then select OK when it is complete, and launch QuickBooks again.
Now, go to the next step to utilize the QuickBooks File Doctor tool.
Step 3 – Use QB File Doctor Tool
The last step is to use the QuickBooks File Doctor Tool to resolve the company file problems in the following way –
- From the tool hub, select Company File Issues, then locate & select the QuickBooks File Doctor tool.
Note: It can take up to one minute for the file doctor to open; however, if the tool doesn’t open, search for “QuickBooks Desktop File Doc” in your Windows search bar and open it manually. - In QuickBooks File Doctor, select your company file from the drop-down menu or click Browse and search to find your file.
- Select the Check your file option, then hit Continue and enter your QuickBooks admin credentials.
- Lastly, select Next and let the tool run a file repair process.
The scan time can take up to 10-15 minutes, depending on your file size. Sometimes, the scan may say the process was unsuccessful, even if it rectifies the data issues.
- Once the file scan process finishes, open QuickBooks Desktop and rerun your company file.
Now, check the status of QuickBooks error 3140 to ensure that it is rectified.
Status code 3140: Status Message: There is an invalid reference to QuickBooks Account “###### – #########” in the item Non-Inventory. QuickBooks error message: The expense account is invalid
This 3000 series status code with status message “There is an invalid reference to QuickBooks Account “###### – #########” in the item non-Inventory” can arise due to the following reasons –
- An item account in QuickBooks Financial is either deleted or inactive.
- The mapped item account in QuickBooks Point of Sale is incorrect.
To eliminate QuickBooks error 3140, you can make the inactive accounts active in the following manner –
- Access the Lists menu in QuickBooks Financial, then select Chart of Accounts.
- Select Account at the bottom, then click Show Inactive Accounts (the inactive accounts can be identified by an X mark beside the name).
- Click the X icon or right-click the account, then choose Make Account Active, followed by running financial exchange.
Note: If the account is deleted, you need to create an account in QuickBooks Desktop.
Now, check if you are able to run the financial exchange and QB error code 3140 is fixed.
Status code: 3412, Status message: Customer has an overdue transaction
The 3412 status code in QuickBooks indicates that the customer has an overdue transaction, and the error can arise when –
- QuickBooks Desktop’s preference is set to prohibit selling to overdue clients.
This overdue transaction issue can be fixed by editing the preferences in QB Desktop as follows –
- Within QuickBooks Desktop, click Edit and choose Preferences.
- Navigate to the left menu to access Sales & Customer, then select Company Preferences.
- Unmark the “Do not sell to overdue customers” option, then hit OK to save the changes, and rerun QuickBooks POS to carry out a transaction.
Check if QuickBooks error code 3412 is addressed and the transaction is running successfully.
Status code 3170: There was an error when trying to modify a vendor/customer list element
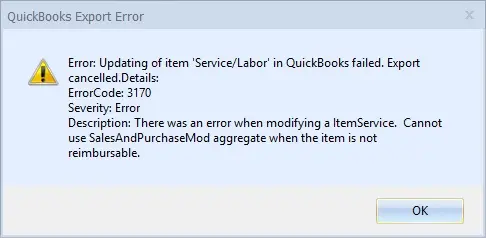
Status code 3170 is a result of an error while modifying the customer/vendor list element. This status code of the 3000 series can arise when –
- QuickBooks Desktop Point of Sale and QuickBooks Desktop have a duplicate name.
To fix this issue, you need to examine the QuickBooks POS activity log, change the customer/vendor name, and combine them in the following manner –
Step 1: Examine QuickBooks Desktop Point of Sale Activity Log
This error status code usually contains the customer/vendor name. If you find the name of the customer or vendor in the error, you can move to step 2. On the other hand, if the customer/vendor name is not found in the error, you can perform this step as follows –
- Choose Customer List from the Customers menu.
- Right-click a column header, then choose Customize columns, and click QB Status.
- Select the QB Status Header to sort the list and find the customer name with Not Posting or Error Status.
Lastly, perform these exact steps for the vendor list, and once done, move to the next step.
Step 2: Change the Vendor/ Customer’s Name in QuickBooks Desktop
Once the customer/vendor name is found, edit the name in QuickBooks Desktop as follows –
- Go to the Customers menu in QB, then select the Customer Center. For vendors, navigate to the Vendors menu and access the Vendor Center.
- Right-click the name listed in the Activity Log, hit Edit, and add the number “1” at the end of the name.
- Next, click OK to save the changes, then run the financial exchange.
Once done, move to the next step to merge the edited names.
Step 3: Combine the Edited and New Names
The last step is to merge the revised and new names created by Financial Exchange in QuickBooks Desktop in the following manner –
- Double-tap the edited name, then remove “1” from the name, and hit OK.
- Next, when QuickBooks asks you to merge the customer/vendor to the customer/vendor created by financial exchange, select Yes and confirm the action.
Once these steps are completed, run the financial exchange between QuickBooks Desktop and QuickBooks POS to ensure that QB 3170 error is fixed.
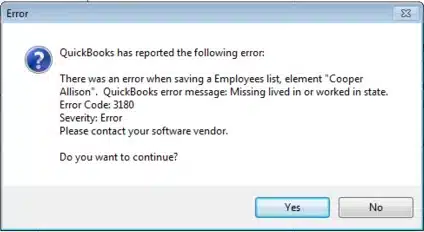
Status code 3180: There was a problem with saving the General Journal Transaction
This status code can occur while saving the general journal transaction and can arise when there are problems with the voucher or with the account. You might encounter QB status code 3180 under the following circumstances:
- If the voucher is damaged.
- If the account associated with the item/s was incorrect during the sale processing.
- If the account linked to the item/s is inactive.
- If the account is deleted in QuickBooks Desktop.
To resolve this issue, you need to recreate the voucher and recheck the accounts in the following manner –
Solution 1: Recreate the voucher
Since a damaged voucher can cause status code 3180, the first solution is to recreate the voucher by following this sequence –
- Reverse the voucher.
- Re-create the voucher.
- Manage the financial exchange.
Next, move to solution 2 and recheck the accounts.
Solution 2: Double-check the accounts
You need to recheck the accounts by following the steps below to ensure that the inactive or incorrectly mapped accounts are rectified –
- On the Home page, navigate to Sales History and make note of all affected items.
- Return to the Home page, select Item List, and then choose Edit.
- In QuickBooks Options, verify that the account mapping is correctly set up.
- Ensure that the affected accounts are active in QuickBooks Desktop.
- In QuickBooks Desktop Point of Sale, go to Item List, select Edit, and configure the correct Income/Asset/COGS account for the item/s.
- Select Save and then manage the financial exchange.
Now, check if the issues while saving the employee name is fixed, and status code 3180 is removed.
Status code 3180: …QuickBooks error message: A/P (or A/R) detail line must have vendor
This status code arises when the vendor is missing from the A/P or A/R detail line. This code pertaining to the QB 3000 error series can occur due to the following reason –
- QuickBooks Desktop accounts receivable or payable were used to create a Paid Out in QuickBooks POS.
The error message you received highlights the incorrect configuration setting associated with this action.
- “There was an error when saving a General Journal transaction. QuickBooks error message: A/P detail line must have vendor.”
- “There was an error when saving a General Journal transaction. QuickBooks error message: A/R detail line must have vendor.”
You can resolve this status code by following these steps:
- Navigate to the Point of Sale home page and choose Sales History.
- Locate the most recent receipt labeled as Payout in the Receipt Type column.
- From the “I want to…” drop-down menu, hit Reverse, then recreate the Paid Out with an account other than A/P or A/R.
Once the Paid Out is reversed and recreated, review status code 3180 in QuickBooks.
Status code 3180: QuickBooks error message: The posting account is invalid
This status code appears with an error message that indicates an invalid posting account. This is another account mapping issue that can occur due to the following reason –
- The wrong type of QuickBooks Desktop account was used to map the accounts in QuickBooks POS.
QuickBooks 3180 status code is accompanied by the following error message –
“Status code 3180: Status message: There was an error when saving a Items list, element “XXXXXXXX.” QuickBooks error message: The posting account is invalid. 140108 payment item lookup error “XXXXXXXX.”
Solution 1: In QBDT Point of Sale
The first solution is to open QuickBooks POS and edit the preferences in the following manner –
- Select Preferences from the File section, then choose Company.
- Select Accounts from the Financial section, then check the Basic and Advanced tabs.
- Verify the mapping of accounts in both the Basic and Advanced tabs, then hit Save to save the changes and run the financial exchange.
Now, move to the next solution and review the list of items in QuickBooks Desktop.
Solution 2: In QuickBooks Desktop
You can review the list in QuickBooks Desktop to ensure that every account is correctly mapped by following these steps –
- Select Item List from the Lists menu, then review each Point of Sale item in the list.
- Ensure that each item is correctly mapped to the appropriate account, and once done, run the financial exchange.
Now, move to the next solution to rename and recreate the financial methods.
Solution 3: Change the Name and Re-create Each Financial Method
You need to rename and recreate all the financial methods to resolve the invalid posting account issues leading to QuickBooks status code 3180. To change the name and recreate the financial methods, follow these steps –
- Open QuickBooks Desktop, navigate to the Lists menu, and select Customer & Vendor Profile Lists.
- Choose Payment Method List, right-click the Cash method, and hit the Edit Payment Method option.
- Add the letter X in the Payment Method field (e.g., XCash), then select OK to save the changes.
- Now, right-click the Cash method, select New, and name it Cash.
- Lastly, run the financial exchange, then rename and re-create all the payment methods if needed.
Check if the invalid posting account issues are fixed and status code 3180 is eliminated.
Status code 3180: Status message: There was an error when saving a Sales Receipt
Issues while saving a sales receipt can lead to status code 3180 in QuickBooks, which can arise due to the following reason –
- There is a damaged payment item in QuickBooks, or the item might be an incorrect type.
You can resolve this status code by following the steps below to rename the payment items and merge the duplicate items in QB Desktop –
- In your QuickBooks Desktop, navigate to the Lists menu and choose Item List.
- Select Include Inactive, then click the Type header to organize the list.
- Modify the names of the Point of Sale payment items in the following manner –
- Right-click the payment item starting with POS, then choose Edit Items.
- Add “OLD” to this item name (For instance, OLD POS Visa Credit Card), then select OK to save the changes.
- Now, execute the financial exchange from your QuickBooks Point of Sale.
- Merge the duplicate items in QuickBooks Desktop by using these steps –
- Right-click the payment item labeled “OLD,” select Edit Item, then remove “OLD” from the name and hit OK.
- When QuickBooks Desktop prompts you to merge the items, select Yes to confirm the action.
Once the process is complete, check if the error in the sales receipt is fixed and status code 3180 is resolved.
Status code 3180: Status message: Sales tax detail line must have a vendor
“Status code 3180: Status message: There was an error when saving a Sales Receipt (or Credit Memo). QuickBooks error message: Sales tax detail line must have a vendor.“
This QuickBooks error 3000-series code indicates issues while saving a sales receipt, which occurred due to problems in the sales tax detail line. The status code can arise due to the following main reasons :
- The QuickBooks Desktop sales tax item lacks association with any vendor.
- The account mapping for the sales tax payable account is incorrect.
- The sales tax payable account is utilized to create a paid-out.
- The sales tax payable account in QuickBooks Desktop is chosen as the target account for one or more receipt items.
The troubleshooting solutions for QB error status code 3180 are as follows:
Solution 1: Ensure a Vendor is Assigned to the Sales Tax Item
First, you need to make sure that the vendor is assigned to the sales tax item by checking that all the sales tax items have a tax agency attached in the following manner –
- Open your QuickBooks Desktop, access the Lists menu, and choose Item List.
- Select Include Inactive, then select the Type header to arrange the list.
- Next, verify that all sales tax items in QB have a tax agency attached to them.
Once done, move to the next solution to verify the tax preference.
Solution 2: Verify your Tax Preference
You can check and edit your tax preference in QuickBooks POS in the following manner –
- Open QuickBooks Point of Sale, access the File menu, and choose Preferences.
- Select Company, then select Accounts from the Financial tab.
- Examine the Basic and Advanced tabs, then confirm that QB Sales Tax Payable is only listed in the sales tax row.
- If not, modify it, and once done, execute the financial exchange.
Once the tax preference is set, ensure that the receipt facing errors is not paid out using sales tax payable in the next solution.
Solution 3: Confirm the Problem Receipt is not paid out using Sales Tax payable
To confirm that the problem receipt is not paid out with the sales tax payable, you need to find the incomplete receipts and reverse them in the following manner –
- Tap Sales History in your QuickBooks Point of Sale, then right-click any column.
- Choose Customize Columns and ensure that the QB Status is selected.
- Identify receipts that are still incomplete. If any of these receipts are paid out to sales tax payable, select the receipt and choose Reverse Receipt.
- Re-create the paid-out using a non-sales tax payable account, and once done, initiate the financial exchange.
Now, check if the issues in the sales receipt are fixed and if QuickBooks error status code 3180 has been rectified.
Status code 3260: Status message: Insufficient permission level to perform this action
This error code arises due to insufficient permissions while performing the action. To QuickBooks 3260 error code, you need to run both QB Desktop and QB POS with admin rights and log in to the QB Desktop file as an admin in the following manner –
Solution 1: Run both Applications with Administrative Privileges
You can run QuickBooks Desktop and QuickBooks POS with admin privileges by following these steps –
- Right-click the QB program and choose Properties, then go to the Compatibility tab.
- Check the Run this program as an administrator box and select Change settings for all users.
- Lastly, ensure the Run this program as an administrator box is checkmarked, then end the process.
Note: You can remove this option if you don’t prefer running the application as an admin, but ensure to eliminate the “ADMIN” in both applications.
Once you are running the applications as an admin, log in to the QB file as an admin in the next solution.
Solution 2: Log in as an Administrator in the QuickBooks Desktop File
To log in as an admin to the QB Desktop file, you need to first log out from the file as a normal user, then follow these steps –
- Access the File menu and choose “Close Company/Log off” (this option message may vary based on your QuickBooks version).
- Sign in as an admin user.
Logging in to QB Desktop, QB POS, and the QB Desktop file as an admin can help fix the permission issues that trigger QuickBooks error 3260. Once these solutions are complete, check the status of this error code by performing the action again.
140109: Account lookup error: “Accounts Receivable/Accounts Payable” when running Financial Exchange
Sometimes, there might be modifications in the Financial Exchange mapping. Due to this, the A/R and A/P accounts in QuickBooks POS may be mapped to neither the A/R nor A/P accounts. This scenario can lead to QB 140109 error, and the error message you receive will indicate the correct setting.
- 140109: Account lookup error: “Accounts Receivable“
- 104109: Account lookup error: “Accounts Payable”
To troubleshoot this error, follow these solutions –
- Launch QuickBooks Point of Sale, go to the File tab and choose Preferences.
- Select Company, then hit Accounts from the Financial section.
- Ensure that the A/R and A/P accounts are mapped to accounts with types A/R and A/P, respectively, then click Save.
Once done, execute the financial exchange and check the status of the QB 140109 error code.
Status code 510 when running Financial Exchange
“Status code 510 status message: Unable to return object; 140116: QB customer look up error: “Counter Sales” when running Financial Exchange“
This status code usually appears in QuickBooks POS and indicates that the software is unable to return the object and locate the counter sales. This scenario in QB POS can occur due to the following reasons –
- This error can appear in the remote store when the Headquarters is running Financial Exchange.
- This error can also occur due to data damage and corruption issues.
Note: Before undertaking the solutions provided below, ensure that backups of QB Financial and QuickBooks POS are created (see the pre-considerations section above).
Once done, perform the following steps to resolve QB status code 510 –
Step 1 – Use the Clean Data utility
You can repair your transactions in QuickBooks POS by using the Clean Data utility in the following manner –
Note: The data cleanup might take some time, depending on your company file size. Your PC and QuickBooks POS might look unresponsive but if the mouse still moves, the cleanup process continues. Carefully follow all these guidelines before running the Clean Data utility –
- Create a backup copy of your data file to prevent accidental data loss in the process.
- Choose the compress database option to repair any damaged lists on the file.
- Never close or stop the QBPOS.exe process, as canceling the Clean Up Data utility can damage your data beyond repair.
Run the Clean Up Data Utility
- Navigate to the File tab, select Utilities, then select Clean Up Company Data.
- Select the Compress database option and click OK.
- (Optional) Go to the Non-history documents window, choose the list you want to remove from your file, then hit Next.
- (Optional) Go to the History documents and other data window, and choose the data you want to remove, along with the date.
- Hit Next and move to the Proceed with Cleanup window.
- Select Cleanup to initiate the process, then wait for the process to finish.
- If the issue persists, run a second clean up by following these steps –
- Go to the File menu, select the Utilities tab, then click Clean Up Company Data.
- Select the Compress database option, select OK, then hit Next.
- Select Next again, then select today’s date on the calendar dropdown, and click Next.
Note: Ensure that you leave all the boxes unmarked.
- Select Cleanup, and once the process finishes, hit OK and restart QuickBooks POS.
Note: If you get an error message after the process is complete, select OK, then re-open QuickBooks.
Now, move to the next step to run the Verify and Rebuild utility on the company files.
Step 2 – Use Verify and Rebuild on Headquarter and Remote Store company files.
The Verify Data utility finds the most common issues in the company file, and the Rebuild Data utility fixes those issues. To run the Verify and Rebuild Data tool, you can follow solution 2 of status code 3140 above.
Note: Make sure that you run the process on both the Headquarter and remote store company files.
Once done, rerun QuickBooks POS and check the status of QuickBooks status code 510.
Post Troubleshooting: Generate a Journal Entry for Receipts
In certain instances, receipts may not transfer successfully in QuickBooks following a Financial Exchange, and you need to re-enter them. There can be various reasons for this issue, which include –
- The receipt stood voided before the Financial Exchange.
- An unbalanced payment exists.
- Skipping occurred due to a large amount.
- The receipt got sent to a different file.
Now, follow the steps below to resolve these issues and create a journal entry for receipts –
Step 1: Verify the Accounts used during the Setup of the Affected Item on the Sales Receipt
First, you need to verify the accounts used while setting up the affected item in the sales receipt in the following manner –
- Tap Preferences from the File menu, then choose Company.
- Hit Accounts from the Financial section, then choose the following tabs –
- For Items, use the Basic Tab.
- For Transaction Accounts, use the Advanced Tab.
Once done, move to the next step to review the accounts used for the item with an error on the sales receipt.
Step 2: Check the Accounts used for the Item with an Error on the Sales Receipt/Voucher.
You need to review the accounts used for the item with an error on the sales receipt/voucher by following these steps –
- Tap Item List, then locate the affected item, and choose Edit.
- Lastly, note the accounts under QuickBooks Options.
Now, you need to mark the receipt with an error in the next step.
Step 3: Mark the Receipt with an Error as Sent
The receipt that encounters the error needs to be marked as “sent” by using these steps –
- Navigate to the Sales History section, search for the sales receipt, and then highlight it.
- Choose the “I Want to…” drop-down list, choose Show Financial Detail, and select the “Mark this document as sent” box.
Once done, move to the last step to generate a general entry for all the details gathered.
Step 4: Generate a Journal Entry with the Gathered Details
As the last step, you need to create a journal entry for all the accumulated details. You can follow the steps below to create and save the journal entry successfully –
- Go to the Company menu, select Make General Journal Entries, and fill out the required fields to create your journal entry.
- Make sure your debits equal your credits when you’re done, then select Save or Save & Close to save the entry and complete the process.
Once you have performed these four steps, you will be able to create a journal entry for the receipts that are not transferred in QuickBooks during the Financial Exchange.
Bottom Line
We hope this detailed guide helps you fix all the status codes related to QuickBooks Error 3000 series. However, if these solutions seem too complicated or you are stuck at a particular step, you can get professional assistance from our Proadvisor solutions support team at 1.855.888.3080 to resolve the financial exchange issues.
FAQs
What is QBO error 3000?
QuickBooks error 3000 is an error that arises during a Financial Exchange between QuickBooks and QuickBooks POS. This error can appear in the form of the following status codes that indicate that the list ID is invalid –
1. Employee hours status code 3000 – This code arises when the employee is inactive, or the track data is incorrectly set up.
2. Status code 3000 – This code arises when QB Financial has an outdated patch.
What is error code 3003 in QuickBooks?
QuickBooks error 3003 is a synchronization error that indicates a loss of sync with the company files. This error appears when users try to synchronize all the databases with an Intuit administration, and the sync process somehow fails.
When can I use the clean data utility for error 3000?
The Clean Up Company Data utility is designed to address transactions and list damage in your company file. Running this utility may be necessary to resolve the following issues:
1. Missing data after an update is applied.
2. Verification of Data ending with a data damage message.
3. Unusual delays in opening the program list.
4. Incorrect displays of forms or reports.
Which systems may see QuickBooks error 3000?
QuickBooks error 3000 may arise in QuickBooks POS version 19 and QuickBooks Pro 2021. You may also see it in other QuickBooks Pro versions.

Erica Watson is writing about accounting and bookkeeping for over 7+ years, making even the difficult technical topics easy to understand. She is skilled at creating content about popular accounting and tax softwares such as QuickBooks, Sage, Xero, Quicken, etc. Erica’s knowledge of such softwares allows her to create articles and guides that are both informative and easy to follow. Her writing builds trust with readers, thanks to her ability to explain things clearly while showing a real understanding of the industry.

