QuickBooks is an accounting and bookkeeping software used by various accountants and small businesses. It makes payroll and other company-related processes much easier and hassle-free. However, if you’re using any of the numerous accounting platforms available in the market and are looking to convert to QuickBooks, you can do that in easy steps thanks to the QuickBooks Conversion Tool.
In this blog, we’ll discuss the ways you can download, install, and use the QuickBooks data conversion tool to transfer the data from the accounting and bookkeeping software you use to QuickBooks. So without further ado, let’s get started.
Need help in converting the data from the accounting software you use to QuickBooks? Contact our ProAdvisor Solutions professionals today at 1-855-888-3080, who can help make the process smooth sailing.
Table of Contents
QuickBooks Conversion Tool – A Short Explanation
The QuickBooks Conversion Tool is a utility developed by Intuit to convert the accounting and bookkeeping data from other similar software to QuickBooks. You can use this tool to convert your data from software like Quicken, Peachtree, Sage 50, and many more. You can also use this tool to convert your QuickBooks Desktop data to QB Online.
Now, let’s discuss some of the key benefits of using the QuickBooks data conversion tool.
QuickBooks Data Conversion Tool: A Few Key Advantages
There are several advantages to using the QB conversion tool provided by Intuit. It’s there to make your conversion process much easier. Some of the benefits you can avail while using this tool are given below:
- It eliminates the need for manually transferring your data
- Using this tool helps in understanding your business status better
- All the files converted are tracked by the tool for backup and records
- Converting to a new QuickBooks company becomes much easier thanks to this tool
- It prevents the loss of data and other files
- It’s easy to set up and use
- You can choose if you want to:
- List the negative balances
- List the positive balances
- If you’re already using a company file in QuickBooks, the conversion tool won’t affect that file; rather, it will make a completely new one
Now that you know about the advantages of the QuickBooks Conversion Tool, let’s take a look at the system requirements you need for the data conversion tool for QuickBooks.
System Specs Needed for the QB Data Conversion Tool
Given in the table below are the minimum system requirements you need to use the QB conversion tool to convert your data:
| Processor | 500 MHz Intel Pentium II or above |
| RAM | Minimum 512MB of RAM |
| Hard Drive | Minimum 2.5GB of free space |
| Microsoft .NET Framework | Version 2.0 or above |
| Operating System | Windows 11, Windows 10, Windows 8 |
| QuickBooks Desktop Version | Pro, Premier, Enterprise version 2018 or higher |
After fulfilling the minimum system requirements, let’s take a look at the different kinds of data you can and can’t convert using the QuickBooks Conversion Tool.
Learn What Data Converts By Using the QB Conversion Tool
Mentioned below is the type of data that does and doesn’t move using the QB conversion tool:
| Data that Converts | Data that Doesn’t Convert |
| Customer, Item, Account, Vendor, and Employee lists | Employee and payroll transactions year-to-date information, i.e, paychecks and year-to-date adjustments. |
| Balances of Accounts | The Payroll items that help in calculating your paychecks |
| Transactions of vendors and customers | Fixed assets |
| The contact info and profile of Employees | Work tickets |
| Payroll General Ledger account balance info | Wage or deduction information for an individual employee |
| Paychecks are converted as journal entries | Sales Orders, Purchase Orders, and Estimates that are partially or completely closed |
Now that we know about the data that converts using the QuickBooks Conversion Tool, let’s take a look at the steps to download it.
Steps to Perform for the QuickBooks Conversion Tool Download
Intuit provides the QuickBooks Conversion Tool free download. After downloading the tool, follow these steps:
- Open the folder where you downloaded the QB Conversion Tool setup file
- Right-click on QuickBooksConversionToolSetup.exe
- Then, press Run as Administrator
- Follow the instructions you see to install
Now, we’ll discuss the steps to transfer your data from Sage 50 to QuickBooks.
Guided Steps to Convert from Sage 50 to QuickBooks Desktop
Before moving from Sage 50 to QB Desktop, you need to first learn the limitations of converting the data with the QuickBooks conversion tool.
Limitations of Converting from Sage 50 to QuickBooks Desktop
There are a handful of limitations you can face while converting to QBDT from Sage 50, such as:
- Chart of Account numbers of more than 7 digits are not supported by QuickBooks
- The tool will fail if the fed account numbers are more than 7 digits
- Journals with a future date will result in transactions posting in QBDT in the future.
- The currency data is transferred to your home currency, even if it was in a foreign currency.
- Some reversed journals might also be posted to QuickBooks
- Clearing them can cause differences in QBDT
- The Sage to QuickBooks Conversion Tool might use a dummy customer to align the AR and AP history.
We’ll take a look at the steps you need to perform to prepare for the conversion next.
Preparing for the Data Conversion from Sage 50 to QuickBooks
Follow the steps below to prepare for converting your accounting and bookkeeping data from Sage 50 to QuickBooks:
- Download and install the QuickBooks Desktop application
- This should be done on the same workstation you’re using Sage 50 on
- Ensure that the QB Desktop and Sage 50 are stored on the same local hard drive
- If they aren’t, move them both to the local hard drive to prevent failures
- Files hosted over a network won’t work with the QuickBooks Desktop conversion tool
- Backup your Sage 50 data file before you use the conversion tool to move to QB
Now, let us see how to set up Sage 50 for conversion.
Set Up the Sage 50 Software for Data Conversion
Ensure that you have admin access in Sage 50 and perform the steps given to you down below:
- Open the Sage 50 software
- Now, access the file you want to convert
- Then, go to the Main Menu
- Next, click on the Maintain option
- Go to Users
- Now, select Setup Security
- Navigate to the Data Access/Crystal Reports tab
- Choose the With the following login information option
- You won’t be able to change the ID field
- Then, press Change and set up a transfer password
- The password should be within 8 characters; if it is any longer than that, the data conversion tool would be unable to work
- Finally, click on OK and close Sage 50
You should follow this up by downloading the QuickBooks Conversion Tool if you haven’t already, and proceed to the next step.
Convert Your Sage 50 Data
To convert your data from Sage 50 to QuickBooks Desktop, follow the steps given below:
- Open the QuickBooks Desktop Conversion Tool
- Locate and select the Sage 50 file that needs to be converted
- Navigate to the Pervasive 32-bit ODBC engine DSN Setup window
- Then, click on the Database Name dropdown menu
- Select your Sage 50 company file
- For multiple company files, scroll down to select your company name
- Click on OK
- Enter the password you created
- Click on Next
- Select the QuickBooks version to which your Sage 50 files are moving to
- Select the QB edition to which your files are moving
- Refrain from adding any special characters
- Now, click on Browse
- Choose the folder where the converted data will be saved
- Then, click on Next
- If the folder is not selected, the file will be imported into the My Documents folder
- Review everything you entered and click on Convert File
- This would open up the QBDT app and the QuickBooks – Application Certificate window, through which you would need to grant access to the company file
- Then, in the certificate pop-up, click on Yes, Prompt Each time
- Finally, click on Continue
The QuickBooks conversion tool will now run and start to convert your data from Sage 50 to QB Desktop. It can take some time for the data to be converted, and the tool will inform you if the conversion was successful. After it finishes working, you might see an Open in QuickBooks prompt; however, it may take up to a few minutes to open the file.
Review the Converted File in the Failed Transaction Log
You can review any data failure from the failed transaction log with the following steps:
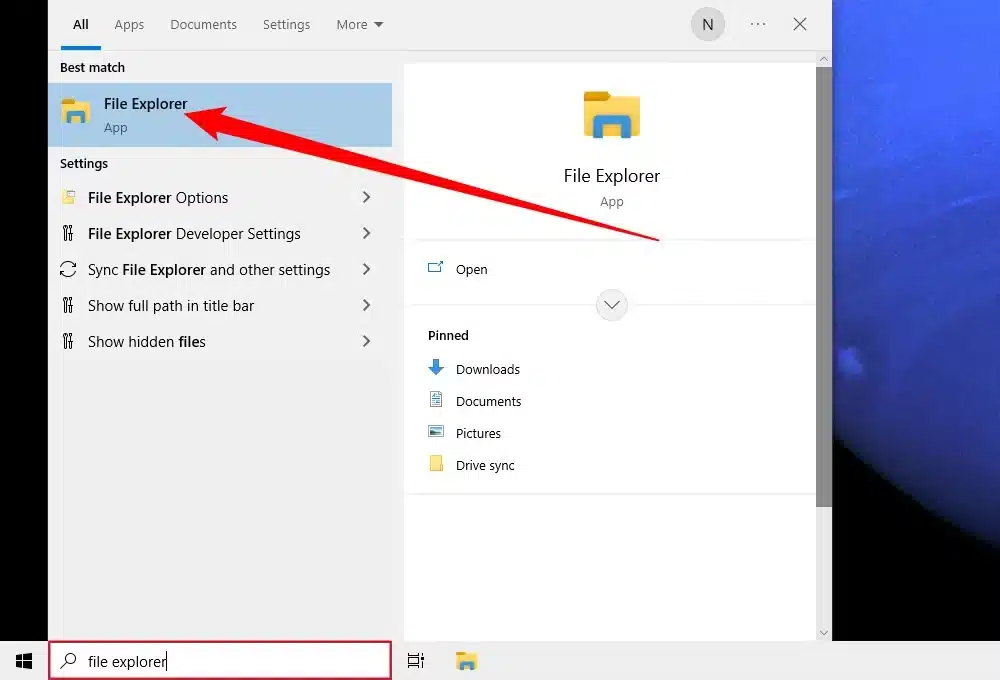
- Open the Start menu in Windows
- Type in File Explorer and open it

- Now, navigate to the This PC tab
- Open Local Disk C
- Then, browse to C:\USERS\[Your Windows User Name]\My Documents\Intuit\QuickBooks
- Check the failed transaction log file
- The file would tell you if any data failed to be transferred
This would tell you if there were any failures in your converted file. Now, let’s see some possible errors you can get during or after converting the Sage 50 file to QuickBooks.
Some Possible Errors You Can Get After Converting Your Sage 50 File to QBDT
Below is a list of some of the error messages you can get, with their possible solutions:
If You See the Error Message “It looks like something went wrong”
- This can be due to your file not being saved locally
- You can receive this error if the file is hosted on a network or a shared server
- To fix it, install Sage 50 on your computer and locally host the file
- It can occur due to a special character in the saved file name
- This can be fixed by removing any special characters in the file name
Performing these steps would fix the “it looks like something went wrong” error while converting your data from Sage 50 to QB using the QuickBooks Conversion Tool.
Fix the “We just need a little more info” Error Message
If you get this error message, you will need to run the conversion tool in compatibility mode. To do so, follow these steps:
- Right-click on the QuickBooks Conversion Tool icon
- Then, press Properties
- Now, go to the Compatibility tab
- Then, select the checkbox for Run this program in compatibility for:
- Next, click on the dropdown menu
- Choose your Windows OS
- Click on OK
This would fix the “We just need a little more info” error. Now, let’s talk about converting your data from Peachtree to QuickBooks.
Converting Data from Peachtree to QuickBooks Desktop
There is no Peachtree to QuickBooks Conversion Tool anymore; however, if you’re still looking to transfer the data, you can do so with the help of MS Excel or a .CSV file.
Convert the Lists and Reports
The lists and reports data should be converted and saved in Excel or .CSV format if you want to move to QuickBooks. Given below are some lists and reports you would need to convert:
- Account Lists
- Customer Lists
- Employee lists
- Inventory/Item Lists
- Vendor Lists
Then, proceed to run the four financial reports given below to make the reports for the same dates, ensuring a smooth transition:
- Balance Sheet
- Trial Balance
- Only Account closing Balances will be imported
- A/R Aging detail
- Name, Amount, Document Number, Date, and Due Date
- A/P Aging detail
- Name, Amount, Document Number, Date, and Due Date
Now, let’s take a look at how QuickBooks matches the fields you import.
How Does QuickBooks Match the Imported Fields
- Chart of Accounts:
- Name, Number, and Account Type
- Customer List:
- Name, Company Name, Contact, Bill to Address, Ship to Address, Phone, Fax, and Email
- Employee List:
- Name, SSN #, Address, Phone, Mobile Phone, Fax, and Email
- Item List:
- Type, Name, Description, Price, Cost, Qty on Hand, Value on Hand, Income Account, COGS\Expense Account, and Asset Account
- Vendor List:
- Name, Company Name, Contact, Main Address, Phone, Fax, and Email
The classes won’t convert to QB from another program. Any historical data is not present in the migrated file.
For the migration to be successful, you have imported the below given list in order:
- Chart of accounts
- Customer List
- Vendors List
- Item List
- Employee List,
- Accounts Payable
- Accounts Receivable
Performing these steps would convert your data from Peachtree to QuickBooks. Now, let’s see the steps for Quicken.
Convert the Quicken Data File to QuickBooks Desktop with the Conversion Tool
You can use the Quicken converter to transfer the files to QuickBooks Desktop. However, you can only convert from Quicken’s version that is not parallel to the QB version you use; for example, you cannot convert data from Quicken version 2020 to QB version 2020, be it Pro, Premier, or Enterprise. Also, for Mac users, you have to first convert the Quicken data file for the Windows version before transferring it to QBDT Mac. Now, let’s see the steps to convert from Quicken to QuickBooks.
Use the Quicken Converter Utility
Given below are the steps to perform for converting the Quicken file using the Quicken converter tool:
- First, download the conversion tool version adjacent to your QBDT, like:
- Quicken 2024 Converter
- Quicken 2023 Converter
- Quicken 2022 Converter
- Now, install the tool and move your data
- Open the Quicken Converter setup
- Click on Next
- Then, hit the Install button
- Now, choose Launch the Quicken Converter
- Press Finish
- Now, click on I am transferring data from Quicken for Windows
- Then, proceed to click on Get Started
- Choose Open a data file located on this computer
- Click on Select File
- Now, navigate to your Quicken file (.QDF)
- Select the file and press OK
- Hit the Convert it! Option
- Choose to click OK
- Finally, press Save and hit Exit
Now, you can proceed to convert the file to QuickBooks Desktop.
Use the QuickBooks Conversion Tool
Now, go ahead and move the Quicken file to QB Desktop using the QuickBooks Conversion Tool:
- Open the QuickBooks application
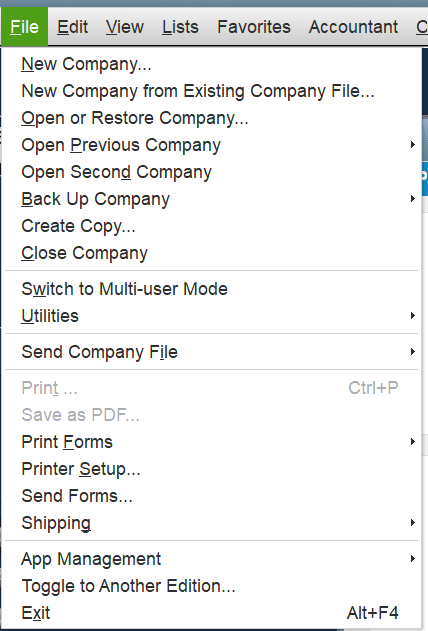
- Go to the File menu

- Click on Utilities, followed by Convert
- Now, select From Quicken
- Choose the Quicken file (.QDF)
- Now, just follow the steps provided by the conversion utility
This would convert your Quicken file to QuickBooks Desktop.
Convert from Quicken to QuickBooks Online
If you want to transfer the files to QB Online, you have to first convert the file to Excel or .CSV and then follow the steps given below.
- Import the converted file into QuickBooks Online
- Sign in to your QB Online account
- Click on Settings
- Then, proceed to click on Import Data
- Choose the list that you wish to import
- Now, click the Browse button
- Locate the .CSV file
- Hit Open
- Then, select Next
- The Map data page will appear
- You would see a green tick on the fields that QB recognizes
- You’d see No Match for the ones QB doesn’t recognize
- Now, click on the dropdown menus
- Map the fields
- Click on Next
- Now, verify and review the entries that will be imported
- Finally, press Import
Finish this process off by connecting your bank account to QuickBooks Online.
QuickBooks Conversion Tool – A Quick View Table
Given below is a concise summary of this blog on the topic of QuickBooks Data Conversion Tool in a tabulated format:
| What is the QuickBooks Conversion Tool? | The QuickBooks Conversion Tool is a utility provided by Intuit that helps you transfer your data files from the accounting software you use to QuickBooks. |
| Its key advantages | You don’t have to feed in the data manually, it prevents the loss of data, converted files are backed up, and it is easy to set up and use. |
| Steps to install | Locate the folder where it is downloaded, right-click on QuickBooksConversionToolSetup.exe, click on Run as Administrator, and follow the tool’s instructions to install. |
| Steps to convert | First, prepare for the conversion, then set up Sage 50 for conversion, next convert your Sage 50 data file, and lastly review the converted file. |
Conclusion
In this blog, we talked about the QuickBooks Conversion Tool and how to download it. Moreover, we also discussed the steps you need to take to set up the file from the accounting software you use while transferring to QuickBooks. If you need any further assistance in converting to QuickBooks, you can contact our Proadvisor Solutions’ professionals at 1-855-888-3080 today!
FAQs
Can QuickBooks be converted to Excel?
Yes, QuickBooks provides options to export your data file to Excel manually. The options can vary between different versions of QuickBooks and the type of data that needs to be exported. You don’t need to install any external software because of the QB-given options.
What is the QuickBooks Migration Tool?
The QuickBooks Migration Tool is a utility provided by Intuit that you can use to transfer your data from one QB platform to another, or from one workstation to another. It makes the migration process much easier and eliminates any data loss that may happen while transferring the files manually
Is there a QuickBooks Windows to Mac conversion tool?
No, QuickBooks doesn’t provide a Windows to Mac conversion tool. However, you can do so with the help of the QuickBooks Migrator Utility. This tool comes built into your QuickBooks Desktop application and is easy to set up and use.
More useful articles:-
How to Download QuickBooks PDF Converter Tool
Download QuickBooks Tool Hub 1.6.0.8
QuickBooks Clean Install Utility Download
QuickBooks Utility Application Pop-Up Issue
How do I fix payroll liabilities in QuickBooks?

Erica Watson is writing about accounting and bookkeeping for over 7+ years, making even the difficult technical topics easy to understand. She is skilled at creating content about popular accounting and tax softwares such as QuickBooks, Sage, Xero, Quicken, etc. Erica’s knowledge of such softwares allows her to create articles and guides that are both informative and easy to follow. Her writing builds trust with readers, thanks to her ability to explain things clearly while showing a real understanding of the industry.