Are you facing an issues with the name list in QuickBooks Desktop? The QuickBooks missing name list problem can prevent users from opening their company files. This problem can appear with an elaborate message stating, “We’re sorry. QuickBooks couldn’t open your company file. We’ll try to fix the problem. Click Start to begin. If the problem continues, contact support for assistance and report the error code Missing Name List Problem.” To fix this name list issue, you can undertake the resolution process mentioned in this article below.
If your name list is missing, you won’t be able to access your company file. Thus, you must resolve this issue on time to ensure proper company file access. You can perform the troubleshooting solutions below or reach out to us for direct assistance. Our expert team will help you resolve the issue with proper guidance, and all you have to do is contact us at 1.855.888.3080.
Table of Contents
What are the Possible Causes for QuickBooks Name List Errors?
If you notice the QuickBooks customer list is missing or there is a vendor name list problem in the company file, there can be various reasons behind it. You must know about these reasons to understand why the issue occurs with better clarity. Below, we have provided a list of reasons that might be responsible for the name list issue in QB –
- There is some data damage in your company file, and the file might be corrupted.
- The company file is facing data integrity problems, which can be why the names are missing.
- A problem with your QB installation can also lead to QuickBooks missing name list issues.
- There is a virus or malware infection in your system, which can affect the company file data.
These are the main causes behind the name list issue in QuickBooks Desktop. Now, let’s learn about the effective solutions to resolve this issue in the next section.
Practical Solutions to Troubleshoot Missing Names in QuickBooks
You must fix the missing name list issue in QuickBooks Desktop; otherwise, you might face problems while accessing the company file. Thus, after learning why this issue arises, follow the troubleshooting solutions given below to resolve it –
Solution 1 – Run the QuickBooks File Doctor Utility
If the name list is missing, damage or corruption in the company file might be the trigger. QuickBooks File Doctor is an essential utility of the QB Tool Hub that helps fix company file problems. Here’s how you can use this tool to run a company file repair process –
- Firstly, download and install the most recent Quickbooks Tool Hub version on your computer, then launch the program.
- Now, move to the Company File Issues tab and select the Quick Fix My File option.
- Run the tool to resolve the company file issues and wait for the process to complete. Once the tool stops, check if the issue with the missing name list is resolved.
- If the QuickBooks company file is missing names, return to the Company File Issues section and select QuickBooks File Doctor.
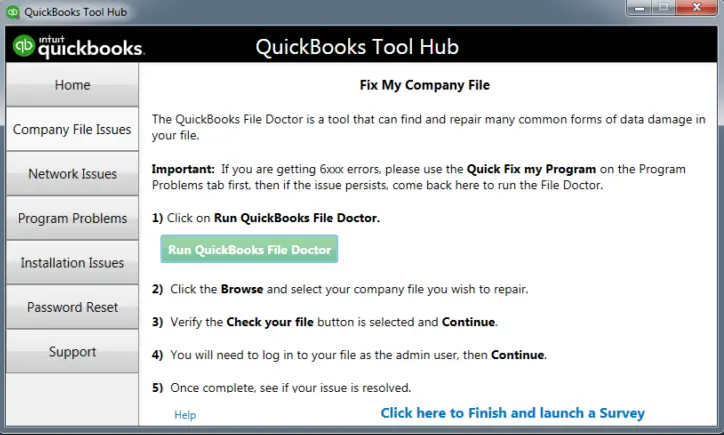
- QB File Doctor might take about a minute to open, but if it doesn’t open, search for “QuickBooks Desktop File Doc” in the Windows search bar to open it manually.
- Select the company file from the dropdown or click Browse to find the file, then select Check Your File.
- Click Continue, enter your admin password, and click Next to initiate the file scan process.
Note: The process might take 10-15 minutes to complete, and once done, check if the issue is resolved. The scan may say the process is unsuccessful even if the company file issues are fixed.
Open the company file to check if the name list issue is fixed. However, if the QuickBooks item list is missing names, follow the next solution.
Solution 2 – Use the QuickBooks Verify/Rebuild Data Tool

The Verify Data tool helps identify data integrity issues in your company file, while the Rebuild Data tool rebuilds the damage. You can run the Verify and Rebuild Data tool in QuickBooks to fix the data issues in your company file.

After running the tool, open the company file and check the name list. If there are missing names in QuickBooks reports, go to the next solution.
Solution 3 – Restore a Recent Company File Backup
If the company file is still damaged, you will see an “error: Namelist-Rebuild. The tool is unable to automatically fix this problem”. An alternative solution to fix this issue is to restore the most recent backup. When you restore the company file backup version, QBDT uses the backup file to create a new company data file. To perform the backup restore process, implement the following steps –
- Firstly, ensure the backup company file is on your local hard drive, not an external device or hosting service.
- Then, go to the File menu, select Open or Restore Company, and click the Restore a backup copy option.
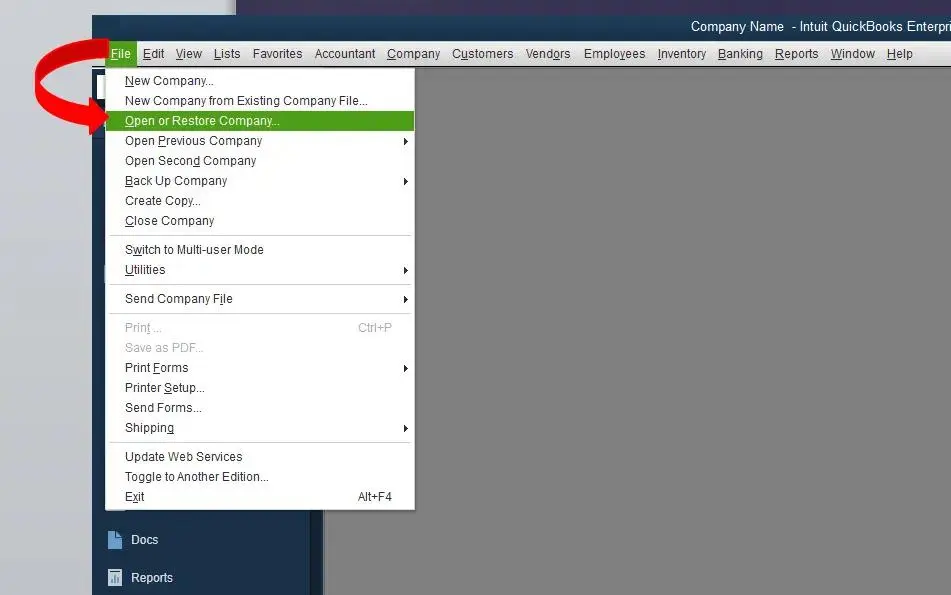
- Further, click Next, select Local Backup, and hit Next again
- Browse your computer for your backup company file with the .qbb extension and choose a folder to save the restored version.
- Select Open, and when you are ready, click Save. If you receive any messages about data overwriting, choose the preferred option and don’t overwrite any data without surety.
Note: If you save the backup in the same folder that contains your existing company file, you may overwrite the data. To avoid this, rename your existing company file or the backup file so the names differ. Alternatively, you can save the backup in a completely separate folder to avoid overwriting the existing company file data.
After restoring the company file backup, try opening the company file again. However, if the QuickBooks name list is not updating or missing, follow the next solution.
Solution 4 – Use QuickBooks Auto Data Recovery Tool
If restoring the backup doesn’t help restore the damaged data, you can use the ADR feature. This tool helps recover lost or damaged data by restoring –
- Lost transactions using the current Transaction Log file and copy of the company data file.
- All the transactions except the last few hours with a copy of the Transaction Log and company data files.
Before you run the ADR tool, keep the following reminders in mind –
- The feature is only available in QuickBooks Pro, Premier, and Enterprise for Windows and not in the Accountant Editions.
- There is a file size limitation while using ADR, and your backup should be no bigger than 1.5 GB. QuickBooks won’t generate an ADR file if the backup is larger than the size limit.
- To maximize the ADR feature, ensure you have the latest Quickbooks updates installed on your PC.
Now, follow the steps given below to recover the damaged/corrupted data using ADR and fix the QuickBooks name list sync issue –
Recover Recent Transactions: Utilize the Transaction Log File and the ADR Version of the Company File
If you want to restore all lost/damaged transactions, you can use the Transaction Log file with the ADR version of the company data file by using the detailed steps below –
- Make a new folder on your desktop, name it QBTest, and then go to the QuickBooks Company File Folder.
Note: If you don’t know the location of your company file, open the Product Information Screen by pressing F2 or Ctrl + 1 and the No Company Open Window. - Now, look for the Transaction Log file (the .TLG file will have the same name as your company file) in the company file folder.
- If you cannot identify the .TLG file, perform the steps below to show file extensions in your Windows OS –
- Press the Windows + E keys to open Windows File Explorer and select Organize.
- Choose Folder and Search Options and select the Hide extensions for known file types option.
- Finally, click Apply and OK to save the changes and see the file extensions.
- Once the file is identified, copy the corresponding .TLG file of your company file and paste it into the new QBTest folder.
- Open the QuickBooksAutoDataRecovery folder from the same location as your QuickBooks company file and copy the .QBW.adr file.
- Paste the ADR version of your company file into the QBTest folder, and you will have both .QBW.adr and . TLG files in the folder.
- Next, open the QBTest folder, find and right-click the .QBW.adr file, then select Rename and delete .adr from the end.
- Now, open QuickBooks and access the company file saved in your QBTest folder, then verify the transactions.
- Use your account register to verify that all transactions are present, then go to the File menu and select Utilities.
- Click Verify Data to check the recovered file’s data integrity and ensure that the company file copy is in good condition.
- If the copy is good and confirms integrity, move the damaged company file to a different folder and transfer the copy from QBTest to the original file location.
Once the process is complete, you will have successfully recovered the lost/damaged transactions.
Recover All but the Last 12 Hours of Transactions: Utilize the ADR Version of the Transaction Log and Company Files
To recover all the lost/damaged data except the last 12 hours of transactions, you must use the ADR versions of the Transaction Log and company files. To utilize these files and recover the transactions, follow the steps given below –
- Create a new folder (QBTest) on your desktop, then open the Company File Folder and look for the QuickBooksAutoDataRecovery folder.
Note: If you can’t find the company file folder, check the location in the Product Information screen (press F2 or Ctrl+1) and by accessing the No Company Open Window. - Locate the .TLG.adr and .QBW.adr files with the same name as your company file, but if you can’t find them, show file extensions in Windows as follows –
- Open the File Explorer by pressing the Windows + E keys and go to the Organize tab.
- Choose Folder and Search Options, select Hide extensions for known file types, and click Apply & OK.
- Further, copy the .TLG.adr and .QBW.adr files and paste them into the above-created QBTest folder.
- Open the folder and rename the files to remove .adr from the end of the file name.
- Now, open QuickBooks and access the company file saved in your QBTest folder to check all the transactions are present.
- Use your account register to verify the transactions and move to the File menu.
- Check the data integrity of the recovered file by selecting Utilities and choosing Verify Data.
- If this copy is in good condition, move the damaged QB company file to a different location/folder and transfer the copy from QBTest to the original folder.
After running the Auto Data Recovery Tool, reaccess your company file. If the QuickBooks missing name list problem still exists, follow the next solution.
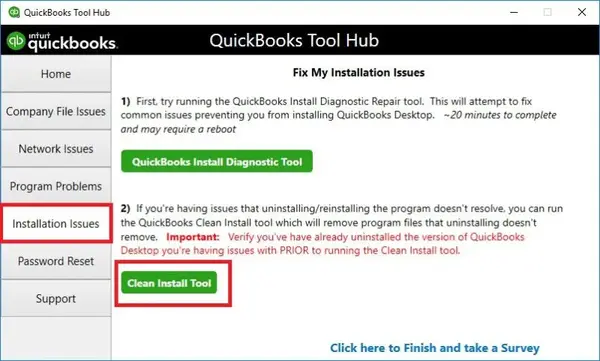
Solution 5 – Clean Install QuickBooks Desktop
Sometimes, if the QBDT app is not correctly installed, it can create issues in the company file, including missing name lists. To fix this issue, use the Clean Install tool and install a fresh QB version.
After the version is installed, activate QuickBooks in the following manner –
- Open QuickBooks, then navigate to the Help menu and select Activate QuickBooks Desktop.
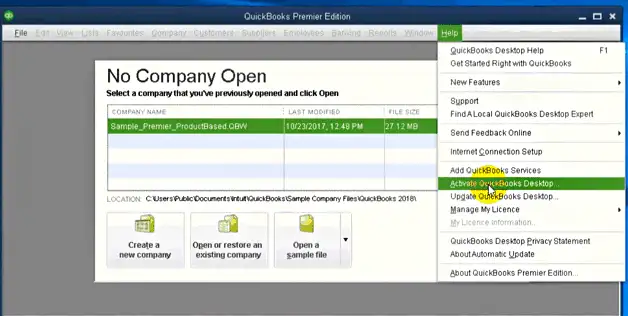
- Follow the on-screen steps to verify the info and complete the activation process.
Once done, try to access your company file and check if the name list issues are resolved.
Conclusion
We hope this detailed article helps you resolve issues with the name list in QuickBooks. However, if these solutions are ineffective and you still encounter the QuickBooks missing name list problem, you might need expert assistance. For this, reach out to our Proadvisor solutions support team at 1.855.888.3080, and they will help you fix the issue.
FAQs
What are the lists and places where you can encounter missing names in QuickBooks?
QuickBooks uses several lists to track transactions and business activities, including customers, suppliers, accounts, items, and employees. If there are problems in your company file, you might notice one or more of these lists missing.
These names, items, and accounts can be missing or blank in several places in your QB company file, including reports, transactions, and centers.
Is it important to create a company file backup before fixing the QuickBooks employee name list problem?
Yes, you must create a company file backup before following the troubleshooting process. This helps ensure there is no risk of data loss in the company file due to the issue. Moreover, one of the solutions to fix the name list problem is to restore the company file backup you created before troubleshooting.
Can a system restore help fix the name list problem in QuickBooks?
If the name list issue in QuickBooks occurs after running a Windows update, you can try restoring the system to an earlier point. Performing a system restore in the following manner can help fix the issue –
1. Open the Control Panel from the Windows Start menu and search for Recovery.
2. Select Recovery, click Open System Restore, and hit Next.
3. Now, choose a restore point related to the problem, then click Next and Finish.

Erica Watson is writing about accounting and bookkeeping for over 7+ years, making even the difficult technical topics easy to understand. She is skilled at creating content about popular accounting and tax softwares such as QuickBooks, Sage, Xero, Quicken, etc. Erica’s knowledge of such softwares allows her to create articles and guides that are both informative and easy to follow. Her writing builds trust with readers, thanks to her ability to explain things clearly while showing a real understanding of the industry.