QuickBooks is a widely used application among small and medium-sized businesses for accounting and related business processes. It provides technically advanced and innovative solutions for accounting-related processes. If you use QuickBooks to manage your company accounts, then you need to enter all your banking transactions in it. You can import banking transactions in QuickBooks using Excel CSV file provided by your bank. Through this article, we will provide you with a detailed guide to import CSV file into QuickBooks.
If you continue to face issues in importing banking transactions in QuickBooks, then contact us at our 1-(855)-888-3080 and talk to ProAdvisor Solutions’ Support Team for resolution
You may also see: QuickBooks Error 590
Table of Contents
Prepare CSV File to Import into QuickBooks Online
Before initiating the process to import into QuickBooks Online, you should prepare your CSV file. The CSV file needs to be in perfect order so that the QuickBooks application can read and process it smoothly. There are a few key points that you should take care of so that the data transfer is smooth and error-free. These points have been mentioned below for you:
- QuickBooks application has three different fields for banking transactions, namely Date,
Description, and Amount. Ensure that you have your transactions maintained in this order. You should remove any other fields from your CSV file to avoid any issues. - It is mandatory that the amount is properly filled. If there is a transaction with nil amount,
then put ‘0’ in it. Do not leave any Amount field with no value. This issue normally occurs if you have a 4-column CSV file, so carefully check your file. - No symbol is permitted in the Amount field, whether it be of currency or other signs such as
a comma. Eliminate these signs before you proceed to export the file into QuickBooks.
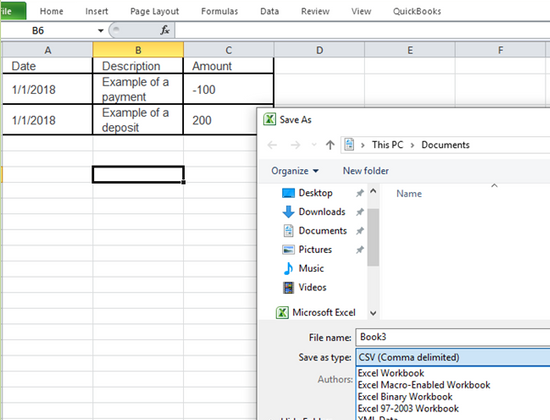
- If the Amount field is in one column in your CSV file, then the minus (-) sign should be used to
show the transactions for money going out instead of brackets {}. - Exclude the details that are not related to transactions from the CSV file. Information such as the
account number, Opening and Closing balances should be removed to prepare your file for import. - Make sure that you save the file after making these changes and then proceed for data transfer.
After performing these steps, you are ready to import banking transaction in QuickBooks using Excel CSV file.
Steps to Import Transactions into QuickBooks from Excel
Now that you have prepared your CSV file according to the requirements of QuickBooks. Follow the steps as provided below in your QuickBooks application to Import transactions into QuickBooks from Excel.
- Open QuickBooks
Online and then sign in with your login credentials. - Go to the ‘Banking’
section and click on the ‘File Upload’ option. - Click on the ‘Browse’
option in the dialogue box that appears. - Choose the CSV file
that you have prepared for import, from the given options. - Click on the ‘Open’
option and then press the ‘Next’ button. - You would be
required to select a ‘Date’ and also a ‘Date format’. - Select the fields
of ‘Description’ and ‘Amount’. - Click on the ‘Next’
button after the process. - You would be able
to see all the transactions in your CSV file. - To remove a
transaction, click on the check-box beside the transaction to unmark it. - Click on the ‘Next’
button and then click on ‘Yes’ to confirm. - Click on the ‘Let’s
go’ button and the import process will begin.
You will be notified when the process completes. You should check the entries again if the data has been imported correctly. If you observe any issues, you can perform the process again with the required transaction.
Errors when you Import Bank Transactions into QuickBooks Online
There are various issues that you can come across while import banking transaction in QuickBooks Online. These issues will either restrict you from importing the transactions or would import erroneous data. The issues and the respective methods to rectify them has been provided below for you:
Incorrect Mapping while importing CSV to QBO
Incorrect mapping of your CSV file will restrict QuickBooks from reading your data properly so you should make sure that you have selected the correct columns in the mapping stage. While importing CSV to QBO, delete the columns that are not required by QuickBooks besides that of Date, Description, and Amount to avoid any confusion. The names of columns in the CSV file should be the same as that in QuickBooks. It is suggested to rename the column names if they differ even slightly.
Formatting Issues while QuickBooks Online Import Invoices CSV
Different bank and financial institutions may create their CSV files differently that are used for QuickBooks Online Import invoices CSV. These formatting differences may create issues when you try to import. Some general methods to avoid formatting differences are as follows:
- Keep the ‘Amount’ column as simple as possible. No symbols or commas should
be used. You can edit it through right-click of your mouse and then pressing
the ‘Format Cells’ option. You need to change this to ‘General’
if it is set to ‘Currency’. - If you have used special characters in the ‘Description’ column, then it
can prevent you from importing the file. You should look for them and remove
them to avoid any further issues. The special characters can be spotted easily
by pressing the ‘Ctrl + H’ keys. - The date format should be consistent from the mapping stage. You should ensure that
it’s correct. Highlight the date column, go to the ‘Number’ dropdown at
the top of the screen. Click on the ‘Date’ option and then choose the ‘Short
Date’ option.

You can copy the contents of your CSV file to a blank spreadsheet. This would reveal the data differently, which can then be spotted easily and corrected to import the file.
You may also read: QuickBooks XML Error
Through this article, we discussed the detailed steps to Import banking transactions in QuickBooks using CSV file. You should be able to import your banking transactions in QuickBooks easily through the steps provided above. If you are still struggling to perform these steps, then ProAdvisor Solutions’ Support at Toll-free Number 1-(855)-888-3080 and get assistance from our experts.
FAQs
What should I do if I get an error when I try to import CSV to QBO?
Sometimes, when importing a CSV to QBO, you might end up encountering a few common errors due to the wrong formatting of CSV files. To overcome these issues, you must check the date format, cell formatting, and column formatting in these files. If the error message states something like, “Oops! Missing required field:__”, resolve it by checking for missing fields. If needed, correct the field header and import again.
How can I upload CSV to QBO in QuickBooks Desktop or Online?
QuickBooks Desktop can’t currently upload a CSV file for banking transactions, but you can use alternative ways, such as Web Connect. To implement that, open a web browser and visit your bank’s site. Next, log in to the bank account using the usual method, and lastly, download the transaction as a QB Web Connector (.qbo) file.
More related articles to read :
Why is the QuickBooks saving as a PDF Function not working
How do I install QuickBooks PDF Converter?
How to fix a missing PDF component in QuickBooks?
How to fix ABS PDF Driver Issues in QuickBooks

Erica Watson is writing about accounting and bookkeeping for over 7+ years, making even the difficult technical topics easy to understand. She is skilled at creating content about popular accounting and tax softwares such as QuickBooks, Sage, Xero, Quicken, etc. Erica’s knowledge of such softwares allows her to create articles and guides that are both informative and easy to follow. Her writing builds trust with readers, thanks to her ability to explain things clearly while showing a real understanding of the industry.