QuickBooks as accounting software is a blessing to the tedious book management task for small to mid-sized businesses. Right from handling bills and invoices to tracking vendors and banking, you find a feature for each of them. The root data on which QuickBooks works is in the form of a company file. This file hosts all your accounting data, and it isn’t hard to understand how crucial this file is, and so is the need to have an updated backup. Any error that may appear in relation to the QuickBooks Company file, such as QuickBooks backup error 2277, must be dealt with as soon as possible.
This article explains the best ways to deal with backup errors in QB. But if you are not willing to self-fix this error or you don’t have spare time to do it, then you can directly connect with our Proadvisor solutions’ experts present at +1.855.888.3080 to get the direct help to remove the error code.
Table of Contents
QuickBooks Backup Error Code 2277: Main Causes
You might encounter this backup error code in QuickBooks due to some common factors. In order to effectively handle the error, it is probably more helpful to know why this error takes place in the first place. Summarised below are some of the causes associated with the problems that users experience when backing up the company file –
- The QB company file backup process is faulty or incomplete.
- Your QuickBooks is not up-to-date and lacks the latest features and improvements.
- The company files you are trying to backup might be damaged, corrupted, or broken.
- Windows firewall is causing restrictions by blocking QuickBooks while creating the backup.
- Essential QB files are not available in the system, and they might be accidentally deleted.
- Excess junk or temporary internet files in your web browser can be another reason for QB backup error 2277.
- Intuit is not treated as a trusted site in your web browser, which can cause restrictions.
Perhaps the following are the causes of this error code appearing on your screen, especially if you are using QuickBooks. Now, let’s go to the next topic, which is learning how to deal with QB backup errors efficiently.
Solutions to Fix Backup Error 2277 in QuickBooks Manually
Let us now look at the section where we will discuss ways in which you can manually solve backup Error 2277 in QuickBooks. We suggest you follow the steps in the given order and carefully to avoid unwanted deletion of files.
Solution 1: Run the Intuit Data Protect Diagnostic tool
- You will see the Intuit Data Protect icon on your screen in the Windows System Tray. You must click on it and then choose About Intuit Data Protect.
- Use Ctrl + F2 keys to open the Intuit Data Protect Diagnostics Tool.
- Now you must go to the Run Diagnostics option and let it perform its task. In case the tool reports a miscommunication of QuickBooks software with a firewall or third-party security software, you must manually authorize access to Intuit Data Protect files. The given files are to be added for exceptions:
- First: C:\Program Files(X86)\Common Files\Intuit\Data Protect\IntuitDataProtect.exe
- Second: C:\Program Files(X86)\Common Files\Intuit\Data Protect\IbuEnghost.exe
- Third: C:\Program Files(X86)\Common Files\Intuit\Data Protect\QBIDPServices.exe
Also read: QuickBooks backup failed
Solution 2: Add Windows Firewall Ports to rectify the QuickBooks Backup Error 2277
Bear in mind that if QuickBooks does not have internet access due to a firewall in the Windows system, it causes backup problems in the application. You can fix these errors, like QuickBooks error 2277 in Intuit backup, by reconfiguring the Windows firewall and antivirus app settings.
As the settings are changed to delete obstructions while running QuickBooks, attempt to back up the data once more. If you still encounter the same error code, follow the next solution to eliminate it.
Solution 3 – Empty Temporary Files and Cache Cookies from the Web Browser
Cache and cookies in your browser can hinder performance and create problems when backing up the files. To rectify this, try to clear the cache and cookies from the web browser with the following format –
Microsoft Edge
You can get rid of the cache and cookies from the Microsoft Edge browser by using the steps below –
- Open the Microsoft Edge browser, click the three dots in the upper right corner, and choose History.
- Now, select the three dots at the top of the History panel, click Clear browsing data, and pick All time from the Time range drop-down.
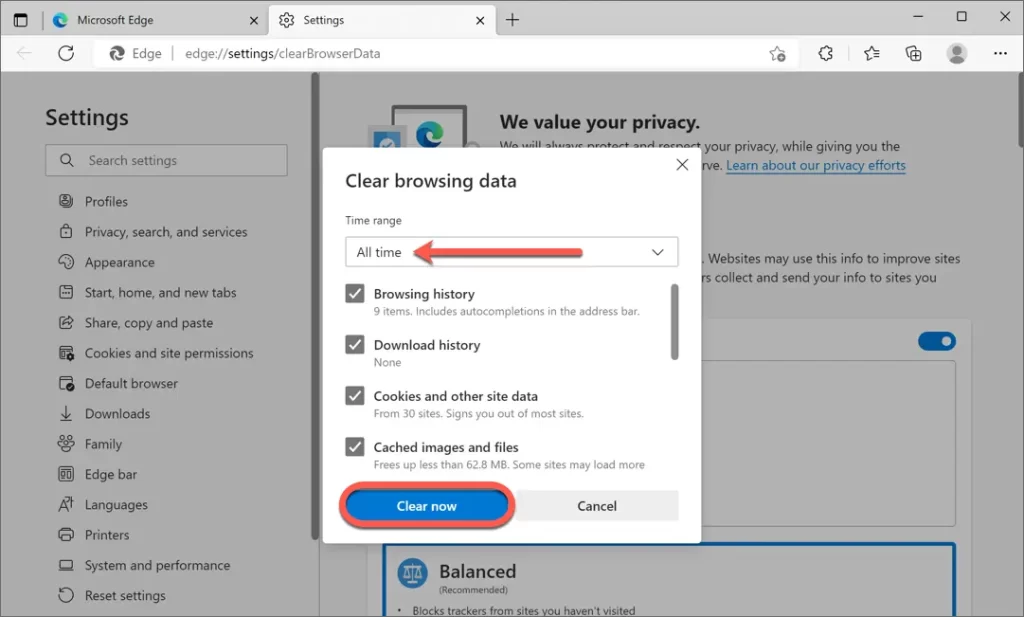
- Lastly, mark the boxes for Browsing history, Cookies and site data, and Cached images and files, and select Clear Now.
Google Chrome
If your default browser is Google Chrome, go through the following steps to remove the browser cache and cookies –
- In Google Chrome, click the three dots in the top-right and click the Clear Browsing Data option.
- Open the Clear browsing data box and mark the boxes for Cookies and Other Site Data and Cached images and files.
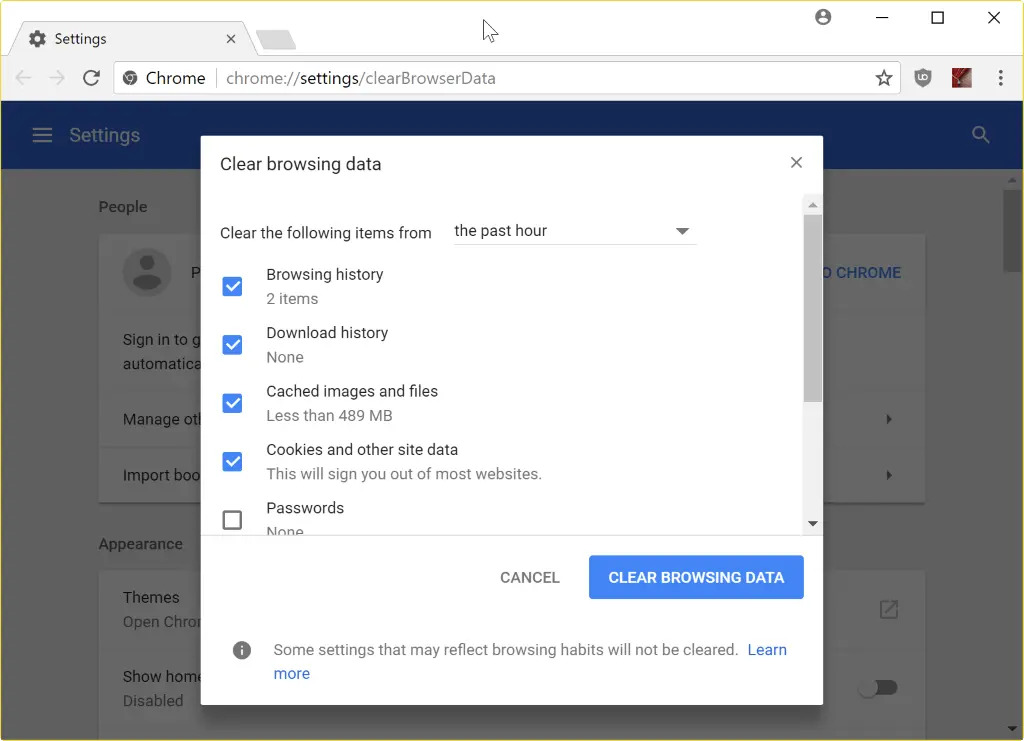
- Finally, choose the quantity of data you want to erase and hit Clear browsing data to remove the chrome cache and cookies.
Note: If you use another browser, remove the cache and cookies according to its particular steps.
If QuickBooks backup error code 2277 is again appearing on the screen then, you go with the next solution to get rid of it.
Also see: QuickBooks restore failed
Solution 4: Select Intuit as a trusted site to correct QuickBooks backup Error 2277
If Intuit is not trusted in your web browser, then QuickBooks error 2277 may result. To rectify the error, you need to add Intuit to the list of trusted sites on your default web browser as stated below –
Microsoft Edge
- From the Settings and More icon, select Settings and navigate to the left pane.
- Click Cookies and Site Permissions, select Manage and Delete Cookies and Site Data, and go to the Allow tab.
- Lastly, click Add, enter intuit.com, and select Add to make it a trusted site.
Google Chrome
- Click the Customize and Control Google Chrome icon, select Settings, and move to the left pane.
- Select Privacy and Security, click Site Settings, and choose Third-party cookies.
- In the Allowed to use third-party cookies section, click Add, type in intuit.com, and click on Add again to save the input.
Note: If you use another web browser, go through their respective steps to include Intuit in the trusted site list.
After this, check the status of the backup error code; if it still recurs, go to the next solution.
Solution 5: Update the QuickBooks application to remove QuickBooks Backup Error 2277
This solution is the traditional way to fix various errors in QuickBooks, even if it is the QuickBooks backup Error 2277. Follow the steps below to perform a manual update:
- If company files and the QuickBooks application are open, close both.
- Go to the Start menu towards the bottom-left of your screen.
- Either look manually or type QuickBooks Desktop in the search text box.
- Once you encounter it, right-click the icon and click on Run as administrator.
- No Company Open screen will emerge and from there, go to the Help menu.
- Click on the Update QuickBooks Desktop button.

- Navigate to the Options tab to select Mark All, followed by the Save button.
- You will see the Update Now tab. Click on it and select the Reset Update checkbox.
- Finally, choose the Get Updates option.
Solution 6 – Repair QuickBooks
To repair the QB application, use the following step-by-step scenario –
- Access the Control Panel from the Windows Start menu and select the option that says Program and Features.
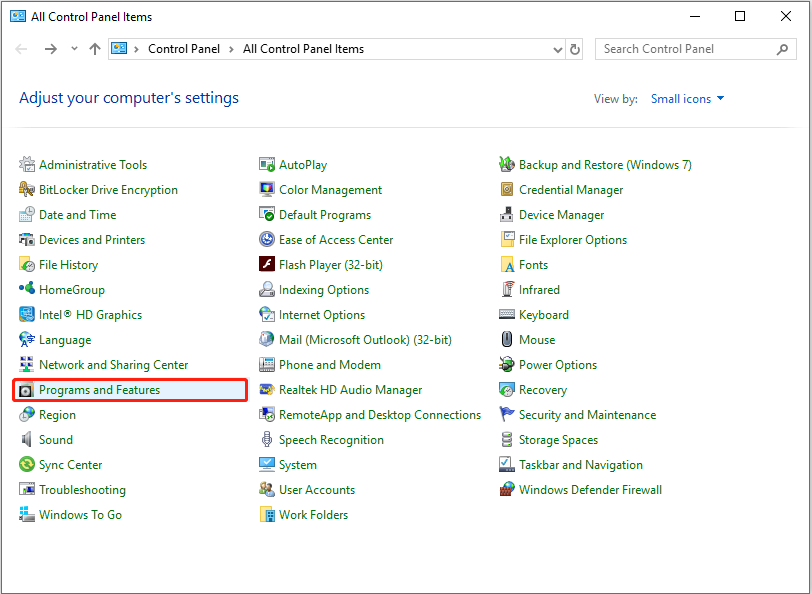
- Now choose QuickBooks from the list of the installed programs, then click on uninstall/change, and in the new window, click repair to begin the process of repairing the QuickBooks software.
Once the process is over, just attempt to create the file backup in QuickBooks, and it will give you the status of the said error. If you still have QuickBooks backup error 2277, then go to the next step to solve it.
Solution 7 – Use QuickBooks File Doctor
The QuickBooks Tool Hub has many tools, but one of the most important tools there is the QuickBooks File Doctor tool. The work of this tool is to solve the company file problems that might hinder the backup process in the following ways –
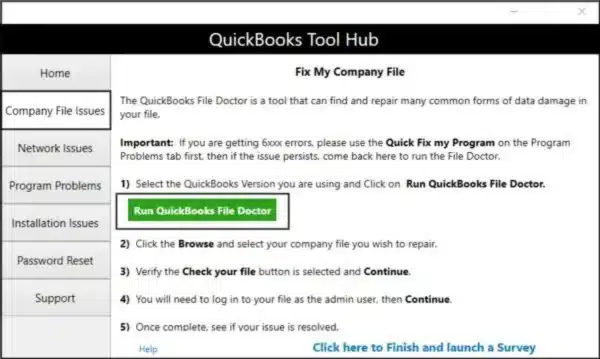
- Download the most recent QuickBooks Tool Hub version from Intuit, install it on your PC, and launch the program.
- Now, go to the Company File Issues section and run the QuickBooks File Doctor tool to initiate a file repair process.
If after turning off the tool you start the QuickBooks software and attempt to back up the data to observe if the error code 2277 is cleared. If the error code appears again, carry the steps in the next solution in order to eliminate the problem.
Solution 8 – Run the Verify/Rebuild Data Tool

If the above solution doesn’t work and the backup error continues, you can use the Verify and Rebuild Data utility in QuickBooks. This tool identifies the problems with your company data and rebuilds the damage accordingly.
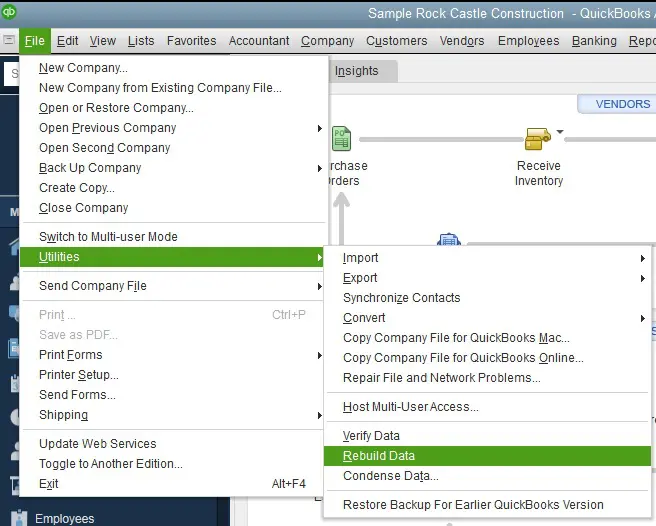
After completing the tool process, it is necessary to repeat the backup function in QuickBooks to discharge the error code.
Conclusion
The suggested quick fixes list by an expert in this extensive blog post will help you solve QuickBooks backup error 2277 without much hassle. If you are still seeing the error after applying the solutions the only thing that remains to be done is to consult.
You can call our Proadvisor solutions expert team directly at +1.855.888.3080 to get rid of the file backup problem first.
FAQs
Can QuickBooks backup error 2277 cause permanent company file data loss in the application?
Yes, if the error persists, then it could lead to permanent data loss in the company file of your business. This is why we still advise our readers to back up QuickBooks data from time to time. Like this way, if the data is missing, the last backup version can be restored and the critical data saved.
What are the signs and symptoms of QuickBooks error code 2277?
QuickBooks error 2277 can have the following signs and symptoms –
1. This section of QuickBooks Desktop may take longer or start to freeze and lag during the process of company file backup.
2. Sometimes, a dialog box with the precise error code may seem on your screen when backing up the QB company file.
3. The system might start freezing abruptly at regular intervals.
4. Some other applications in the system may be possibly influenced, or such applications could begin experiencing performance problems.
Can disabling the antivirus program help resolve QB backup errors?
Yes, rather than change the settings of the antivirus program, you can simply turn it off before you follow the steps shown below for the file backups –
1. Go to Windows start tab and type ‘Windows Security’ in the search field then the Windows Security app will appear.
2. Next, select the app, then go to the Virus & Threat Protection section and open its settings.
3. Now, select Manage Settings and switch Real-time Protection to Off to disable the antivirus.
Are there any other reasons why QuickBooks backup might fail?
Still on this, what with the above reasons apart, the backup path may not be accessible or the path is not dependable and this may lead you to other worries every time you are backing up your QB data. Therefore, make sure you’ve typed the location disk or directory for backups correctly, and if you’re using an external drive, confirm the drive is well connected.

Erica Watson is writing about accounting and bookkeeping for over 7+ years, making even the difficult technical topics easy to understand. She is skilled at creating content about popular accounting and tax softwares such as QuickBooks, Sage, Xero, Quicken, etc. Erica’s knowledge of such softwares allows her to create articles and guides that are both informative and easy to follow. Her writing builds trust with readers, thanks to her ability to explain things clearly while showing a real understanding of the industry.