Is your QuickBooks missing months of transactions? This issue can impact the bookkeeping process and can occur due to connectivity problems and excessive browser cache, among other reasons. In this article, we will discuss practical solutions to restore the missing transactions in QuickBooks Desktop, Online, Self-Employed, and Point of Sale.
Missing bank transactions in QuickBooks can wreak havoc on the bookkeeping process. Self-resolving this issue might be a hassle for some users. In such a case, you can get expert assistance from our Proadvisor solutions’ support team by dialing 1.855.888.3080
Table of Contents
Leading Reasons Why Bank Transactions are Missing in QuickBooks
Are you wondering, “Why are my bank transactions not showing in QuickBooks?” In this section, we will discuss the main reasons behind missing bank transactions in QB. You need to know these reasons to understand better why the issue arises. The following list of reasons are responsible for QuickBooks missing bank transactions –
- There are connectivity problems between your bank and QuickBooks, which can lead to data synchronization issues.
- There are issues with your web browser while using QBO, like excessive cache and cookies.
- Certain bank rules and regulations in QBDT might exclude certain transactions.
- It might be possible that the missing transactions have been categorized into uncategorized accounts.
- If you have recently connected to your bank account, only the last 90 days of transactions will be imported automatically. The remaining transactions need to be uploaded manually, which is why they are missing.
- You might be missing recent transactions as they might not be uploaded by the bank.
- You have set the wrong date ranges or filters while showing bank transactions, so the transaction you are looking for is missing from the display.
- Essential POS transactions might have been manually erased from the PC.
- QuickBooks Desktop was restored immediately following the bank transaction.
These are the leading causes of missing bank transactions in QB. In the next section, we will learn how to address this issue in QuickBooks with effective solutions.
Steps to Restore Missing Transactions in QuickBooks Desktop
If you are missing months of transactions in QuickBooks Desktop, follow the solutions mentioned below to fix the issue –
Solution 1 – Refresh the Connection Between the Bank and QuickBooks
Firstly, try reconnecting to the bank account since general connection issues might lead to missing transactions. To refresh the connection between QB Desktop and the bank, follow the steps mentioned below –
- Open QuickBooks Desktop, select Bank Feeds, then click the Bank Feed Center.
- Now, find and press the Refresh Now option to reconnect with the bank account.
Once done, check the bank transactions in QuickBooks to see if the missing transactions can be located. However, if you are still unable to find the missing transactions, move to the next solution.
Solution 2 – Remove Existing Bank Rules
Sometimes, bank rules and regulations can exclude certain transactions. These rules can be why your QuickBooks is missing bank transactions. To fix this issue, remove the bank rules in the following manner –
- Open QBDT, go to the Banking menu, select Bank Feeds, and click Bank Feed Center.
- Next, select Rules and search QBDT for a rule that might involve missing transactions.
- Lastly, select Edit to change or click Delete to remove the rule from QB.
After removing the bank rules, rerun QB and recheck the bank transactions. If you still find that QuickBooks is missing months of bank transactions, move to the next solution.
Recommended to read : What is QuickBooks Payroll Setup Error 05396 4000?
Solution 3 – Manually Import the Transactions
If none of the above solutions help find the missing transactions, you must learn how to import bank transactions into QuickBooks Desktop. To manually import the transactions, follow the detailed steps given below –
- Open QBDT, choose Banking, select Bank Feeds, and click Import Web Connect Files.
- Next, select the downloaded file containing bank transactions and click Open.
- Choose the account to which you want to upload the transaction, which can either be a new account or an existing one and click Continue.
- When the transactions are imported, wait for the dialog window confirming the success, then click OK.
- Lastly, visit the Bank Feeds Center and examine the imported bank transactions.
Once done, review the transactions and ensure all the missing bank transactions are in QBDT.
Recover Missing Bank Transactions in QuickBooks Point-of-Sale
If QuickBooks Desktop is not displaying certain point-of-sale transactions, follow the solutions given below to recover these lost POS transactions –
Case 1 – Only a Few Bank Transactions are Missing
If you are missing a few bank transactions in QuickBooks POS, follow the steps given below to get them back in QB POS –
- Open QuickBooks Point of Sale, select Sales History and choose the Sales Receipt you wish to submit to QBD again.
- Now, click I wish to and select Show Financial Detail.
- During the subsequent financial exchange, choose Resend this Document and click Finance.
Once done, update QuickBooks Desktop and review the POS transactions to ensure the missing ones are present.
Case 2 – Several Bank Transactions are Missing
You can recover missing months of transactions in QuickBooks POS in the following manner –
- Open QuickBooks Point of Sale, select Financial and click Financial Center.
- Now, select Display Advanced Options and click Recover Data Now.
- When the warning notice appears, tap Continue and provide the financial exchange date range.
- When the confirmation box appears, hit Yes and click Continue to end the process.
Now, ensure that the missing QuickBooks POS transactions are successfully recovered.
How to Recover Missing Transactions in QuickBooks Online?
You can recover the missing bank transactions in QBO by following the solutions mentioned below –
Solution 1 – Clear the Browser’s Cache and Cookies
If your QuickBooks Online is missing months of transactions, the browser might contain excessive cache and cookies. Thus, you need to remove the cache and cookies to fix the missing transaction issue.
Step 1 – Open the Browser in a Private Window
Using the browser in a private window can help determine if the missing transactions in QBO are due to excessive browser cache. You can use the following shortcuts to open the browser in incognito mode –
- Google Chrome – Ctrl + Shift + N
- Mozilla Firefox & Microsoft Edge – Ctrl + Shift + P
- Safari – Command + Shift + N
Now, check if you can see the missing bank transactions in QBO. If yes, then the browser is the problem, and you need to clear the cache and cookies in your default web browser by following the next step.
Step 2 – Clear the Browser’s Cache and Cookies
Follow the steps given below to delete the cache and cookies before running QuickBooks Online in your web browser –
Google Chrome
To clear the browser cache in Google Chrome, implement the following steps –
- Open Google Chrome, go to the top-right corner, select More, then click Delete browsing data.
- Now, pick a time range (like All time), select the types of information you want to clear, and click Delete data.
Firefox
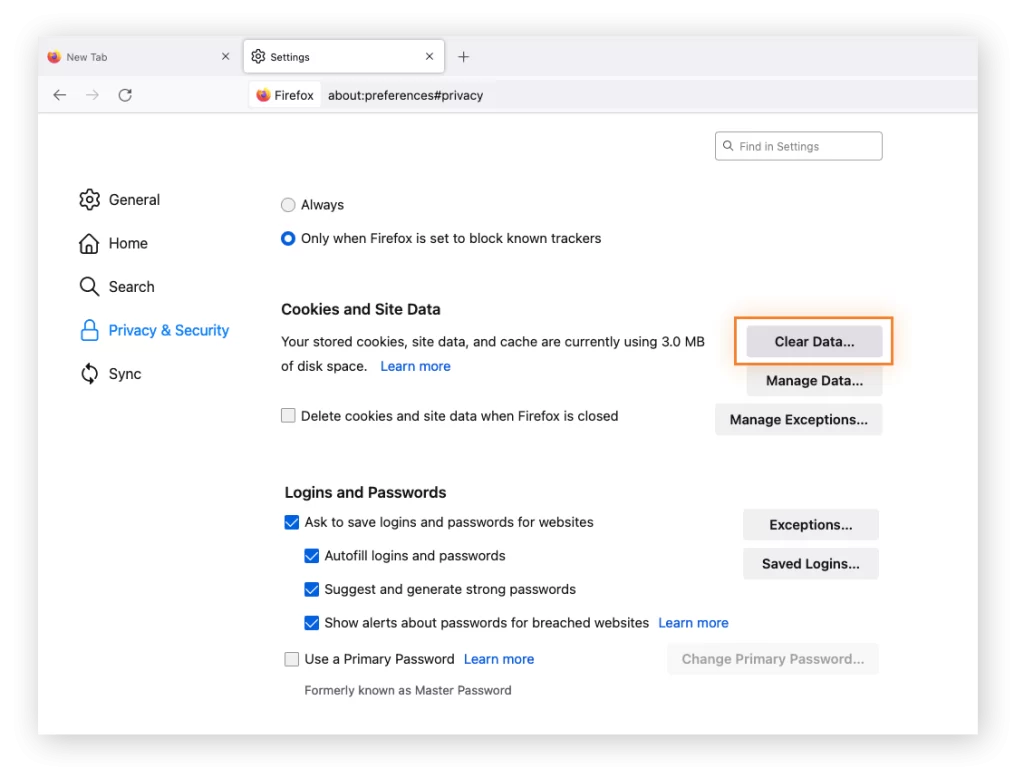
If you use Mozilla Firefox to run QBO, follow the steps given below to delete the cache and cookies –
- Open Firefox, select the Menu button and go to the Settings tab.
- Further, navigate to the Privacy & Security panel and move to the Cookies and Site Data section.
- Click Clear Data, unmark the Cookies and Site Data checkbox, and ensure that Cached Web Content is marked.
- Select Clear, then exit the settings page, and your changes will be automatically saved.
Safari for Mac
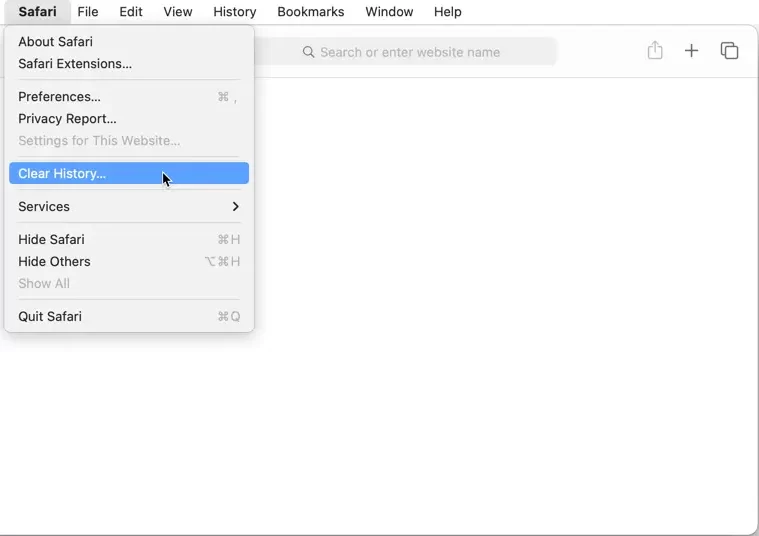
To remove the browsing history in Safari for Mac, implement the following steps –
- Open Safari on your Mac, click History and select the Clear History option.
- Now, open the pop-up menu, choose how far back you want to clear your browsing history, then delete it.
Safari for iPad and iPhone
Use the following steps to clear the cache and cookies in Safari for iPad and iPhone –
- Open the Settings tab, select Safari, then move to the Advanced menu.
- Further, select Website Data and click Remove All Website Data to remove the cache.
Microsoft Edge
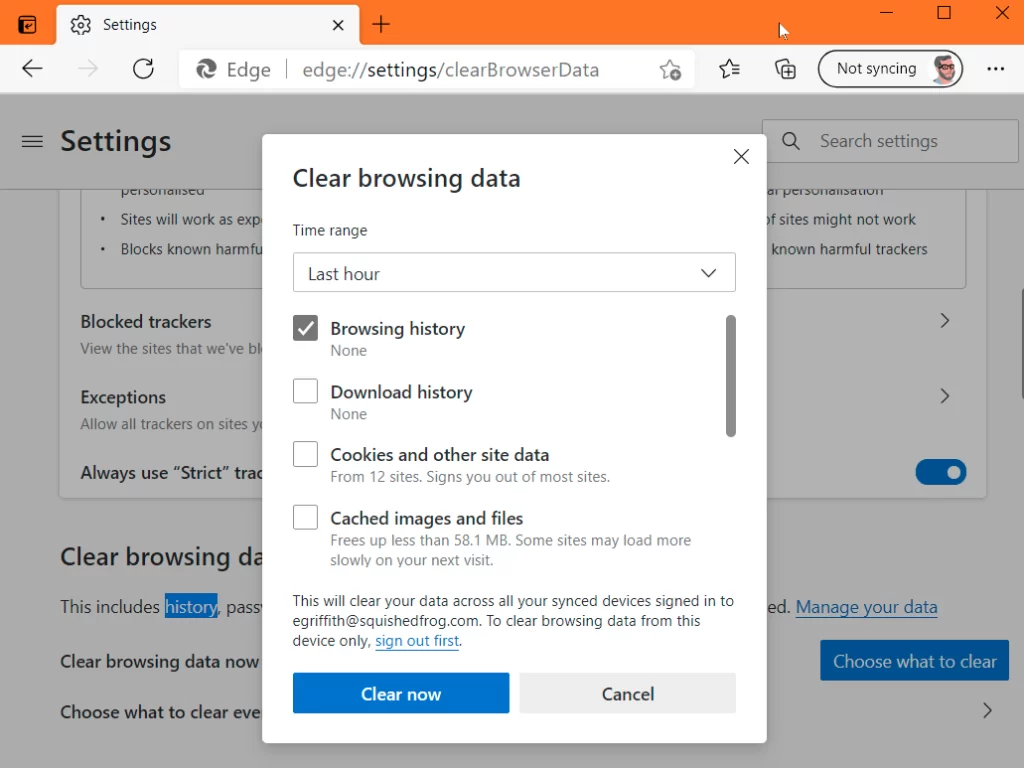
If you use Microsoft Edge as the default browser, implement the following steps to clear the browsing data –
- In Microsoft Edge, select Settings and More, click Settings, and select Privacy, search, and Services.
- Next, go to the Clear Browsing Data section and click Clear Browsing Data Now.
- Select Choose what to clear, then move to the Time range section and choose a time range from the drop-down list.
- Further, choose the types of browsing data you want to remove; for instance, you may want to clear your browsing history and cookies but keep passwords.
- Lastly, select Clear Now, and the selected browser data will be removed.
After removing the cache and cookies, restart your browser and open QuickBooks Online. Now, check if you can see the missing bank transactions. However, if the transactions are still missing, move to the next solution.
Read Also : How do i fix QuickBooks Error Code 800706be?
Solution 2 – Review the Uncategorized Accounts
If you are missing months of transactions in QuickBooks Online, there is a possibility that the transactions are in the uncategorized accounts. To find them, check the uncategorized account in the following manner –
- Open the Accounting menu, select Chart of Accounts, and look for the Uncategorised Income or Uncategorised Expenses account.
- Next, select Run Report and look for your missing transaction on the report.
If you find missing transactions, categorize and match them to post them into the appropriate accounts. However, if no missing transactions are found, move to the next solution.
Solution 3 – Update the Bank Transactions
If the missing bank transactions aren’t over 90 days, run a manual update to download the missing transactions into QuickBooks. To update the bank transactions manually, follow the steps given below –
- Firstly, go to the Bookkeeping section, select Transactions, and click Bank Transactions.
- Next, click Update to update the bank transactions.
Once the update is complete, review the bank transactions to check if the missing transactions have been downloaded. If the disappeared transactions are over 90 days old, move to the next solution and manually upload them in QB.
Solution 4 – Manually Upload the Transactions
If your QuickBooks is missing months of bank transactions that are older than 90 days, you can manually upload them in QuickBooks Online by following the step-by-step process given below –
Step 1 – Choose a Start Date
The first step is to find the date of the oldest transaction in the account to avoid duplicates.
- Go to the Settings menu, select Chart of Accounts, and find the account to which you want to upload the transaction.
- Select View Register, find the oldest transaction (usually the opening balance), and write down its date.
Once done, get transactions from the bank by following step 2.
Step 2 – Get the Transactions from the Bank
To import the past transactions from your bank, download the CSV files of your transactions in the following manner –
- Sign in to your bank or credit card’s website, then follow your bank’s instructions to download CSV files of your transactions on your PC.
- Next, check the date range for the download, which should be at least one day before the oldest transaction date.
- Lastly, download your transactions, then save the file to an easily accessible location on the PC.
Note: If possible, choose QBO format for the bank transaction files. Otherwise, you can also upload transactions in QuickBooks Online from a CSV or a QFX file.
Once done, move to the next step to check the file format and size.
Step 3 – Check the File Format and Size
After downloading the file, ensure the format is correct, and the size is within the allowed limit. Here are a few essential things to check to prevent issues and errors –
- Remember, the maximum file size is 350 KB. If the file size exceeds the limit, shorten the date range and download the transactions in smaller batches.
- Remove any zeroes from the file and leave those cells blank.
- If the transactions show numbers in the Description column, fix them.
- Next, remove the word “amount” from the Credit or Debit column header, as they should only say “Credit” and “Debit.”
- Ensure that all dates follow the same format (it is recommended to use the dd/mm/yyyy format).
- If you’re a Mac user, save the downloaded file as a Windows CSV file.
- If your bank adds the day of the week in the Date column, remove the day of the week by splitting the date and day of the week into separate columns.
Once the file format is set and the size is within the limit, move to step 4.
Step 4 – Upload the Bank Transactions Manually
The next step is to manually upload the bank transactions in QBO using the instructions below –
- Go to the Transactions menu, select Bank Transactions, and click the blue tile for the account to which you want to upload the transactions.
- Next, select the Link account dropdown, click Upload from file, and select Drag and Drop or select Files.
Note: If your account is not connected to online banking, you need to select the Upload your file option.
- Now, select the file you downloaded from your bank, click Continue, and open the QuickBooks account dropdown.
- Further, select the account you want to upload the transactions into and hit Continue.
Note: If you’re new to QBO and don’t have an account to upload the transactions, create a new bank account by clicking Add New from the dropdown menu.
- Follow the onscreen steps to match the columns on the file with the correct fields, select Continue, and choose the transactions you like to import.
- Lastly, select Continue, click Yes, and hit Done to end the process.
Once the transactions are uploaded, move to the next step to categorize them.
Step 5 – Categorize the Bank Transactions
Now that the bank transactions are in QBO, you need to categorize them. These transactions go into your accounts after they are reviewed. To review and categorize the transactions, follow the steps given below –
- Firstly, go to the Transactions menu, select Bank Transactions, and click Update to update the transactions.
- Now, return to Bank Transactions and select the account you want to review.
- Click the For Review tab and review the transactions one by one as follows –
- If the particular transaction says Add –
Click Add if the suggested category is incorrect, then change the category by choosing another one from the dropdown or adding a new one. - If the bank transaction says Review –
Select Review, select a category, or add a new one, then click Confirm.
Note: QBO also includes certain details automatically if you set up specific banking rules or if the transaction descriptions say so.
Once the transactions are reviewed and categorized, reconcile them in the next step.
Step 6 – Reconcile the Bank Transactions
The last step is to reconcile the transactions using the instructions below to ensure all transactions are recorded correctly –
Note: If you are reconciling transactions older than your opening balance, you need to edit your opening balance first. On the other hand, if you are reconciling multiple months of transactions, do them one at a time, starting with the oldest testament.
- Go to Settings and select Reconcile (if you’re reconciling for the very first time, select Get Started).
- Further, choose the account you wish to reconcile from the Account dropdown menu and ensure it’s the same one on your statement.
Note: If you see a message about a past reconciliation, select We can help you fix it, and fix it before starting this reconciliation.
- Review the Beginning balance and ensure it matches the one on your statement. If they don’t match, you must compare the opening balance with the real-life account and review the account register.
- Next, enter the Ending balance (also called ‘new balance” or “closing balance”) and the Ending date on your statement.
- If you see it, check the ending date of the last statement, which is the end date of your previous reconciliation. Your current bank statement should start the day after the statement ending date.
- Lastly, when you’re ready, select Start reconciling and run the reconciliation process.
Once done, compare your statement with QuickBooks to ensure that the difference between your statement and QuickBooks is 0.00.
After the bank transactions are successfully uploaded in QBO, you will be able to see all the missing transactions in the accounts.
Recommended to read : What is error 30134 in QuickBooks desktop?
How Do You Add Missing Transactions in QuickBooks Self-employed?
If you are missing bank transactions in QuickBooks Self-Employed, go through the following solutions to find and restore the missing transactions –
Solution 1 – Refresh the Bank Account
Firstly, try to refresh the bank account and reload the transactions in QuickBooks Self-Employed as follows –
- Open QuickBooks Self-Employed, select the Gear icon and click Bank Accounts.
- Now, select the Refresh All option to refresh the account and reload the transactions.
However, if you cannot find the missing transactions, manually add them by following the next solution.
Solution 2 – Manually Add the Older Transactions
QuickBooks Self-Employed downloads 30 to 90 days of transactions when you first connect the bank account and credit cards. In some cases, you can download transactions up to one year old, too. However, if you find older transactions missing in QuickBooks, you must export them from the bank and then import them into QuickBooks. Follow the process mentioned below to add the missing older transactions successfully –
Step 1 – Set the Date Range
The first step to add missing several months of transactions from the linked bank is to find the oldest transaction date. Finding the oldest transaction date will help you set a date range for adding transactions and avoid duplicates for already existing ones. To find the oldest transaction date, follow the steps given below –
- Open QuickBooks Self-Employed, go to the Transactions menu, and open the Account: All drop-down menu.
- Choose the account you plan to upload transactions into, then from the Date drop-down menu, select All.
- Lastly, click the Date column header to sort the list by date and note down the oldest transaction date in the account.
Once done, export the transactions from the bank by following step 2 below.
Step 2 – Export the Transactions from your Bank
After finding the oldest transaction date, you need to export the transactions from the bank in the following manner –
- First, log in to your bank’s website, then download the transactions as a CSV file (usually, a button or link on your account page will help you do so).
Note: If your bank provides specific instructions for QuickBooks Self-Employed, this is okay as long as you download the transactions as a CSV file.
- Now, set the date range for at least one day before the oldest transaction in the QuickBooks account, then follow the on-screen instructions to finish downloading the transactions.
After the transactions are successfully exported, move to step 3.
Step 3 – Import the Transactions into QuickBooks Self-Employed
Open QuickBooks Self-Employed on your laptop or PC and import the transactions in the following manner –
- Open QuickBooks Self-Employed in a web browser, select Settings and click Imports.
- Further, click Import older transactions for the account you want to add transactions to, then hit Browse and find the file you downloaded from your bank (usually located in the Downloads folder).
- Select the file, click Open to start the import, and review the column headers and data.
- Now, ensure the Date, Description, and Amount columns on the CSV file match the columns and order in QuickBooks. Other column headers in the CSV file can be in any order.
- Lastly, select Continue to complete importing the bank transactions.
Once the process ends, your older transactions will be in QuickBooks Self-Employed.
Step 4 – Review the Imported Data
After uploading the missing months of transactions in QuickBooks, review the imported data to ensure there are no duplicates.
- In QuickBooks Self-Employed, go to Transactions, then open the Account: All drop-down.
- Select the account, go to the Date drop-down menu, and click All.
- Now, select the Date column header to sort the list by date and look a few days before and after the original oldest transaction (see step 1 of this solution).
- If there are any duplicate bank transactions in QB Self-Employed, delete them.
Once the transactions are reviewed, move to the next step to categorize them.
You may read also : Why my QuickBooks Migration Tool Not working properly
Step 5 – Categorize the Transactions
The last step is to categorize the transactions added in QuickBooks Self-Employed in the following manner –
On the Web Browser
To categorize the manually uploaded bank transactions in QuickBooks, follow the steps below –
- Go to the Transactions menu in QuickBooks Self-Employed, then find a transaction on the list.
- Now, select Business if the transaction was for business, or click Personal for a personal transaction. However, if the bank transaction was for both, click Split.
- Review the category in the Category column, but if you need to change the category, select the Category link.
- Select a general type, choose a more detailed category, and when you’re done, select Save.
On an iPhone/iPad or an Android Phone/Tablet
Follow the steps given below to categorize the bank transaction on a phone or tablet –
- If you’re using an iOS device, open QuickBooks Self-Employed and go to the Transactions menu. On the other hand, if you’re using an Android device, select the menu icon and then click Transactions.
- Find a transaction on the list, swipe left to categorize it as Business, right for Personal, or click Split if the transaction is a mix of both.
- Review the category in the banner and select the Category link to change it (if required).
- Once you have chosen a new category, select Save.
After the bank transactions are manually added in QuickBooks Self-Employed, review them again to ensure the missing older transactions are successfully added.
Conclusion
Hopefully, this detailed guide helped you recover missing transactions in QuickBooks Desktop, Online, Self-Employed, and POS. However, if QuickBooks is missing months of transactions even after following these solutions, you will need expert help. You can reach out to our team of professionals by dialing 1.855.888.3080 and get help promptly resolving the missing transaction issue.
FAQs
What are a few things to consider before downloading bank transactions in QuickBooks Desktop?
If your bank transactions are missing from QBDT, you need to keep the following things in mind before downloading them from the bank –
1. Make sure to back up your QuickBooks company file to avoid accidental data loss.
2. Remember that you can download transactions to the same company file only once. However, the bank can reopen the transaction from their side so QB can download them.
3. Only .QBO files are compatible with Web Connect, and the .QFX and .QIF files won’t work.
How do I see all transactions in QuickBooks Online in detail?
You can see the debits and credits of each transaction by using the Transaction Journal Report. This report provides a detailed and focused view of the amounts and accounts. To see this report, go to the Report menu and select Transaction Journal. Alternatively, you can press the Ctrl + Y key on Windows and the Cmd + T key on Mac to get this report. You can customize the date and transaction types to view the transactions in more detail.
How can I find and sort the bank transactions in QBO?
To filter transactions
1. Go to Settings, select Chart of Accounts, and find the account you want to see/review.
2. In the Action column, select Account History, then select the Filter icon.
3. Select the filters you want to apply or use the Find field to search by amount, reference number, or memo.
4. To remove a filter, select the X next to the filter name and click Apply to confirm.
To sort transactions
1. Go to the column header, click the Sort icon, and sort the transactions as per date, ref number, payee, or reconcile status (as required).
2. Now, select any sortable column header and sort the account history to see the transactions in ascending or descending order.
How do you reconcile accounts connected to online banking in QuickBooks?
Reconciling bank accounts with QuickBooks can help compare the transactions and ensure that all the transactions are present and balanced. To reconcile the accounts connected to online banking, follow the steps below –
1. Open the first transaction on your bank statement and find the same transaction in the Reconciliation window in QB.
2. If the transactions match, put a checkmark next to the amount in QuickBooks to mark it as reconciled.
3. If a transaction doesn’t appear on your statement but you see it in QuickBooks, don’t put a checkmark on the mismatched transactions.
4. If you’re absolutely sure you’ve found a match but something small isn’t quite right, choose the transaction in QuickBooks to expand the view. Select Edit and change the details to match your statement.
5. When you reach the end, make sure the difference between your statement and QuickBooks is $0.00 and click Finish now.

Erica Watson is writing about accounting and bookkeeping for over 7+ years, making even the difficult technical topics easy to understand. She is skilled at creating content about popular accounting and tax softwares such as QuickBooks, Sage, Xero, Quicken, etc. Erica’s knowledge of such softwares allows her to create articles and guides that are both informative and easy to follow. Her writing builds trust with readers, thanks to her ability to explain things clearly while showing a real understanding of the industry.