If your QuickBooks File Doctor Not Working, you can utilize QuickBooks Tool Hub, a centralized application provided by Intuit that helps diagnose and resolve common problems in QuickBooks. It comprises a number of utilities, including File Doctor, QuickFix My Program, Install Diagnostic tool, and many more. In this blog, we have shed some light on the File Doctor Tool and the issues related to it.
QuickBooks File Doctor is one such tool that is designed to fix company file and network issues to ensure smooth accessibility of company files over the network. But sometimes, problems may arise while running the tool or you may completely fail to even open the tool. In this specific blog, we have addressed the primary reasons and the best solutions to get rid of ‘QuickBooks File Doctor not working’ issue. Therefore, keep reading the article and follow the troubleshooting guide to resolve the QuickBooks File Doctor Tool issues.
Is ‘QuickBooks File Doctor tool’ issue too overwhelming to address? If you are not a tech savvy and want an expert to tackle the issue on your behalf, you can reach out to our team of professionals at 1.855.888.3080. You’ll get the best guidance in resolving the problems while running the QuickBooks File Doctor Tool.
Table of Contents
Major Reasons and Factors Leading to the QuickBooks File Doctor Not Opening Issue
If the QuickBooks File Doctor is taking a long time to open, the following causes might trigger the issue –
- You are running an outdated version of the QuickBooks File Doctor Tool, which can make it incompatible with the current QuickBooks version.
- There are software conflicts in the system, and some 3rd party applications might cause interruptions while running the QuickBooks File Doctor Tool.
- The Windows firewall might consider the QuickBooks File Doctor Tool as a threat, which can prevent users from running the tool correctly.
- System requirements to download and run the QuickBooks File Doctor Tool are not met, and your Windows might not have the required OS version and hardware specifications.
- There are network connectivity issues while running the file repair process, which can impact the tool’s functionality.
- The company files you are trying to repair might be severely damaged, and the QuickBooks File Doctor Tool might not be capable of fixing such extensive damage.
- You are not running the QuickBooks File Doctor Tool with proper admin privileges, which can cause access problems.
- Your system might be infected with some malicious bugs or glitches, which can impact the QuickBooks File Doctor Tool.
- Your company file size might be more than 200 MB in QuickBooks Pro and 450 MB in QuickBooks Enterprise.
- Since the company files rely on the NET framework, issues with the framework can also cause problems while running the file repair.
- The company file you want to repair doesn’t exist in the system, or the file is converted to a newer version over the network.
Now that we have understood the main reasons that hinder the QuickBooks File Doctor Tool’s working let’s move forward and learn the essential steps to eliminate this error.
Recommended To Read : What is QuickBooks Error Code 6106?
Reliable Solutions to Easily Rectify “QuickBooks Desktop File Doctor Taking a Long Time” Issue
A lot of work can come to standstill if you are unable to repair the company file damage with the QuickBooks File Doctor Tool. Another key point is that File Doctor also fixes network issues. It means malfunction of the tool will prevent you from fixing network issues as well. Thus, you need to resolve the ‘QuickBooks File Doctor Tool not working’ issue on priority to access the data file seamlessly and fix network issues efficiently.
‘QuickBooks File Doctor not working’ issue can be successfully addressed by performing the detailed steps given below –
Solution 1 – Access the No Company Open Window and Manually Launch the QuickBooks File Doctor Tool
Many general issues while running the QuickBooks File Doctor Tool can be fixed by manually launching the tool. You can fix the ‘QuickBooks File Doctor won’t open’ issue by manually running the tool in the following manner –
- Press and hold the Ctrl key, double-click the QB icon to launch the No Company Open window.
- Once the window appears, go to the QuickBooks File menu and choose the Utilities.
- Select the Repair File and Network Problems option, and once the informational dialog box appears, hit OK.
- Now, log in to the tool with your admin credentials, then hit Yes on the informational wizard.
- Select the wrench icon to open the QuickBooks File Doctor Tool.
- Hit Continue and log in to the company file you want to scan and repair.
- Once the advanced settings are available, tap the File menu.
- Verify the issues or repairs required and hit Next, then launch the company file.
- Lastly, wait for the tool to stop running, then check the files to ensure that the QuickBooks File Doctor not opening error is fixed.
If the error message persists as the file repair process fails, move to the next troubleshooting step to resolve the issue.
Solution 2 – Uninstall QuickBooks File Doctor Tool and Reinstall the Tool from Intuit
If manually launching the QBFD tool didn’t help, there might be issues with the tool’s installation process. To resolve these problems, you can uninstall the current version and reinstall the QBFD tool from Intuit.
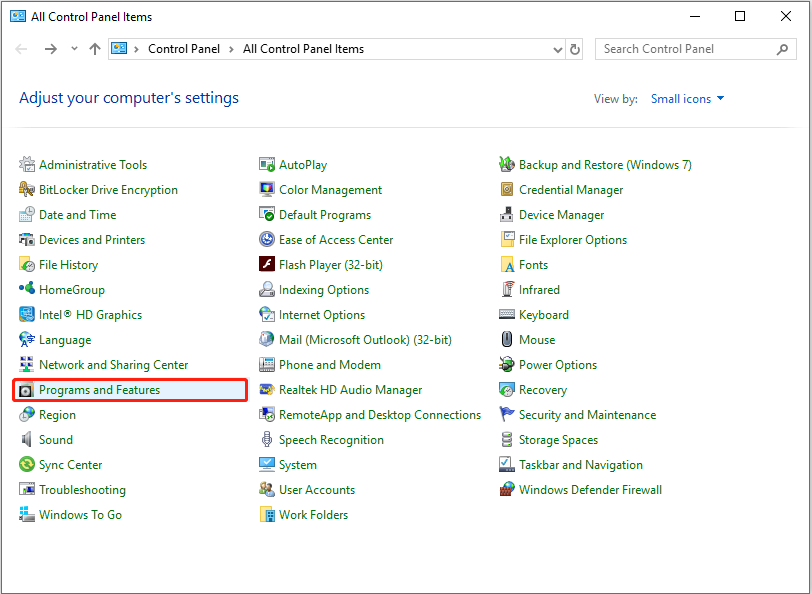
- Click on the Windows Start menu and open Control Panel, then go to the Programs menu.
- Under Programs, select Programs and Features.

- Select QuickBooks File Doctor from the list of programs.
- Select Uninstall/Change, Remove and then hit Next to uninstall the tool from the system.
- Once the tool is removed, download the recent QuickBooks File Doctor Tool version from Intuit’s website.
- Save the downloaded file at an accessible location on your PC.
- Check if you have a reliable internet connection and ensure that the Windows files are updated.
- Double-click the file that you have just downloaded and initiate the installation process, then log in to the tool with admin rights.
- Ensure that the multi-user mode is disabled before accessing the tool.
- If you are running the tool on a network server, keep the hosting mode enabled and ensure that there are no firewall blockages.
- Configure the firewall in all your servers and client computers and then restart your PC.
If you are still unable to run the QuickBooks File Doctor Tool, go through the next solutions to eliminate the issues.
Read Also : How Do I Fix QuickBooks Error 404
Solution 3 – Restore the Backup of the Corrupted QBW Company File from the File Menu
If manually launching the QBFD tool or reinstalling the tool did not work, you can try restoring the backup of the damaged company file. Restoring a backup can help when the tool is unable to fix the severely damaged company file, and you can perform the backup restore process by performing these steps –
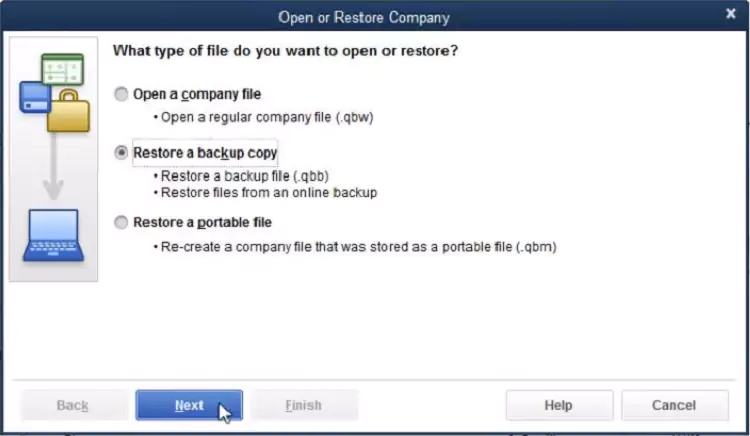
- Open QuickBooks and go to the File tab, then choose Open or Restore Company.

- Choose Open or Restore a Backup Copy and hit Next, then select Local Backup and hit Next again.
- Browse the folder to look for the files with the QBB extension.
- Select OK when the flashing wizards appear and choose Next, then access the drop-down menu.
- Select the Save As button and pick a location to save the restored files.
- Enter the file’s name in the given field and choose QBW as the file extension, then hit Enter.
Run the QuickBooks File Doctor Tool again, and if the tool is still not running, you can try performing the next few solutions to tackle the issue.
Solution 4 – Reconfigure the Anti-Virus Software to Add Ports
Problems while running the QuickBooks File Doctor Tool can arise when there are blockages from the anti-virus app. This scenario can be fixed by turning the multi-user mode off and configuring the anti-virus app in the following manner –
- Launch the MacAfee software and choose the Web & Email Protection section, then select Windows Firewall.
- Select the Ports and System Protection option and click on Add.
- Type eMule as the Service Name and select the Local TCP/IP Ports option.
- Write the TCP data for QuickBooks and select all the workstations from the Open Ports section.
- Hit Save and restart your PC, then run the QuickBooks File Doctor Tool to check the status of the ‘QuickBooks File Doctor taking a long time’ error.
If none of the above steps work, you can follow the next troubleshooting steps to address the QuickBooks File Doctor Tool issues.
Solution 5 – Reduce the Company File Size with the Condense Data Tool

If your company file exceeds the maximum limit (200 MB for QuickBooks Pro and 450 MB for QuickBooks Enterprise), then the QuickBooks File Doctor Tool won’t be able to run a repair. In this scenario, you can use the condense data tool to reduce the file size.
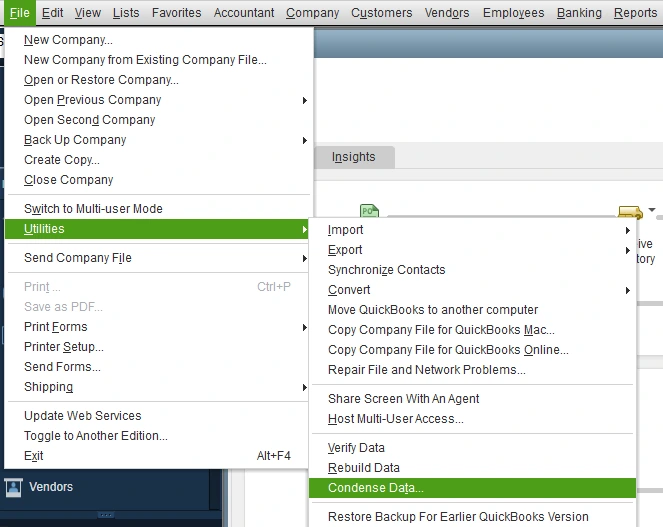
- Open the QuickBooks File menu and choose the Utilities section.
- Next, select the Condense Data option and choose the “keep all transactions but remove audit trail info to date” button.
- Hit Next again, and once the process is complete, hit Close and rerun the QuickBooks File Doctor Tool.
This step won’t affect your transactions, and the data will be condensed while keeping all the transactions intact.
If the tool doesn’t work even after reducing the file size, you can recover the data with the ADR tool in the next step.
Solution 6 – Utilize the ADR Tool to Recover the Company File Data
Sometimes, the QBFD tool might find the issues with the company file but is unable to resolve them due to severe damage. In such cases, you can utilize the Auto Data Recovery Tool to recover the lost or corrupted files.
Method 1 – Recover recent transactions by using the original .TLG file with the .QBW.adr file
You can recover all the recent transactions by using the original transaction log file along with the ADR version of the QBW file.
- Create a new folder on your desktop named QBTEST.
- Open the Product Information window by pressing the F2 key on the keyboard and locate the company file folder.
- Access the Company File Folder and locate the .TLG file with the same name as your company file.
- If you can’t locate the file –
- Open the File Explorer and select the Organize tab.
- Select the Folder and Search options, then choose the Hide Extensions for Known File Types option and hit Apply.
- Now, go back to the Company File Folder and check if you are able to locate the. TLG file.
- Copy the file and paste it into the QBTEST folder, then locate the QuickBooksAutoDataRecovery folder from the company file folder.
- Copy the .QBW.adr file and paste it in the QBTEST folder on the Desktop.
- Right-click the file name, choose the Rename option, and remove .adr from the name.
- Hit Enter to save the changes, and once done, reopen QuickBooks and access the company file saved in the QBTEST folder.
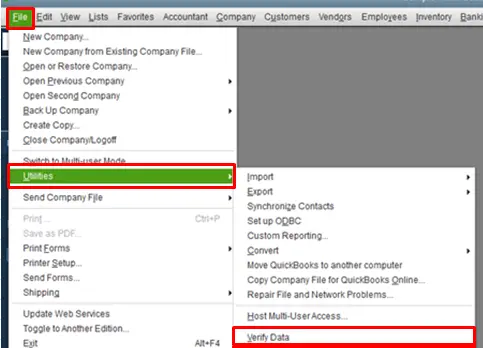
- Verify all the transactions from the account register and go to the File menu.
- Navigate to the Utilities tab and choose the Verify Data option to review the data integrity.

- Once the data integrity is checked, move the damaged company file to a different location.
- Lastly, transfer the copy from the QBTEST folder to the original location.
Method 2 – Recover the last 12 hours of transactions by using the .QBW.adr and .TLG.adr files
If you only want to recover the last 12 hours of transactions, you can use this method instead of the above one.
- Create a folder named QBTEST on your desktop and locate the QuickBooksAutoDataRecovery folder from the location where your company file is saved.
- If you can’t locate the folder, press the F2 key and check the location from the Product Information window. You can also review the folder location from the No Company Open window.
- Look for the .TLG.adr and .QBW.adr files from the same location, and if you can’t identify the files –
- Open the File Explorer tab and access the Organize menu.
- Choose Folder and Search Options and select the Hide Extensions for Known File Types option, then hit Apply.
- Once the files are identified, copy the .TLG.adr and .QBW.adr files to paste them into the QBTEST folder.
- Now, right-click each of the files, choose Rename, and remove .adr from both file names.
- Open QuickBooks and access the company file from the QBTEST folder.
- Verify the transactions from the account register and check the data integrity from the File menu.
- Go to the Utilities section of the QuickBooks File menu and click on the Verify Data option to run a verification process.
- Confirm the data integrity, and if the company file copy is good, move the damaged file to another location.
- Lastly, transfer the company file copy to the original location.
These steps can help you recover the lost and damaged data, which can resolve the QuickBooks File Doctor Tool issues in QuickBooks.
Conclusion
The ‘QuickBooks File Doctor is not working’ issue can be successfully terminated by performing the detailed solutions mentioned in this blog. If the issues persist even after following these steps, you might need expert assistance in resolving the error. For this, you can reach out to our team of Proadvisor solutions’ experts by dialing 1.855.888.3080 to get direct guidance.
FAQs
Why is QuickBooks File Doctor taking a long time to open?
If your QuickBooks File Doctor won’t open or is taking a long time, the following common reasons might be responsible –
1. The tool might be outdated or incorrectly installed.
2. The company file you are trying to repair might be severely damaged.
3. Some 3rd party applications might interfere with the process.
How can you run the QuickBooks File Doctor Tool correctly?
You can run the QuickBooks File Doctor Tool by downloading and installing the QuickBooks Tool Hub. The tool is located in the Company File Issues section of the QuickBooks Tool Hub, and you can double-click the QuickBooks File Doctor Tool icon to open it.
How can I resolve the QuickBooks File Doctor Tool not working error?
If your QuickBooks File Doctor is not working, you can perform the following easy solutions –
1. Run the QuickBooks File Doctor Tool manually.
2. Reinstall the correct QuickBooks File Doctor Tool version.
3. Restore the backup of the damaged company file.
4. Recover the corrupted file data with the ADR tool.
5. Configure the anti-virus app.
Why is my QuickBooks File Doctor admin password not working?
If your QuickBooks File Doctor not accepting admin password, you might need to change the password in the following manner –
⦁ Log in to QuickBooks as an admin user and go to the Company menu.
⦁ Choose Change your Password and edit the details to create new credentials, then apply the changes.
How long does the QuickBooks File Doctor Tool take?
The amount of time it might take the QuickBooks File Doctor Tool to diagnose and repair the issues depends on the file location and file size. If the file size is small and it is situated in the network-only mode, the QuickBooks File Doctor Tool might complete the process within minutes. Otherwise, you might have to wait a little longer, and a pop-up message will appear once the process is complete.

Erica Watson is writing about accounting and bookkeeping for over 7+ years, making even the difficult technical topics easy to understand. She is skilled at creating content about popular accounting and tax softwares such as QuickBooks, Sage, Xero, Quicken, etc. Erica’s knowledge of such softwares allows her to create articles and guides that are both informative and easy to follow. Her writing builds trust with readers, thanks to her ability to explain things clearly while showing a real understanding of the industry.

