QuickBooks is an accounting application used worldwide by small and medium-sized businesses. You either need to purchase the desktop version by paying a one-time purchase fee or pay a periodic subscription amount. To authenticate the subscription, QuickBooks uses a unique Product number and License number. The License number is a unique id provided to the users when they purchase a QuickBooks product. Users need to provide these when they register their QuickBooks after installing it. Users get the option to change QuickBooks License number if they cannot register their product. In this article, we will discuss all the related aspects and the detailed steps to change the license number in QuickBooks.
“If you need an expert’s assistance to change QuickBooks license number or you come across any issues while performing the steps, contact Pro Advisor Solutions’ Support Team at 1.855.888.3080”
You may also see: How to merge QuickBooks company files
Table of Contents
Why Change QuickBooks License and Product Number?
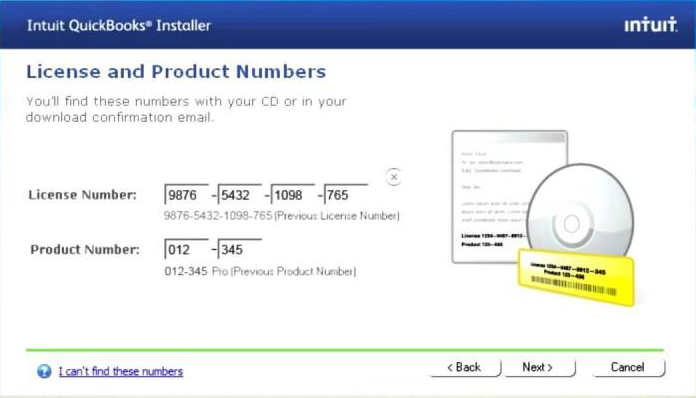
When users installs, re-install, or update their QuickBooks application, they need to activate it. The users need to provide details such as their license number and product number for authentication.

Due to various reasons, you may get issues while going through the authentication process. If you have saved incorrect info earlier, you can change QuickBooks License number and Product Number to resolve this issue. Contrary to popular beliefs, you do not need to uninstall or re-install your product to change these numbers. It is pretty common while running QuickBooks in the multi-user mode.
How can you Change QuickBooks License Number?
You will face issues while authenticating your product if you have an incorrect License number saved in your QuickBooks application. The best way to deal with it is to change QuickBooks License number. Follow the steps as provided below:
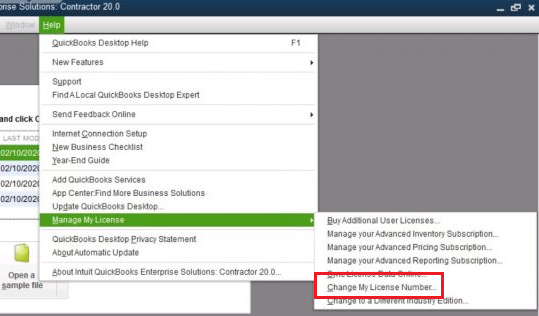
- Open your QuickBooks application and click on the ‘Help’ menu.
- Click on the option saying ‘Manage my license’ and then click on ‘Change my license
number. option’

- Feed the correct or new license number now in the provided field.
- Press the ‘Next’ button and then click ‘Finish.’
- Restart your computer for the changes to take effect.
The process is different for Mac-based application and is provided in the next paragraph.
How to Change QuickBooks license for Mac?
If you are using QuickBooks on Mac, the process differs a bit. Follow the below-provided steps:
- Open your QuickBooks application and go to ‘Menu.’
- Click on ‘Manage My License’ and then select the option saying ‘Deauthorize
this Computer.’ - Press the ‘Deauthorize’ button on the pop-up that appears and then press ‘Quit.’
- When you open your QuickBooks application again, it will ask you to
register the product. - Fill in the new license number to complete the registration and change
the license number.
How do I Change my QuickBooks License Number?
Users often ask how do I change my QuickBooks License number? Here is another method to change QuickBooks License number by editing the ‘Qbregistration.dat’ file. Follow the steps as provided below:
- Open your QuickBooks application and press the F2 key.
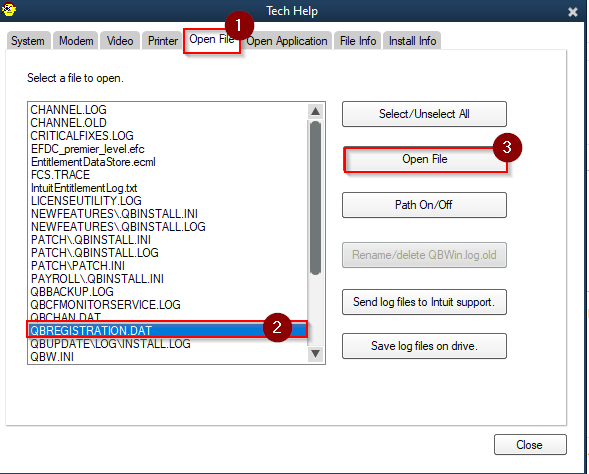
- Press the F3 key now to open the ‘Tech help’ window.
- Go to the ‘File’ menu and then click on the ‘Qbregistration.dat’ file to open it.

- Open the file using Notepad.
- Press ‘Ctrl + A’ keys to select all the content in the file and then ‘Ctrl + C’ to copy.
- Create a Notepad file on your desktop and press ‘Ctrl + V’ to copy all the data to the new folder.
- Name the file, save it and then close it to have a backup.
- The ‘Qbregistration’ file shows all the QuickBooks versions installed on your desktop.
- Find the version that has the wrong license number and product info.
- Erase the numbers and enter the correct number in its place.
- Ensure that you follow the correct format to enter the number. The Product number should be like (000-000), and the License number should be a 15-digit number in the format (0000-0000-0000-000).
- Make sure that you do not erase any brackets if they were present before.
- You can use the ‘Ctrl + F’ key to find other entries with the previous product number and License number. Make the changes again as required.
- After making all the changes, go to the ‘File’ menu of the Notepad file and select the ‘Save’ option. You can also use the ‘Ctrl + S’ key to save the changes.
- Restart the computer for the changes to take effect.
You may also read: How to Fix QuickBooks Registration Error
Concluding
Through this article, we discussed the various aspects and the detailed steps to change QuickBooks License number. You should be able to follow these steps and perform the process easily. If you find yourself stuck while performing the process or face any difficulties, contact Pro Advisor Solutions’ Customer Service Team at 1.855.888.3080. Our experienced experts will help you out.

Erica Watson is writing about accounting and bookkeeping for over 7+ years, making even the difficult technical topics easy to understand. She is skilled at creating content about popular accounting and tax softwares such as QuickBooks, Sage, Xero, Quicken, etc. Erica’s knowledge of such softwares allows her to create articles and guides that are both informative and easy to follow. Her writing builds trust with readers, thanks to her ability to explain things clearly while showing a real understanding of the industry.

