Is your Windows firewall is blocking QuickBooks from connecting to the internet to download the updates or the server system to access the company file? Such issues in QuickBooks restrict you from performing crucial business operations like managing your business data or processing payroll. To remove the firewall restrictions, you must configure the settings and create firewall rules for QuickBooks. In this article, we will learn how to remove the firewall restrictions while using QBDT.
Windows firewall is an essential utility that protects your system from external and internal threats. However, when Windows firewall blocks QuickBooks, you might need expert assistance fixing the problem. Dial 1.855.888.3080 and connect with the Proadvisor solutions’ team of experts now.
Table of Contents
What is Windows Firewall and Why is it Necessary?
The Windows firewall is a security feature that helps protect your PC by filtering the network traffic (based on source, IP address, port number, etc.) that enters and exits it. It reduces security threats, protects sensitive system data, and provides protection against cyber attackers. The firewall prevents malicious software or unauthorized programs from accessing the computer or network via the Internet. This is why when QuickBooks is treated as a non-trusted program, the Windows firewall blocks its access to the Internet or other systems in the network.
Common Reasons Why Windows Firewall is Blocking QuickBooks Desktop 2024
To understand the troubleshooting procedure better, you must know why the firewall restricts QB from connecting to the internet. The Windows firewall blocking QuickBooks due to the following leading causes –
- The Windows firewall recognizes QuickBooks as a threat and prohibits its connection to the server. This can happen when QuickBooks or Intuit is not added as a trusted site in the firewall.
- The ports used by QuickBooks Desktop to connect to the internet and other systems in the network are disabled on the device.
- Other network glitches or common internet connection problems can also be responsible for firewall restrictions on QuickBooks.
Now, let’s move to the next section and learn how to configure the firewall to remove obstructions while working with QuickBooks Desktop.
Read Also : How to restore QuickBooks Missing Data After update
How to unblock QuickBooks in Windows firewall (Updated Methods)
You won’t be able to download the updates and connect to other systems in the network if QuickBooks is blocked by the Windows firewall. You must configure the Windows firewall and security settings to remove the block imposed on QuickBooks –
Step 1 – Install QB Tool Hub
The first step is downloading the QuickBooks Tool Hub, which contains essential tools and features to fix QB issues. Follow the detailed steps mentioned below to download & install the QB Tool Hub –
- After closing QuickBooks, download the latest QuickBooks Tool Hub version (click HERE), save the .exe setup file to an easily accessible location, and open it from there.

Note: If you already have QB Tool Hub installed on the PC, go to the bottom of the Home section to find your version. If you don’t have the most recent version (1.6.0.5), follow these steps to download and install it. - Once the setup file is open, follow the on-screen instructions and accept the terms and conditions for installing the program.
- After completing the installation, double-click the QB Tool Hub icon on your desktop to launch it.
Note: If you face trouble locating the QB Tool Hub icon, manually search for “QuickBooks Tool Hub” in the Windows search panel and select it to launch the program.

After installing the QB Tool Hub utility, run the QuickBooks File Doctor tool in the next step.
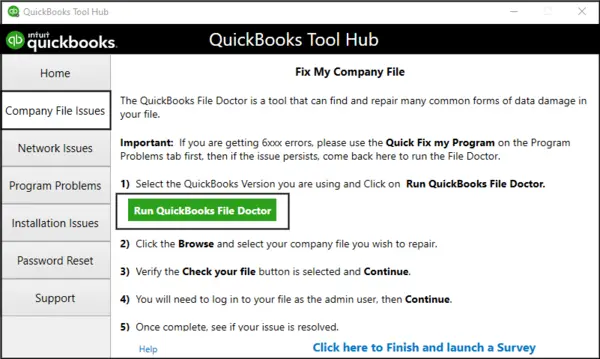
Step 2 – Run the QuickBooks File Doctor Tool
QB File Doctor can automatically resolve network problems by configuring the Windows firewall. Go through the following steps to run the QuickBooks File Doctor tool –
- Launch QB Tool Hub, move to the Company File Issues menu, and select the QuickBooks File Doctor tool.

Note: The tool might take up to a minute to open, but if it is inaccessible, manually open it. Search for “QuickBooks Desktop File Doc” in the Windows search bar and manually access the tool. - Next, open the drop-down menu and choose the QB company file you want to repair. If you can’t find the file, select Browse and Search, then pick the company file that needs to be repaired.
- Further, select Check your file and network, hit Continue, and enter your QB admin credentials.
- Click Next, and once the scan process ends, launch QuickBooks Desktop and open the company file.
Note: Depending on the file size, QB File Doctor can take up to 5 minutes to scan the company file. Sometimes, the scan may say the process wasn’t successful, even if the problems are resolved.
After running the tool, run QuickBooks and check if the firewall is configured and the obstructions are removed. However, if the Windows Firewall is blocking QuickBooks, you can manually configure the firewall settings by following step 3.
Step 3 – Manually Configure Windows Firewall Settings
If the QuickBooks firewall issue persists and QB File Doctor cannot unblock it, you must manually configure the firewall settings. Follow the steps mentioned below to create firewall exception rules for QuickBooks and remove the restrictions –
Add Firewall Exceptions for QB Ports
By adding firewall exceptions, QuickBooks will have uninterrupted access to the internet. To create firewall exceptions for QuickBooks ports, implement the following steps –
Note: If you use more than one QBDT version on the same PC, you must configure the firewall settings for each version. Moreover, add every QB version’s port number in the “specific ports” field in step 4 below.
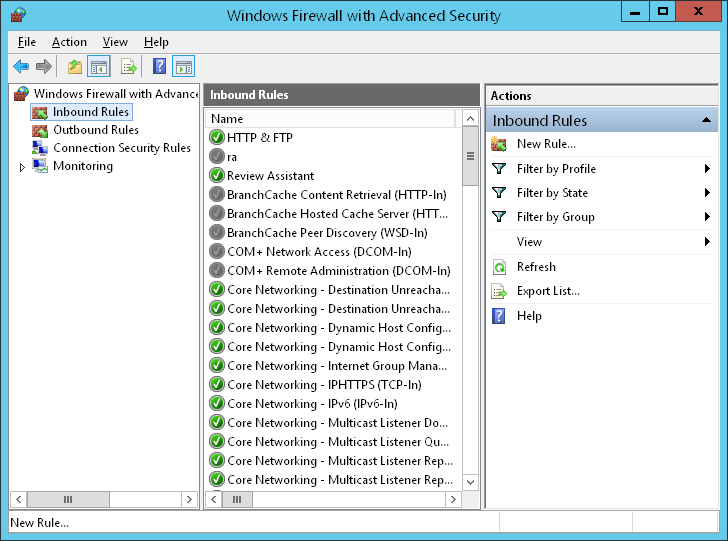
- Type “Windows Firewall” in the Windows search panel, open the firewall, and then go to the Advanced Settings menu.
- Further, right-click Inbound Rules, select the New Rule option, and click Port.

- Click Next, ensure TCP is checkmarked, then refer to the list given below to find and add firewall ports for your QuickBooks version –
- QuickBooks Desktop 2020 and later: 8019, XXXXX.
- QuickBooks Desktop 2019: 8019, XXXXX.
- QuickBooks Desktop 2018: 8019, 56728, 55378-55382.
- QuickBooks Desktop 2017: 8019, 56727, 55373-55377.
- Enter the port number in the Specific Local Ports field and click Next to continue.
Note: If you use QBDT 2019 or future versions, you need to include the Dynamic Port Number. Dynamic ports are firewall ports specifically assigned during QB installation to provide exclusive use of a specific port. - Find and add the Dynamic Port Number as per the QBDT version by following the steps below –
- Type “QuickBooks Database Server Manager” in the Windows search bar, open the program and navigate to the Port Monitor tab.
- Now, locate your QBDT version, note the port number, and include it in the port exceptions list.
Note: You can click Renew to edit the assigned port number (for QBDT 2019 and later versions). To renew the port number, open the Scan Folder menu, click Scan Now, and reset the firewall permissions.
- Hit Next, select Allow the Connection, then hit Next again, and ensure all profiles are marked (if asked).
- Select Next, create a new exception rule named “QBPorts(year),” and click Finish to save the rule.
- Repeat these steps to create outbound rules for QuickBooks. Follow steps 1 to 7, but choose Outbound Rules instead of Inbound Rules in Step 2 above and save the outbound rules.
After the QB port exceptions are added, rerun QuickBooks and check if you can access the company file in multi-user mode and download the updates without any interruptions by the firewall. However, if the Windows firewall is blocking QuickBooks, move to the next section.
Recommended to read : What to do if QuickBooks Missing Months Of Transactions
Add Firewall Exceptions for QB Executable Files
If creating QuickBooks 2023 firewall port exceptions doesn’t help, try creating exceptions for QB executable files. QuickBooks Desktop uses these executable files to perform various tasks. To create firewall exceptions for the .exe files, go through the following steps –
- Type “Windows Firewall” in the Windows search bar, select it in the search results, and click Advanced Settings.
- Further, right-click Inbound Rules and select New Rule, then click Program.
- Hit Next, click This Program Path, and select Browse.
- Now, pick a QuickBooks Desktop executable (.exe) file from the list below-
| Executable files | Location |
| AutoBackupExe.exe | C:\Program Files\Intuit\QUICKBOOKS YEAR |
| Dbmlsync.exe | C:\Program Files\Intuit\QUICKBOOKS YEAR |
| DBManagerExe.exe | C:\Program Files\Intuit\QUICKBOOKS YEAR |
| FileManagement.exe | C:\Program Files\Intuit\QUICKBOOKS YEAR |
| FileMovementExe.exe | C:\Program Files\Intuit\QUICKBOOKS YEAR |
| QuickBooksMessaging.exe | C:\Program Files\Intuit\QUICKBOOKS YEAR |
| QBW32.exe | C:\Program Files\Intuit\QUICKBOOKS YEAR |
| QBDBMgrN.exe | C:\Program Files\Intuit\QUICKBOOKS YEAR |
| QBServerUtilityMgr.exe | C:\Program Files\Common Files\Intuit\QuickBooks |
| QBCFMonitorService.exe | C:\Program Files\Common Files\Intuit\QuickBooks |
| QBLaunch.exe | C:\Program Files\Common Files\Intuit\QuickBooks |
| QBUpdate.exe | C:\Program Files\Common Files\Intuit\QuickBooks |
| IntuitSyncManager.exe | C:\Program Files\Common Files\Intuit\Sync |
| OnlineBackup.exe | C:\Program Files\QuickBooks Online Backup |
- Click Next, select Allow the Connection, then hit Next again, and ensure all the profiles are selected (if required).
- Click Next, create a firewall exception rule named “QBFirewallException(name.exe), and select Finish.
- To add outbound rules for the executable files, follow the same process (Steps 1 to 6). In step 2, select Outbound Rules rather than Inbound Rules to create these rules.
After creating the exception rules, reopen QuickBooks Desktop in multi-user mode and access the company file from a workstation. You can also download the updates to check if the QuickBooks Firewall issue is resolved. If you still face Windows Firewall blocking QuickBooks issue, fix the antivirus settings in the next step.
Step 4 – Configure the Antivirus Settings
Incorrect or misconfigured antivirus settings can prevent QuickBooks from connecting to the Internet and other systems in the network. Thus, to ensure that QuickBooks has proper permissions to connect to the Internet and other systems in the network, you need to reconfigure the antivirus. Follow your antivirus’s specific steps and guidelines by visiting the program’s official website or contacting your vendor for instructions.
After configuring the antivirus program, restart your PC to ensure that the changes are saved. Then, rerun QuickBooks and check if the issue is resolved.
You may also read : How do i fix QuickBooks Error Code 05396 40000
Conclusion
We hope this comprehensive guide helped you configure the firewall settings successfully. However, if the process fails and the Windows firewall is blocking QuickBooks Desktop, you can get immediate assistance from our support team by dialing 1.855.888.3080.
FAQs
How can I check if the Windows firewall is blocking something?
You must check for firewall blockages if your internet works fine but cannot access a website or program. To check if the Windows firewall is blocking something, follow the steps given below –
1. Go to the Control Panel from the Windows Start menu and open the Windows Firewall.
2. Move to the Advanced Settings tab, select Outbound Rules, and check the website list.
3. If a website or program is blocked, it will show up in the list with a red symbol or words “blocked IPs” or “IPs blocked” beside it.
Note: Even if the firewall is not blocking a particular site or program, it might be blocked by the router or network admin.
What are the prerequisites for configuring the Windows firewall?
Before configuring the Windows firewall settings, ensure that QuickBooks is updated to the latest version. Also, ensure that your Windows OS is updated and the most recent QuickBooks Tool Hub version is installed.
How do you disable the Windows firewall on your PC?
You can temporarily disable the Windows firewall to remove restrictions while using QuickBooks by following the steps given below –
1. From the Windows Start menu, access the Control Panel and open Windows Firewall.
2. Next, select the Turn Windows Firewall On/Off option and click Disable Firewall.
Once disabled, rerun QuickBooks Desktop and check if the firewall blockages are removed.
What if the Windows firewall blocking QuickBooks email?
If everything is working perfectly and you can’t email from QuickBooks due to firewall restrictions, you must add your default email program as an exception in the Windows firewall settings.
Read more articles : –
[Fix] QuickBooks Cannot Communicate with the Company File
How to Fix QuickBooks Error 12007 (Network Timeout Issue)
Error message: QuickBooks Connection has been lost [Fixed]
[Resolved] Sorry We Need to Verify your Subscription QuickBooks
Fix QuickBooks Payroll Service Server Error

Erica Watson is writing about accounting and bookkeeping for over 7+ years, making even the difficult technical topics easy to understand. She is skilled at creating content about popular accounting and tax softwares such as QuickBooks, Sage, Xero, Quicken, etc. Erica’s knowledge of such softwares allows her to create articles and guides that are both informative and easy to follow. Her writing builds trust with readers, thanks to her ability to explain things clearly while showing a real understanding of the industry.