A recurring invoice is an automated bill that businesses send to their customer on a fixed frequency, such as daily, weekly, monthly, or annually. As an accounting and bookkeeping software, naturally, you have the option to set up recurring invoices in QuickBooks Online. You can also set up autopay for the recurring invoices. In this blog, we’ll cover the steps you need to know to set up your recurring invoices in QuickBooks today! So let us start with the guided steps without any further delay.
Do you need help with setting up recurring invoices in QuickBooks? Contact our experts at 1-855-888-3080 to get professional help and guided assistance for the same!
Table of Contents
How to Set Up Recurring Invoices in QuickBooks Online?
If you find yourself sending the same invoice over and over again to a customer at a set frequency, it is better to automate the process with the feature given on the QBO website. The steps to set up recurring invoices in QuickBooks Online are mentioned below:
Create a Fresh Recurring Transaction:
You can create a fresh recurring transaction in QB Online with the steps that are given below:
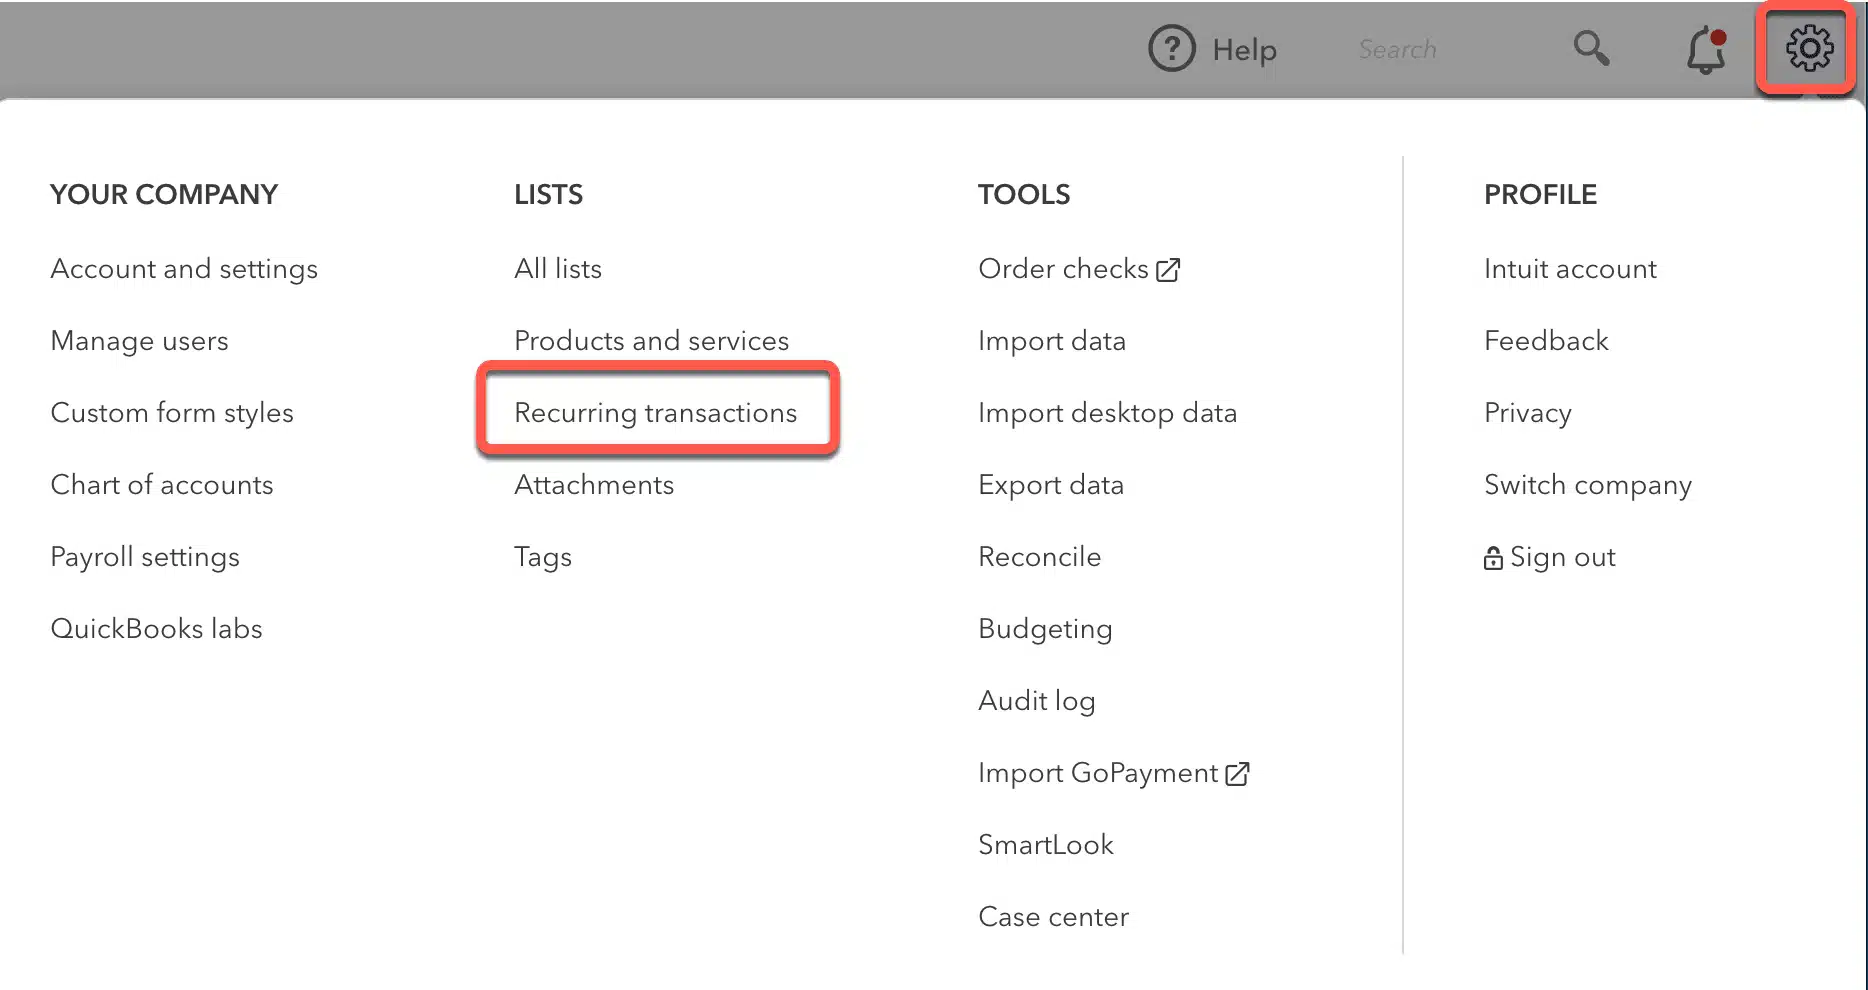
- Open QuickBooks Online
- Click on the Gear icon
- Then, press the Recurring Transactions option
- Select New
- Choose the type of transaction you wish to create
- Select OK
- Now, type in a Template name
- Select a Type:
- Scheduled: You should select this option if you want to send the transactions automatically. Use this for the payments where the schedule and the payment amounts are constant. For example, rent payments, loan payments, and depreciation.
- Reminder: You should choose this if you want to schedule transactions but still have the option to send them manually. Use this for the transactions that can vary or need to be edited before they are sent. For example, utility bills.
- Unscheduled: You should select this if you don’t wish to schedule them at any specific frequency, but still want to create them. Use this for a complicated transaction that you don’t want to retype and set up a schedule for.
- If you use Merchant Services and set up a scheduled or reminder type of recurring template, you can decide if your customer can pay you online or not
- You can do so by selecting or deselecting the checkboxes for Bank Transfer and Cards in the Online Payment section.
- Check if the invoices should contain unbilled charges and automatically send emails if you are creating a Scheduled or Reminder invoice recurring transaction.
- Complete the fields
- Select Save Template
Performing these steps would set up recurring invoices in QuickBooks.
Recur an Already Existing Transaction
If you have already created an invoice, receipt, bank deposit, or credit statement, you can make it recur with the following steps:
- To make an already existing invoice recur, you have to first click on Manage
- Then, click on Scheduling
- Now, turn on Make invoice recurring
- Fill out the details
- Press the Save template option
- Now, just press Make recurring
This would set up recurring invoices for an already existing transaction in QB Online.
Copy a Recurring Template
You can copy a recurring template to make a new one in no time with the steps given below:
- Open QuickBooks Online
- Go to the Settings menu
- Navigate to the Lists column
- Press Recurring Transactions

- Now, go to the Action column
- Open the Edit dropdown menu
- Click on Duplicate
Your recurring transaction would now be copied.
Edit a Recurring Template in QuickBooks Online
To edit a recurring template in QuickBooks Online, follow the steps given below:
- Open the Settings menu in QuickBooks Online
- Click on Recurring Transactions
- Go to the Action column
- Press Edit for the transaction you wish to edit
- You can edit the template name, type, and the customer name as per your needs
- While editing a Scheduled or Reminder template, you can:
- Adjust how far in advance QB will create the templates or send reminders
- Set the frequency in the Interval section
- In the Details section, you can add or remove any:
- Product details
- Service details
- Category details
- Select Save template after you’re done
These changes will only apply to the already set up recurring invoices in QuickBooks. It won’t apply to other transactions in QB.
Change the Service Date of Recurring Transactions
You can change the service date of recurring transactions in QuickBooks Online with the steps given below:
- Search for the Recent Automatic Transactions report
- Open the Recent Automatic Transactions report
- Set the report dates
- Select Run report
- Choose an individual transaction to display
- Update the Service Date field to the date the service was performed
- Press Save
Now, the service date of recurring transactions has been changed.
Set Up Autopay for Your Recurring Invoices
If you have already set up recurring invoices in QuickBooks with a saved interval, you can set up autopay with the steps given below. However, it is important to note that the autopay would be cancelled if you change any of the following fields:
- Total amount
- Frequency
- Terms
- Payment options
- Email address
- Customer name
Now, let us proceed with the steps.
Step 1: Make Your Customers Set Up Autopay
Before your customers set up autopay, here are some requirements for them to set it up:
- Autopay can only be used for the whole invoice amount
- If your customer edits the invoice amount, the autopay would be cancelled
- Your customer needs an Intuit account to use autopay.
- They’ll need to create an Intuit account if they don’t have one
Now, your customer would need to follow these steps to set up autopay:
- Open the Invoice
- Select the Set up autopay to enroll option
- Sign in using your Intuit user ID
- Ensure that the Autopay checkbox is selected
- Check the frequency and start date
- After you’re ready, choose Autopay to pay the current invoice
- A confirmation email will be sent after Autopay is set up
This would set up recurring invoices in QuickBooks with autopay.
Step 2: Check the Autopay Status of the Customer
To check the autopay status of your customer, follow these steps:
- Find the invoice for which you want to check the payment status
- Select Status to open the activity tracker panel
- Now, you’ll see Autopay Scheduled under the Invoice activity section if your customer has set up autopay
When are the Autopay Payments Processed?
- Autopay payments are processed 3 days before the due date
- If the payment is in less than 3 days, autopay will be processed immediately
- If the invoice is due on a receipt, the autopay payment will be processed as soon as the invoice is created
This was all about how to set up a recurring invoice in QuickBooks Online.
Set Up Recurring Invoices in QuickBooks – A Quick View Table
Given in the table below is a concise summary of this blog on the topic of setting up recurring invoices in QuickBooks Online:
| What are recurring invoices? | Recurring invoices are automated bills that businesses send to their customers on a fixed schedule. |
| When should I use this feature? | If you send an invoice to a customer every week, month, or quarter, with a fixed date, it is better to automate that process. To do so, you would need to set up recurring invoices in QuickBooks. |
| What are the steps to set up a recurring invoice? | To set up a recurring invoice, click on Recurring Transactions, choose a template name, select a type, and save the template. |
Conclusion
In this blog, we talked about why and how you can set up recurring invoices in QuickBooks Online. Additionally, we also talked about how you can set up autopay for a recurring invoice. If you need further assistance in setting up a recurring invoice or setting up autopay for a recurring invoice, you can contact our professionals at 1-855-888-3080 today. Our experts will guide you through this process and ensure it is smooth sailing.
FAQs
How do I set up recurring invoices in QuickBooks Online?
For setting up recurring invoices in QuickBooks Online, follow these steps:
1. Select Recurring Transactions
2. Choose a template name
3. Choose a recurring invoice type
4. Save the template
How to set up autopay for a recurring invoice?
To set up autopay for a recurring invoice, you can follow these steps:
1. Ensure your customers meet the requirements for autopay
2. Make your customers set up autopay
3. Check the autopay status
4. Learn when the autopay payments are processed
Read more useful articles:-
How to Resolve QuickBooks Drop-Down Menus Not Working
How Do I Undo a Reconciliation in QuickBooks Online without an accountant
Fix the QuickBooks Invoice Template Not Printing Correctly Issue
How Do I Fix No Version of QuickBooks Was Found to Update Issue
How to Fix QuickBooks Desktop Tax Table Not Updating

Erica Watson is writing about accounting and bookkeeping for over 7+ years, making even the difficult technical topics easy to understand. She is skilled at creating content about popular accounting and tax softwares such as QuickBooks, Sage, Xero, Quicken, etc. Erica’s knowledge of such softwares allows her to create articles and guides that are both informative and easy to follow. Her writing builds trust with readers, thanks to her ability to explain things clearly while showing a real understanding of the industry.