Have you recently switched to a new company in QuickBooks? This might require you to change or rename company file in QuickBooks Desktop. There can be other reasons why you want to rename that file. There are different processes to change or rename company file in QuickBooks Desktop, Online, and Self-Employed. You must also be aware of your business name and the company’s legal name. You may follow an additional step if your company’s legal name differs from the company name you entered. This blog will convey all the information and set of procedures that you need to know to rename company files in QuickBooks.
Are you confused about the steps of renaming a company file in QuickBooks Desktop, Online, and Self-Employed? If yes, don’t worry, our professionals are always there at your service. Call Proadvisor solutions’ Helpline Number 1.855.888.3080 any time and get your problems resolved at the moment.
Table of Contents
Why Rename Company File in QuickBooks Desktop?
You want to rename a company file in QuickBooks for many reasons. The name of your company file depends on the way you set it up while creating it. You may consider changing the name of the file in QuickBooks Desktop for the following reasons:
- You may have committed a typing/spelling mistake while creating the company file.
- You may have used the wrong name for the company file.
- Your company file may not reflect the changed name.
- Your current company file name may not meet the minimum characters required.
- You may be merging the company files due to a collaboration with a different company.
These are some reasons why it may be required to rename a company file in QuickBooks Desktop. Let’s now quickly look at the ways to QuickBooks rename company file.
How to Rename Company File in QuickBooks Desktop?
The process of renaming a company file in QuickBooks comprises two steps. These steps have different roles before and after the renaming process. The two steps to rename a company file in QuickBooks are:
- Renaming Your QuickBooks Desktop Company File
- Setting up QuickBooks Desktop to Use the New Company File Name
Let’s have a close look at these two steps in detail. This will help you in renaming a company file in QuickBooks smoothly.
Step 1: Renaming Your QuickBooks Desktop Company File
This step will primarily focus on the renaming process. We will tell you about the steps to rename a company file in QB Desktop. But before that, you need to double-check that you have backed up your company file.
We advise you not to go ahead without backing up the company file. After the backup is done, you can follow the action points mentioned below:
- The first thing you have to do is check the company file’s location.
- You need to press the F2 button or the Ctrl + 1 buttons simultaneously to open the Product Information window.
- Here, you will find the location in the File Information panel.
- Now, you need to visit the specified location by right-clicking the Windows Start key on the keyboard and choosing the File Explorer option.
- Here, you need to right-click the company file and choose the Rename option. The file can appear as [Company Name].qbw or only [Company Name].
- After this, you have to change the file name and proceed by pressing the Enter button.
- Lastly, you will have to select Yes to confirm the changes you have made.
These steps will help you to rename your QuickBooks Desktop company file. Now, you can move to the second step for setting up the QB Desktop.
Step 2: Setting up QuickBooks Desktop to Use the New Company File Name
Now, after completing the renaming process of the company file, you need to set it up for professional use. In this step, we will set up the QuickBooks Desktop application to use the new company file name.
- You need to select the option Open or restore an existing company from the QB File menu.
- Now, you have to choose the option Open a company file and click on the Next option.
- Finally, you need to choose the file you have renamed and click Open.
These steps will give you an answer to the question of how to change the company file name in QuickBooks Desktop. Now, what about changing the company name? Let’s talk about that now.
How to Change Company Name in QuickBooks Online?
Changing a company name is not a task that you do daily. So, you need to be extra careful while changing the company name. The steps to change the company name in QuickBooks Online are as follows:
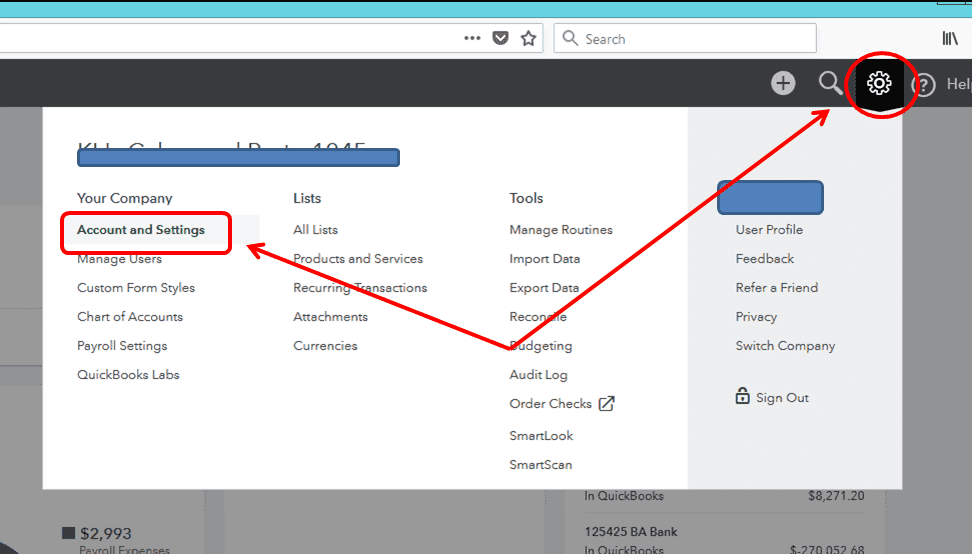
- You need to open QuickBooks, click on the Gear icon, and then on Company Settings (somewhere it might be Accounts and Settings).

- You must proceed by clicking on Company from the left menu.
- Next, you need to select the Pencil icon in the Company Name section.
- In here, you have to enter the company name. You also consider adding a legal name if your company’s legal name is different from the company name.
- Finally, you need to select the Save option and then click on Done to proceed.
These steps will enable you to change the company name in the QuickBooks Online versions. But the job is not done yet. You have to edit the name in certain places, too.
Editing the Company Name at Certain Places in QuickBooks
If you have changed your company name recently, you might need to update the new name at certain places in QuickBooks. These places are:
- Company name
- Legal name
- Email messages
- Location list
These are the positions where you have to update the new name of the office. Now, let’s have a look at the ways to change the company name in QuickBooks Self-Employed.
How to Change Company Name in QuickBooks Self-Employed?
This section will take you through the steps to change the company name in QuickBooks Self-Employed (QBSE). You need to follow the steps given below to change the company name in QBSE:
- You need to log in to your QBSE account and proceed to the Settings menu.
- Here, you have to select the Intuit Account to open the Intuit Account Manager.
- Now, you need to click the Sign-in and Security menu.
- Here, you need to select the User ID, Email Address, or Password section, change the business name, and click on Save to apply the changes.
After the fourth step, you need to log out and log in again to your account to apply and refresh the changes. If you wish to edit the company name in the invoice, you can follow these steps:
- You need to choose Invoices from the left panel in QuickBooks SE.
- You need to open the invoice and select the Edit button.
- There, you need to click on the option to Edit Work Info and change the name.
- After you have made the following changes, you need to click on Save.
These steps will help you rename the company file in QuickBooks Self-Employed. You must follow the outlined steps mentioned in the section above.
Changing the Business Name of a QuickBooks Company
The first thing that you should keep in mind is that to show the changes in the client list, you will have to edit its display name. The steps to change the business name of a QuickBooks company are as follows:
- You need to sign in to your QuickBooks Online Accountant (QBOA) account and visit the Clients menu.
- Here, you need to locate the appropriate client and then click on Edit Client from the Action column.
- Finally, you need to change the business name here and proceed by clicking the Save option.
These steps will help you change the business name of a QuickBooks company. Now, you know all the information regarding changing the company file name in QuickBooks Desktop, Online, and Self-Employed.
Summing It Up!
This is all you have to know about how to rename company file in QuickBooks and set up a business/company name. This blog will help you with the accurate steps explained in detail. You need to follow a detailed set of instructions while changing the company file name in QuickBooks. You need to be extra careful and considerate of the new company file name. Any mistake can disturb the whole process, and you may have to repeat it. Please feel free to contact our ProAdvisor Solutions experts at the 1.855.888.3080 for quick assistance.
FAQs
Can I rename my QuickBooks company file?
Yes, you can easily rename your QuickBooks company file. You just have to right-click on the file that you want to change the name of and click on the Rename option. The new file name may appear as [Company Name].qbw or just [Company Name].
How to update QuickBooks Desktop company file?
Make sure you have updated the QuickBooks version before updating the company file itself. Now, you need to open your company file and follow the instructions to update it. You may also need to sign in as an admin user to upgrade the company file in QuickBooks Desktop.
How do I change the company file in QuickBooks Online?
You need to proceed to the Settings first. Then you need to choose Switch Company under the Profile tab. Now, you will get a list of the company files there. Choose and select the company file where you want to switch and your company file will be changed.
How do I change my company name in QuickBooks Intuit?
You need to visit the Settings option, choose Company, and click on Edit in the Company name section. Now, you need to enter the new company name here. If the legal company name is different from the Company name you entered, you need to enter the legal name in the Legal name field.
Read more Company File Related Articles :-
[Fix] QuickBooks Cannot Communicate with the Company File
Fix QuickBooks Company File Not Found Error
QuickBooks Company File in Use Error? Here’s How to Fix It
Fix QuickBooks Error 6123, 0 When Opening Company File
QuickBooks Abort Error while Opening Company File – Fixed

Erica Watson is writing about accounting and bookkeeping for over 7+ years, making even the difficult technical topics easy to understand. She is skilled at creating content about popular accounting and tax softwares such as QuickBooks, Sage, Xero, Quicken, etc. Erica’s knowledge of such softwares allows her to create articles and guides that are both informative and easy to follow. Her writing builds trust with readers, thanks to her ability to explain things clearly while showing a real understanding of the industry.