If you are facing issues while generating Quick Reports or your QuickBooks Quick Report is not working, then this article is for you. Quick Reports allows users to quickly review the activity for a customer, vendor, or item in QuickBooks. If the report is not working correctly, it can prevent users from generating all the information. This report issue can arise in different scenarios, such as the report not showing all transactions or the report not updating. To learn effective solutions to fix these scenarios, keep reading this blog till the end.
Are you struggling while creating Quick Reports in QuickBooks? Follow the solutions given in this blog to fix the issues. However, if you want a quicker resolution avenue, you can reach out to our Proadvisor solutions support team at 1.855.888.3080 to get immediate guidance with the QB report issue.
Table of Contents
Effective Solutions to Fix QuickBooks Reporting Issues
If you are facing issues with the QuickBooks report, follow the troubleshooting solutions given below to fix the different cases –
Case 1 – QuickBooks Quick Report Doesn’t Show All Transactions
Sometimes, your QuickBooks Quick Report doesn’t display all transactions, and this issue can arise in any report, like a customer Quick Report. This report issue can occur due to the following possible reasons –
- The user for which you are trying to generate the report might be broken.
- The report settings might be incorrect, which can prevent the report from displaying all transactions.
To fix the issue, implement the practical solutions given below –
Solution 1 – Delete the Broken User and Add a New One
If your QuickBooks report has missing data or it is not showing all the transactions for a particular user, there is a chance that the user is broken. To fix this issue, delete and add a new user by using the mentioned below –
Note: Before performing these steps, sign in as a company file admin user.
Delete the Broken User
To delete the broken user in QB, implement the following steps –
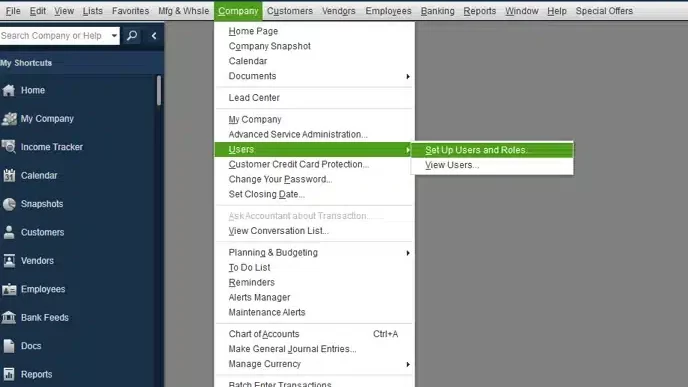
- Go to the Company menu, select Users, and then, click on the view users option afterthat select User.
- Next, click Delete and hit OK to confirm the action.
Add a New User
Go through the following steps to add a new user in QuickBooks –
- Navigate to the Company tab, then select Users and click Set Up Users and Roles.
- Enter the admin password, click OK, and move to the User List tab.
- Choose New, then enter a username and an optional password.
- Further, move to the Available Roles section and select the user’s roles.
- Finally, click Add and hit OK.
After the user is added, check the Quick Report to see if all transactions are showing. However, if you still face QuickBooks Desktop report problems, move to the next solution.
Also See : How to fix QuickBooks error code 1601
Solution 2 – See All Customer Transactions
If you aren’t able to see all transactions in a customer Quick Report, ensure that the settings are set to display all the transactions in the following manner –
- Go to Customers, then select Customer Center, and choose the name of the customer.
- Select the Transactions tab, then from Show, select All Transactions.
Now, check to see if you can view all the transactions in the Quick Report. If you still have issues, use the QuickBooks Verify and Rebuild Data tool to fix the data problems.
Once done, run the Quick Report again to ensure the “QuickBooks Quick Report not working” issue is fixed.
Case 2 – The Inventory OH and Quick Report and Not Matching
Sometimes, when generating a QuickBooks Quick Report, you might notice that the inventory values don’t match. This reporting scenario can arise due to the following reasons –
- The reporting period is not set to All Dates.
- You have included non-posting transactions in the Quick Report.
- The transactions include different units of measurement, creating inconsistencies.
- There are data integrity problems, and the data needs to be rebuilt.
- The user has limited access and lacks admin rights.
Solution 1 – Set the Reporting to All Dates
If your Quick Report doesn’t match with the inventory one, ensure you have set the reporting period to All Dates. Also, ensure the transactions include the same unit of measurement.
Now, check if the reports are matching; otherwise, use the Filter feature while running the report. If the reporting issue persists, move to the next solution.
Solution 2 – Run the Verify/Rebuild Utility
If the reporting issues persist, try using the QuickBooks Verify and Rebuild Data tool to fix the data integrity problems. After running this tool, check the QuickBooks Quick Report to see if it matches.
However, if the QuickBooks report doesn’t match, follow the next solution.
Solution 3 – Customize User’s Access
If a particular user lacks proper access, they won’t be able to see transactions on the Inventory Item Quick Report. To fix this issue, review the user access as follows –
Review the User Access
To review the user role and access, implement the following steps –
- Navigate to the Company menu, select Users, and click Set Up Users and Roles.
- Enter the admin password, select OK, and go to the Role List tab.
- Select View Permissions, choose the roles you want to review, and click Display.
Change the User Access
If you want to change the user role, edit the permissions in the following manner –
- Go to the Company tab, click Users, and select Set Up Users and Roles.
- Enter the admin password, hit OK, and navigate to the Role List tab.
- Choose a role, then click Edit to review its permissions and move to the Area and Activities section.
- Select an area of your accounts and click None, Full, or Partial to set the user access level.
- Once you set the user permissions, hit OK to save the settings.
Now, you will be able to see the inventory item, and the Quick Report will match.
Case 3 – QuickBooks Report Not Generating
If your QuickBooks memorized report is no longer generating, follow the troubleshooting steps mentioned below –
Note: Before troubleshooting this issue, ensure you have the latest Quickbooks Desktop updates installed on your PC.
Solution 1 – Basic Troubleshooting
Implement the steps mentioned below to fix the memorized report issues in QuickBooks –
Step 1 – Re-sort the Memorized Report List
The Memorized Report List might be damaged if you cannot generate the report. To fix this issue, re-sort the list in the following manner –
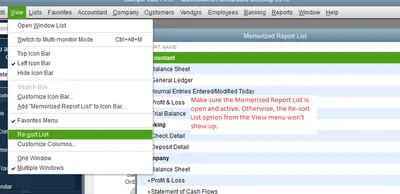
- Move to the Reports menu, then click Memorized Reports and select Memorized Reports List.
- Further, go to the Memorized Reports section and choose Re-sort List.
- Finally, when you get the “Are you sure you want to return this list to its original order?” prompt, click OK to confirm.
After the list is re-sorted, move to the next step to run the Verify/Rebuild tool.
Step 2 – Use the QuickBooks Verify/Rebuild Tool

The next step is to fix the possible data damage on your company file. Use the QuickBooks Verify and Rebuild Data tool to check the data integrity.

Note: Additionally, you can use the QBWin.log file to resolve the data damage.
After running the tool, try generating the QuickBooks report again to ensure the report is generating properly. If the QuickBooks report won’t run, follow the next solution.
Solution 2 – Recreate the Report Group
You must recreate the memorized report group in the following manner –
- Firstly, create a company file backup, then go to the Reports menu and select Memorized Reports.
- Select Memorized Report List, then from the Memorized Report dropdown arrow, select New Group.
- Enter Z Do Not Use in the Name field, then click OK, and move all the reports that do not work to that group:
- Right-click an affected report, select Edit Memorized Report, and mark the Save in Memorized Report Group checkbox.
- Now, open the Save in Memorized Report Group dropdown menu, click Z Do Not Use, and repeat the step for all affected Memorized Reports.
- Further, make 15-20 new memorized reports and save them in the Z Do Not Use group.
Note: The new reports should fill the damaged slots in the Memorized Report List, and the number of reports required depends on the file. - Select the Memorized Report, click Re-sort List, then hit OK on the following message.
- Finally, close and reopen QuickBooks, then recreate and memorize the reports you need.
Once done, try generating the report again to ensure the issues are fixed.
You may also see : How Do I Fix QuickBooks Error Code 12031
Case 4 – Reports Won’t Run in QuickBooks Online
If the QuickBooks Online report doesn’t run, you need to follow the troubleshooting steps given below –
Step 1 – Run QuickBooks Online in Incognito Mode
You can run QuickBooks Online in a private browser to check if the issue while running reports arises due to cache problems. Use the following shortcut keys to run your web browser in the incognito mode –
- For Google Chrome: press Ctrl + Shift + N
- For Mozilla Firefox and Microsoft Edge browsers: press Ctrl + Shift + P
- For Safari: press Command + Shift + N
Once done, try running the report again, and if it works, go back to your regular browser and remove the cache.
Step 2 – Remove the Cache and Cookies
You must clear the cache and cookies from the regular browser to fix the QuickBooks Quick Report not working issue. Follow the steps below to clear the cache and cookies according to your browser –
Google Chrome
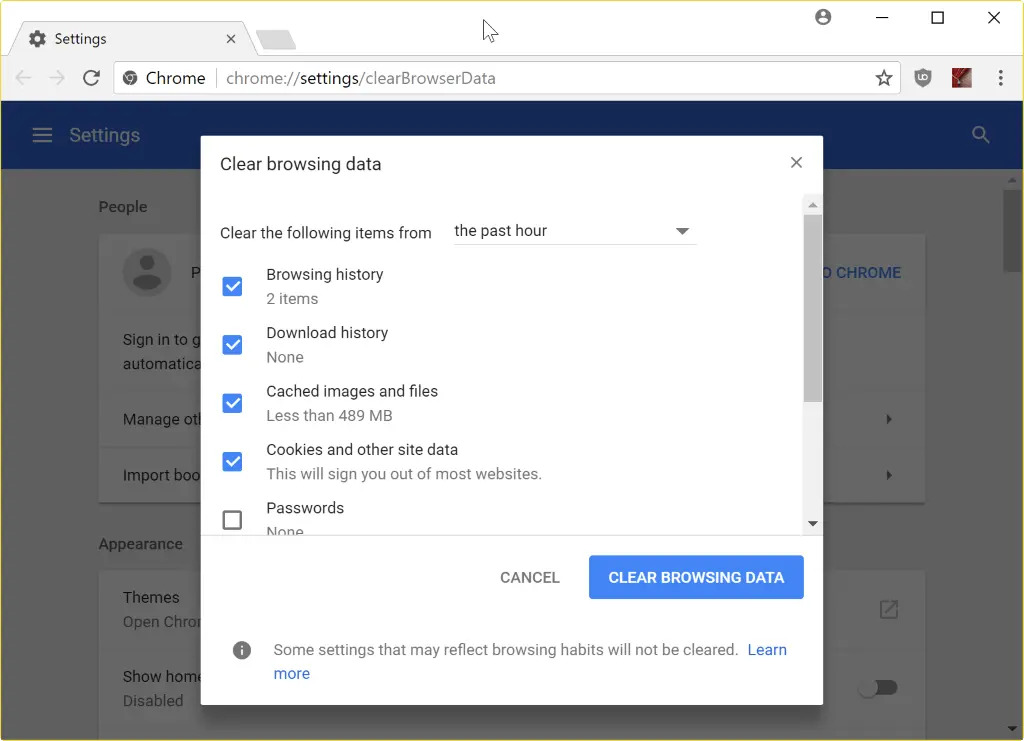
- In Google Chrome, click the More icon from the top right corner.
- Select Delete browsing data, then choose the period to remove the browser data, for instance, the Last Hour/All Time.
- Finally, choose the type of information you want to clear and select Delete Data.
Mozilla Firefox
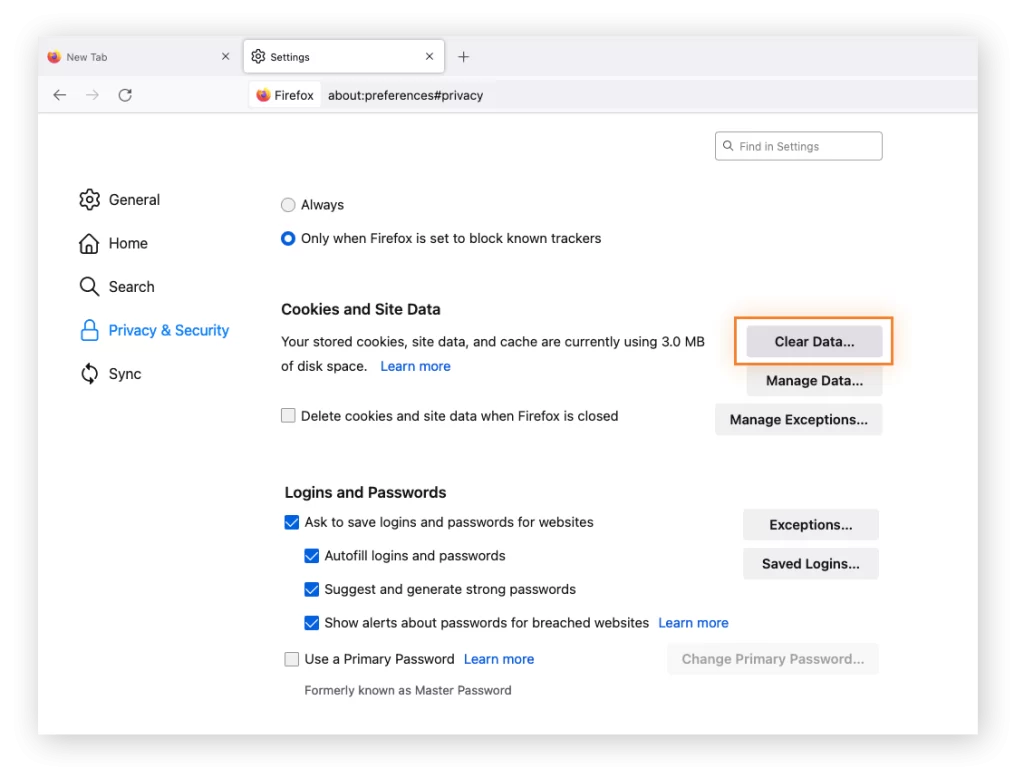
- Open the Mozilla Firefox, select the Menu icon at the top right, and move to the Settings tab.
- Select Privacy & Security, then click Clear Data from the Cookies and Site Data section.
- Once the Clear browsing data and cookies window emerge, go to the drop-down menu and select Everything (next to When).
- Checkmark the Temporarily cached files and pages checkbox, select Clear, and exit the page. Once done, the browser changes will be automatically saved.
Safari for Mac
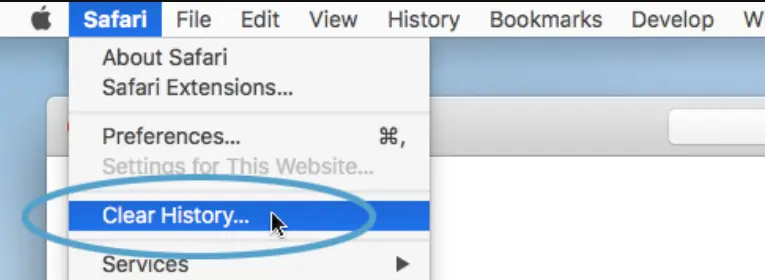
- Open Safari on your Mac, select History and click the Clear History option.
- Further, go to the pop-up menu and pick the time range for which you want to clear the browsing history.
Safari for iPad and iPhone
- Open Safari on your iPad or iPhone, and navigate to the Settings tab.
- Now, click Clear History and Website Data to delete the history, cookies, and other browsing data.
However, if you want to clear the cache and cookies but keep the history, perform the following steps –
- Open Safari from the Settings section, then select Advanced and click the Website Data option.
- Next, select Remove All Website Data to clear all cache and cookies except the history.
Microsoft Edge
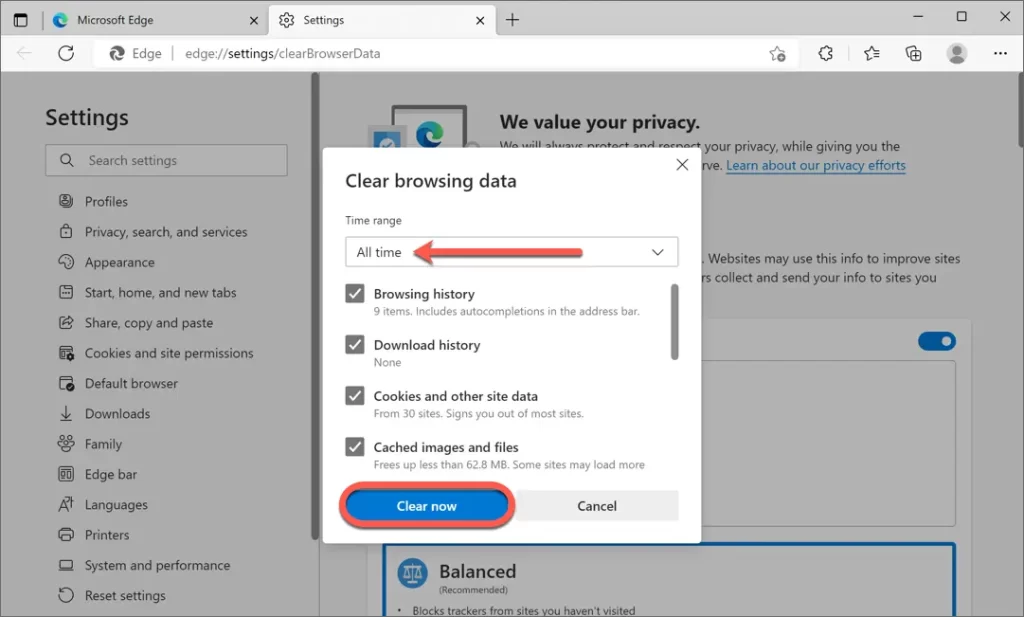
- Open the Microsoft Edge browser on your computer, go to Settings and More, and select Settings.
- Select Privacy, Search, and Services, then move to the Delete browsing data section and hit Clear Browsing Data Now.
- Select “Choose what to clear,” then pick the time range from the Time range dropdown menu to remove data.
- Finally, select the type of browsing data you want to clear and select Clear Now.
Once the cache and cookies are removed, try running the report in QuickBooks Online to ensure QuickBooks Online report problems are resolved.
Recommended to read : What Is QuickBooks Payroll Update Not Working Issue
Case 5 – QuickBooks Report Not Updating
If QuickBooks Advanced Reporting can’t update your report, ensure you have the latest QuickBooks Desktop Enterprise version. Moreover, ensure that the minimum system requirements and compatibility are met. Once done, undertake the following solution to fix the QB report issues –
Solution 1 – Check your Company File for Data Issues
To check your company file for data integrity issues, follow the steps mentioned below –
- Log in to QBDT as an Admin, then head to the Company menu to choose Users.
- Select Edit the Admin user and remove special characters like “:” “&” and “/” from the company file name.
- Ensure the extension is .qbw, then exit and restart QuickBooks.
- Now, go to the Window menu and select Close All, then navigate to the File menu at the top bar.
- Finally, choose Utilities and click the Verify Data button.
If QuickBooks detects no problems with your company data, install QuickBooks Enterprise again. If data damage is detected, follow the given steps to rebuild it.
Then, update the report using Advanced Reporting. However, if the report won’t update, follow the next step.
Solution 2 – Run Advanced Reporting
You can rectify the QuickBooks reporting not updating issue by using the steps given below –
- Ensure the company file path or file name doesn’t include parentheses, brackets, or apostrophes. If they do, rename the file or folders as required.
- Then, reopen the QB company file and run Advanced Reporting.
- Change the date format to the standard MM/DD/YY and run the report.
If the report still won’t update, follow solution 3 below.
Solution 3 – Ensure QBConnect32.exe isn’t Blocked
You need to ensure that your PC’s antivirus program doesn’t block the QBConnect32.exe file. This is because antivirus blockages will cause issues while running this file, which can lead to issues with the report. If the file is blocked, add an exception for QlikView connect in the anti-virus program’s real-time scan.
The QVConnect32.exe file can be found at this location – C:\Users\username\AppData\Local\Microsoft\Windows\INetCache\QVConnect\11.20.12235.0.
Note: The steps to add exceptions to the anti-virus depends on the program you use. Thus, contact the vendor or program’s site for assistance with the steps.
Once the blockage is removed, run Advanced Reporting to ensure the report is updating without issues.
Case 6 – QuickBooks Report Printing Problems
If QuickBooks reports are not printing correctly, the following reasons might be responsible –
- There are data integrity problems in the report you are trying to print.
- The printer you are using to print QB reports is damaged or corrupted.
- The printer settings for XPS Document Writer might be incorrect.
- The Print Spooler Service is not running correctly or hasn’t started.
To fix this report printing issue, perform the following troubleshooting solutions mentioned below –
Solution 1 – Use QuickBooks Verify & Rebuild Data Tool
Firstly, you must ensure the integrity of the data in your QuickBooks company file. For this, use the Verify and Rebuild Data tool in QuickBooks.
After running the tool, try to print the report again. But if the report won’t print, follow the next solution.
Solution 2 – Use the QuickBooks PDF & Print Repair Tool
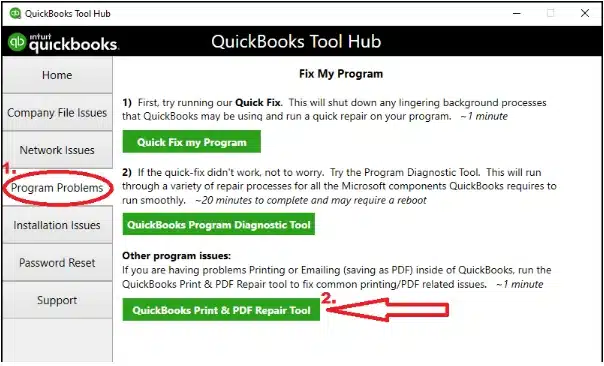
The QuickBooks PDF & Print Repair tool can help with the printing issues in the app. To use the tool, first ensure the latest QuickBooks Tool Hub version is installed on your PC, then take the following steps –
- Go to the Program Problems tab in QB Tool Hub, then select the QuickBooks PDF & Print Repair tool.
- Next, run the tool, and once the tool stops, try to print your report again.
If your QuickBooks report printing issues persist, follow the next solution.
Solution 3 – Allow your PC to Print to XPS Document Writer
If you can’t print QuickBooks reports, the printer settings in Windows might need to reset. To allow your computer to print to the XPS Document Writer, follow the steps below –
- Open the Control Panel from the Windows Start menu and switch to Category View.
- Select Programs, and in the Programs and Features tab, select Turn Windows features on or off.
- Select Microsoft XPS Document Writer from the service list and click OK to save the changes.
If you still can’t print to XPS writer, contact an IT professional to check issues with the printer. If the report printing issue persists, follow the next troubleshooting solution.
Solution 4 – Automatically Start the Print Spooler Service
If the Print Spooler Service is not running correctly, update its properties to start it in the following manner –
- Right-click Start and select Run to open the Run window, then type “Services.msc” in the command box.
- Select OK, search for “Print Spooler Service,” then right-click on Print Spooler Service.
- Click Properties, then select Startup Type, click Automatic, and select Apply and OK.
- Finally, right-click on Print Spooler Service and click Start to start the service.
After starting the service, try printing the QuickBooks report again to ensure the issues are resolved.
Conclusion
You can follow this comprehensive article to learn how to fix issues with your QuickBooks report. However, if these solutions are ineffective and QuickBooks Quick Report is not working, you might need assistance. You can contact our support team at TFN to get professional guidance in fixing the issue.
FAQs
What are QuickBooks Quick Reports, and how to access them?
Quick Reports are a feature in QuickBooks that allows users to quickly see activity for a customer, vendor, or an item. You can see Quick Reports for different accounts, like cash, customer, accumulated depreciation, etc. You can access a QuickBooks QuickReport in the following ways –
1. You can access a QuickReport in QuickBooks Desktop from a Summary Report.
2. Select the QuickReport button at the top of the General Ledger while selecting an entry.
3. You can also access a QuickBooks QuickReport from the Chart of Accounts.
4. Keyboard shortcut: Select a customer, vendor, or item, then press the CTRL + Q keys to access the QuickReport.
5. Right-click on a selection in the list, then select the QuickReport option.
6. You can also customize reports in QuickBooks, like export reports to Excel to modify the fonts, colors, or other visual aspects.
What are some tips to resolve QuickBooks reporting problems?
To ensure QuickBooks reporting issues don’t occur in the future, follow the tips mentioned below –
1. Generate the reports regularly to keep a check on erroneous results and streamline reports.
2. Memorize the reports and optimize them frequently.
3. Process multiple reports using the Group feature in the Memorized Reports section.
4. Send reports in a secure manner by encrypting them.
5. Ensure the data used to prepare the reports confirms integrity and usefulness.
How do we resolve the QuickBooks custom report not working issue?
Here are some things you can try if your QuickBooks custom report isn’t working:
1. If your custom report is not exporting all data to PDF or Excel, restart your browser and export the report in a private/incognito browser.
2. If your custom reports are lost or have disappeared, you can try refreshing the page by pressing the F5 key.
3. If your reports are no longer generating, update QuickBooks Desktop to the latest release.
4. If your QuickBooks memorized report isn’t opening or a different report opens, re-sort the Memorized Reports list.
5. If none of this helps, contact our Proadvisor solutions support team at 1.855.888.3080 for immediate assistance.

Erica Watson is writing about accounting and bookkeeping for over 7+ years, making even the difficult technical topics easy to understand. She is skilled at creating content about popular accounting and tax softwares such as QuickBooks, Sage, Xero, Quicken, etc. Erica’s knowledge of such softwares allows her to create articles and guides that are both informative and easy to follow. Her writing builds trust with readers, thanks to her ability to explain things clearly while showing a real understanding of the industry.