If your QuickBooks payment link not working, customers won’t be able to pay their invoices online. This issue can cause hindrances in the invoice payment process. It can arise when the data is corrupted, QuickBooks is not updated, or the Online Payments is inactive. To fix this payment issue, you can perform troubleshooting solutions, like activating Online Payments and running the Verify/Rebuild tool. In this blog, we will discuss these solutions in detail and help you fix the payment problems on time.
Customers can’t make payments if the invoice doesn’t have a payment link or the link isn’t functional. This issue can be very frustrating for customers and can prevent a smooth payment process. To fix this, you can follow this guide or reach out to our professional team at 1.855.888.3080 for faster resolution.
Table of Contents
Main Causes Why the Payment Link in QuickBooks Desktop is Not Working
There can be many reasons why the payment link issue arises in QuickBooks Desktop and Online versions. Before troubleshooting the issue, you must know the reasons behind it for better clarity and understanding. Below, we have provided a list of reasons that can be responsible for QuickBooks Desktop payment issues –
- There is data damage or data integrity issues in the QuickBooks company file.
- Your QuickBooks Desktop version is not updated and lacks the latest fixes, improvements, and features.
- The pay link on the customer invoice might be broken, causing issues while making invoice payments.
- The browser you are using to run QuickBooks Online might have excessive cache and cookies.
- Online Payments are not turned on in your QuickBooks Desktop or QuickBooks self-employed version.
- You are running QuickBooks Online via an unsupported browser or a browser that does not fulfill the minimum requirements.
- The browser used to run QBO might have excessive cache, which can cause performance issues.
- You use Plain Text as the Online Delivery option, but the invoice link has been reset.
- The payment link attached to the PDF invoice might not be pay enabled, or the invoice might not use the Airy new invoice template.
- These are issues with the L3 data processing, and they need to be toggled.
These are the leading reasons why your QuickBooks payment link is not working. Now, let’s learn how to troubleshoot solutions to fix this payment issue in the next section.
Recommended to read : How Do I Fix QuickBooks Error PS038
Solutions to Fix QuickBooks Desktop Payment Issues
Until the payment link issues in QBDT are resolved, customers won’t be able to make payments. To fix these issues, you must perform the troubleshooting solutions given below –
Solution 1 – Install the Recent QuickBooks Desktop Updates
An outdated QuickBooks Desktop can cause various issues in the application, including payment link issues. Thus, you must install the latest QuickBooks Desktop updates on your PC to fix the payment issue.
After updating the software to the latest release, check if the payment issues are fixed. However, if the payment link is not showing up on invoices, follow the next solution.
Solution 2 – Use the Verify/Rebuild Data Utility

Data corruption in your QuickBooks company file can cause payment problems. To fix this, you can use the QuickBooks Verify and Rebuild Data tool to check and fix the data integrity issues. This tool will help you detect the data damage and rebuild it accordingly.

After running this utility, check if the payment link problems are fixed. However, if the dashboard payment link no longer works, move to the next solution.
Solution 3 – Activate Online Payments in QB Desktop
The online payment option will be unavailable if online payments are not activated/turned on in QBDT. Thus, you must turn on online payments in QB Desktop by following the detailed steps below –
Step 1 – Connect to the QuickBooks Payments Account
If you don’t have a Payments account, you must first sign up for QuickBooks Payments and create an account to process the customer payments. If you already have a QuickBooks Payments account, connect your existing account to QB Desktop by implementing the following steps –
Note: Remember, you can use a single QuickBooks Payments account for one company file at a time.
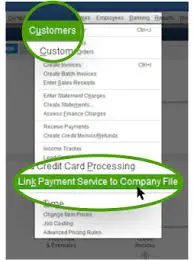
- Open QuickBooks Desktop, move to the Customers section, and click Link Payment Service to Company File.
- If you receive a ‘credit card protection’ message, fill out the fields and click OK to continue.
- Further, enter the user ID and password you used to sign up for QuickBooks Payments and select Sign In.
- Now, click Connect to connect to the QuickBooks Payments account. However, if you’re transferring your Payments account to another company file, click Transfer and select Yes, transfer.
After connecting, you will see an icon on the homepage indicating you have successfully signed in and are connected to the Payments account. Once done, turn on the payment options by following Step 2 below.
Step 2 – Turn on Online Payments Option in QBDT
The next step is to activate online payments to send invoices to your customers that can be paid online. To turn on the online payments in QuickBooks Desktop, go through the steps given below –
Turn On Online Payments for All Customers
Perform the steps given below to turn on online payments in QuickBooks Desktop for all customers –
- Navigate to the Edit tab, select Preferences, and choose Payments.
- Move to the Company Preferences section, then in the Online Payments tab, select the payment methods you want to make available to the customers.
- Lastly, hit OK and select Apply to existing customers.
Once the payment settings are set, these will become your default settings for all customer invoices.
Turn On Online Payments for a Specific Customer
You can turn on the online payments for a particular customer by going through the following steps –
- In QBDT, move to the Customers menu, select Customer Center, and locate the customer for whom you want to enable online payments.
- Select the Edit icon to edit their profile, choose Payment Settings, then go to the Online Payments tab.
- Lastly, choose the payment options you want to make available to this customer and click OK to save the settings.
After the online payments are turned on, follow the next step and send the invoice to customers.
Step 3 – Send an Online Invoice
You can email your customers the invoice with a Pay Now button by performing the detailed steps below –
- Go to the Customers menu, click Create Invoices, and choose the customer from the Customer: Job dropdown menu.
- Ensure there’s an email address in the Email field, then next to ‘Your customer can pay online using,’ check the available online payment options.
- If you wish to edit the payment options for this invoice, click Change and mark the checkboxes for all the options you want available.
- Further, click Save and add the products and services you need to sell.
- Fill out the rest of the invoice, go to the Main tab at the top of the invoice form, and open the Email dropdown menu.
- Click Invoice, then review the invoice message, and hit the Send button when you are ready.
After sending the invoice to customers, check if the View and Pay Now link buttons are available and functional. However, if the QuickBooks payment link is not working, move to the next solution.
Also See : Fix QuickBooks Payroll Service Server Error
Solution 4 – Repair the Invoice Link
If the link on the invoice is not working or isn’t functional, customers won’t be able to make a payment. Thus, you must repair the payment link on the invoice by using the instructions below –
- Sign in to QuickBooks Desktop, review each invoice, and unmark the Send Email checkbox.
- Select Save, then recheck the Send Email checkbox and save it to repair the link.
- Finally, send the forms and check if the invoice payment link is working correctly.
However, if the payment link on the invoice isn’t working, follow troubleshooting Solution 5 below.
Solution 5 – Turn L3 Data Processing On/Off
If you turned on online invoice payments but the e-payment link is not available, try turning the L3 processing on/off in the following manner –
- Log into the MSC externally from QuickBooks Desktop, then move to the Account menu and click Account Profile.
- Scroll to the bottom of the page, select Edit for L3 Data Processing…, and clear the check mark.
- Click Save, then proceed to link the data file with their Payments account again.
- To relink the data file, click Customers, select Link Payment Service to Company File, and then end the process.
Once done, check if the email to the customer shows the payment URL and ensure the payment problems are fixed.
Solutions to Resolve QuickBooks Online Payment Issues
You might encounter payment issues, like the pay link not working, in QuickBooks Online. To fix these payment issues, undertake the following troubleshooting solutions.
Solution 1 – Clear Browser Caches and Cookies
Excessive browser cache and cookies can be a reason why the QuickBooks Online payment link is not working. This is because browser data can cause inconsistencies, leading to performance issues. To fix the payment link problems, run QBO in a private window, then clear the browser cache by performing the following steps –
Step 1 – Run QuickBooks Online in Incognito Mode
Running QBO in a private/incognito window can help determine if the payment link issues are due to browser caching. Use the following shortcut keys to open your browser in an incognito mode –
- Google Chrome – Ctrl + Shift + N
- Mozilla Firefox & Microsoft Edge – Ctrl + Shift + P
- Safari – Command + Shift + N
Now, try to access the Payment Links menu in QBO, and if you can’t access it in private mode, switch to one of the following supported web browsers –
- Google Chrome – version 78 or newer
- Mozilla Firefox – version 76 or newer
- Microsoft Edge – version 75 or newer
- Opera – version 68 or newer
- Samsung – version 10 or newer
- Safari – version 12 or newer
On the other hand, if you can access the Payment Links menu in incognito mode, follow the next step and clear the browser cache.
Step 2 – Remove the Browser Cache
You can go through the following steps to delete the browser cache in your default web browsers –
Google Chrome
To delete the browser cache in Google Chrome, implement the steps mentioned below –
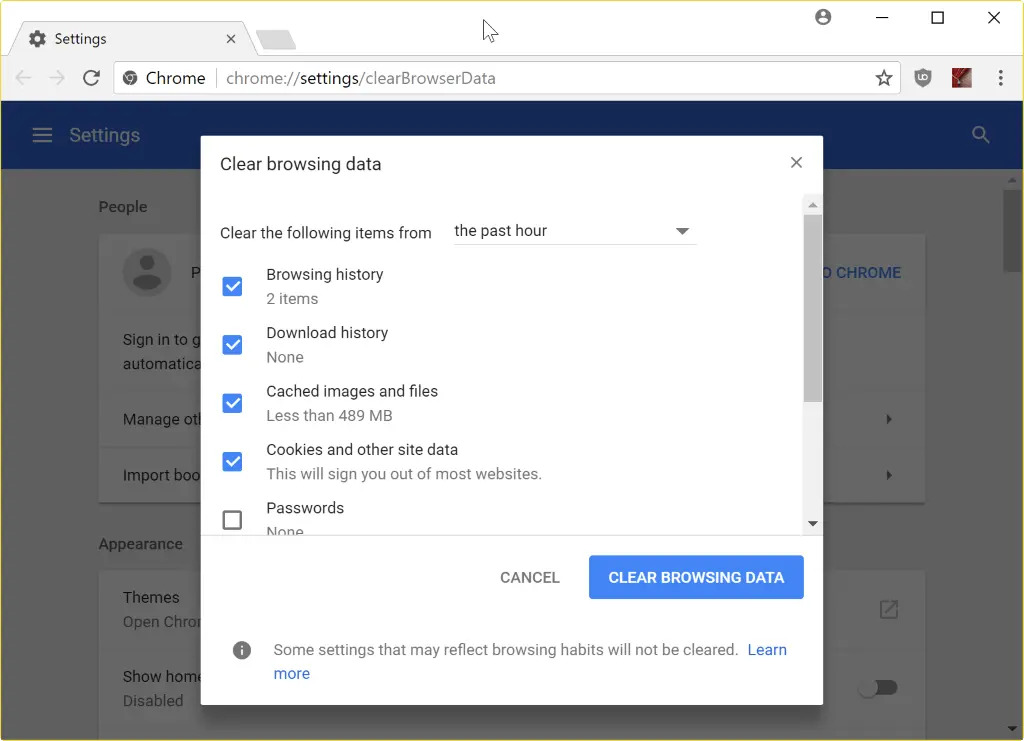
- On your PC, open Google Chrome, then go to the top-right corner and click More.
- Click Delete browsing data, then select a time range (like the Last hour) and the types of information you want to delete.
- Finally, click Delete data, clear the cache, and end the process.
Firefox
If you use Mozilla Firefox as the default web browser, perform the steps given below to remove the cache –
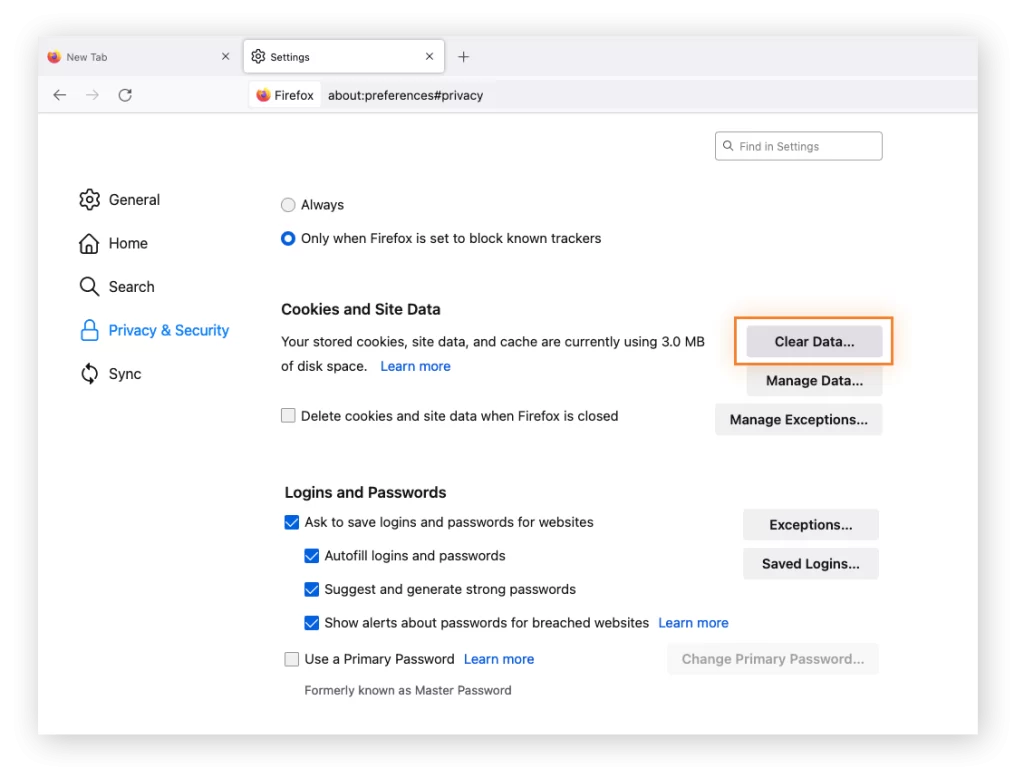
- First, open Mozilla Firefox, click the Menu button and move to the Settings tab.
- Now, go to the Privacy & Security panel and click Clear Data from the Cookies and Site Data tab.
- Unmark the Cookies and Site Data checkbox, ensure that Cached Web Content is marked, and click Clear.
- Once done, close the settings page, and your browser changes will be automatically saved.
Safari for Mac
Go through the following steps to delete the browsing history in your Safari for Mac browser –
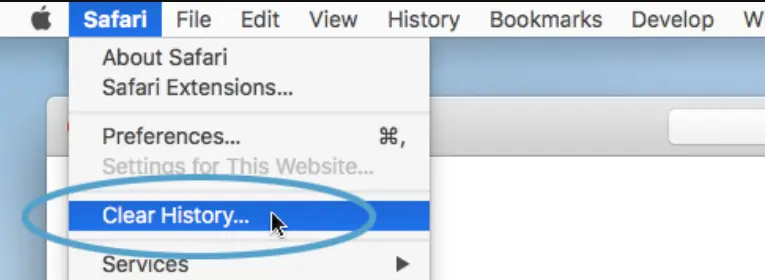
- Open the Safari app on your Mac, click History, and click the Clear History option.
- Open the pop-up menu, choose how far back you want your browsing history deleted, and clear it.
Safari for iPad and iPhone
You can clear the cache and cookies in Safari for iPad and iPhone by going through the steps given below –
- Move to the Settings tab, click Safari, and go to the Advanced section.
- Further, click Website Data and click the Remove All Website Data option to clear the cache.
Microsoft Edge
If you run QBO in Microsoft Edge, go through the following steps to remove the browsing data –
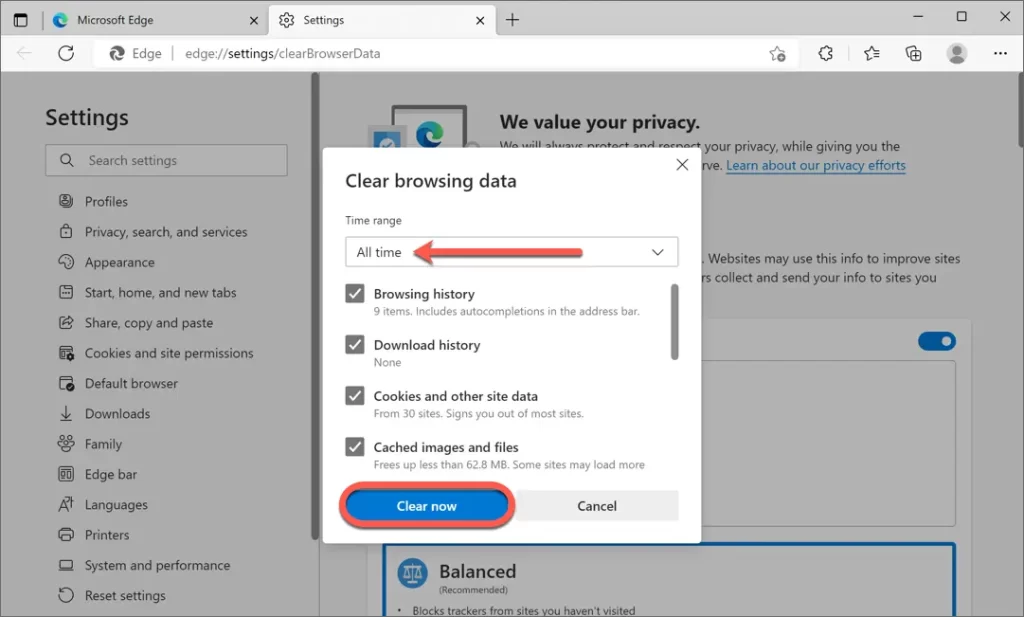
- Open Microsoft Edge, click Settings and more, then select Settings.
- Click Privacy, search, and Services, then move to the Clear Browsing Data section and select Clear Browsing Data Now.
- Next, click Choose what to clear, then move to the Time range section, and pick a time range from the drop-down list.
- Further, select the types of browsing data you want to clear; for example, you may want to remove browsing history and cookies except for passwords.
- After the browsing data is chosen, select Clear Now to remove it.
After deleting the cache and cookies, start your web browser again and run the QuickBooks Online software. Then, check if the payment link issues are resolved; otherwise, move to the next solution.
Solution 2 – Review if the Payment Link is Added to the Invoice Message or PDF
If the customers are not able to make payments with the invoice link, check if you manually added the payment link to an invoice message or to an invoice PDF.
If you use Plain Text for Online Delivery, you usually add the payment link in the default invoice payment message. On the contrary, if you choose HTML or Online Invoice as your Online Delivery option, the pay button will be seen in the e-invoice. Depending on the Online Delivery option chosen, undertake the steps given below –
Case 1 – If You Select Plain Text on the Invoice Message
If you opt for Plain Text, review the payment link on the invoice message in the following manner –
- Select the Gear icon, click Accounts and Settings, then navigate to the Sales tab.
- Further, move to the Messages section, then review the Sales form and the Email message box.
Once done, check the invoice message and ensure that the payment link shows up.
You may also read : Why am i getting QuickBooks Error 12031
Case 2 – If You Use Payment Link Attached to a PDF Invoice
If you use a payment link attached to a PDF invoice, ensure the invoice is pay enabled, and you use the Airy new invoice template by implementing the following steps –
- Click the Gear icon, select Custom form styles, and find the desired template.
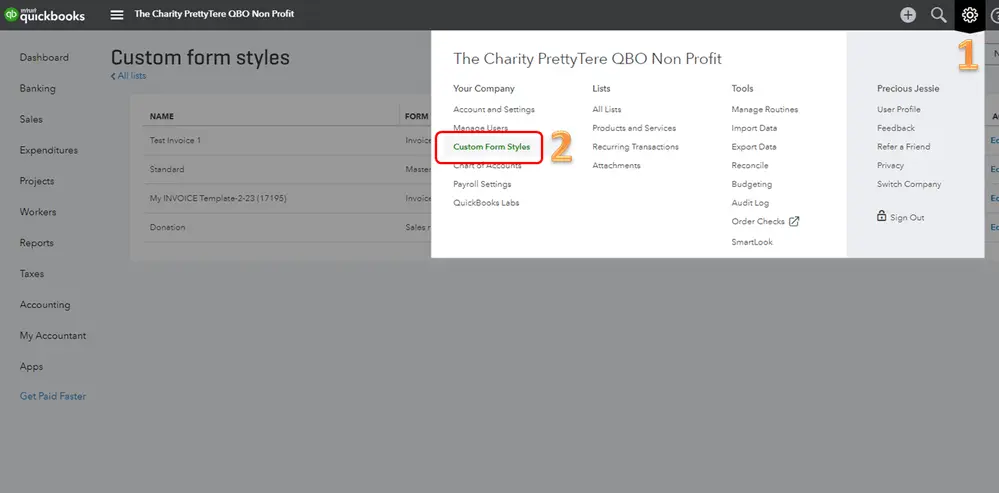
- Next, go to the Action column, select Edit, and move to the Design column.
- Finally, click Change up the template and choose the Airy New template option.
After setting the template, review the applicable options for the PDF invoice from the Print Preview section. Then, check if the payment link shows up on the invoice and ensure the QBO payment issues are fixed.
Conclusion
We hope this comprehensive guide helps you resolve the “QuickBooks payment link not working” issue in both the Desktop and Online versions. However, if these solutions are ineffective and the payment link issues persist, you can contact our expert team at 1.855.888.3080 to get direct guidance in fixing the issue.
FAQs
How can I turn on QuickBooks Payments in QuickBooks Self-Employed?
To allow customers to pay their invoices online, ensure that QuickBooks Payments is activated. Firstly, you must have a Merchant Service account and a selected card/bank option when emailing the invoice. Then, activate QuickBooks Payments in QBSE by using the following steps –
1. Sign in to QBSE, click Invoices from the left menu, and select the Create Invoice option.
2. Move to the New Invoice page, then from the Get Paid Fast and Free section, select the Set up Payments link
Once done, follow the on-screen instructions to complete the link setup process and ensure the payment link is working.
How can I change the Pay Now hyperlink to an actual button on an invoice?
The Pay button will be displayed as a hyperlinked URL while using the payment link in QBO. To change this hyperlink to an actual button, implement the steps mentioned below –
1. Open the invoice and ensure that the customer’s email is correct, then choose Save and Send.
2. Find your customer’s email, and once the customer clicks Review and Pay, they should be able to use the Pay button.
How can I prevent payment link issues from occurring in the future?
You can take the following steps to ensure the payment link issues don’t occur in QuickBooks –
1. Ensure that the invoice link provided to customers is functioning properly and pertains to the correct invoice.
2. Check the configuration of your payment gateway or accept payments and process transactions for the invoices.
3. Review the payment methods to check if your payment gateway supports them and is compatible with the invoice link for online payments.
4. Communicate with the customers and collect feedback to understand if they encounter any specific errors or issues with the invoice link.
5. Check the invoice link’s compatibility with different web browsers and devices to ensure it is accessible across various platforms.
6. If you have recently integrated a new payment gateway or changed the payment processing system, ensure the integration is correctly configured.

Erica Watson is writing about accounting and bookkeeping for over 7+ years, making even the difficult technical topics easy to understand. She is skilled at creating content about popular accounting and tax softwares such as QuickBooks, Sage, Xero, Quicken, etc. Erica’s knowledge of such softwares allows her to create articles and guides that are both informative and easy to follow. Her writing builds trust with readers, thanks to her ability to explain things clearly while showing a real understanding of the industry.