QuickBooks utilizes mapped network drives to access company files stored on a different computer system or an online server. Not only that, but you can also use shared storage for accessing QB company files.
However, sometimes users might find QuickBooks not seeing mapped drives. For instance, let’s say QB files were previously mapped to a certain drive named W. Now, you are not able to see it. Usually improper administrator permissions or issues with your network connectivity cause this error. Furthermore, reasons such as malware in system files or failed Windows updates can also be the cause of it. Additionally, the network drives may have been mapped incorrectly on your system, leading to QB not seeing mapped drives.
In this blog, we will dive deep into the problem and figure out how to resolve it.
Need support to address it if your QuickBooks not showing network drives? Our specialists are just a call away. Reach out at 1-855-8888-3080 and let our ProAdvisor Solutions experts guide you.
Table of Contents
What are Mapped Drives?
You can easily access data on another computer or local server on your network, provided it is shared with you, i.e., you have access to it.
When you map these locations on the network as drives, they will show up as local drives on your computer. While mapping a drive, you have to assign a specific letter to it. Then, when you browse to the File Explorer on your system, you will see the drive with the letter you gave it.
If you want to access a file or folder in the mapped drive, all you need to do is open the File Explorer, open the mapped drive as you would open a local drive, and select the file or folder there.
Mapped drives are very useful when you are working on your QB Desktop in multi-user mode. It helps you access your company file stored on the host computer (server) from various workstations.
Why is My QuickBooks Not Seeing Mapped Drives?
There are some key factors that can contribute to your QuickBooks mapped drive not showing. For instance, it may be because of:
- Incorrect access permissions or not using Windows as an administrator.
- The Windows access permissions might be set inaccurately on your server system.
- Your Windows Firewall might be blocking QuickBooks.
- Any malware on crucial system files may block the connection with the server.
- Internet connection settings and network discovery options can disrupt the sharing of company files, leading to QuickBooks not seeing mapped drives.
- The network drive may not be mapped properly on your system.
- In Windows 8 or 10, an improper selection or a network disk that is not appropriately mapped may not be recognized.
- Improper selection and connection of the drive to the network location may be why QB can’t see network drives in Windows 7.
- Manually configured IP and DNS settings may not be set up correctly.
- Failed Windows updates may lead to QuickBooks not showing mapped network drives on any computer connected to your network.
- Software or program-related issues might often lead to QuickBooks not showing network drives problem.
Any of these factors can be the reason why is QuickBooks not showing mapped drives, and it is essential to resolve this issue. Some resolutions are listed in the section below for you to self-troubleshoot the problem.
Working Solutions to Try When QuickBooks Mapped Drive Not Showing
Firstly, we recommend you begin by installing the latest Windows and QuickBooks updates on your computer. Moreover, some users have observed that launching QB as an administrator messed with the access to the mapped drives. Therefore, you should also try opening QuickBooks normally.
Now, let’s go over some working and proven methods to troubleshoot the QuickBooks not seeing mapped drives. Follow these procedures step-by-step as they’re listed, and you will be able to fix this issue.
Solution 1: Turn On Network Discovery
If your system does not have the network discovery option turned on, then QuickBooks not showing mapped drives because it fails to discover the network. Therefore, you are advised to keep Network Discovery turned on. You can follow these steps if it’s turned off.
- Open the Control Panel on your computer system.

- Select the Network and Internet option.

- Head to the Network and Sharing Center.

- Now, select “Change advanced sharing settings” from the left panel.

- Look for the ‘Turn on network discovery’ button
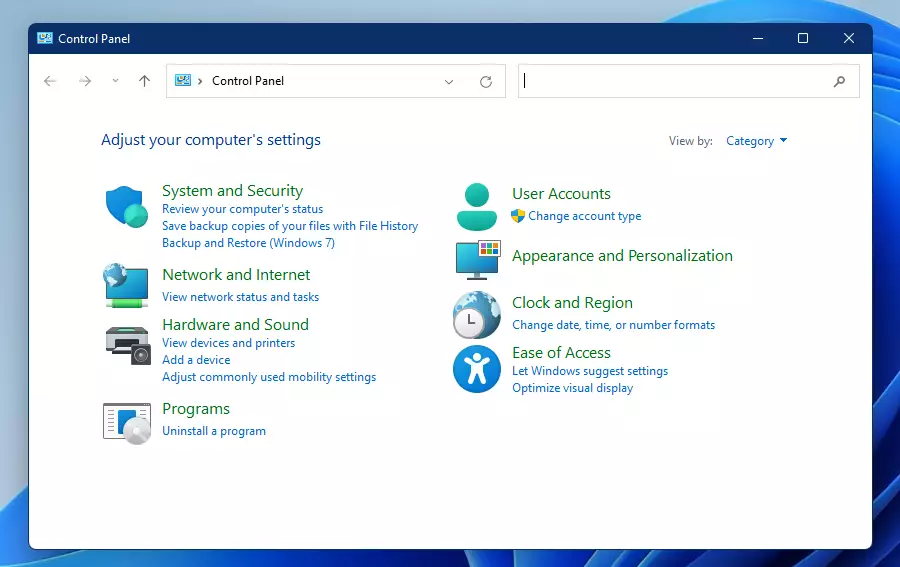


When you’re done following this process, your network discovery will be enabled. However, if you find the QuickBooks mapped drive not showing, move to the next step.
Solution 2: Verify if the Workstation Can Reach the Server
Let us first check and make sure that the QuickBooks workstation is connected to the server hosting the company file. To do so:
- Open the Run Window (Windows + R), type cmd in the Run box, and hit Enter.
- In the Command Prompt Window, enter ipconfig/ all (notice there is a space after the /)
- Press the Enter key, and when you see a hostname, which is the server name, note it down somewhere.

- Next, enter ping servername. The image above will give you an example.
- Hit the Enter key.
- You are connected to the server if you get a reply for every packet.
- However, you should speak to your IT professional and get your network tested if you find there is a slow reply or packet loss.
Do this for every workstation where you find QuickBooks not seeing mapped drives.
Solution 3: Perform a Wildcard Search for Company Files and Open Them
Often, when the name of the company file is changed or the company file itself is moved, you might not be able to see the mapped drives.
To resolve that, we will perform a wildcard search for your company files. To do that, search for these extensions with an asterisk (*) in the search bar in the File Explorer or Start menu.
- *.qbx (Accountants Transfer Files)
- *.qby (Accountants Change Files)
- *.qba (Accountants Copy Files)
- *.qbb (Back Up Files)
- *.qbw (Working Files)
When you see the file, note down its location or file path somewhere. Next, open the company file with the .qbw extension. Here is how you can do that:
- Go to the File menu and tap on Open or Restore Company.

- Choose Open a Company File, followed by Next.
- Now, choose the desired data file and hit Open.
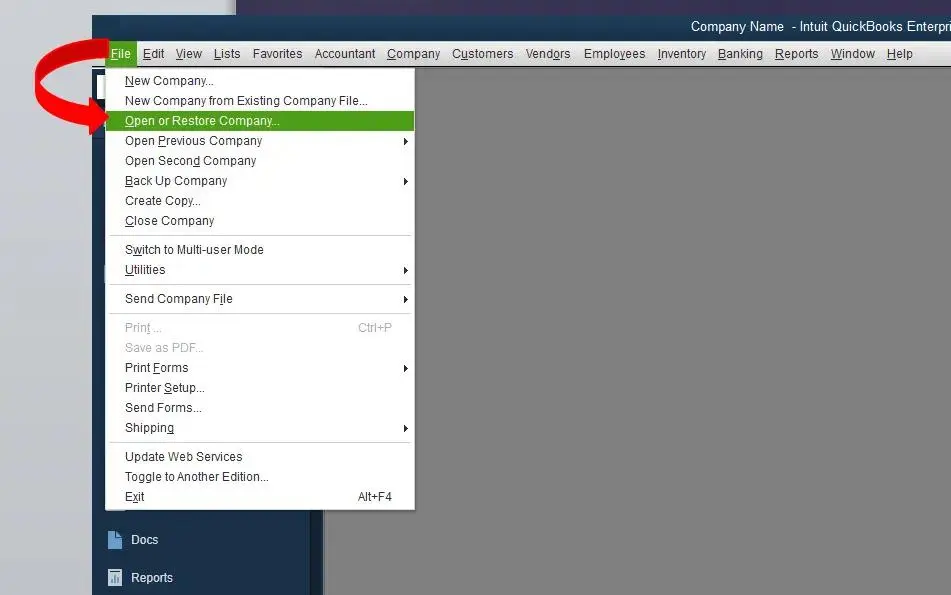
If this doesn’t fix the problem, try remapping the network drive.
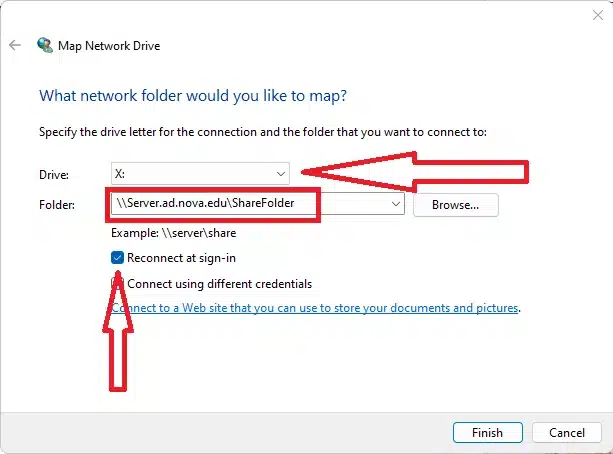
Solution 4: Re-Map the Network Drive
You might need to remap the network drive to resume working. Follow the steps below on how to do so:
- Open File Explorer on your computer and go to This PC.

- You will see three dots next to the View option in the horizontal bar. Tap on it and choose Map network drive.

- Now, from the list, you will need to select a letter for your drive to define your mapped drive.
- Choose any letter that you find available.
- Now, enter the file path or location in the Folder field, or choose Browse and navigate to the desired location.
- If you want to Reconnect at sign-in, select the checkbox for the same.
- Finally, tap on Finish.
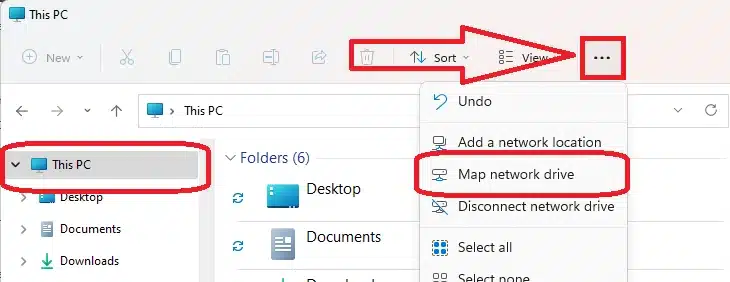
However, if QuickBooks does not see mapped drive, we will need to get the IP address and DNS manually.
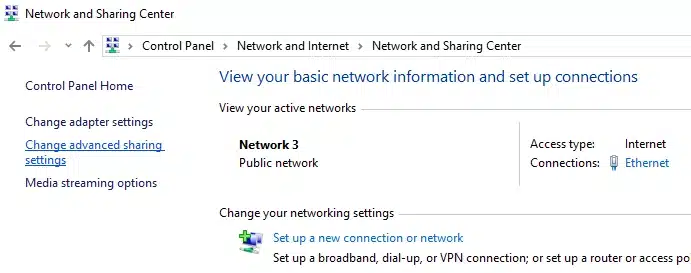
Solution 5: Manually Get IP Address and DNS
There might be difficulties in locating the UNC path, which might be why you can’t see network drives Windows 11. For that, follow the steps below to allow automatic access to the server’s IP address and DNS:
- Launch the Windows Start menu and open Settings.
- Go to the Control Panel icon and in the Network and Sharing Center
- Tap on Change Adapter and open the Network Connection window.
- At this point, right-tap on Ethernet, followed by Properties from the menu that appears.

- Go to the Networking tab and choose the checkbox for Internet Protocol Version 4.
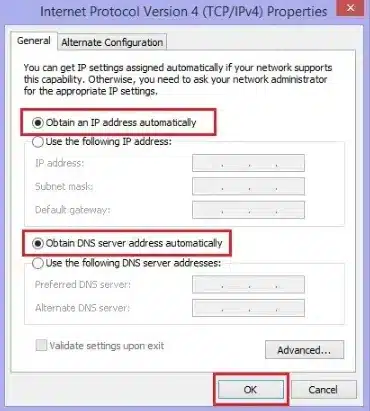
Note: If the checkbox is already marked, unmark it.
- Select the radio option that says Obtain DNS Server Address Automatically.
- Finally, hit Enter or select OK.
When connecting to the server, there won’t be any need to manually input the settings anymore. The workstation will directly connect to the server. Now, launch QuickBooks Desktop on your computer.
If you find that QuickBooks is not showing mapped drives, run QB as an administrator.
Solution 6: Launch QB as an Administrator
You should launch QuickBooks as an administrator to make sure that it has all the permissions it needs.
- Right-click on the QBDT icon

- Hit Run as Administrator
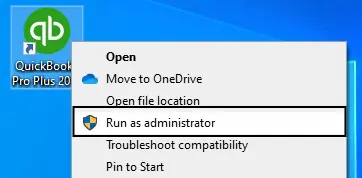
Moreover, make sure that you are logged in as an admin user on Windows. You can also modify a user to give them admin rights in Windows.
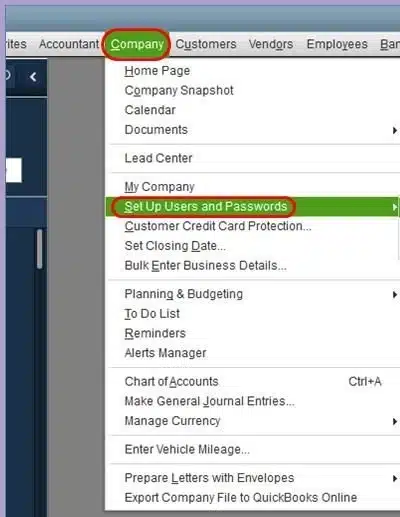
Solution 7: Create a New User Profile in QBDT
Try creating a new user profile to see if it fixes the issue:
- Open your QB Desktop
- Press the Company menu
- Select Set Up Users and Password

- Select the Set Up Users option
- Now, press the Add User button
- Type the required information, such as username and password
- Press Next
- Now select among the following options you see on your screen accordingly
- No Access
- Full Access
- Selective Access
- Finally, press Finish
After following these steps, you’ll be able to find your mapped drives successfully. If you can’t, check out the following solution.
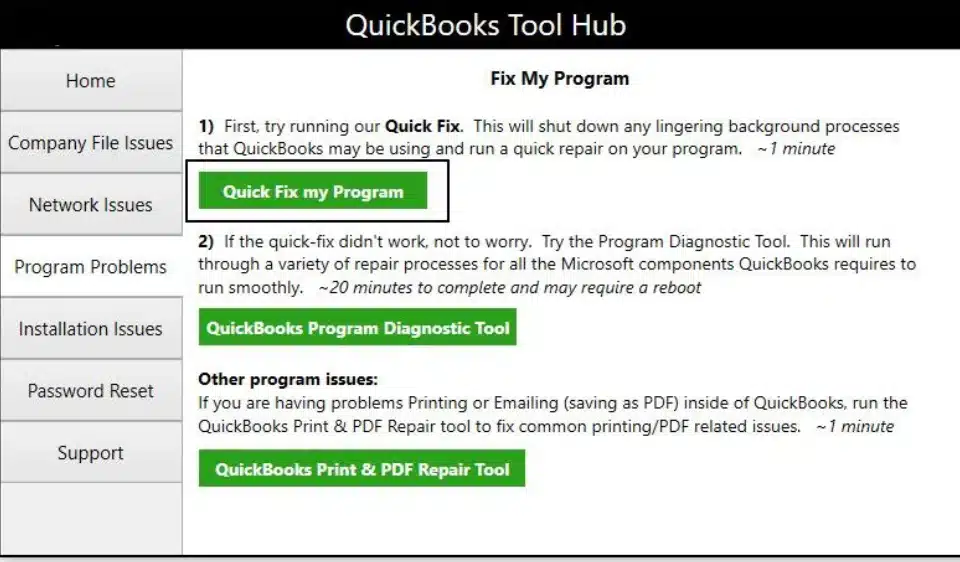
Solution 8: Fix Your QuickBooks Desktop Using Quick Fix My Program
You can repair your QBDT app to see the mapped drive by using Quick Fix My Program in QB Tool Hub by following the steps given below:
- Open QuickBooks Tool Hub

- Select Program Problems
- Click on Quick Fix My Program

- Wait for the process to complete
- Close QuickBooks Hub Tool

You should be able to see your mapped drives now. Move on to the next solution if you can’t.
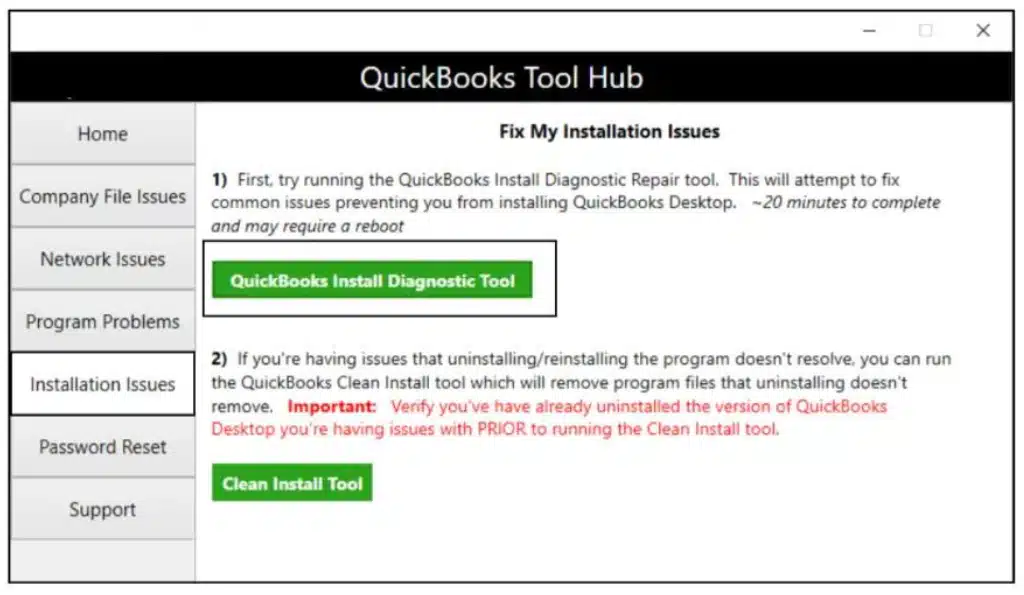
Solution 9: Run QuickBooks Install Diagnostic Tool in QB Tool Hub
If you’re running into QuickBooks not seeing mapped drives, it can be due to an improper installation of your QBDT app. Below are given the steps you can take to fix it:
- Open QuickBooks Tool Hub
- Navigate to Installation Issues
- Select QuickBooks Install Diagnostic Tool

- Wait for the tool to finish its process
- Exit QB Tool Hub
- Restart your system
You should be seeing mapped drives in QB now. If you can’t, check the following solution.
Solution 10: Allow Access to Company Files in Windows
This error can arise due to QB not having complete access to your company file folder. To fix this, follow these steps:
- Navigate to the folder in which your company file is located
- Right-click on the folder
- Select Properties
- Go to the Sharing menu and press Share…
- Now, enter QBDataServiceUserXX in the Add tab, where XX represents the version year of your QBDT
- Select Full Control
- Press Share
- Click OK
After all these methods, if QuickBooks not seeing mapped drives is still an issue you’re facing, move on to performing a clean install of your QuickBooks.
Solution 11: Perform a Clean Install of QBDT
By reinstalling your QuickBooks Desktop app, you can remove various issues that might be arising due to an improper installation. It’s essential to perform a clean install of the QBDT app.
Doing this would fix the issue you might be facing.
Can’t See QB Mapped Drives – A Quick View
Below is presented a concise summary of the information available in this blog in a tabulated format:
| QuickBooks not seeing mapped drives | Sometimes, a user can have issues in seeing mapped drives that they created using QuickBooks |
| Its causes | Incorrect access permissions, you’re not using Windows as an admin, on your server system, the Windows access permissions might be inaccurate, or the system files might be blocking the connection with the server. Furthermore, your network drive might not be mapped properly. |
| Its fixes | Turning on network discovery, verifying the workstation’s connection with the server, performing a search for company files and opening them, remapping the network drives, or manually getting the IP address and DNS. Additionally, launching QB as an administrator, creating a new user profile, fixing your QBDT using Quick Fix My Program, running the QuickBooks Install Diagnostic Tool, allowing access to the company file, or performing a clean install. |
| Tools Used | QuickBooks Tool Hub, Quick Fix My Program, QuickBooks Install Diagnostic Tool, QuickBooks |
Parting Words
With the help of this blog, you’d understand what are the main causes of QuickBooks not seeing mapped drives. Also, you’d understand how to mend these errors on your own with the provided step-by-step guide. If you face any issues in following any of the steps or are not able to resolve this issue yourself, dial 1-855-888-3080 to speak to our Proadvisor Solutions experts today.
FAQs
What causes mapped drives to disappear?
Mapped drives mainly disappear due to incorrect admin permissions or network issues. However, it can also be a result of the incorrect mapping of your drive.
How do I show all mapped drives?
To see all the mapped drives on your desktop, you have to open the Command Prompt by typing cmd in the Start menu. Then type net use and press Enter. A table would be displayed that would show all your mapped drives with their network paths.
Why can’t you see mapped drives in QuickBooks?
There are several reasons why you are not seeing your mapped drives in QuickBooks. It mainly occurs due to incorrect admin permissions or issues with network connectivity. It can also happen due to improper mapping of your drive, issues with your company file, and various other reasons as discussed in the blog above.
Read more useful articles:-
Technical Fixes for Installation Issue: QuickBooks Error 1317
Fixing QuickBooks Error 2308: Expert Tips and Solutions
How To Troubleshoot QuickBooks Desktop Running Slow Issue? (Expert’s Guide)
QuickBooks Crashes When Sending Email! Here’s How to fix it
Intuit Data Protect Backup Failed! How to Deal with It?

Erica Watson is writing about accounting and bookkeeping for over 7+ years, making even the difficult technical topics easy to understand. She is skilled at creating content about popular accounting and tax softwares such as QuickBooks, Sage, Xero, Quicken, etc. Erica’s knowledge of such softwares allows her to create articles and guides that are both informative and easy to follow. Her writing builds trust with readers, thanks to her ability to explain things clearly while showing a real understanding of the industry.