With QuickBooks, sending statements, estimates, sales receipts, invoices, and reports via email is pretty convenient. However, when emails with such financial documents fail to deliver, it can be a significant trouble. In this guide, we will discuss one such issue where QuickBooks invoices not being received by the recipient. So, let’s begin by finding out why QuickBooks invoice delivery fails and what must be done to get it back working in no time.
Not being able to send invoices to customers directly impacts sales, so this issue requires an instant fix. Contact the Proadvisor solutions’ troubleshooting experts at 1.855.888.3080 now and let them handle this trouble.
Table of Contents
Why QuickBooks Stops Sending Invoices
There are various reasons why QuickBooks invoices are not showing in sent items. You must know these reasons to understand the QuickBooks invoice delivery issues better. Below, we have provided a list of reasons that might be responsible for invoice delivery issues in QBO –
- The email address in QuickBooks Online might be incorrect or not set correctly.
- The invoices you send to customers might land in spam or junk folders.
- Your customer’s email address might be incorrect, leading to email delivery issues.
- The mail server host names and IP addresses are not included in the outgoing server allow list.
- Your web browser might have an excessive cache that can cause problems while running QBO and sending emails.
These are the major causes of email delivery problems in QBO. Now, move to the next section to learn about the effective fixes for this issue.
Recommended to read : Fix QuickBooks Desktop Accountant Copy Error
Solutions to Fix QuickBooks Invoice Delivery Error
If invoices are not reaching recipients in QuickBooks Online, you must follow the troubleshooting solutions given in this section to fix the issue –
Solution 1 – Reset Your Email Address
The email address must be reset if you have imported QBDT data into a QuickBooks Online company. To reset the email address, follow the steps mentioned below –
- Sign in to your QuickBooks Online account, then go to Settings.
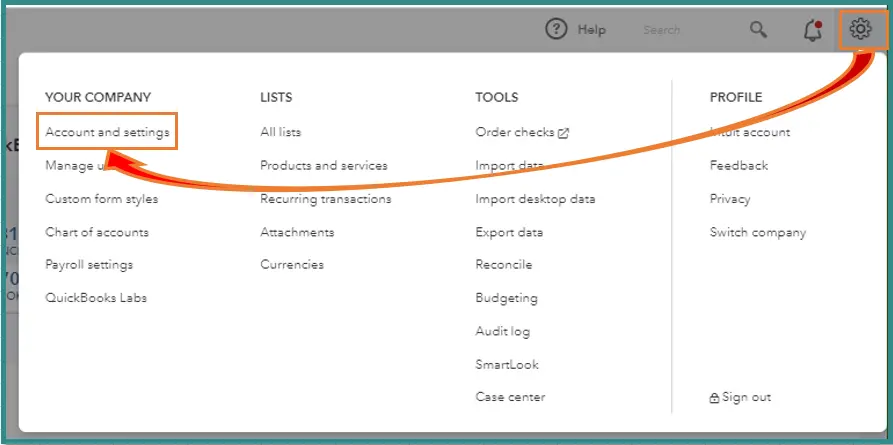
- Select Account and Settings, move to the Company section, and select Edit in the Contact Info tab.
- Review each email address, make the required changes, then click Save and Done.
Once the email address is set, rerun QBO and check if you can send invoices. If you still notice QuickBooks invoice delivery failure, move to the next solution.
Solution 2 – Re-enter Your Email Address
You can ask your customers to check their junk and spam folders to find the email. If email is not found, clear and enter the email address again as follows –
- Go to the Settings tab, select Account and Settings, and move to the Company section.
- Open Contact Info, click Edit and clear the Company email field.
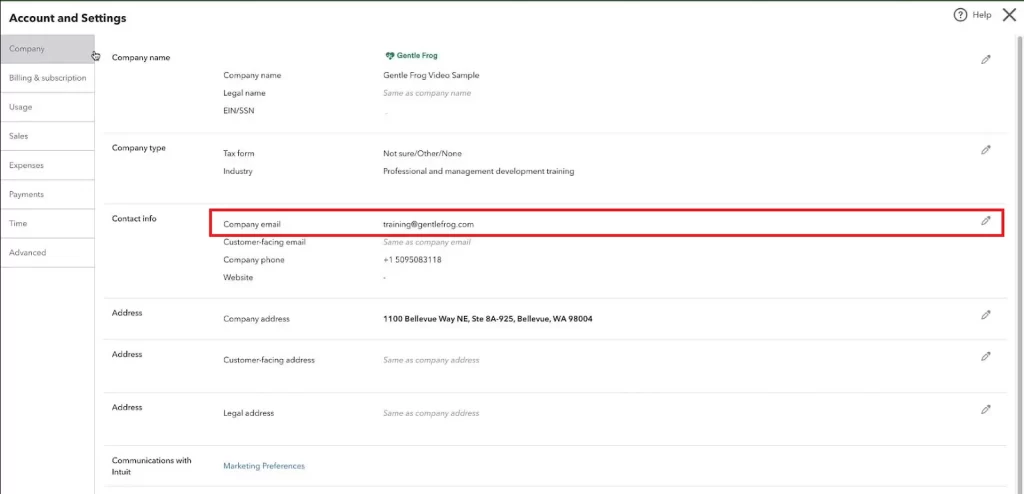
- Enter the desired address without any characters or spaces, even if it appears correct.
- Select Save, click Done, and send yourself a test mail.
Now, check if you received the email; otherwise, try using a different email address with a different domain (for example, if you were using Gmail, use a Hotmail or Yahoo email address instead).
However, if QuickBooks invoices are not being received, move to the next solution.
Solution 3 – Check the Status of the Sent Invoice
You need to review the status of the invoice you sent to see when it was undelivered to the customer. To check the sent invoice, follow the steps below –
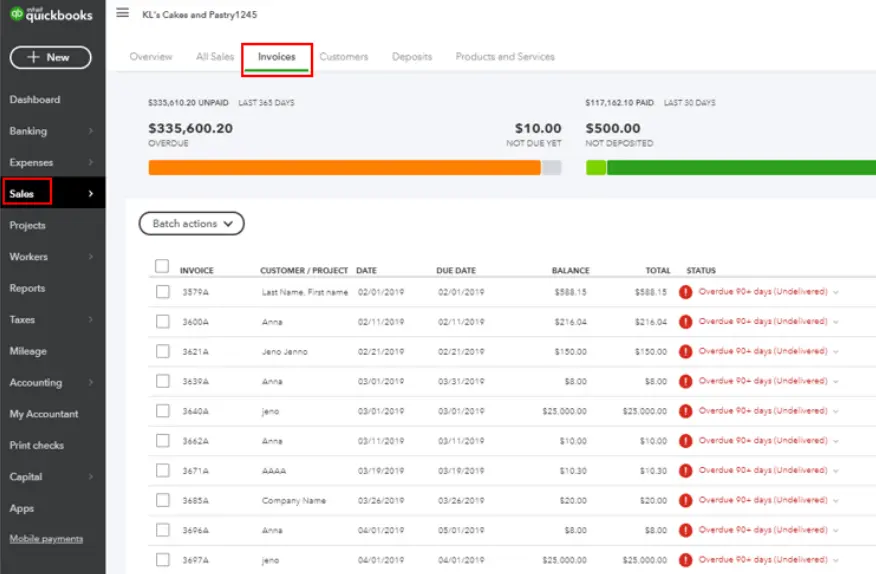
- Go to the Sales tab, click Invoices, and open the Status column.
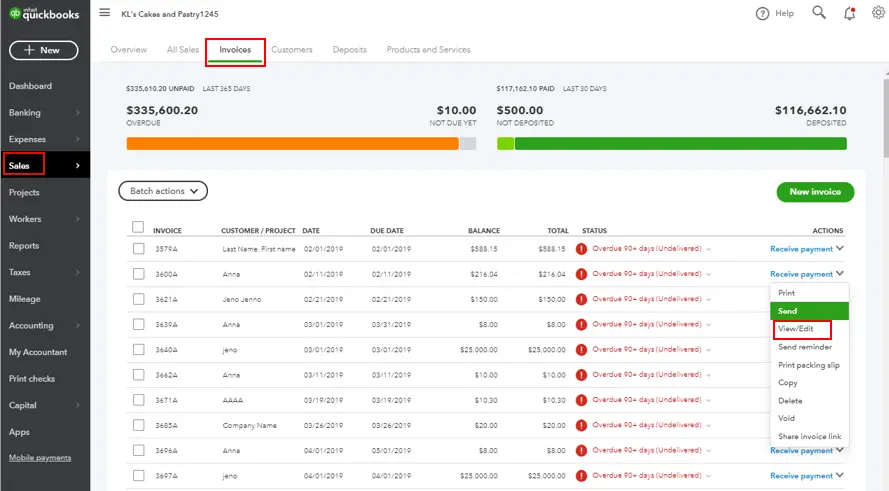
- Now, check the invoice status to see if it is undelivered or sent.
Note: If you’re in the Invoices tab, click the Needs Attention message to display the undelivered invoices.
Once the undelivered invoices are found, try to send them again via QBO. Ask the customers to check their junk or spam folders to confirm if the invoices are delivered. If the customers are not getting QuickBooks invoices, move to the next solution.
Also See : How to transfer the Primary Admin Role in QuickBooks Desktop
Solution 4 – Check the Customer’s Email Address
Your customers won’t receive the invoices if the email address is incorrect. Thus, you need to ensure the customer’s email address is correct by following the instructions below –
- Go to the Customers & leads section, select Customers, and choose the customer who didn’t receive the invoice.
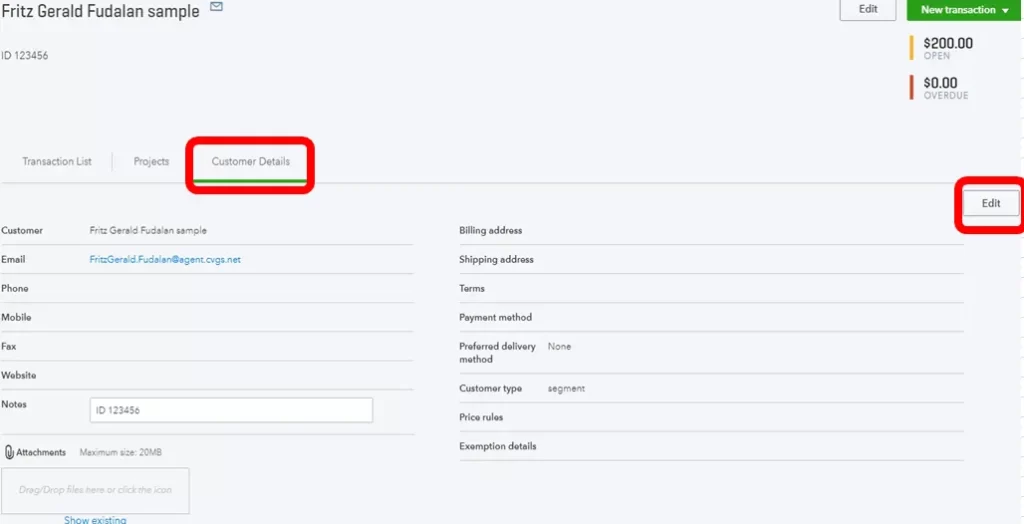
- Select Edit, check the email address, edit it if needed, and resend the invoice.
If QuickBooks email delivery issues persist, follow the next troubleshooting solution.
Solution 5 – Configure the Server
If the mail server host names and IP addresses are not added to the allowed list, the QBO mails might get marked as spam. Thus, contact an IT expert to add the QuickBooks Online mail server hostnames and IP addresses to your outgoing mail server allowed list. The steps to add the host names and IP addresses depend on your email setup, and you need to include the following –
Server Hostname
o1.sg.n.intuit.com | mailout204.intuit.com | mailout4a.intuit.com |
| o2.sg.n.intuit.com | lvmailout01.intuit.com | mailout5a.intuit.com |
| o3.sg.n.intuit.com | lvmailout02.intuit.com | mailout11.intuit.com |
| o4.sg.n.intuit.com | lvmailout03.intuit.com | mailout12.intuit.com |
| o5.sg.n.intuit.com | lvmailappout10.intuit.com | mailout13.intuit.com |
| mailout1b.intuit.com | lvmailappout11.intuit.com | mailout14.intuit.com |
| mailout2b.intuit.com | lvmailappout12.intuit.com | mailout21.intuit.com |
| mailout3b.intuit.com | lvmailappout13.intuit.com | mailout22.intuit.com |
| mailout4b.intuit.com | lvmailappout20.intuit.com | mailout23.intuit.com |
| mailout1a.intuit.com | lvmailappout21.intuit.com | mailout24.intuit.com |
| mailout2a.intuit.com | lvmailappout22.intuit.com | mailout101.intuit.com |
| mailout3a.intuit.com | lvmailappout23.intuit.com | mailout102.intuit.com |
| mailout203.intuit.com | mailout202.intuit.com | mailout103.intuit.com |
| mailout201.intuit.com | mailout104.intuit.com |
IP Address
69.169.238.234 | 206.108.40.28 | 199.16.139.23 |
| 69.169.238.235 | 206.108.40.89 | 199.16.139.24 |
| 168.245.76.26 | 206.108.40.90 | 199.16.139.25 |
| 168.245.70.213 | 206.108.40.92 | 199.16.139.26 |
| 168.245.123.49 | 206.108.40.92 | 199.16.139.27 |
| 168.245.118.60 | 206.154.105.172 | 206.108.40.7 |
| 198.37.158.59 | 206.154.105.173 | 206.108.40.8 |
| 199.16.139.16 | 206.154.105.174 | 206.108.40.9 |
| 199.16.139.17 | 206.154.105.175 | 206.108.40.10 |
| 199.16.139.18 | 206.154.105.176 | 206.108.40.11 |
| 199.16.139.20 | 206.154.105.177 | 206.108.40.12 |
| 199.16.139.21 | 206.154.105.178 | 206.108.40.13 |
| 199.16.139.22 | 206.154.105.179 | 206.108.40.14 |
| 206.108.40.18 | 206.108.40.17 | 206.108.40.15 |
| 206.108.40.16 |
If you need to specify a subnet mask, use 255.255.255.255 and try sending the invoices from QBO again. However, follow the next solution if QuickBooks invoice email problems keep occurring.
Solution 6 – View the List of Bounced Emails with Delivery Errors
If your customers are not receiving the emails and you aren’t notified, your service provider’s server doesn’t provide notifications for email delivery errors. This can lead to the QuickBooks email notification not working issue. Thus, you must see the list of bounced emails to check which emails are encountering the delivery error. To check the bounced email list, follow the steps below –
- Go to Dashboards, then under the Tasks section, select View the Errors.
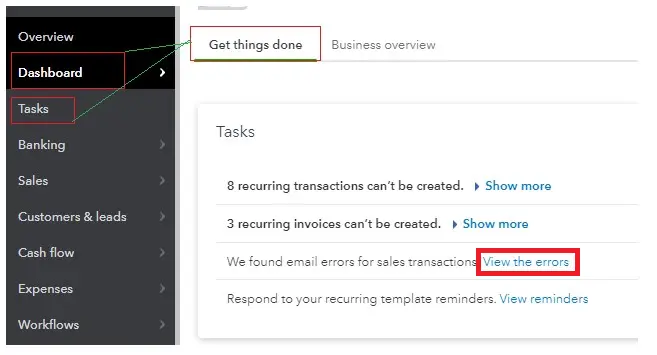
Note: The View the Errors link includes a list of emails with delivery errors sent through your email provider’s server. In the delivery errors section, you can see the delivery date, type, Ref No., Customer, error, and delivery method.
- Once the bounced emails are identified, you can try sending them again via QBO.
If the customer still hasn’t received the email, check their email address and ask them to view their junk/spam folder. However, if the email delivery issue persists, follow the next solution.
You may also see : How Do I Fix QuickBooks Template Printing Issues
Solution 7 – Run QuickBooks Online in Incognito Mode
The unexpected behavior while sending emails from QBO can occur due to excessive cache. You can run QuickBooks Online in a private browser to check if the issue arises due to cache problems. Use the following shortcuts to use the incognito mode in your web browser –
- For Google Chrome: press Ctrl + Shift + N
- For Mozilla Firefox and Microsoft Edge browsers: press Ctrl + Shift + P
- For Safari: press Command + Shift + N
Once done, email the invoice again, and if it works, go back to your regular browser and clear the cache.
Clear the Cache and Cookies
You must clear the cache and cookies from the regular browser to fix QuickBooks invoice delivery status issues. Follow the steps below to remove the cache according to your browser –
Google Chrome
- Open Google Chrome, then select the More icon from the top right corner.
- Click Delete browsing data, then select the period to remove the browser data, for example, the Last Hour/All Time.
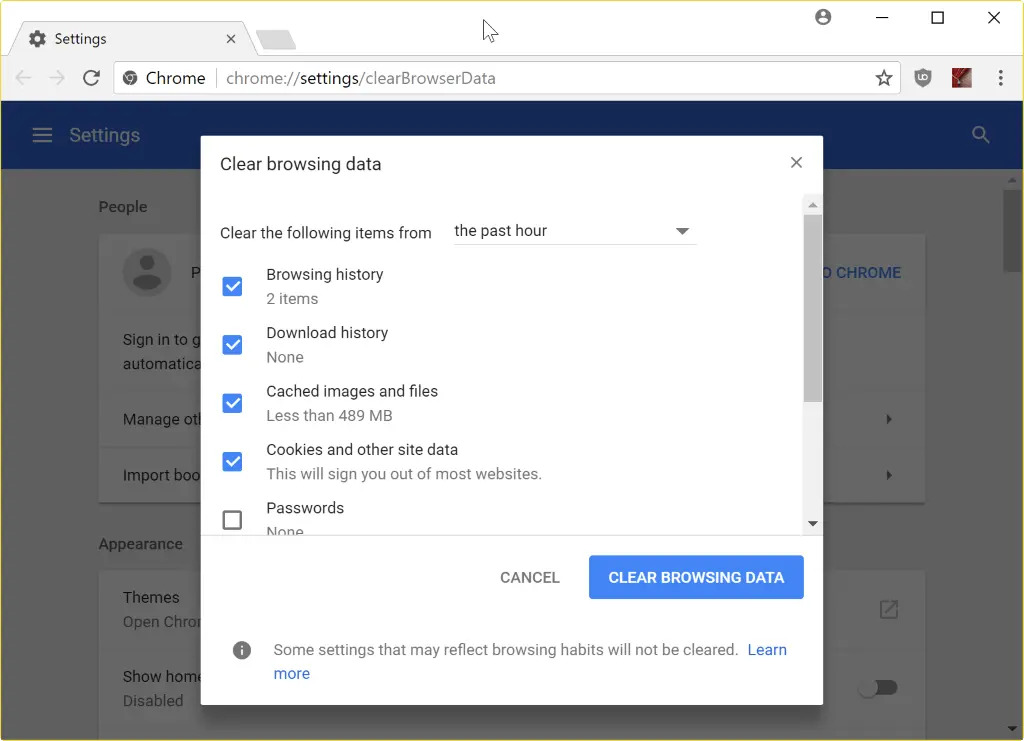
- Lastly, choose the type of information you want to clear and click Delete Data.
Mozilla Firefox
- Open the Mozilla Firefox, click the Menu icon at the top right corner, and go to the Settings tab.
- Select Privacy & Security, then click Clear Data in the Cookies and Site Data tab.
- After the Clear browsing data and cookies window appear, go to the drop-down menu and click Everything (besides When).
- Checkmark the Temporary cached files and pages checkbox, click Clear and exit the page. The changes will be automatically saved.
Safari for Mac
- Firstly, open Safari on your Mac, click History and select the Clear History option.
- Now, go to the pop-up menu and choose the time range for which you want to clear the browsing history.
Safari for iPad and iPhone
- Open Safari on your iPad or iPhone, and then go to the Settings tab.
- Further, select Clear History and Website Data to delete the history, cookies, and other browsing data.
On the other hand, if you want to clear the cache and cookies but keep the history, go through the following steps –
- Open Safari from the Settings tab, select Advanced, and click the Website Data option.
- Now, click Remove All Website Data to clear all cache and cookies except history.
Microsoft Edge
- Open the Microsoft Edge browser on your PC, go to Settings and more, then click Settings.
- Select Privacy, Search, and Services, then navigate to the Delete browsing data section and click Clear Browsing Data Now.
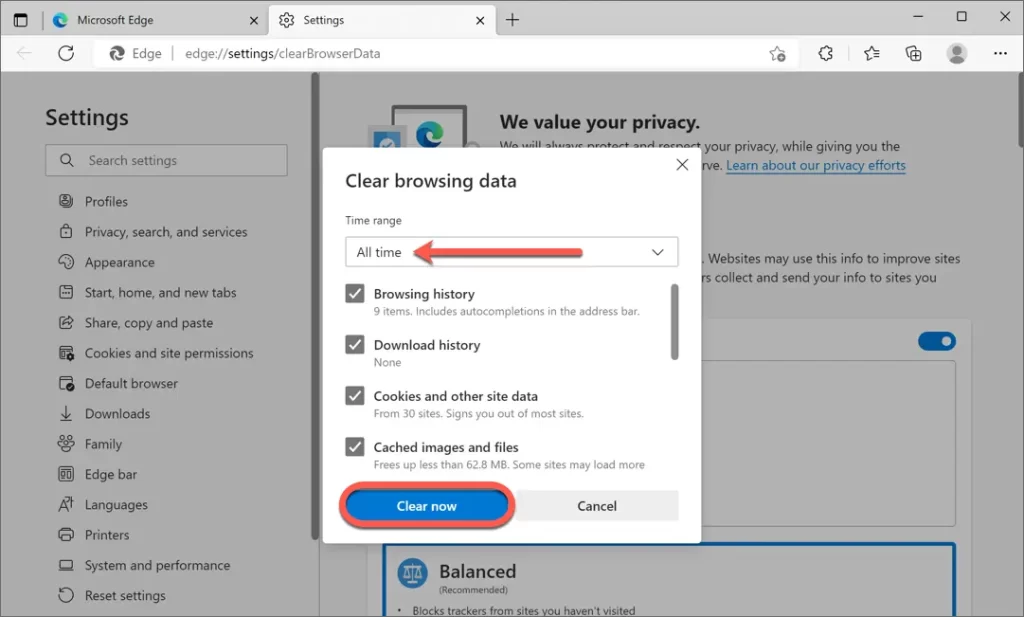
- Select “Choose what to clear,” then select the time range from the Time range dropdown menu to clear data.
- Lastly, select the type of browsing data you want to clear and click Clear Now.
After deleting the web browser’s cache and cookies, rerun QuickBooks Online and try sending the invoice to check if the issue is resolved. If you are missing invoices in QuickBooks sent items, move to the next solution.
You may read also : Fix QuickBooks is not showing network drives
Solution 8 – Save Your Invoice as a PDF and Send it through Another Email Address
If none of the above solutions work, you can save your invoice as a PDF and send it via email through business or another email address. To save the invoice as PDF, follow the steps mentioned below –
- Go to the Sales menu, move to the Invoices tab, and find the invoice.
- Click on the dropdown under the Action column, then choose Print, and click on the Download icon beside the Print icon.
- Finally, follow the on-screen prompts to save the invoice as a PDF file.
Once done, attach this file to the email you’ll send using QBO and check if it is sent successfully.
Conclusion
We hope this detailed guide helped you navigate the invoice email issues in QuickBooks. However, if these solutions don’t work and QuickBooks invoices are not being received, you will need additional assistance. You can contact the support team at 1.855.888.3080 for the best guidance in fixing the issue.
FAQs
How do you email invoices from QuickBooks Online?
You can send an invoice in an email from QBO using the instructions below –
1. Go to Sales, select Invoices, and find the invoice you wish to email.
2. Move to the Action column, select the drop-down arrow, and click Send.
3. Verify the information, include additional contacts from which you wish to receive the invoice, and select Send.
What alternate ways to send the invoice if QuickBooks invoices are not received?
If you are facing QuickBooks email delivery problems, you can follow the alternative ways given below to send the invoices –
1. You can save your form/invoice as a PDF file and email it to your business or another address.
2. For invoices or estimates, you can send your customers a link to their invoice/estimate through SMS or a messenger service. Select “Save and share link,” then click “Copy link” and paste it into your SMS/messenger service.
3. If you have a Gmail or G-suite email account, use the Send with Gmail feature to send QBO invoices from your address. To do this, you need to first connect the Gmail account to QuickBooks before sending the form.
4. Lastly, you can save your document as a PDF, print it, and mail it to your customers.
Can sending a copy of the invoice fix the QuickBooks email delivery issue?
If you can’t fix the email delivery problems in QBO by following the solutions above, try creating a duplicate invoice in the following manner –
1. Go to Sales, select All Sales or Invoices, and find the invoice you want to copy.
2. Select Edit and click Manage to open the settings panel.
3. In the Action box, select the dropdown and click Make a copy.
4. Finally, edit the invoice as needed and select Save
After saving the invoice copy, email it to the customer and delete the original invoice to avoid duplication.

Erica Watson is writing about accounting and bookkeeping for over 7+ years, making even the difficult technical topics easy to understand. She is skilled at creating content about popular accounting and tax softwares such as QuickBooks, Sage, Xero, Quicken, etc. Erica’s knowledge of such softwares allows her to create articles and guides that are both informative and easy to follow. Her writing builds trust with readers, thanks to her ability to explain things clearly while showing a real understanding of the industry.