When you use QB Payments to process a customer payment in the QuickBooks Online website and Desktop app, it can take a few days to get the money deposited in your bank account. However, with the QuickBooks Instant Deposit feature, you are able to receive funds into your bank account in less than 30 minutes. It enables you to receive payments to the bank account within a short time after payment has been cleared, rather than waiting for a certain period, usually 1- 3 days, for deposition.
But sometimes, you might face the issue of QuickBooks Instant Deposit not working. It can occur due to not processing customer payments for the day. It can hamper your workflow and important business processes. In this blog, we’ll cover the steps to resolve the Instant Deposit not working problem in QB Desktop and Online. First, let’s see how to set up Instant Deposit the right way to avoid facing any issues.
If you aren’t able to use the Instant Deposits in QuickBooks, follow the instructions in this guide to navigate through it. However, if you need a faster resolution, you can contact our experts at 1.855.888.3080 for direct guidance on QuickBooks Instant Deposit issues
Table of Contents
A Detailed Guide to Set Up QuickBooks Instant Deposit in Desktop – The Right Way
QuickBooks uses your debit card to deposit the money into your checking account. This card can be a Mastercard or Visa connected to a checking account at the credit union or the bank. Intuit only uses the debit card to facilitate the instant deposit. Any other fees or charges will be charged from your QB Payments bank account. So let us now see the steps to set up Instant Deposit in QB Desktop –
Add Your Debit Card to QB
- Open the QuickBooks Desktop App
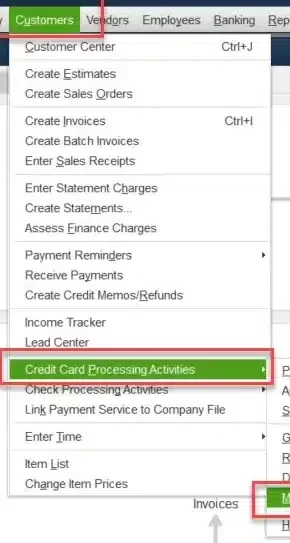
- Navigate to the Customers menu
- Then, click on the Credit Card Processing option

- Select Record Merchant Service Deposits
- On the home page of the Merchant Service Deposits window, navigate to the instant deposit banner
- Click on Get Set Up
- You’ll only see this option if you are logged in as the primary admin of your company
- Follow the steps on your screen and enter your debit card info
- Enter the confirmation code you receive to verify the account
Choose an Account to Record Instant Deposits
- You’ll be prompted to select your instant deposit account
- Choose Select Account at the prompt
- You can edit this selection by going to Change Deposit Settings
- Go to the Bank for Instant Deposits field
- Select your account
- You can also add a new account that would be added to your chart of accounts
- Click on Save Settings
See Your Available Funds
- Go to the Customers menu
- Click on Credit card processing
- Then, select Record Merchant Service Deposits
- Check your available balance in the instant deposit banner
Get an Instant Deposit
- Navigate to the Customers menu
- Click on Credit card processing
- Press Record Merchant Service Deposits
- Select Get it fast in the instant deposit banner
- Review the total amount with the associated fees in the Confirm Deposit window
- Click on Get it now to initiate your deposit
This would set up your QuickBooks Instant Deposit the correct way. You’ll get an email after QB successfully deposits the money. It can take up to 30 minutes, depending on your bank.
Set Up Automatic Instant Deposits in the QB Desktop Application
You can schedule instant deposits in the QB Desktop app for certain days of the week. QB checks and instantly deposits your entire available balance three times a day, those being 9 AM PT, 2 PM PT, and 9 PM PT. The steps to schedule automatic instant deposits are given below:
- Go to the Record Merchant Service Deposits window
- Click on Deposit Settings
- Press Change from the Schedule section
- Select the days you want an instant deposit for
- Select Save schedule
This would let you set up automatic instant deposits in the QB Desktop app.
What is the Correct Way to Set Up Instant Deposits in QuickBooks Online?
To get an instant deposit in QB Online the right way and avoid the QuickBooks Instant Deposit not working error, you must perform the detailed steps given below –
Add Your Debit Card or Bank Account in QB Online
- If you wish to add a debit card, ensure that it is a Visa or a Mastercard. Ensure it’s connected to your checking account or credit union
- If you have a QuickBooks Checking account, we set your QuickBooks checking debit card as your default
- This can let you get an instant deposit without processing fees
- You can’t connect prepaid bank cards, ATM’s, credit cards, or cash cards like PayPal
- You can’t keep multiple bank accounts or bank accounts on file for instant deposits
Set Up Your Debit Card or Bank Account
- Click on Get set up
- Follow the steps on your screen to add your debit card or bank info
- Enter the verification you would receive to verify your account
Request a One-Time Instant Deposit
- Go to the Instant Deposit section
- Click on Get it now
- Review the total and the fees associated
- Press Get it now
Review the Monthly Statements for Instant Deposits
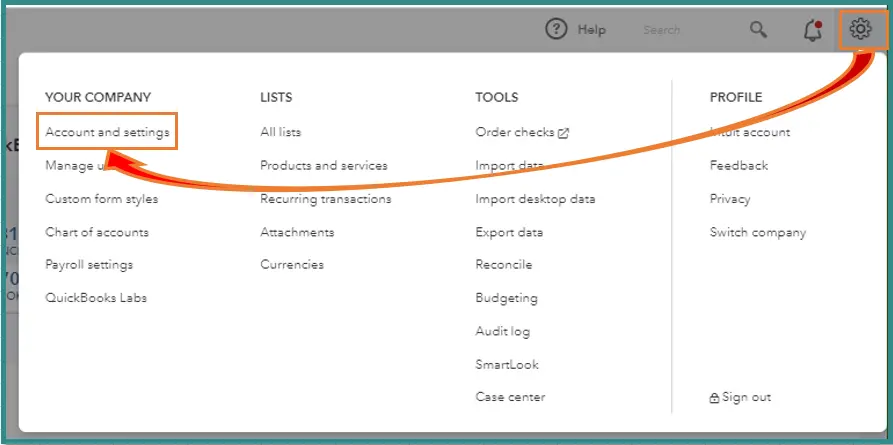
- Navigate to the Settings menu
- Click on Account and Settings
- Then, go to the Payments tab
- Select Documents
- Choose a monthly statement you wish to view
This would set up Instant Deposit in QuickBooks Online correctly.
Valid Steps to Schedule Automatic Instant Deposits in QuickBooks Online
QuickBooks Online users can also schedule automatic instant deposits for certain days of a week. QB checks and instantly deposits the entire available balance six times a day, those being:
- 6:15 AM PT
- 9:15 AM PT
- 11:15 AM PT
- 2:15 PM PT
- 5:15 PM PT
- 7:15 PM PT
The customer payments you receive between 2:15 and 3:15 PM PT can’t be scheduled for instant deposits. You will get them at a normal speed. You can set up instant deposits for other transactions using these steps:
- Click on Settings in QBO
- Then, select Account and Settings

- Go to the Payments tab
- Navigate to the Deposit Speed section
- Select the Set a schedule for instant deposits option
- Choose the days you want instant deposits for
- Click on Save schedule
This would set up automatic instant deposits in QB Online.
Learn More About the QuickBooks Payments Instant Deposits Feature
Some essential features of QB Payments Instant Deposits include the following –
- Intuit provides this option so users can instantly receive payments in their bank account or the checking account created in the app.
- Instant Deposits are available 24/7, including holidays and weekends.
- If users are making an Instant Deposit to a checking account created in QuickBooks, no fees or additional charges are applied. For other accounts, there is a 1% fee per transaction for sending Instant Deposits.
- Instant Deposits are subject to eligibility criteria, and new QB users can opt for delayed eligibility.
To know how to configure and enable QuickBooks Payments Instant Deposits, read the extensive steps provided below –
- First, ensure your QuickBooks Payments account is active, then go to Sales and select Deposits.
- Now, select Get Instant Deposit on the QuickBooks dashboard and choose Instant Deposit for eligible payments.
- Review the deposit details and associated fees and click the Get Deposit button to transfer funds instantly to your bank account.
QuickBooks Payments Instant Deposits can enhance businesses’ cash flow, and with standard processing, users have to wait for 3-5 days for ACH or Credit Card transactions. Let us now discuss the reasons why your QB instant deposit might not be working.
Factors that Can Cause the QuickBooks Instant Deposit Not Working Problem
Given below are the factors that can be the reason why your Instant Deposit is not working in QuickBooks Desktop and Online:
- The primary cause of Instant Deposit failures in QB is an insufficient balance in the Payments account. If this is the case, the processing period will have been extended, or at times, the funds will not be cleared, preventing you from receiving your deposit instantly.
- Problems with the balance or settings in your bank account, such as an improper account link or a discrepancy, also hinder the use of the Instant Deposit feature.
- In some cases, if QuickBooks does not recognize the bank details you provided or if your bank temporarily restricts your account, the instant deposit may not work.
- If you are trying to initiate Instant Deposits on weekends, bank holidays, or outside regular business hours, the request will not go through until the next business day.
- The limitations of the Instant Deposit feature vary by platform, and if you exceed the transaction limit set in QB, the deposit may not be processed.
- If QuickBooks is currently reviewing the payment or transaction, this is necessary for new users or large payments; it might not release funds for Instant Deposit.
- There are parameters like payment processing that may not work optimally if the software lacks improved fixes and enhancements.
- Lastly, technical issues with QuickBooks or its payment processing servers can also prevent the Instant Deposit feature from running correctly.
These are the potential causes of the QuickBooks Instant Deposit not working problem. Let us first learn how to fix it in QB Online.
Methods to Resolve the QuickBooks Instant Deposit isn’t Working Problem in QB Online
Listed below are the troubleshooting methods you can use to resolve the problem of Instant Deposit not working in QB Online:
Check Your Account Balances
You need sufficient funds in the payments account to process a transaction using the Instant Deposit feature; hence, a balance check is required in the following quick way –
- Start by logging into your QuickBooks account and navigating to the Payments section, which reflects your funds.
- In the section, check your fund balance to ensure there is enough available for the current transaction (1.75% of the instant deposit amount).
If the funds have not cleared or are pending, wait before using the Instant Deposit feature; otherwise, the deposit might fail.
Verify Bank Account Information
If the bank account information is incorrect or outdated, Instant Deposit in QuickBooks will fail. Thus, you must ensure your bank account information is correct and linked correctly to QB. If it’s not correct, you can change the instant deposit account with the steps given below:
- Go to the Settings menu
- Click on Account and Settings
- Navigate to the Payments tab
- Then, move to the Deposit Accounts section
- Press Change
- Review and enter your card or bank info
- Press Save
- Lastly, select Done
This would resolve the problem you were instant deposit issue you were dealing with.
Ensure It’s a Business Day
It goes without saying, but processing a transaction on weekends or a bank holiday is a sure-shot way to delay the payment or get it stuck. Hence, if your instant deposit does not clear, wait for a business day and process the transaction during operational hours to ensure the QuickBooks Instant Deposit isn’t working issue is rectified.
Review the Transaction Limits
If your Instant Deposit exceeds the QB transaction limits, you have to either wait for the limit to reset or request a manual deposit. To check your Instant Deposit limits, follow the detailed instructions below –
- Open QBO, go to the Payments section, and access the Settings tab.
- In the resulting window, check the current transaction limit and verify your Instant Deposit to ensure it isn’t exceeded.
If the limit is not exceeded but the Instant Deposit fails in QuickBooks, follow the next step.
Complete Payment Verification
If QuickBooks checks your payment, you will not be able to make an instant deposit until QuickBooks approves and verifies that it is free of any fraudulent activity. You must look for any account notifications or requests for additional information during verification. Once verification is complete, use the Instant Deposit feature to ensure the transaction is successful.
Practical Solutions to Perform If QuickBooks Instant Deposit is Not Working in QB Desktop
If you have activated Instant Deposit in QB Desktop, but the function won’t work, you must follow the troubleshooting solutions given below to fix it –
Update QuickBooks Desktop
If your application is outdated or you are using an older version, you won’t be able to activate or use the Instant Deposit function in QB. To fix the QuickBooks Instant Deposit not working issue, update the QB Desktop app with the steps given below:
- Open the QB Desktop app
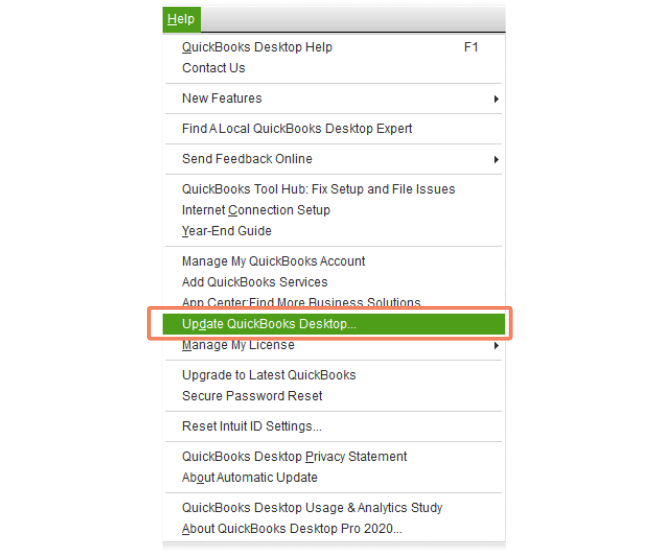
- Navigate to the Help menu
- Click on Update QuickBooks Desktop

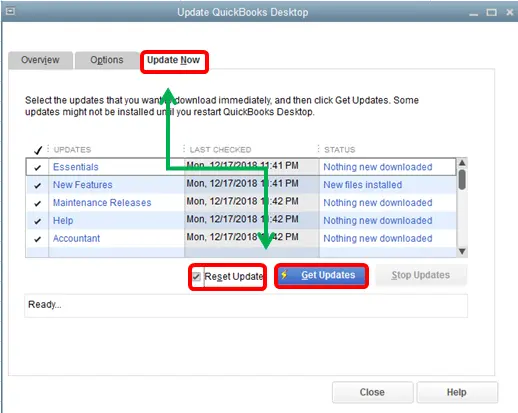
- Select Update Now
- Press the Get Updates option

- Close and reopen the QBDT app to install the updates.
This would fix the QuickBooks Instant Deposit not working issue.
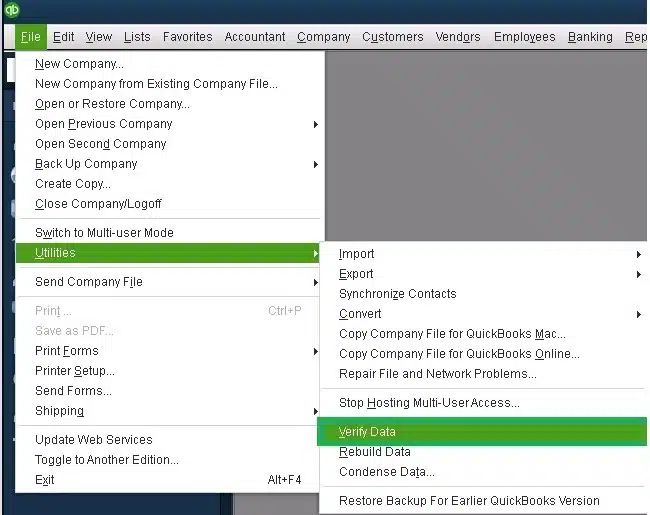
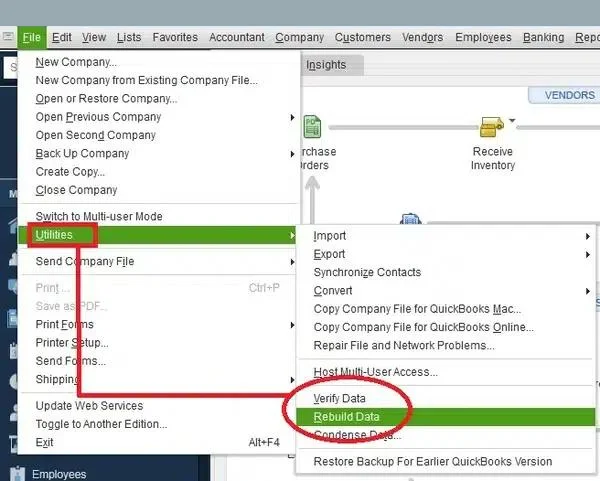
Use the Verify/Rebuild Data Utility
Data corruption or company file integrity issues can be the reason QuickBooks Instant Deposit is not working. You can use the QuickBooks Verify and Rebuild Data utility to detect data damage and fix the integrity problems in your company data with the steps given below:
- Open the File menu in QB Desktop
- Click on Utilities
- Select Verify Data

- Then, go to the File menu again
- Select Utilities
- Click on the Rebuild Data option

- QB will ask to create a backup before rebuilding your company file
- Hit OK
- A backup is required to rebuild the company file
- Choose where the backup would be saved
- Press OK
- Do not replace an existing backup file
- Enter a unique name in the File name field
- Press Save
- You would get the message stating Rebuild has completed
- Click on OK
After running the Verify/Rebuild tool, check if the Instant Deposit issues are resolved.
QuickBooks Instant Deposit Not Working – A Quick View Table
Given in the table below is a concise summary of this blog on the topic of the QuickBooks Instant Deposit is not working problem:
| Description | The QuickBooks Instant Deposit not working issue is one that many users face, which can render them unable to receive their funds immediately. This can hamper your workflow and important business processes. |
| Way to set it up in QBO | Add your debit card or bank account, set up your debit card or bank account, request a one-time instant deposit, and review the monthly statements for instant deposit. |
| Way to set it up in QBDT | Add your debit card to QB, choose an account to record instant deposits, check your available funds, and get an instant deposit. |
| Set up automatic instant deposits in QBO | Click on Settings, go to Account and Settings, then to the Payments tab, go to the Deposit Speed section, and Set a schedule for instant deposits. |
| Set up automatic instant deposits in QBDT | Navigate to the Record Merchant Service Deposit window, select Deposit Settings, press Change from the Schedule, and select a date you want an instant deposit for. |
| Methods to fix it in QBO | Check your account balances, verify the bank account info, ensure it’s a business day, review the transaction limits, and complete payment verification. |
| Methods to fix it in QBDT | Update the QB Desktop app, and use the verify and rebuild data utility. |
Conclusion
The QuickBooks Instant Deposit not working problem can cause you to not receive your funds on time, in turn hampering your workflow and important business processes. We have discussed the causes of this issue, along with the methods needed to troubleshoot it, in this blog. If you are still facing the same problem, contact our experts at 1-855-888-3080 today!
FAQs
What are the correct steps to turn off instant deposits in QB Online?
To disable the automatic instant deposit feature in QuickBooks Online, follow the steps given below:
1. Select the QBO Gear icon
2. Click Account and Settings
3. Choose the Payments tab.
4. Then, select Deposit Speed
5. Click on Change
6. Remove the check for all the marked days.
7. Leave all the days off, then click the green Save schedule button to apply the new settings.
Why is my QBDT application taking a long time to deposit the money?
If you notice a delay in depositing money, you might be new to the QuickBooks Payments system, as your initial batch of payments may take up to five business days to process while your account is being set up. If the payment takes a long time even after this initial setup period, the following reasons might be responsible –
1. QuickBooks may hold certain payments for review due to potential fraudulent activity, especially for unusual transactions.
2. Your payment method determines how long the deposit will take, and processes like ACH transfers may take longer than credit card payments.
3. Finally, once QuickBooks sends the funds to your bank, it might take additional processing time from the bank’s side before the money appears in your account.
What are the correct steps to delete or undo deposits in my QuickBooks Desktop application?
You can delete, remove, or undo a deposit in QB Desktop by using the process mentioned below –
1. Select the Reports menu
2. Click on Report Center
3. Move to the Banking section
4. Find the Deposit Detail report
5. Then, select the Run icon
6. Choose the deposit you want to delete
7. Now, move to the Make Deposits section
8. Review the payments
9. Confirm that you need to delete/remove the deposit.
10. Right-click in the window
11. Select the Delete deposit option
12. Press OK to confirm.
Are there any measures to prevent future issues with the QuickBooks Instant Deposit feature?
1. Ensure your software is regularly updated to maintain compatibility with the latest features, fixes, and security protocols.
2. Users must keep track of business days and banking hours when initiating Instant Deposits to ensure they are processed without delay or interruptions.
3. Monitoring your QuickBooks Payments is essential to account for pending transactions, verify processes, and identify any underlying issues.
4. Lastly, users must review the transaction limits and plan their deposits accordingly to ensure they do not exceed the allowed thresholds.
How to turn on instant deposit in QuickBooks Online?
To turn on instant deposit in QuickBooks Online, follow these steps:
1. Firstly, add your debit card or banking information
2. Then, set up your debit card or banking information
3. Request a one-time instant deposit
4. Review the monthly statements for instant Deposit
5. If you wish, schedule automatic instant deposits in QB Desktop
Why is my QuickBooks payment not available for instant deposit?
Your QuickBooks payment might not be available for instant deposit due to these reasons:
1. You don’t have enough balance in the payments section
2. Your banking information is incorrect
3. It’s not a business day
4. The payment is incomplete

Erica Watson is writing about accounting and bookkeeping for over 7+ years, making even the difficult technical topics easy to understand. She is skilled at creating content about popular accounting and tax softwares such as QuickBooks, Sage, Xero, Quicken, etc. Erica’s knowledge of such softwares allows her to create articles and guides that are both informative and easy to follow. Her writing builds trust with readers, thanks to her ability to explain things clearly while showing a real understanding of the industry.


