QuickBooks Update Error 1603 can strike while installing QuickBooks Desktop or right after opening it after the installation. This comprehensive guide will discuss the most common reason for this installation error in QuickBooks and solutions that can rectify it in the shortest time possible.
You may experience QuickBooks Error 1603 while installing or updating the program and using the QuickBooks Tool hub; you may quickly fix it. However, you must first make sure that Windows and QuickBooks are both up to date. To ensure a smooth QuickBooks installation, you must also ensure to fix the Microsoft framework and components. Here is how this error appears on your system:
Error message: The update installation has run into an internal fault, according to error code 1603.
Let’s now move forward and figure out why this error arises in QuickBooks and what must be done to resolve it like a pro.
If you have any sort of doubts regarding “QuickBooks Update Error 1603”, you may contact experts at Proadvisor solutions’ Toll-free Number +1.855.888.3080 for the best consultation.
Table of Contents
What is QuickBooks Installation Error 1603?
“QuickBooks Error 1603: The Update Installer has Encountered an Internal Error” is one error signifying a problem with the installation of Microsoft .NET Framework, a damaged Windows installer, or QuickBooks Desktop Installation.
This error generally appears while installing QuickBooks Desktop or updating it. However, it does not mean that this error has messed up the user’s accounting data. Instead, it only means one’s having issues with the QuickBooks installer or update files.
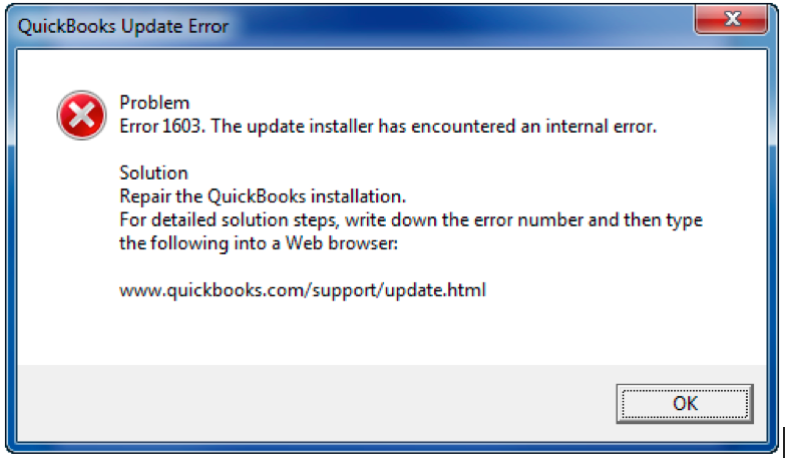
Some of the most common error messages associated with this error are mentioned below.

[QuickBooks Update Error 1603] There was a problem installing QuickBooks with "Microsoft .NET Framework 1.1.."
OR
[Install Warning 1603]: Error installing QuickBooks with "Microsoft .NET Framework.”
OR
[Install Error code 1603]: Unable to Apply the patch.

As you are now completely familiar with this error, lets move forward and understand the common causes for it appearence.
Recommend to Read: QuickBooks Desktop Update Error 12152
General Causes of QuickBooks Error Code 1603
QuickBooks error 1603 is triggered by issues in Microsoft Installer and .NET Framework, bugs in Windows updates, and restrictions by Windows security policies. Below-mentioned are all these causes given in a listicle format.
- A problematic Microsoft Installer or a QuickBooks Installer.
- It is also triggered when there is a problem with the installation of the Microsoft .NET Framework.
- If the user is using the Windows 10 version of Microsoft OS, then you might have installed the ‘Creator Update.’
- Last but not least, if you are on Windows OS, you may be getting the error due to intimidation of Windows Security Policies.
So, we have walked through the description of the issue arising and its causes. It’s now time for us to hop on to the remedial steps we need to take in order to eradicate the QuickBooks Error 1603.
Prerequisites Before Fixing QuickBooks Desktop Error 1603
Before diving into troubleshooting steps for QuickBooks error 1603 when updating, ensure the following:
- The solutions mentioned below may help you treat the installation issues causing the error.
- If you are not confident about implementing these steps, consult a professional team straightaway and prevent data loss.
- You can contact your computer manufacturer or a Windows expert for technical assistance.
- If the issues persist after implementing these methods, knock on the doors of professional QB consultants.
Now, let’s look into the essential solutions that can help bring down this error in no time.
Solution 1:- Download and Ise the Install Diagnostic Tool From Tool Hub
#1: Downloading and Installing QuickBooks Tool Hub
To fix some general errors, QuickBooks Tool Hub is precisely what a user needs to get rid of many issues.
- Exit ‘QuickBooks Desktop’.
- You need to download QuickBooks Tool Hub from HERE; the latest version available would be optimum. Remember to download it in a directory where it will be easily accessible later (For Instance- Desktop or Downloads).
- If you already have one, check the version by clicking on the ‘Home’ tab. Here, you will need to look at the bottom, where you will find the version of QuickBooks Tool Hub.
- Go to the destination folder where you downloaded QuickBooks Tool Hub. Right-click and select ‘Open’ from the drop-down menu.
- QuickBooks Tool Hub Installation process begins. You need to follow the directions as demonstrated on the installer on-screen to continue with the installation. Read the terms and conditions applicable and mark them as accepted
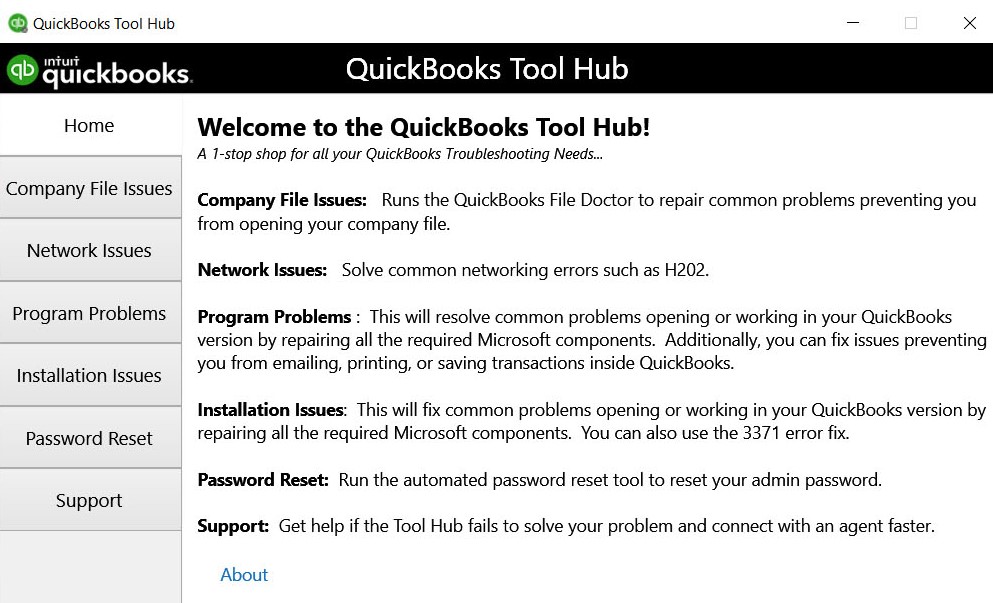
- Once it’s done, you will see the application being installed. When the installation finishes, right-click and select ‘Open’ to start QuickBooks Tool Hub.
(Unable to locate the Tool Hub icon? no worries! Just go to windows search and key in ‘QuickBooks Tool Hub’, and now you will get it.)
#2: Run QuickBooks Install Diagnostic Tool
- Start ‘Quick Books Tool Hub,’ as mentioned earlier.
- Inside ‘QuickBooks Tool Hub,’ choose ‘Installation Issues.’
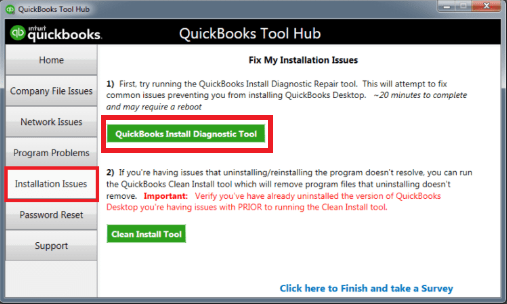
- Go to ‘QuickBooks Install Diagnostic Tool.’ Allow it to run on its own; it takes time somewhere around 20 minutes to diagnose the anomalies, if any.
- Once it’s done, reboot the PC.
Solution-2: Launch and then update the Microsoft Windows
Updates from Windows are often helpful in rectifying Installation-related errors.
- Go to ‘Start Menu.
- Select ‘Control Panel’ from the Start Menu.
- Scroll down the list of settings inside the Control Panel to find ‘Windows Update.’ Click on ‘Windows Update.’
- Under the ‘Windows Update,’ select ‘Check for Updates. Your PC will start looking for available updates by now. If there are any, they will begin downloading.
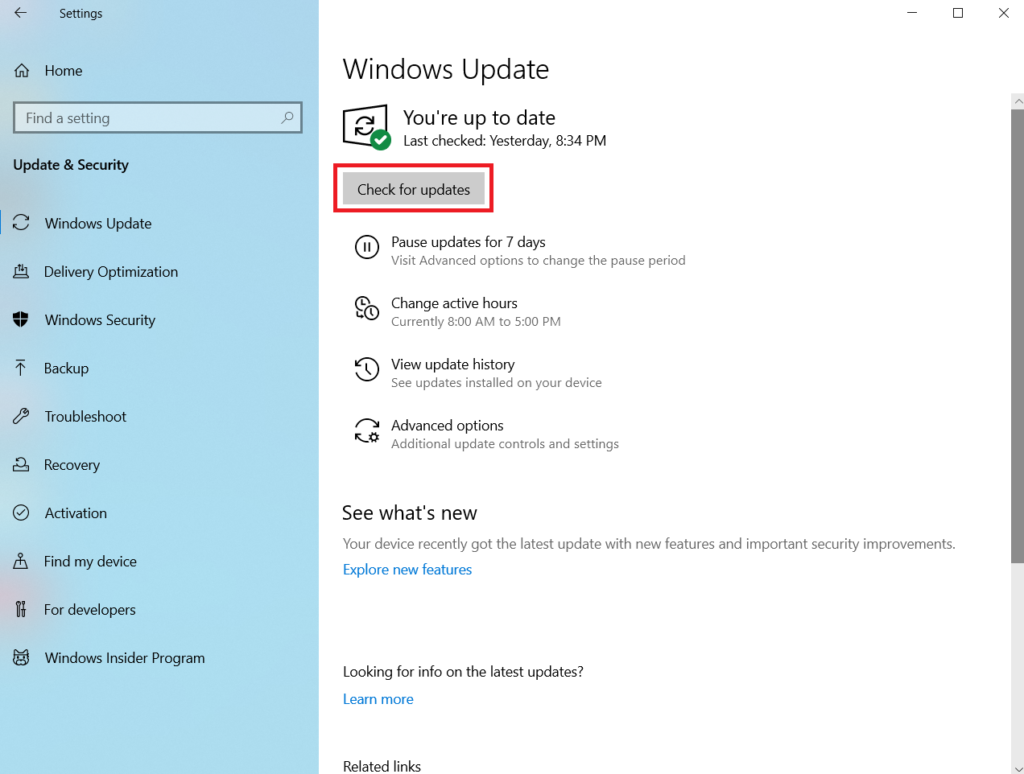
- Once updates are installed, Reboot the PC.
Solution-3: Fix Windows Components Manually
If the above issue persists, all you need to do now is fix Windows components manually. However, you should either possess an IT professional. You might also seek support from Microsoft.
# 1: Repair the Microsoft .NET Framework program
- Exit the QuickBooks Desktop.
- Next, press the Windows Button to open the Start menu, then Search For “Program and Feature.”
- In the Program and Feature tab, select the Microsoft Framework and then choose “Uninstall/ Change. “
- Select the Repair Microsoft .NET Framework option and then click on Next.
- Follow the on-screen steps appropriately.
- Once the Repair process ends, restart the computer.
- Start the QuickBooks Desktop and open your QuickBooks Data File.
# 2: Reinstall the .NET Program
- Open the “Start Menu“.
- Type “Program and Feature” & then look for the installed .NET Framework version.
- Now, Click on “Uninstall/Changes“.
- Follow the instructions properly to uninstall it.
- Once the uninstall process is finished, then you have to visit the Microsoft .NET Framework download link.
- In The end, reboot the system, start the QuickBooks Desktop, and open the company file.
Solution-4: Use the Selective Startup Mode to Install QB
If the third-party apps are acting as barriers for QuickBooks Desktop Installation, for instance, antivirus software such as Bit Defender, you may need to run the installation in the selective startup (safe mode).
#1: Preparation of Data Backup
A user must ensure that one has a backup of data that is required for later usage.
- A backup of the company’s data should be extracted and secured by the user.
- Prepare a backup copy of your QuickBooks Desktop product and related information such as license number.
#2: Start your Computer in Selective Startup Mode
To ensure that no other program interrupts QuickBooks installation, you need to switch to ‘Selective Startup’ mode. If you can’t do it yourself due to a suitable reason, make someone do it for you, such as your PC manufacturer or another IT expert.
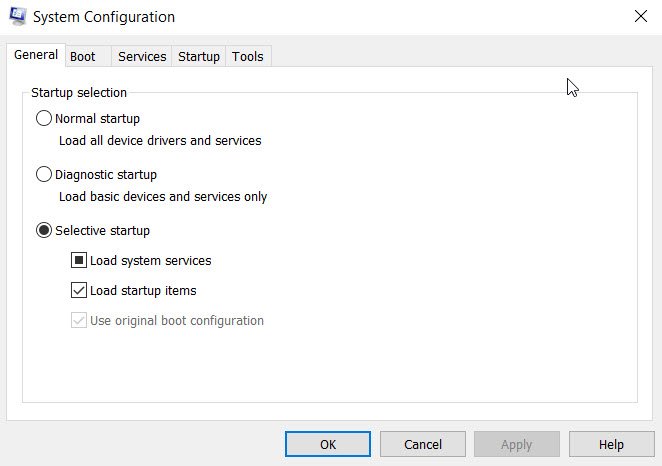
- Press keys Windows’ + ‘R’ simultaneously to begin the ‘Run’ window.
- In the empty field, type ‘MSConfig.’ Click ‘OK’.
- Go to ‘Services’, check the ‘Hide all Microsoft services.
- Click ‘Disable All’.
- Make sure to uncheck ‘Hide all Microsoft services.
- From the list of services, verify the ‘Windows Installer’ checkbox is checked.
- Click ‘OK’.
- From the System, Configuration Window selects ‘Reset’ when prompted.
Recommended to Read: Fix Balance sheet out of balance in QuickBooks
Solution-5: Close the QB and then Completely Uninstall it from your PC
- To open the Run window, press the Windows and R keys simultaneously.
- You have to open the Control Panel now, and to do so, type the control panel into the search bar of the Run window and click ok.
- Then, move to the Programs and Features option.
- As you can see all the programs installed on your system, you can also see the QuickBooks among those.
- Click on it, and you will be provided with the Uninstall/Change option.
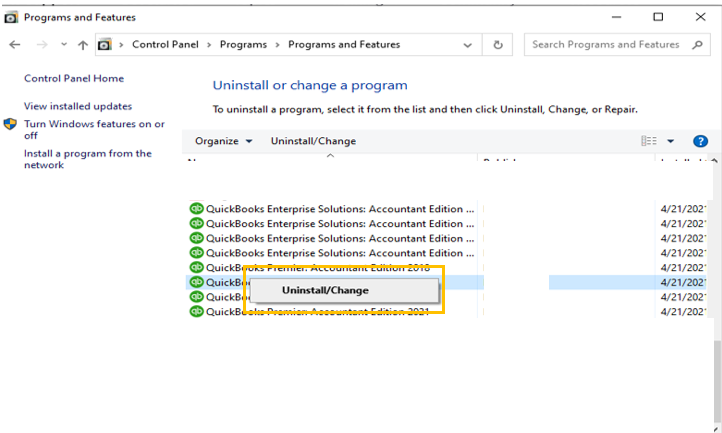
- At last, Uninstall it from your system.
Also See : What is error code 15241 in payroll?
Solution-6: Download and Run the QBinstalltool.exe file
- Download the ‘QBinstallTool.exe‘ from a valid location to avoid pirated or corrupted files.
- Then install it and save it on your desktop.
- You can now run the QuickBooks install diagnostic tool by clicking on this file.
Solution-7: Fix the damaged MSXML 4.0
- Install the QuickBooks through ‘CD.’
- Insert the CD into the provided slot of your system.
- Close the QuickBooks installation if you were installing the same.
- Then, follow the on-screen instructions to start the MSXML installation for your OS.
- How can you fix QuickBooks Update Error 1603 on Windows 10, Windows 7, and Windows XP?
- Open the search bar and enter the following text: msiexec.exe /forum ‘d:\QBOOKS\msxml.MSI’. Hit the Enter button after that.
- If the file is not located on a D drive, replace the location with another drive where you have it.
- Follow the same steps for Windows 7 and XP.
Solution-8: Run Windows Installer Service
- Go through the Windows control panel and select the system and security option.
- Now, choose the Administrative tool and double-click on the services option.
- Look out for the window installer option in the services tab.
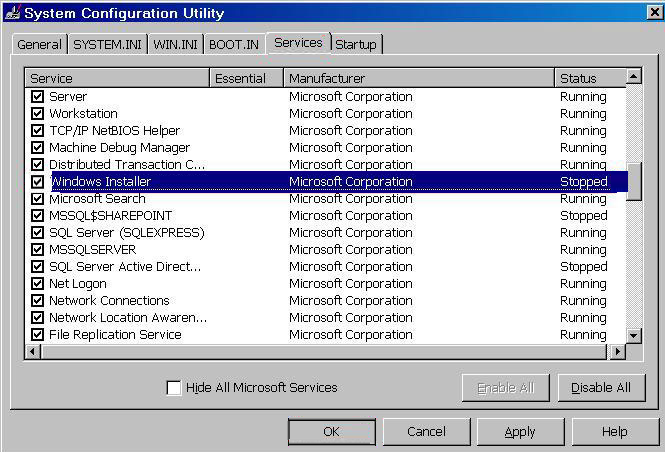
- First, disable the service and then enable it to restart the Window installer service.
Solution- 9: Configure the Device’s Security Settings
Installing applications can become troublesome when the security settings are incorrect. Therefore, undertake the following actions to reconfigure the settings and permit QuickBooks to update successfully
- Log in to the computer with the Administrator credentials (username and password).
- From the Windows icon on the keyboard, open the Start menu and type gpedit.msc.
- When the following window appears, choose Computer Configuration > Administrative Templates.
- Then, opt for Windows Components and Windows Installer.
- Next, hit the Prohibit User installs option with a double-click.
- Make changes by clicking the Not Configured option > OK.
- Again, press OK and attempt to reinstall QuickBooks.
Solution- 10: Modify the .ND and .TLG File Names
The QuickBooks files need to be repaired to address the QuickBooks Update error 1603.
- Go to the QuickBooks File Directory and search for the files with the .ND and .TLG extensions to access them.
- Right-click one of the files and select Rename to add .OLD at the end of the file name as a suffix.
- Now, repeat this step for all the .ND and .TLG files to repair the damage and rectify the error.
Solution- 11: Run QuickBooks Tool Utility and Activate the QBFD Tool
You can fix the company file and network issues by running the file doctor.
- Open the QuickBooks Tool Hub and run the QuickBooks File Doctor from the Company File Issues tab.
- Browse your company file and select the Check your File and Network option to initiate the repair process.
- Let the tool run, and once done, rerun QuickBooks and check the status of the error code.
Conclusion
Any user can easily troubleshoot the QuickBooks Update Error 1603 using the steps provided above. However, if you are dealing with any technical failures or are unable to counter the QuickBooks error due to any reason, we have a pool of talented and promising support experts onboard for you available 24/7 on Proadvisor solutions Helpdesk Number +1.855.888.3080.
FAQs
What error did messages flash on the screen when QB 1603 attacks the system?
When QB error 1603 infects the system, the following error messages appear:
1. Error Status 1603: Cannot apply the patch.
2. Error Status 1603: The update installer faced an internal error.
3. MSI returned 1603: A fatal error occurred during the installation.
4. Install Error 1642: An error installing the Microsoft .NET Framework emerged while installing QuickBooks.
5. Install Error 1603: A problem arose while installing Microsoft .NET Framework.
Where does Error 1603 QuickBooks take place?
QuickBooks error 1603 can attack any system, including Windows XP, 10, 7, 8, Vista, etc.
What are some less common reasons why QuickBooks Update Error 1603 strikes?
Many times, the QuickBooks software program experiences glitches and issues that lead to errors. Some of these errors are unexpected and arise out of nowhere. There can be a few possible reasons why the error pops up in your QuickBooks Desktop, which we have discussed in this article. If you are encountering the QuickBooks error code 1603, we have provided some reliable steps to troubleshoot this error effectively.
You may read also :
QuickBooks Subscription Has Lapsed – How to Renew It
Fix QuickBooks File Doctor Not Working or Won’t Open Issue
How to transfer QuickBooks to a new computer
Fix QuickBooks error 6189 and 816
QuickBooks Detected that a component required to create pdf

Erica Watson is writing about accounting and bookkeeping for over 7+ years, making even the difficult technical topics easy to understand. She is skilled at creating content about popular accounting and tax softwares such as QuickBooks, Sage, Xero, Quicken, etc. Erica’s knowledge of such softwares allows her to create articles and guides that are both informative and easy to follow. Her writing builds trust with readers, thanks to her ability to explain things clearly while showing a real understanding of the industry.

