Are you facing an issue where QuickBooks data is missing after update? This common issue can occur due to a corrupted company file or connectivity issues, among other reasons. It can lead to the risk of losing essential data, so it needs to be fixed on time. Follow this article till the end to learn how to find and recover your missing QB data.
Missing crucial QuickBooks data after an update is a critical issue that must be addressed on time, as it can lead to permanent data loss. If you require immediate assistance fixing the issue, contact our team of professionals at 1.855.888.3080.
Table of Contents
Reasons Why All QuickBooks Data is Gone After Update
There can be several reasons why QuickBooks data missing after update. Before troubleshooting this issue, you must learn about these reasons for better clarity. The following list of reasons is responsible for the missing data issue in QB –
- Damage to the company file and data integrity issues can lead to missing data.
- You have condensed the QB data recently, which can delete info before a particular date.
- If someone else on the network works on a different file, the missing data might sometimes be stored in another company file.
- The backup file in QB is frequently moved from one location to another.
- There are internet connection issues, or the connection was disrupted while backing up QB data.
- You have recently upgraded QuickBooks or moved to a new device, and some data has not been restored.
- Your recent QuickBooks data backup was unsuccessful, or it was accidentally deleted.
- QuickBooks is incompatible with the new system, leading to missing records in the data backup.
- You have moved the company file to another location, and QuickBooks is still searching for the file in its default location.
- The file access permissions might be incorrect during or after updating QuickBooks.
- Software glitches and malware infections in the PC can be other reasons your QB data is missing.
- If QuickBooks is damaged or incorrectly installed on the new PC, it can lead to missing data or invoices.
These are some of the leading causes behind the QuickBooks Data Missing After Update Issue. Now, in the next section, let’s learn how to fix this issue with practical solutions.
Practical Solutions to Perform When QuickBooks Data Disappeared After Update
Until this issue is resolved, you risk permanently losing your QB data. Thus, after understanding the reasons behind this issue, troubleshoot it by performing the solutions given below –
Solution 1 – Review the Audit Trail Report
You need to check the Audit Trail Report, which contains all the transactions recorded in the company file. These transactions include the deleted ones; thus, the report can help find all past transactions and their changes. Follow the steps given below to review the Audit Trail Report and find the QuickBooks data lost after the update –
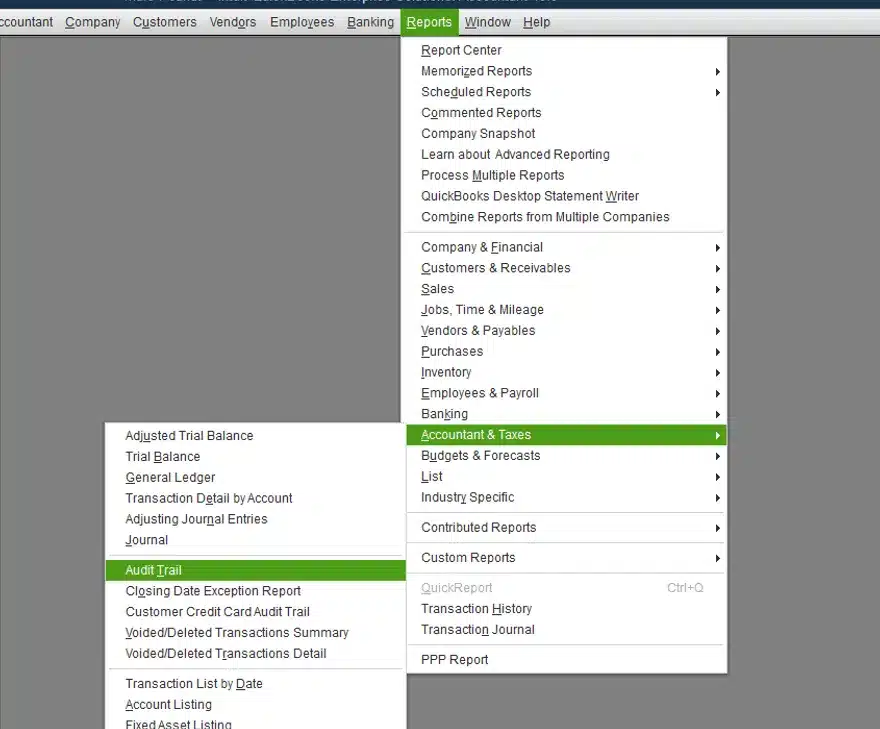
- Open the Reports menu in QBDT, select Accountant & Taxes, and choose the Audit Trail at the end.
- Customize the report to suit your needs in the audit trail location, then click Customized Report at the top of the report.
- Further, move to the Filters tab and add filters, like the Transaction Type, Name, and Date, to find your transaction.
- Next, locate the person linked to the transaction on a specific date and hit OK to view the report.
- Now, you will see various items and some lines with slight changes to the same transactions.
- Look for a bold section highlighting the parts of transactions that were changed and saved from their previous amount, then select the Last Modified By column.
- Lastly, find which users were logged into QuickBooks when the modifications were made and look for missing transactions after the QB update.
If you cannot find the missing transactions by reviewing the Audit Trail Report, proceed to the next troubleshooting solution.
Solution 2 – Check for Data Condensation
When you condense your data, it can remove info before a specific date to reduce the file size. This can sometimes lead to missing data; thus, you need to inspect for data condensation as follows –
- Firstly, open QuickBooks Desktop and press the F2 key to access the Product Information window.
- Wait for the Condense Information section to appear on the right, then check this section to determine if the data has been condensed. Also, check the last run and last payroll deleted date.
Once the data is inspected for condensation, check if the missing data is found. Move to the next solution if you still can’t find the missing data.
Solution 3 – Locate the Company File and Move it to its Default Location
You might find QuickBooks data has disappeared after the update if QuickBooks cannot find the company file at its default location. This can happen if the file is moved to another location and the new location is not updated in QB. To fix this issue and find the missing data, move the company file to its default location using the instructions below –
- Open the search panel, type your company file extension (.qbw) with an asterisk (*) mark at the start to narrow down the search, and go to the company file location.
- Right-click on the data file, select Copy, and follow this path – C: Users\Public\PublicDocuments\Intuit\QuickBooks20XX\CompanyFiles.
- Lastly, paste the company file in this location and try opening it in QB Desktop in the following manner –
- Move to the File menu in QuickBooks and click Open or Restore company.
- Select Open a company file, hit Next, then choose your data file and click Open.
Now check if all the missing data is found after moving the file to its original location. However, if you are still missing QuickBooks data after the update, move to the next troubleshooting solution.
Solution 4 – Configure the Windows File & Folder Permissions
You might find missing data if QuickBooks is unable to connect with the company file after the update. This can happen if the Windows file permissions are incorrect or reset after the update. To fix the missing data issue, configure the permissions in the following manner –
- Close QuickBooks, follow this path – C:\ProgramFiles\Intuit, and right-click the Intuit folder.
- Click Properties, move to the Security tab, then select Advanced.
- If the ownership of the Intuit folder is mentioned as SYSTEM or anything else, change it to USERS in the following manner –
- Select Advanced Security Settings in the Intuit Permissions window, and click Change.
- Type Users in the text field, hit Enter, then mark the Replace owner on the sub-containers and objects checkbox.
- Select Users (PC Name\Users), click Full Control, and select OK to proceed.
- Further, go to the Security tab on the Intuit Properties window and click Edit.
- Mark the Full Control checkbox for your User Account, click OK, and exit the Intuit Properties window.
Now, try opening the company file in QuickBooks Desktop again and check if you can find the data. However, if QuickBooks data is still missing, move to the next solution.
Solution 5 – Look for Missing Transactions in Another Company File
Sometimes, another company file might contain the missing transactions. This can happen if someone on the network works on a different file. In such a case, you can look for the missing data by checking another company file as follows –
- Launch QuickBooks Desktop, press the F2 key to open the Product Information window and check the information about the current company file.
- Scroll down the window to view the File Information section, then note down the File Path of the file you’re currently using.
- Ensure the path is the same as your regular company file where everyone is working, then perform these steps on all the network computers.
If you find a different file path on any of the PCs on the network, look for missing transactions in the company file saved in that other location. However, if QuickBooks data is still missing after the update, move to the next solution and check the network connectivity.
Solution 6 – Ping the Server to Check the Network Connectivity
Network connectivity issues can be another reason why your QuickBooks data is lost after an update. This happens if you try to access the company file from the network, but the workstation isn’t connected to the server. To fix the connection issue, first ping the server in the following manner –
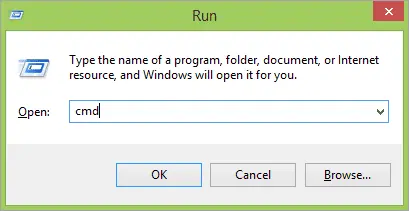
- Press the Windows + R keys to open the Run window, then type the CMD command and hit OK.
- Next, enter ‘ipconfig/all,’ press Enter, and note down the host/server name.
- Type ping [name of your server], then hit Enter, and check the reply for the data packets.
If you receive replies for each packet in a timely manner, the connection between the server and workstation is reliable. However, you must fix the Database Server Manager issues in the next section if there are slow replies or packet loss.
Resolve Database Server Manager Issues
To fix the connection problems while locating your company files, rectify the multi-user network issues that arise when the QuickBooks Database Server Manager is not running correctly. Follow the steps below to ensure that the DBSM isn’t restricted by antivirus and repair the .ND (Network Data) file –
- Press the Windows + E keys to open Windows File Explorer and follow the path – C: Users\Public\PublicDocuments\Intuit\QuickBooks20XX.
- Next, right-click the damaged .ND file inside the folder, select Rename and add ‘.old’ after the extension in the file name.
- Press Enter to save the modified file name, then run QuickBooks DBSM and go to the Scan Folders menu.
- Further, select Browse and specify the folder location where you renamed the Network Descriptor (.nd) file.
- Click Start Scan, and once the folder contents are scanned, try accessing the company file on your workstation.
Once the network issues are resolved, check if you have the lost data back in QuickBooks. However, if the QuickBooks Missing Data After Update Issue persists, try to restore the data backup using the next solution.
Solution 7 – Restore the Company File Backup
If your company data is lost after the update, you can restore the backup to fix the issue. Before restoring the company file backup, make sure the backup file is stored on the local hard drive, then go through the following steps –
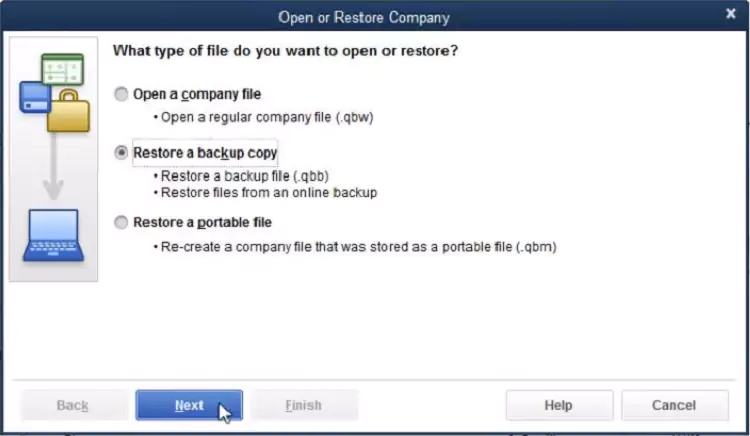
- Launch QuickBooks Desktop, go to the File menu, and select the Open or Restore Company option.
- Select Restore a backup copy, click Next, select Local Backup, and click Next again.
- Browse the PC to find the backup company file, which should look like [company name].qbb, then select a folder to save the restored version.
- After finding a suitable folder, click Open, and hit Save when ready.
Note: If you open the backup file in the same folder as your existing company file, you might risk overwriting the data. To avoid this, rename your existing company file or the backup file to ensure the names are unique. Another option is to save the backup in a separate folder to avoid the risk of overwriting.
- If you see any messages about overwriting the data, select the option that suits your needs, and do not overwrite anything unless you are sure.
After restoring the backup file, rerun QuickBooks and access your data file. If the company data is still lost after the update, run the Verify/Rebuild Data tool in the next solution.
Solution 8 – Use QuickBooks Verify/Rebuild Data Utility
Damaged or corrupted company files can be a reason why your QuickBooks data is lost after the update. To address the data integrity issues, run the QB Verify/Rebuild Data tool by implementing the following steps –
Step 1 – Verify the Company Data

You can use the Verify Data tool to verify the company file and identify data integrity issues by following the steps given below –
- Firstly, open the Window, select Close All, then move to the File section.
- Next, click Utilities and select the Verify Data tool, then take the following actions as per the results after verifying the data –
- If no issues are detected in your company data, it confirms integrity, and you don’t need to proceed with the following steps.
- If you receive an error message after verifying the data, search it on our website and find effective solutions to fix it.
- If you get the “company data has lost integrity” message, the data file is damaged or corrupted, and you need to rebuild it to resolve the issue.
Once the data is verified, run the Rebuild Data tool in step 2 below.
Step 2 – Rebuild the Company Data

You can use the Rebuild Data tool to rebuild the company data and fix the integrity problems in the following manner –
- Launch QuickBooks Desktop, navigate to the File menu, and select the Utilities tab.
- Now, select Rebuild Data, and when QB asks to create a backup, click OK to create the company file backup.
- Save the backup file to an easily accessible location, hit OK, and do not replace another one. Then, enter a new name in the File Name field and hit Save to confirm the name.
- Next, click OK when you get the “Rebuild has completed” message, and go to the File tab in QuickBooks.
- Click Utilities and select the Verify Data tool to check for additional data damage, then take the following actions –
- If the Verify Data tool finds more data damage, troubleshoot the issues manually. You can search for the issue/error in the qbwin.log file and find practical solutions on our website.
- However, if no data issues are found, restore the file backup by clicking Open or Restore Company from the File menu.
Note: Do not replace your QB company file while creating the backup version. You must re-enter the information after the backup file is created.
After running the tool, rerun QuickBooks and open the company file. If the data is still missing, follow the next solution to recover the missing QuickBooks data after the update.
Solution 9 – Recover Missing QB Data with Auto Data Recovery
If none of the above solutions help, you can recover the missing data using Auto Data Recovery. The ADR utility helps recover all or almost all of your corrupted or missing data in the following two ways –
- Restoring the lost/missing transactions using the Transaction Log file and a copy of your company data file.
- Recovering all the missing transactions except the last few hours using a copy of the company file and the Transaction Log file.
Before running the ADR tool, ensure QuickBooks is updated and the file size limitations are followed. If the file size exceeds 1.5 GB, QB will not generate the ADR file. Moreover, you can use the ADR tool in QuickBooks Pro, Premier, and Enterprise and not in the Accountant Editions.
Now, let’s run the ADR tool and recover missing QuickBooks data after the update in the following manner –
Use the Transaction Log File & the ADR Version of the Company File to Recover Recent Transactions
You can use the QuickBooks Transaction Log file and the ADR version of the company file to recover all recent transactions by implementing the following steps –
- Firstly, create a new QBTest folder on the computer and open the company file folder. If you don’t know the company file location, find the location in the Product Information window (press F2 or Ctrl+1) or go to the No Company Open window.
- Locate the .TLG file with the same name as your company file, but if you can’t find it, modify Windows settings to display the extensions of the file using the instructions below –
- Open Windows File Explorer by pressing the Windows + E keys and click Organize.
- Next, click Folder and search options, select Hide extensions for known file types, and hit Apply & OK to confirm the action.
- Further, copy the corresponding .TLG file of your company file and paste it to the QBTest folder created in step 1.
- Open the QuickBooksAutoDataRecovery folder, which has the same location as your company file and copy the .QBW.adr file.
- Paste the .QBW.adr file into the QBTEST folder, and you will now have both the .QBW.adr and .TLG files in this folder.
- Next, right-click the .QBW.adr file, click Rename, remove .adr from the end of the file name, and hit Enter.
- Open QBDT, open the company file saved in your QBTest folder and review the transactions.
- Use the account register to ensure all transactions are present, then go to the File tab.
- Now, select the Utilities option and click Verify Data to verify the data integrity of the recovered file.
- If the recovered copy of the company file is in good condition, move the damaged company file to another folder/location and transfer the copy from QBTest to the original file location.
You have now successfully restored all the recent missing transactions in QuickBooks. However, if you wish to recover all transactions except the last 12 hours, follow the steps in the next section.
Use the ADR versions of the Transaction Log and Company Files to Recover All transactions except the Last 12 Hours
You can use the ADR versions of the Transaction Log and company data files to recover all except the last 12 hours of transactions in the following manner –
- Create a new folder named QBTest on your desktop, then open the folder with your company file. If you don’t know the company file location, find it in the Product Information screen (press F2 or Ctrl+1) or in the No Company Open Window.
- Next, find the QuickBooksAutoDataRecovery folder and locate the .TLG.adr and .QBW.adr files with the same name as your company file. If you can’t locate the files, modify Windows settings to display the extensions of the files (see point 2 in the ‘Use the Transaction Log File & the ADR Version of the Company File to Recover Recent Transactions’ section of this solution).
- Copy the .TLG.adr and .QBW.adr files, paste them into the QBTest folder and then proceed to rename them.
- Right-click both files, click Rename, and remove .adr from the end of the file names, which will give you .QBW and .TLG files in the folder.
- Next, launch QuickBooks, open the company file saved in the QBTest folder, and use the account register to verify the transactions.
- Verify that all transactions are there, then go to the File menu and select Utilities.
- Further, click the Verify Data tool to confirm the data integrity of the recovered file.
- If the recovered file is free from issues, move the damaged company file to another location and transfer the copy from QBTest to the original file location.
Once you have successfully used ADR to recover the files, reopen QuickBooks to ensure that the missing data is restored.
Solution 10 – Repair QuickBooks Desktop
If your data or invoices are lost after moving to a new computer, it is likely that QuickBooks is not correctly installed or damaged. This issue can be fixed using QuickBooks Tool Hub in the following manner –
Step 1 – Download & Install QB Tool Hub
The first step is downloading the QuickBooks Tool Hub to access the troubleshooting tools. You can download and install this program by implementing the following steps –
- Close QuickBooks, download the latest QuickBooks Tool Hub version (click HERE), save the .exe setup file on your local storage, and then open the file.
Note: If you have already installed the QB Tool Hub on your PC, find the current version at the bottom of the Home menu. If you don’t have the most recent QuickBooks Tool Hub version (1.6.0.5), follow these steps to download and install the latest version.
- Further, follow the on-screen instructions and accept the terms and conditions for installing the program.
- Once the installation is complete, double-click the QB Tool Hub icon on your Windows desktop to launch it.
Note: If you face trouble locating the QB Tool Hub icon, manually search for “QuickBooks Tool Hub” in the Windows search panel and select it to launch the program.
Once done, run a program repair with the Quick Fix My Program tool in the next step.
Step 2 – Use the Quick Fix My Program Utility
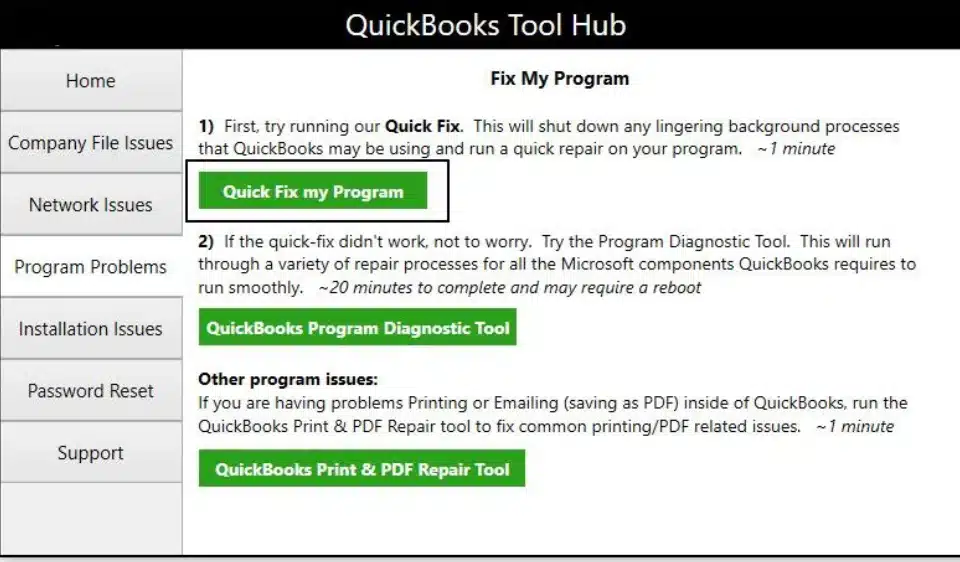
You can run a program repair using the Quick Fix My Program tool if your invoices are lost after updating QuickBooks. This tool terminates background processes that QuickBooks uses and can resolve general program problems. To use this tool, follow the detailed steps mentioned below –
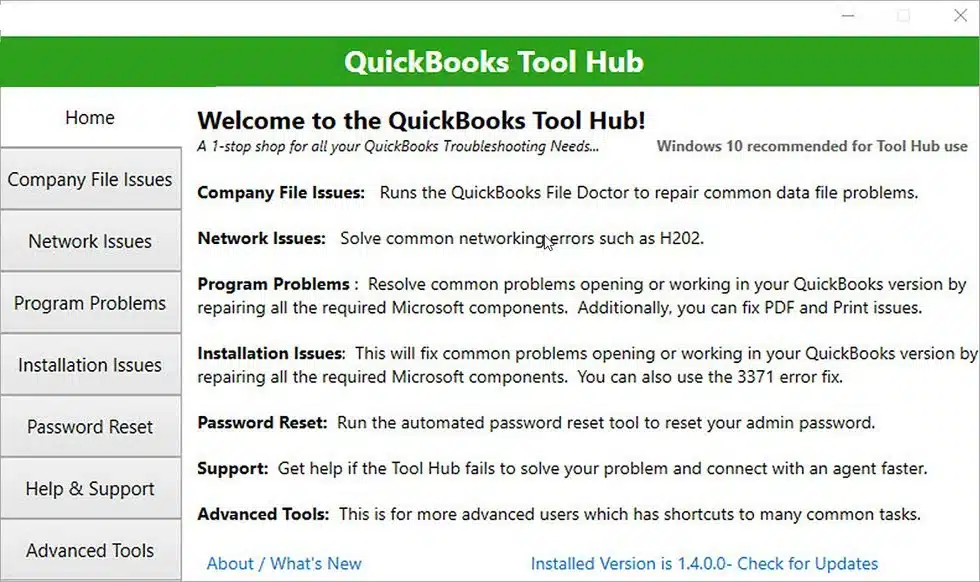
- Launch QB Tool Hub and click the Quick Fix My Program tool from the Program Problems menu.
- Further, run the tool and repair QuickBooks Desktop. Once the tool stops running, open QBDT and open your company file.
Now, check if you can find the missing data and invoices. If the issue persists, run the QuickBooks Install Diagnostic tool in the next step.
Step 3 – Run the QB Install Diagnostic Tool
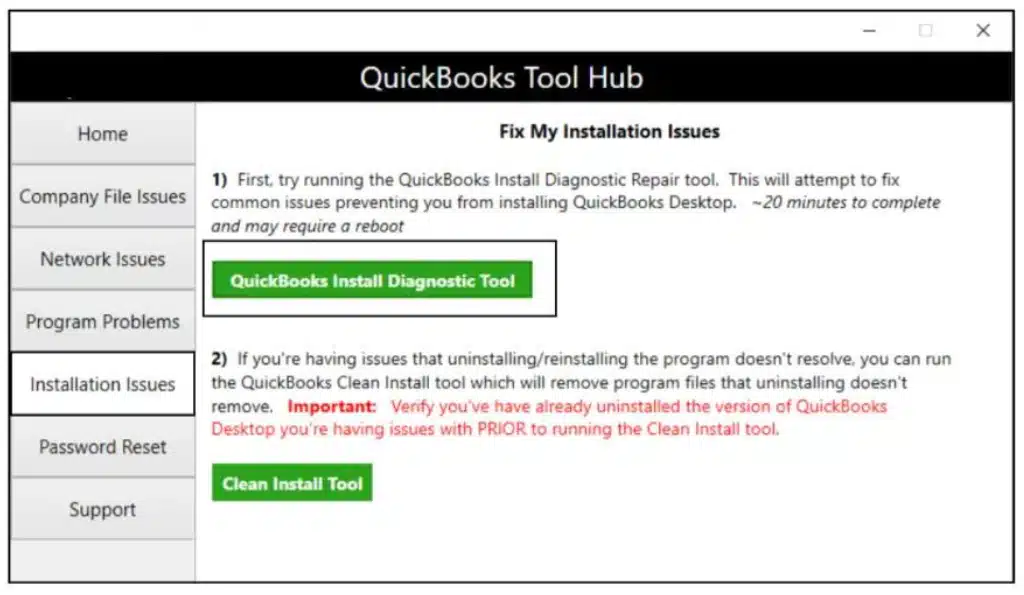
The QuickBooks Install Diagnostic utility helps resolve the QBDT installation problems. You can run this tool to perform an installation repair by following the steps below –
- In the QuickBooks Tool Hub program, go to the Installation Issues section and click the QuickBooks Install Diagnostic tool.
- Run the tool and let it fix the QBDT installation issues, which can take up to 20 minutes.
- Once the process is complete and the tool stops running, restart the PC and relaunch QB.
Ensure QuickBooks is updated to the latest release, then check your company data to ensure the missing data issue is resolved.
Conclusion
We hope this comprehensive guide helped you resolve the QuickBooks Data missing after update issue. However, if you find QuickBooks data is missing after update, even after following the troubleshooting solutions, you can contact our Proadvisor solutions’ team of experts at 1.855.888.3080 for immediate troubleshooting assistance.
FAQs
How can I create a company file backup in QuickBooks Desktop?
Creating a company file backup is important before troubleshooting the missing data issue in QB. To create a backup version and prevent accidental data loss, follow the steps given below –
1. Firstly, open QuickBooks, go to the File menu, and select Switch to Single-user Mode.
2. Move to the File menu again, select Back up Company, and click the Create Local Backup option.
3. Now, select Local Backup, click Next, and navigate to the Local Backup Only section.
4. Click Browse to pick a location to save your backup company file, then set the number of backups you want to keep (optional).
5. Let QB run a test to ensure your backup file is in good shape. Once done, select OK, click Save it now, and hit Next.
6. Once QuickBooks has successfully created a single backup company file, you will get a confirmation message.
What should I do if I have accidentally deleted an invoice in QB?
Sometimes, invoices might be missing if they are accidentally deleted. In such a case, you can find the deleted invoices in the Audit Log Report as follows –
1. Open the Reports menu, go to the Find report by name dropdown, and type in Audit Log.
2. Further, select This Year or Custom on the Date Changed dropdown (depending on the time of the deleted transaction).
3. Lastly, select Deleted/ Voided Transactions from the Events dropdown menu.
Where did my QuickBooks company file go, and how can I locate it manually?
You can quickly locate your company files in QuickBooks by following the steps below –
1. Firstly, open the No Company Open window in QuickBooks and select Find a company file. This window often appears when you are initially launching QBDT or saving your company file.
2. Now, the following file extensions are automatically searched for in the Find a Company File window:
-.QBW for the QuickBooks company file.
-.QBB for the QuickBooks backup company file.
Usually, the QB company file is saved in the folder – C:\Users\Public\Public Documents\Intuit\QuickBooks\Company Files. You can check the file name, date, timestamp, and size to find the most recent file. Then manually locate your company files using Windows File Explorer in the following way –
1. Firstly, open the Windows Start menu, type File Explorer into the search bar, and open it.
2. Select My Computer or This PC, and in the search field, type *.qbw, *.qbb to find all files.
Note: Include the asterisk (*) before the extension or search for *.qb for QuickBooks.

Erica Watson is writing about accounting and bookkeeping for over 7+ years, making even the difficult technical topics easy to understand. She is skilled at creating content about popular accounting and tax softwares such as QuickBooks, Sage, Xero, Quicken, etc. Erica’s knowledge of such softwares allows her to create articles and guides that are both informative and easy to follow. Her writing builds trust with readers, thanks to her ability to explain things clearly while showing a real understanding of the industry.