If your QuickBooks automatic update greyed out, you won’t be able to turn off the automatic updates. This issue can prevent you from having the option to disable QB from downloading updates automatically. There are many reasons for this issue, including a damaged company file or an outdated QB application. This blog will discuss troubleshooting solutions to successfully resolve QuickBooks’ automatic update greyed-out issue.
Keep following the instructions given in this blog to learn how to fix the automatic update issue. However, if you don’t want to resolve this issue by yourself and need a faster resolution avenue, you can contact our Proadvisor solutions’ support team at 1.855.888.3080. Our specialists will provide thorough guidance to help you access the no option in automatic updates and fix other related issues.
Table of Contents
What is the QuickBooks Automatic Update Greyed Out Issue?
QuickBooks Desktop allows users to download recent updates automatically by providing an option to enable automatic updates. Many users find this option beneficial as it saves them the effort of manually downloading updates. But sometimes, users might not want to enable automatic updates; for this, Intuit provides the Yes and No options. When this issue occurs, the No option to turn off the automatic updates is greyed out, which prevents users from switching it off. The issue can be very frustrating for users who don’t want their application to download the latest updates automatically.
Main Reasons Why QuickBooks Turn Off Automatic Update is Greyed Out
Now that we know what this issue entails, it is essential to learn about the triggers behind it. If you have tried to disable the automatic updates in QB, but you find the option to be unavailable or greyed out, some of the following main causes could be responsible –
- QuickBooks update issues can often arise due to an unstable or unreliable network connection.
- The QuickBooks version installed on your current computer is an old QuickBooks Desktop that doesn’t hold the newer features plus enhancements.
- You are not using QuickBooks as an admin user, which can prevent you from performing certain actions, like turning off the automatic updates.
- The company data file in your QB Desktop might be damaged, corrupted, or broken.
- General issues with your QB application or an incorrect installation process can also be responsible for the QuickBooks automatic update greyed out issue.
These are the main reasons why you are unable to select the No option for automatic updates in QB. Now, let’s hop to the next section to learn about the solutions to address the problem effectively.
Troubleshooting Ways to Fix “No option in QuickBooks Automatic Update Grayed Out” Issue
Until you resolve the issues while opting for the No option for QB automatic updates, you won’t be able to disable the updates from downloading automatically. Thus, you must follow the effective solutions given in this section if QuickBooks Disable Automatic Updates Greyed Out-
Solution 1: Check the Connection and Ensure it is Stable
First and foremost, you must check the internet connection, as an unsteady or unreliable connection can cause QB update issues. After you have a good and stable source of connection, you should try disabling the QB automatic updates.
If the option is still greyed out, move to the next troubleshooting solution.
Solution 2: Sign in as an Admin
Another thing that users need to consider is that the lack of admin rights can prevent you from turning off the automatic updates. Thus, make sure you are logged into QB as an admin user before changing the automatic update settings as follows –
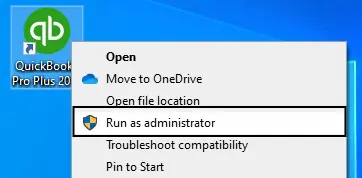
- Exit QuickBooks Desktop, right-click the QB Desktop icon on your PC, and choose the Run as Admin option.

- Now, enter your admin login credentials, run QB as an admin, and try to select No for automatic updates.
If the option is still unavailable, you can try the steps in the next solution to fix the issue.
Solution 3: Update QB to the Latest Release
If your QuickBooks Desktop is outdated, you must download and install the updates before trying to turn the automatic updates off. Once the latest QuickBooks Desktop updates are installed, check the automatic update options and see if the No option is greyed out.
If the QuickBooks turn-off automatic updates option is greyed out, use the steps in Solution 4 below.
Solution 4: Access a Sample File in QB
Sometimes, problems while disabling automatic updates can arise due to a damaged company file. Other times, this issue can be a result of a damaged QB Desktop program. To figure out why this issue arises, you can try opening a sample file in the application by using the instructions below –
- Press the Windows Start button to access the Start menu, click Ctrl on your keyboard, and select QuickBooks. Ensure you keep holding the Ctrl key till your QuickBooks Desktop has opened.
- Now, leave the Ctrl key, click on the Open a Sample File option, and navigate to the Updates option.
If the No option for automatic updates is available to select while accessing a sample file, there is data corruption in your company file (see Solution 5). However, if you still see the No option in the Automatic Update section greyed out or unavailable for selection, your QuickBooks Desktop application might be damaged (see Solution 6).
Solution 5: Use the Verify/Rebuild Tool
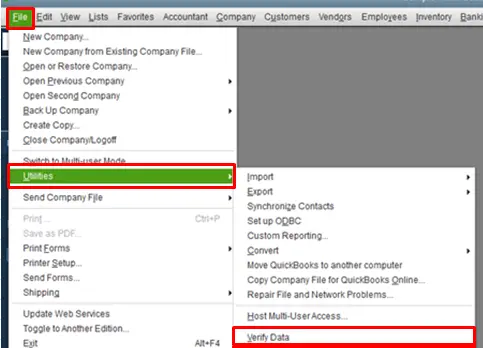
As mentioned above, you must fix the company file issues to resolve the “QuickBooks automatic update greyed out” issue. To repair the company file, we have the perfect utility called the QuickBooks Verify and Rebuild Data tool. You can Verify and Rebuild your company data using the process provided by this tool, then reopen QuickBooks.
Now, check if you can select No for automatic updates or if the option is still greyed out. If it’s the latter, move to the next troubleshooting solution to address the QB issues.
Solution 6: Repair QuickBooks Desktop
If using the Verify/Rebuild tool doesn’t help fix the issues, or you ascertained that there are problems with your QB program (see Solution 4), you can try repairing the application. There are two methods to repair QuickBooks Desktop: using the QB Tool Hub and via the Control Panel, which are explained below –
Using QB Tool Hub
You can use the QuickBooks Tool Hub features to repair the program by referring to the instructions below –
- Start by downloading the recent QuickBooks Tool Hub version (1.6.0.5), then install it using the onscreen steps and launch the program.

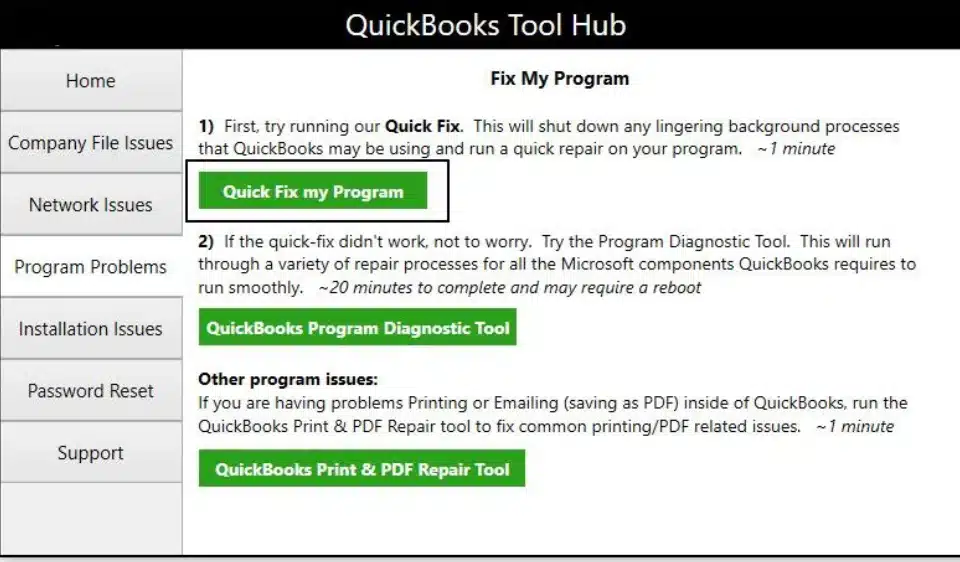
- Once QB Tool Hub opens, select Quick Fix My Program from the Program Problems tab to run a program repair process.

- After the tool stops, open QuickBooks and check if still the QuickBooks automatic update greyed out.
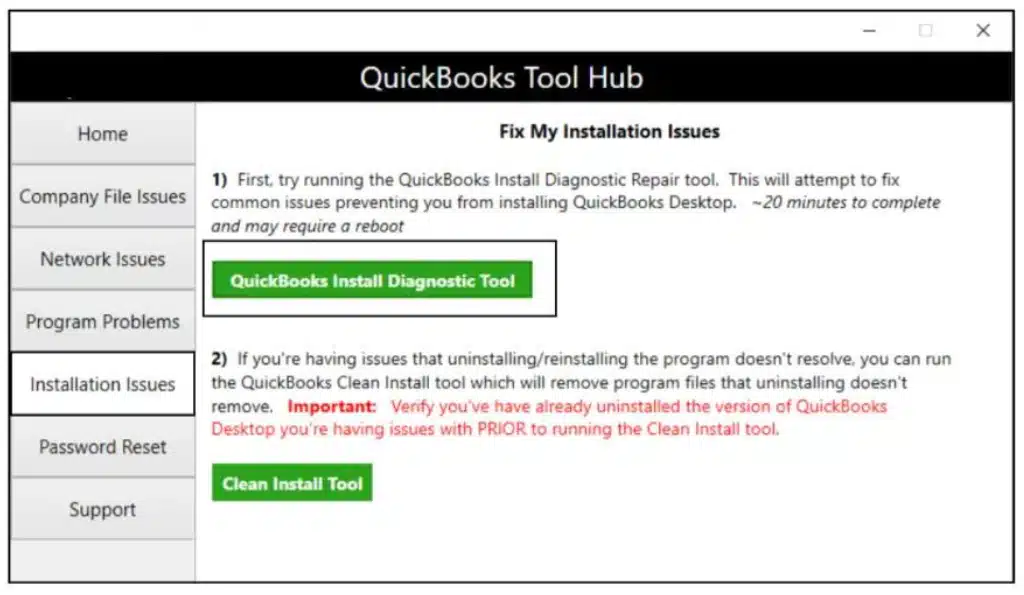
- If the issue persists, go back to the QB Tool Hub and move to the Installation Issues tab. Select the QuickBooks Install Diagnostic Tool, initiate an installation repair process, and wait for the tool to finish running.

Now, check the status of the “QuickBooks 2023 automatic update greyed out” issue; if it persists, use the next alternative to repair the application.
Via the Control Panel
You can repair QuickBooks Desktop by accessing the Control Panel in the following manner to fix the general program issues –
- Before you start, create a QB company file backup to avoid any accidental data loss.
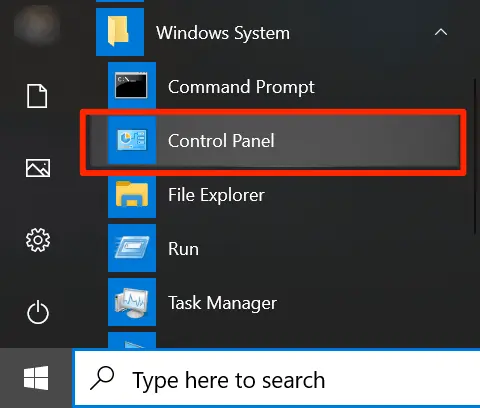
- Next, reboot the computer, then access the Windows Start menu and find Control Panel from the search field or select it from the list.

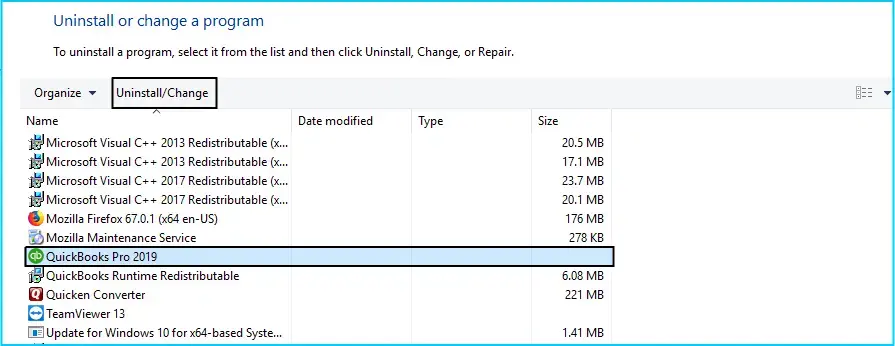
- Move to the Programs and Features section, then select Uninstall a Program, and pick QuickBooks from the program list.
Note: If you can’t find the Programs and Features section, first select Programs, then select the Program and Features tab. - Further, click Uninstall/Change, select Continue or Next, and choose the Repair option.

- Press Next again, wait for the tool to start its diagnosis and hit Finish once the repair process ends.
After the QB Desktop is repaired, you will be able to disable the automatic updates in the application. However, if you still encounter the same issue and the option QuickBooks disable automatic updates greyed out, perform the steps in the next solution.
Solution 7: Rename the QBUpdate.EXE Program
If none of the above solutions work, you can modify the name of the QBUpdate.EXE program by implementing the steps below –
- Find the QBUpdate.EXE program in the C:\Program Files\Common Files\Intuit\QuickBooks\QBUpdate navigation path.
- Once the program is found, right-click on its name and add OLD at the end to make it QBUpdateold.exe.
- Finally, click Enter to save the name modifications and rerun QBDT.
If you still face issues while turning off automatic updates or the option is greyed out, follow Solution 8 below to resolve the issue.
Solution 8: Disable the QBUpdate.EXE Program
If renaming the program in the above solution doesn’t help, try disabling it by using the following steps –
- Open Task Manager and go to the Startup tab, then right-click any column header and select Command Line.
- Next, identify the startup entry and disable the QBUpdate.EXE program. You can also disable the Intuit Data Protect utility if you don’t use the cloud backup service.
Once the program is disabled, check if the No option for automatic updates is available. If QB automatic updates are still greyed out, try disabling the monitor service in the next solution.
Solution 9: Disable the QBUpdateMonitorService.EXE Program
You can disable the QBUpdateMonitorService.EXE program to fix the automatic update issues in QB Desktop in the following manner –
- Click on the Services tab in the Task Manager to find the QuickBooks Update Monitor Service and other QB services.
- Next, right-click the service and select Open Services, then right-click the QBUpdateMonitorService again and select Properties.
- Go to the Startup Type section, select Disable, and click Stop under the Service status.
- Finally, hit Apply and OK to save the changes and use the same steps to disable QBIDP service (if you don’t use Intuit Data Protect).
Once these steps are done and the services are disabled, rerun QuickBooks. If the “QuickBooks disable automatic updates greyed out” issue persists, you must follow the instructions in the next solution.
Solution 10: Run the REGEDIT Command
If none of these solutions help you resolve the automatic update issue in QB, the last resort is to run the REGEDIT command by implementing the detailed steps below –
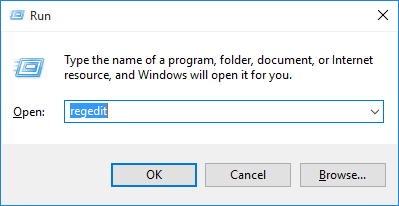
- Open the Windows Start menu, then access the Run window by pressing the Windows + R keys and enter “regedit” in the command box.

- Press OK to initiate the command, then click twice on HKEY_LOCAL_MACHINE, select SOFTWARE, and click Microsoft.
- Choose Windows NT, highlight the Current Version folder, and navigate to the right window to locate the Registered Owner.
- Further, right-click the Registered Owner, click Modify, and enter a name in the Value Data field.
- Select OK, move to the File menu, and select Exit to end the process.
After running this command, rerun QuickBooks and check the status of the greyed-out option to ensure the issue is successfully resolved. All these solutions are specifically provided in this detailed blog to help you eliminate the “QuickBooks automatic update greyed out” issue with ease. However, sometimes, these troubleshooting solutions might not work, and the issue might remain unresolved. In such cases, you must seek professional assistance from our dedicated Proadvisor solutions support experts at 1.855.888.3080 and get your issues promptly resolved.
Frequent User Questions
How can I turn off shared updates in my QuickBooks Desktop application?
You can easily disable the option to download shared updates in QBDT by using the steps below –
1. Open QuickBooks Desktop, move to the Help section and choose the Update QuickBooks Desktop option.
2. Navigate to the Options tab, select No for the Share Download option, and click Close.
Is there another alternative to disable automatic updates in QB Desktop?
Yes, if the No option is greyed out in QuickBooks, you can use the following instructions to disable the automatic updates –
1. Click the Ctrl + Alt +Delete keys together and a window will open where the Task Manager will be visible.
2. Select it to open the Windows Task Manager, move to the Startup tab, locate QuickBooks Automatic Update, and disable it.
Can reinstalling the QB Desktop application help fix the “QuickBooks automatic update greyed out” issue?
Yes, if you aren’t able to repair QuickBooks and the program issues are preventing you from disabling automatic updates, you can try reinstalling it. Use the QuickBooks Clean Install utility to install a fresh application version, then try selecting No for QuickBooks automatic updates again.

Erica Watson is writing about accounting and bookkeeping for over 7+ years, making even the difficult technical topics easy to understand. She is skilled at creating content about popular accounting and tax softwares such as QuickBooks, Sage, Xero, Quicken, etc. Erica’s knowledge of such softwares allows her to create articles and guides that are both informative and easy to follow. Her writing builds trust with readers, thanks to her ability to explain things clearly while showing a real understanding of the industry.


