Have you ever experienced the problem ‘QuickBooks autofill not working’? Autofill is one of the most important features in QuickBooks that saves your time. Information like vendor names, account types, and transaction descriptions is filled in by this feature. But sometimes this autofill feature doesn’t work, especially on Windows. When it happens, it interrupts your workflow and makes you annoyed. You are finding yourself forced to re-enter the same information repeatedly, which is counter to the purpose for which you are using QuickBooks to save time. This article will guide you through determining solutions if QuickBooks autofill doesn’t work automatically.
This blog is a collective guide to help you turn on autofill in QuickBooks Desktop. We will also provide proven and effective troubleshooting methods to resolve this issue. However, we also recommend you get in touch with our experts at +1.855.888.3080. They are ready to assist you with the early resolutions in no time!
Table of Contents
What is the Autofill Option in QuickBooks?
QuickBooks’ Autofill feature automates or suggests entering fields to accelerate data entry and save time, while minimizing errors. As soon as you begin typing in a field, QuickBooks anticipates the rest using previous entries. For instance, if you are typing “Off” in an expense account, it might pop up with a suggestion of “Office Supplies.” You can go with the suggestion or continue typing. The Autofill option in QuickBooks applies to:
- Vendor/Customer Names: QuickBooks learns frequent entries.
- Accounts/Items: Fills in account or product information.
- Transaction Descriptions: Repeats common descriptions.
To enter using Autofill, simply start typing. If an auto-suggestion appears, press Tab or Enter to have it accepted. You can enable/disable this feature in Preferences. Autofill expedites and simplifies bookkeeping. It adapts to your patterns and gets better with time. Apply it to reduce manual typing and eliminate errors.
Why is my QuickBooks Desktop Autofill Not Working?
There can be various reasons why QuickBooks autofill does not work on your desktop. You have to find out the possible reasons so that you can fix them. Below are some of the usual reasons behind the error:
- You might have a disabled QuickBooks autofill feature.
- There could be some extract of a corrupted or damaged company file.
- You might be using an old QuickBooks version.
- You might have too many temporary files open on your desktop.
- You might have overfilled the duplicate entries in QuickBooks.
- There can be some installation problems with QuickBooks.
- You might be facing some system and network issues.
These are some of the possible reasons behind the ‘QuickBooks autofill not working’ error. Now, let’s take a look at the solutions to resolve the error.
Solutions to Fix QuickBooks Online Autofill Not Working
There are many solutions that can help you fix the issue of autofill not working properly in QuickBooks Desktop. We will be using many methods to resolve the error. The overview of the steps to resolve the QuickBooks online autofill not working error is:
- Verifying and Rebuilding the Data Tool
- Clearing the Browser’s Data
- Using the Incognito Mode
- Using QuickBooks Tool Hub to Fix Corrupted Files
- Installing QuickBooks in Selective Startup Mode
These are the five easy and quick solutions that we are going to implement to resolve the autofill error in QuickBooks. Let’s have a close look at each of these steps in brief.
Solution 1: Verifying and Rebuilding the Data Tool
You, as a user, can easily use the Verify and Rebuild Data Tool to find any damaged company files or elements. This can help you fix the autofill option not working in QuickBooks. The steps to verify and rebuild the data tool to resolve autofill issues in QuickBooks are:
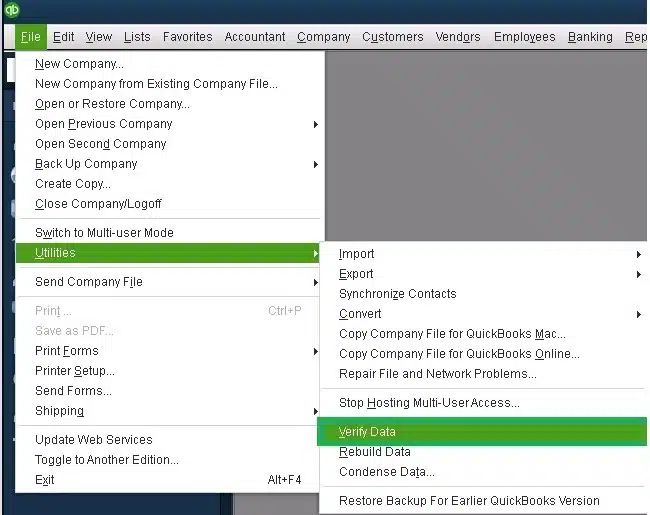
- You must first open your QBDT and click on the File button.
- Next, proceed to the Utilities tab from the list.
- Here, you will need to locate the option Verify Data Utility and click on it.

- Now, you will need to allow the tool to perform the scan for data problems.
- The next step is to open the Rebuild Data tool from the Utilities tab to fix the errors found in the files.

- Later, you can check the QBWIN.LOG to look for any residual errors.
- If found, you will have to resolve these errors manually and save the changes.

Lastly, you can even try loading your transactions or adding payments to verify if the problem is still there. If it does not fix the autofill issue, you can move to the next solution.
Solution 2: Clearing the Browser’s Data
Because the autofill feature is enabled and you’re still prompted each time whether to autofill, we suggest that you clean out the browser cache. The cache exists to collect saved data to enable web pages to load faster and more easily.
From time to time, the cache fills up, which can in turn lead to performance issues. Clearing it will make the system reload and cancel out what’s making the autofill feature not work in QuickBooks. Here are the generalized steps to clear the browsing data on the different web browsers:
Step 1: Clearing the Cache on Mozilla Firefox
The Firefox cache holds images, scripts, and other components of the web pages you go to temporarily to accelerate your browsing. This step explains how to clear the cache on the Firefox browser:
- Tap or click the menu button and choose Settings.
- Choose the Privacy & Security panel.
- In the Cookies and Site Data entry, tap or click Clear Data.
- The Clear browsing data and cookies dialog box appears.
- On the dropdown beside When:, select Everything. Ensure that Temporary cached files and pages only are checkmarked.
- Click the Clear button.
- Close the Settings page. Your changes will be saved automatically.
These were the steps to clear the browsing data in the Mozilla Firefox browser. Let’s look at the other browsers as well.
Step 2: Clearing Cache and Cookies on Google Chrome
When you use the internet using Chrome, it stores some website information in its cache and cookies. Removing this stored data solves some issues, such as loading or formatting problems on websites or autofill issues in QuickBooks.
- Open Chrome on your computer.
- At the top right, click More and then Delete browsing data.
- Select a time span, such as Last hour or All time.
- Choose the kind of information you wish to delete.
- Click Delete data.
If you clear cookies while you are signed in to Chrome, you will not be signed out of your Google Account.
Step 3: Clearing Cache on Apple’s Safari Browser
You can delete all the history that Safari stores of the places you have visited within a time you specify. If your other Apple devices, including your Mac, have iCloud enabled for Safari, your surfing history is cleared from all of them. The steps to clear the cache on the Safari browser are as follows:
- Switch to the Safari app on your Mac.
- Select History > Clear History, and click the pop-up menu.
- Select the time frame you’d like your browsing history cleared.
Erasing your surfing history in Safari will not erase any surfing histories that are stored individually by sites that you’ve been to.
Step 4: Clearing Cache on Microsoft Edge Browser
The steps to clear the cache and cookies data on the Microsoft Edge browser are as follows:
- Choose Settings and more > Settings > Privacy, search, and services.
- Under Delete browsing data, clear browsing data now, choose what to clear.
- You need to select a time range from the dropdown menu.
- Here, you need to select the types of browsing data you wish to delete.
- For instance, you can clear browsing history and cookies, but not passwords and form fill data.
- Click on Clear now.
Clearing the cache and cookies data can help you fix the autofill not working issue in QuickBooks. If clearing the data did not help, you can move to the next solution.
Solution 3: Using the Incognito Mode
Since your autofill feature is not working in QuickBooks, it might be possible that this could have something to do with temporary internet files. Browsing applications retain these kinds of records, but occasionally they’ll get in the way of webpages and create problems. You can try opening a private window and see if your autofill feature is working.
- Google Chrome: Ctrl + Shift + N
- Mozilla Firefox: Ctrl + Shift + P
- Microsoft Edge: Ctrl + Shift + P
- Safari: Command + Option + P
You can open the incognito mode to fix this issue. If this solution does not help you fix the ‘QuickBooks autofill does not work’ issue.
Solution 4: Using QuickBooks Tool Hub to Fix Corrupted Files
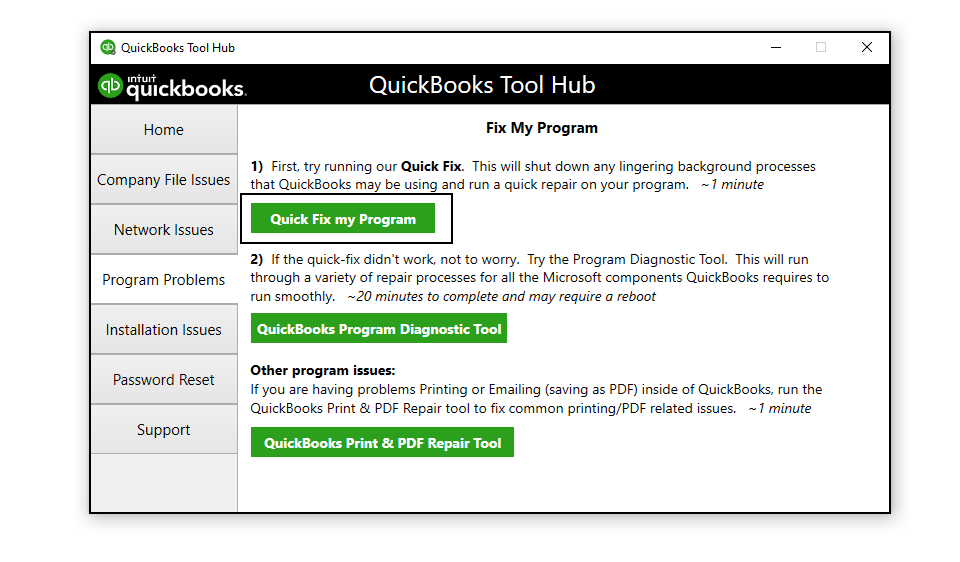
You must download and install the Quick Fix My program from the QuickBooks tool hub in order to fix the autofill issues in QuickBooks. The process steps are:
- You must download and install the QuickBooks tools hub.
- Once installed, you must locate and execute the Quick Fix My program from the gallery.

- Then you must open QuickBooks Desktop and open your file.
If this does not solve the ABS PDF driver problems in QuickBooks, you can try the second solution, which is checking file issues or programs.
Solution 5: Installing QuickBooks in Selective Startup Mode
Third-party application interference can lead to the autofill option not working when installing QuickBooks Desktop. Installing QBD in Selective Startup Mode will prevent any other application from interfering. The following are the steps you need to perform:
- Press Windows + R, and the Run window will appear.
- Type MSConfig and click OK.
- Go to the General menu and click on Selective Startup and Load System Services.
- Now go to the Services menu and choose the option Hide all Microsoft Services.
- Now, click on Disable all.
- Uncheck the Hide all Microsoft services box.
- Ensure the Windows Installer box is selected from the list of services.
- Click on OK and then choose Restart in the system configuration window.
- Now, install QuickBooks on your system.
- Press Windows + R after the installation process is over. The command window will pop up.
- Type MSConfig and press OK.
- Go to the General menu and select Normal startup.
- Press OK and then Restart in the System Configuration window.
By following the above steps, you will be able to install QuickBooks in Selective Startup mode.
You can also follow the above steps to repair the QuickBooks autofill not working issue.
Summing It Up!
These are the easy and quick solutions to fix the ‘QuickBooks autofill not working’ error. Autofill saves time and prevents errors. Therefore, it’s worth repairing. With these tips, you can have Autofill up and running again and enjoy a smooth QuickBooks experience. You may also install QuickBooks in Selective Startup mode to prevent software conflicts. All these steps are simple and take no more than a little time. Keep your software up to date, and do routine maintenance to prevent future problems.
FAQs
Why is the QuickBooks autofill not working on my PC?
QuickBooks Autofill may not be working on your computer for a number of reasons. You may have disabled the feature by mistake. Your version of QuickBooks may be old. A corrupt company file or an excess of temporary files can also create problems.
How to turn on autofill in QuickBooks Desktop?
If you want to turn on Autofill in QuickBooks Desktop, you need to start QuickBooks and proceed to Edit Preferences. Then, you need to click on General from the left menu. Under the tab My Preferences, choose the box Automatically remember account or transaction information.
How do I autofill a memo in QuickBooks Desktop?
For autofilling a memo in QuickBooks Desktop, you need to make a transaction first. During typing, some pre-filled suggestions will appear. You can press the Enter or the Tab key to accept the autofill suggestion. If Autofill isn’t working, check that it is turned on in Edit > Preferences > General by checking the box that says Automatically remember account or transaction information.
What are the features of the autofill option in QuickBooks?
The Autofill in QuickBooks assists in accelerating data entry and reducing errors. It saves names, accounts, items, and descriptions that you have entered in the past. It predicts the most probable match while you’re typing. It can apply to vendor and customer names, types of accounts, and memo fields.
More Articles to Read :
Steps to Solve QuickBooks Direct Deposit Not Working Issue
Fixing QuickBooks Payroll Error 2107: Proven Methods
How to Fix QuickBooks Not Responding Or Stopped Working
QuickBooks Could Not Update the Component
QuickBooks Error 7149 Step-by-step & Easy Solutions

Erica Watson is writing about accounting and bookkeeping for over 7+ years, making even the difficult technical topics easy to understand. She is skilled at creating content about popular accounting and tax softwares such as QuickBooks, Sage, Xero, Quicken, etc. Erica’s knowledge of such softwares allows her to create articles and guides that are both informative and easy to follow. Her writing builds trust with readers, thanks to her ability to explain things clearly while showing a real understanding of the industry.