You might need to share the company file with your accountant for different purposes. This must be done without interruptions to your in-house accounting operations and with the security of the data kept in mind. The best way to do so is to share the accountant copy of the company file over secure Intuit servers. However, if you find the QuickBooks accountant copy failed with or without any error, this guide is for you. In this guide, you will find solutions to different issues when creating or sending the accountant’s copy of the company file.
If your regular financial operations are stuck not being able to share the accountant’s copy of the company file, reach out to our team of Proadvisor solutions’ experts at 1.855.888.3080 for immediate help and support
Table of Contents
Leading Reasons Why QuickBooks Encounter Errors While Attempting to Create Accountant Copy
For various reasons, you might encounter errors while creating an accountant copy in QuickBooks. Learning about these reasons will help in the troubleshooting process. Below, we have mentioned the leading causes behind the accountant’s copy file error in QuickBooks-
- You are not logged in to QuickBooks Desktop as an admin user.
- Your QuickBooks Desktop is not updated to the latest version and lacks important security fixes and improvements.
- The company name, file name, or Chart of Accounts might contain special characters.
- Your company file size might be larger than 200 MB when sending the Accountant’s copy via ACFT.
- There is a long dash in your notes while sending the Accountant’s changes.
- Your QB company file might be damaged or have data integrity problems.
- Crucial files, like the EntitlementDataStore.ecml, might be damaged or corrupted.
- QBDataServiceUser might not have sufficient file permissions, which can cause issues while creating the Accountant’s copy.
- The drive that contains the Accountant’s copy might lack proper storage space.
These are the main reasons for errors while creating or sending the Accountant’s copy. In the next section, we will learn how to fix them effectively.
Solutions to Fix QuickBooks Accountant Copy Failed Error
If you are facing an error while creating or sending an Accountant’s copy in QuickBooks Desktop, follow the troubleshooting solutions below to fix it –
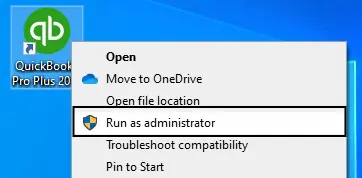
Solution 1 – Run QuickBooks with Admin Rights
You must ensure you are running QB as an admin, as a lack of admin privileges can lead to the “Something’s not right” error in Accountant Copy. To run QB Desktop as an admin user, follow the steps given below –
- Exit QuickBooks, right-click the QB Desktop icon, and choose the Run as Admin option.

- Now, enter your admin login details (if prompted), then try sending the Accountant copy again.
If you cannot send the Accountant copy, follow the next troubleshooting solution.
Solution 2 – Update QBDT to the Latest Release
The ACFT service won’t work with outdated QBDT versions, which can create Accountant File Transfer Service issues. Thus, if your QB isn’t updated, download and install the latest QuickBooks Desktop updates on your PC.
After updating QuickBooks, reboot your PC and try sending the Accountant’s copy with ACFT again. If the “Unable To Create Accountant’s Copy In QuickBooks Desktop” issue persists, move to the next solution.
Solution 3 – Check Your Company File Name
You might receive an error message when sending the Accountant copy if the company file name contains special characters. Thus, you must check your company file name for special characters, like a comma. If the file name or company name contains special characters, rename them and remove the characters.
Once done, try sending the Accountant’s copy again to check if the QuickBooks Accountant Copy Failed error is fixed.
Recommended to read : How to Change Primary Admin in QuickBooks Desktop
Solution 4 – Reduce the Company File Size
You won’t be able to transfer the Accountant copy if the file size exceeds 200 MB. Thus, you need to check the company file size in the following manner –
- Open the QuickBooks Company File, then press the F2 key to open the Company Information window.
- Now, go to the File Information section and check the file size to ensure it’s less than 200 MB (200,000 KB).
If the file size is larger, you can create/restore a QuickBooks portable company file to reduce the file size or send the QBX/QBY files without the Accountant File Transfer Service.
Option 1 – Create/Restore a QB Portable Company File
You can create and restore a portable company file to fix the file size issues in the following manner –
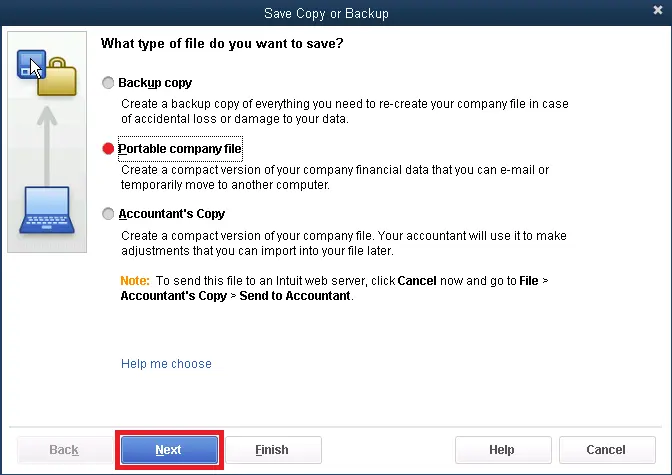
Create a Portable Company File
To create a portable company file, implement the steps below –
- Log in to QB as an admin, then go to the File menu and select Create Copy.
- Select Portable Company File, click Next, then give your portable company file a unique name.

- Select an easily accessible location to save your portable company file, then click Save and OK.
Restore a Portable Company File
Follow the steps mentioned below to restore the portable company file version –
- Log in to QuickBooks as an admin, then move to the File menu and select Open or Restore Company.
- Select Restore a Portable File, select Next, then choose your portable company file with the .QBM extension.

- Select Open, read the notes on the “Where do you want to restore the file” page, and click Next.
- Finally, click Save when you’re ready to open your portable file.

Note: Ensure the regular company file and portable file have unique names to avoid data overwriting. Alternatively, save the portable file in a folder different from the original company file.
QB will automatically reindex your data when you open the portable company file, which helps fix many data issues.
Option 2 – Manually Send the QBX/QBY File
If you can’t send the file through ACFT due to file size issues, send the Accountant’s copy using a manual workflow via a USB drive, email attachment, or cloud service. To create an Accountant’s copy that you can put on a USB or online hosting service, follow these steps –
- Open the File menu, select Send Company File, then click Accountant’s Copy.
- Further, select Client Activities, then click Save File and hit Next.

- Select Accountant’s Copy, click Next, enter the dividing date, and hit Next again.

You will now have an Accountant’s copy with the .QBX extension, which can be sent via email, put on a USB, or shared through a cloud service.
On the other hand, if the file size is less than 200 MB and you still find the QuickBooks Accountant copy failed, move to the next solution.
Solution 5 – Check if a Long Dash is Present in your Notes
If there is a long dash in your notes, it can cause issues when sending the Accountant’s changes. To avoid the long dash, ensure the following –
- Enter the text directly into the client’s notes, and don’t add the long dashes.
- Create the text using Text Editor and copy and paste the text from there.
- Directly email the MS Word document with the changes to the QBY file to the client.
- Don’t use a long dash in MS Word, as a single dash would suffice.
Once these changes are made, check if you can send the changes to the Accountant’s copy. If you can’t send the Accountant’s changes to the client, go to the next solution.
Solution 6 – Check if the Company File is Damaged
You need to determine if the problem is specific to the current company file by testing a new file in the following manner –
- Open the File menu, select New Company, then click Express Start or Start Setup.
- Now, create the new file and send an Accountant’s copy to see if it works.
If you can successfully send the Accountant’s copy, your original company file might be damaged. To fix the company file damage, use the following steps –
- Run the Verify and Rebuild Data tool in QuickBooks Desktop to resolve the company data integrity issues.
- If the file damage persists, restore the company file backup on the PC.
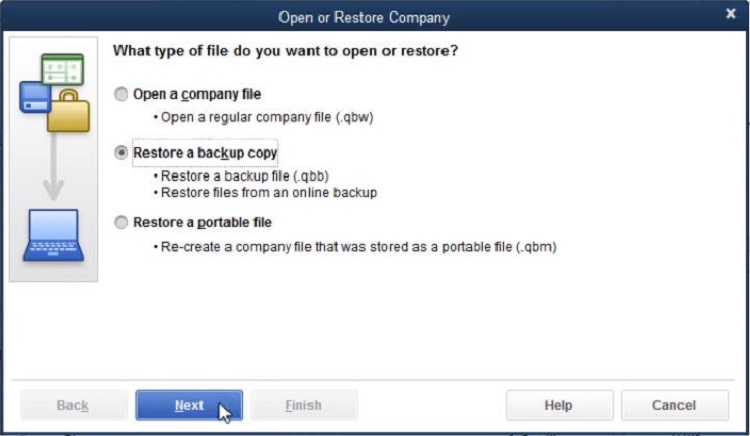
Restore the Company File Backup
You can restore a backup company file in QB in the following manner –
- From the QB File menu, select Open or Restore Company, then click Restore a Backup Copy.

- Further, hit Next, select Local Backup, and click Next again.
- Browse the PC for your backup file, select a folder to save the restored version, and then click Open.
- Lastly, select Save and ensure not to overwrite any data unless you are sure.
Note: Save the backup and original company files in different folders or ensure they have unique names if stored in the same folder.
Once done, open the restored file and check if the QuickBooks Accountant’s copy failed error occurs. If it doesn’t, replace the damaged company file with its backup version. If there have been new transactions since the backup, add them to the restored file.
However, if the accountant’s copy file error in QuickBooks persists, follow the next solution.
Solution 7 – Rename the EntitlementDataStore.ECML File
This file contains the license and product info for QuickBooks Desktop. If the file is damaged or corrupted, you must rename it to recreate the file in the following manner –
- Exit QuickBooks Desktop, then open the Run window by pressing the Windows + R keys.
- Now, copy and paste the following path – C:\ProgramData\Intuit\Entitlement Client\v8, then hit Enter.
- Further, locate and right-click the EntitlementDataStore.ecml file, select Rename, and add .OLD to the file name.
- Save the file name by pressing Enter, then reopen QB and register it again.
- Finally, sync your license data from the Help menu. Select Manage My License and click the Sync License Data Online option.
After the process ends, try to send QuickBooks Accountant’s copy again. If you still encounter QuickBooks Accountant Copy Failed error, move to the next solution.
Solution 8 – Grant Proper File Access Permissions
You won’t be able to create an Accountant’s copy if the file has inadequate permissions. Thus, you must set proper file access permissions in the following manner –
- Go to the QuickBooks folder, right-click the file and select Sharing and Security.
- Once a new dialog box appears, select Permissions and click Add Browse.
- Find the current QBDataServiceUser, provide Read/Write permissions, and save the changes.
Once done, try to create the Accountant’s copy again and check if the QuickBooks Accountant Copy Failed Issue is resolved.
On the other hand, if you encounter specific problems while creating or sending the Accountant’s copy, move to the next section.
QuickBooks Accountant Copy Error: Specific Issues
In this section, we will discuss effective solutions to fix specific issues when creating, working on, or importing the Accountant’s copy in QuickBooks Desktop –
Case 1: Failed or a Big Red “X” When Working on Accountant’s Copy
You might get the error message “Failed” or “QuickBooks has detected an error with your installation. Please reinstall QuickBooks,” with a big red X. This message can appear while creating an Accountant’s copy or converting the Accountant’s copy to an Accountant’s copy working file. To eliminate this error message with an X mark, follow the solutions given below –
Solution 1 – Copy the Accountant’s Copy to your Desktop
An easy way to fix this error while working on the Accountant’s copy is to copy the file with the .QBX extension to your Desktop. Once copied, try to work on the file from the new location on the PC and check if the error persists.
If the QuickBooks Accountant copy failed, follow the next solution.
Solution 2 – Create a Portable Company File
A portable file is a compact version of your QB Desktop company file. Creating a portable version fixes minor data issues in your existing company file. To create a portable copy, follow ‘Option 1: Create/Restore a QB Portable Company File’ of the ‘Solutions to Fix QuickBooks Accountant Copy Error’ section above.
If creating a portable version doesn’t resolve the error, follow Solution 3 below.
Solution 3 – Resolve Company File Data Damage
Issues while creating or working on the Accountant’s copy can occur if the company file is damaged. Thus, the next solution is to fix the data damage in your QB company file in the following manner –
- You can use the Verify and Rebuild Data utility to fix the data integrity problems in your company file.
- If the data damage isn’t fixed, install QuickBooks Tool Hub and run the QuickBooks File Doctor tool from the Company File Issues section.
Once the tool stops running, check if the QuickBooks Accountant Copy Error resolved.
Case 2: Not Able to Create Accountant’s Copy
If the QuickBooks Accountant copy has failed or you cannot create it, there might be insufficient space in your drive. You might get an error message stating, “Not able to create Accountant’s Copy – to export your company file on the drive (letter of the drive). There must be (number of kilobytes) space on the drive (letter of the drive). There is only (number of space) amount of space available.“
To eliminate this error message, free up space in your hard drive or save the Accountant’s copy to a different drive with ample space.
Case 3: Unable to Display Accountant Changes
If QuickBooks is unable to display Accountant changes, ensure that –
- The latest QB Desktop updates are installed in the system.
- The Accountant’s changes are saved on the local computer. If not, copy or move them to a local folder.
If you are still unable to see the changes, perform the following solutions –
Solution 1 – Remove Special Characters from the Chart of Accounts
To remove special characters from the Chart of Accounts, use the following steps –
- Go to Lists, select Chart of Accounts, then check if any account has special characters (!@#$%^&*) in their name.
- Right-click on the account, select Edit account, remove the special character(s), and click Save & Close.
Now, check if you can export the Accountant’s changes; otherwise, move to the next solution.
Solution 2 – Create a New Accountant’s Copy
You need to create a new Accountant’s copy, save a new working file, and then add the changes by following the step-by-step process below –
Step 1 – Covert the Accountant’s Copy to a New Working File
Follow the steps below to open the Accountant’s copy and save a new working file –
- Open the File menu, select Open and Restore Company, then select Convert an Accountant’s Copy Transfer File.
- Click Next, read the overview, then hit Next again and read the Can and Can’t Dos.
- Select Next, find and open the Accountant’s copy (.QBX) file, and confirm if you want to convert the file.
- Finally, rename the file and select Save to confirm the changes.
Once a new working file is saved, move to step 2.
Step 2 – Make Changes to the Client’s Books
Now, you need to change the client’s books using different Accountant tools. After the changes are made, export them in the next step.
Step 3 – Export the Accountant Changes
To export the Accountant’s changes, implement the following steps –
- Select Send Company File from the File tab, then select Accountant’s Copy.
- Click View/Export Changes for Client and select the + icon to see detailed info.
Note: To save a copy of the changes, select Save as PDF or click Print. - To save the file locally, select Create Change File, choose the appropriate location, and click Save.
- To send the file using ACFT, click Send Changes to Client, then enter your name and the client’s email addresses.
- Finally, select Notify Me when the client imports the changes and hit Send.
If you still can’t view or send the Accountant’s changes, follow the next solution.
Solution 3 – Send the Changes as Journal Entries
You can create journal entries to make adjustments to your client’s book and send them to clients in the following manner –
Create Journal Entries
To create or add a journal entry, go through the following steps –
- Go to the Company menu, select Make General Journal Entries, then fill out the fields to create your journal entry.

- Ensure your debits equal your credits, then click Save or Save & Close.

Send the Journal Entries to Clients
Implement the following steps to send the journal entries –
- Select Send General Journal Entries from the Accountant menu, then open the Dates dropdown.

- You can select the date range of journal entries you want to send or add custom dates in the From and To fields.
- Select the journal entries you want to send and review the Journal Entry Details section.
- If you need to correct an entry quickly, select its account in the Account column and select Save and Close.
- You can send the journal entries now by clicking Email as Attachment. Alternatively, click Save as File to save to a folder you can quickly access, then attach the file in an email to send it to your client.

Ensure the error is resolved once the journal entries are sent with the Accountant’s changes.
Case 4: Unable to Import Accountant Changes in QuickBooks Desktop
If the Accountant’s changes import fails, the following might be the reasons –
- The web/file option is unavailable while importing the Accountant’s changes.
- Your QuickBooks Desktop is not responding.
- You are trying to import the data from a different Accountant’s copy than the one created for this company file.
To fix the “Accountants changes QBY file failed to import” issue, follow the effective solutions given below –
Solution 1 – Ensure the Right Company is Open and Not the Upgraded One
You must open the company file with “Accountant’s changes pending” written in parentheses at the top. If you have the right file but it doesn’t say “Accountant’s changes pending,” you must manually enter the changes.
If the company file opens in an updated QB version, restore a backup created before the update and check if the Accountant’s changes are still pending.
If you have the right company file and it’s not upgraded but still can’t send the changes, follow the next solution.
Solution 2 – Save the Files Locally
If the Accountant’s changes are on a USB flash or server drive, copy the file to your local drive and try importing it.
If you cannot import the Accountant’s changes, move to the next solution.
Solution 3 – Send the Accountant’s Changes Using a Different Method
If you are trying to send the Accountant’s changes with ACFT, try sending it differently by using a USB, CD, or email attachment.
If you can’t import the changes, check if the company file is damaged. Fix the file damage (follow ‘Solution 3: Resolve Company File Damage’ of ‘Case 1: Failed or a Big Red “X” When Working on Accountant’s Copy’ above).
If fixing the company file issues doesn’t help, enter the changes manually and create a new Accountant’s changes file.
Note: To ensure this issue doesn’t happen again, don’t upgrade a company file with pending Accountant’s changes. Remember not to remove the Accountant’s copy restriction without talking to your accountant.
Once done, try importing the Accountant’s changes again and ensure the QuickBooks Accountant Copy Error is fixed.
Conclusion
This comprehensive guide will help you easily resolve the QuickBooks Accountant copy failed error. However, if these solutions are ineffective, you can get direct assistance fixing the QuickBooks Accountant Copy Error by contacting our team of experts at 1.855.888.3080.
Read more related articles :-
4 Easy Steps on How to Create an Accountant’s Copy in QuickBooks Desktop
Unable to Send Usage Data in QuickBooks Desktop [Easy Fixes]
How To Fix QuickBooks Error 400 [Bad Request Issue]
How to Fix QuickBooks Error PS038 (when paychecks get stuck)
FAQs
What are the two ways to send an Accountant’s copy in QuickBooks?
You can send the Accountant’s copy in QBDT by using either of the following workflows –
Manual Workflow
You and the accountant can exchange the Accountant’s copy via a USB Drive, email, or cloud service. The updated version can also be sent in the same way.
ACFT Workflow
The Accountant’s Copy File Transfer Service lets you and your accountant exchange the Accountant’s copy through Intuit’s secure server.
How can you remove the Accountant’s copy restrictions from QuickBooks Desktop?
To learn how to remove Accountant restrictions from QuickBooks, check out the instructions below –
1. Open the File menu, select Send Company File, then click Accountant’s copy.
2. Select Client Activities, click Remove Restrictions, then select ”Yes, I want to remove the Accountant’s Copy restrictions,” and click OK.
What changes can be made to your client’s books with an Accountant’s copy working file?
You can use different accountant tools to make necessary changes and corrections to the client’s books, which include the following –
1. Correct opening balances.
2. Write off a group of invoices.
3. Enter multiple transactions at once.
4. Delete or void transactions by batch.
5. Correct transactions assigned to incorrect accounts or classes.
6. View all list changes.
7. Fix incorrectly recorded sales tax.
8. Correct inventory errors.

Erica Watson is writing about accounting and bookkeeping for over 7+ years, making even the difficult technical topics easy to understand. She is skilled at creating content about popular accounting and tax softwares such as QuickBooks, Sage, Xero, Quicken, etc. Erica’s knowledge of such softwares allows her to create articles and guides that are both informative and easy to follow. Her writing builds trust with readers, thanks to her ability to explain things clearly while showing a real understanding of the industry.