In QuickBooks, you get the option to send your transactions via Webmail or Outlook. When this function is set up, you can send invoices, reports, and more. This cuts down the time spent on manually sending the same email each and every month to your customers and vendors. In this blog, we’ll cover all the information you need to know for the QuickBooks email setup. First, let us cover the steps you need to set up Outlook to work with QB Desktop.
Facing issues with setting up email to work with QuickBooks Desktop? Contact our experts at 1-855-888-3080 today to resolve your problem in no time!
Table of Contents
In-Depth Guided Steps for Office 365 QuickBooks Email Setup
Before we start, ensure that you have an Outlook email profile, as it is necessary to connect Office 365 with QB Desktop. Ensure you are using Microsoft Outlook 2010 or newer, and follow the steps given below:
Step 1: Acquire the Following Info from Your Internet or Email Provider
- Username
- Password
- Incoming email server address
- Incoming email server type
- Outgoing email server address
Step 2: Set Up Outlook
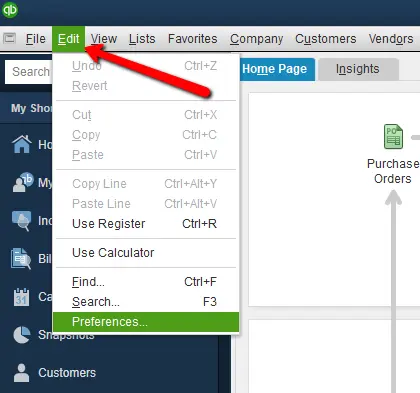
- Open the QuickBooks Desktop app
- Navigate to the Edit menu

- Click on Preferences
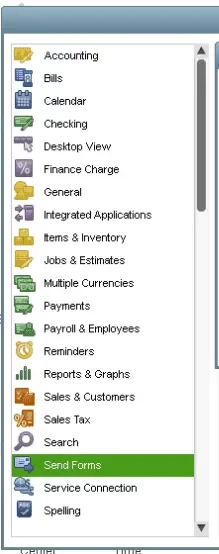
- Select Send Forms
- Then, click on Outlook
- Hit OK
This would complete the QuickBooks email setup with Outlook. However, if you don’t see the Outlook option after clicking on Send Forms, follow the troubleshooting methods given below.
Solutions if Outlook is Missing in Preferences
Before we troubleshoot this problem, let us understand why Outlook is missing from Send Forms in QB Desktop:
- Your QB Desktop version doesn’t support Outlook
- There’s an issue with the Outlook installation
- The profile is not set up in Microsoft Outlook
- Outlook is not your default email program
Now, let us proceed to resolve the missing Outlook problem during the QuickBooks email setup.
Edit the Mail Profile in Windows
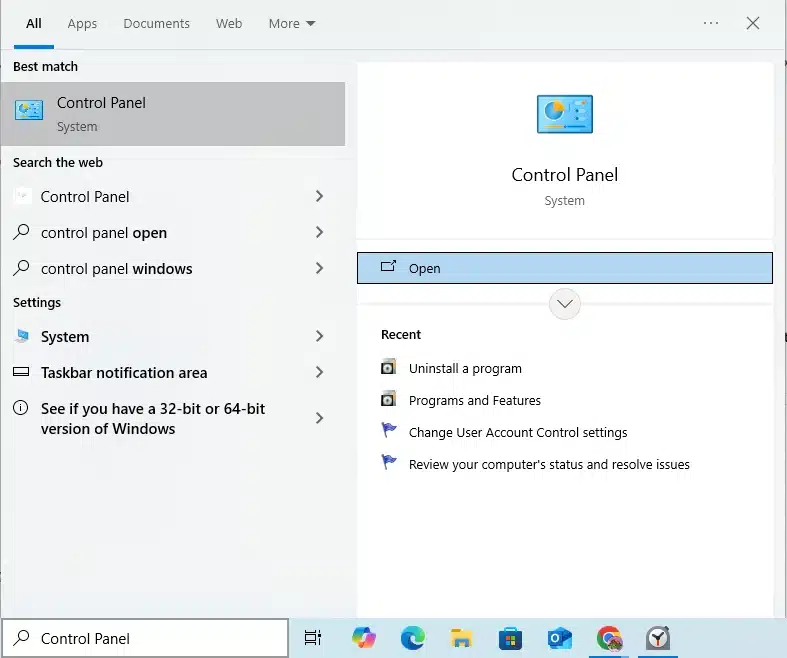
- Close the QB Desktop app
- Open the Start menu
- Search for and open the Control Panel

- Type in Mail in the panel’s search field
- Click on Mail
- Press Show Profiles
- Click on the Always use this profile checkbox
- Hit OK
Now, you will be able to see Outlook during the QuickBooks email invoice setup.
Set Up Outlook as Default
Set up Outlook as the default email program for your email and contacts. If you have many Outlook profiles, choose a default Outlook profile.
How to Set Up Email in QuickBooks Desktop | Steps for Webmail Set Up
The QuickBooks email setup to send receipts and invoices can also be done via Webmail> However, there are a few things you should know and imply before you get started:
- Verify your webmail servers and port settings with your internet service provider
- Webmail providers might require you to enable your account settings for two-step verification for added security
- QBDT can auto-fill information for some of the most common providers
We have provided the ISPs and their port information below.
ISPs and their Port Information
Note: QB doesn’t support providers using STARTTLS encryption
| ISPs | SMTP Server | SMTP Port |
| 1AND1.com | smtp.1and1.com | 587 (SSL enabled, with password) |
| ADELPHIA | mail.adelphia.net | 110 |
| AOL | smtp.aol.com | 465 or 587 (SSL enabled for incoming and outgoing mail servers) |
| BELL SOUTH | mail.bellsouth.net | 110 |
| COMCAST | smtp.comcast.net | 587 |
| COMPUSERV | smtp.compuserve.comsmtp.aol.com | 110 or 587 |
| COX Business | smarthost.coxmail.com | 465 or 587 |
| COX CENTRAL | smtp.central.cox.net | 465 or 587 |
| COX EAST | smtp.east.cox.net | 465 or 587 |
| COX WEST | smtp.west.cox.net | 465 or 587 |
| EARTHLINK | smtpauth.earthlink.net | 25 (with password) |
| LYCOS | smtp.mail.lycos.com | 25 |
| MICROSOFT OUTLOOK 365 | outlook.office365.com | 587 (SSL enabled) |
| NETSCAPE | smtp.isp.netscape.com | 25 (SSL enabled) |
| PRODIGY | smtp.prodigy.net | 25 (SSL enabled) |
| ROADRUNNER | smtp-server.sc.rr.com | 587 |
| SPRINT PCS | smtp.sprintpcs.com | 25 |
| VERIZON | outgoing.verizon.net | 465 |
| VERIZON YAHOO | outgoing.yahoo.verizon.net | 465 |
Now, let us see the steps to set up webmail in QuickBooks Desktop.
Set Up Webmail
- Open the QuickBooks Desktop app
- Click on the Edit menu
- Press Preferences
- Select Send Forms

- Click on Web Mail
- Choose the Add option
- Fill out the Add Email info
- Hit OK
- Press OK again
Now, just sign in to your webmail provider’s login page and grant Intuit access. Let us see how to set up enhanced security in Gmail for QBDT.
Scenario 1: Set Up Secure Webmail when Adding Gmail for the First Time
- Turn on 2-step verification for your Google account
- Go to the Edit menu in QBDT
- Click on Preferences
- Select Send Forms
- Then, choose the Web Mail option
- Select Add
- Now, select the email provider as Gmail from the dropdown menu
- Enter your Gmail email address
- Continue with Use enhanced security selected
- Press OK
- You’ll be asked to sign in to your Intuit account
- Your Gmail sign-in page would open
- Sign in and grant access to Intuit
This would complete the QuickBooks email setup Gmail with enhanced security; however, if you have already set up Gmail, you can change the current Gmail account to use secure webmail.
Scenario 2: Change the Gmail Account to Use Secure Webmail
- Turn on 2-step verification for the Gmail account
- Open the QB Desktop app
- Navigate to the Edit menu
- Click on Preferences
- Press the Send Forms option
- Select Web Mail
- Select your Gmail User ID
- Click on Edit
- Then, select Use enhanced security
- Hit OK
- You’ll be asked to sign in to your Intuit account
- The Gmail sign-in page would open
- Sign in and grant Intuit access
If you receive any password issues while setting up webmail or after, see the troubleshooting methods in the next section.
Fix Password Problems With Webmail in the QuickBooks Desktop App
Now that we have seen how to setup QuickBooks email with Gmail and Outlook, let us see some troubleshooting methods for the password issues you can face:
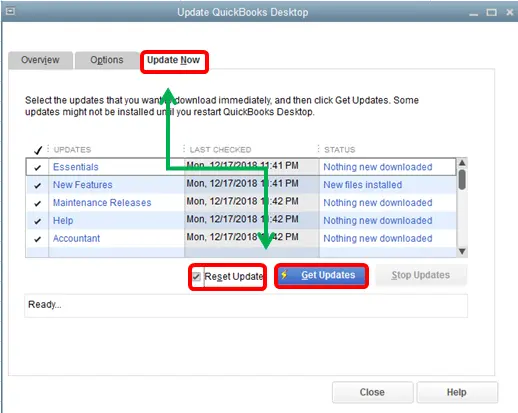
Update the QB Desktop Application
If your QB Desktop app is outdated, you can update it to the latest version in order to fix password issues with the following steps:
- Open the QB Desktop app
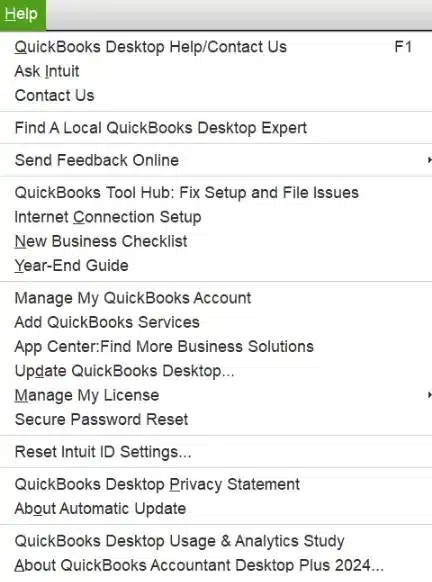
- Go to the Help menu

- Click on Update QuickBooks Desktop
- Select Update Now

- Press the Get Updates option
- Close and reopen QB to install the updates
This would fix common password issues with your webmail. If you face issues while updating the QBDT app, you can end the QB Desktop tasks given below to fix password issues with your webmail:
- Close the QuickBooks Desktop app
- Open the Task Manager on your PC
- Go to the Details tab
- Select End Task for each of the following processes:
- QBW32.exe or QBW.exe
- QBCFMonitorService.exe
- qbupdate.exe
- QBDBMgr.exe or QBDBMgrN.exe
- QBMapi32.exe
- Update QB Desktop again
This would resolve the problem.
Set Up Multiple Emails in QuickBooks Desktop | A Concise Method
If you have already completed the QuickBooks email setup, you can set up multiple outgoing emails using the steps given below:
- Open the QB Desktop application
- Go to the Edit menu
- Click on the Preferences option
- Select Company Preferences
- Then, choose the Send Forms option
- Now, click on the Delivery Default dropdown menu
- Select E-mail
- Go to the Email Templates section
- Select either Invoices or Estimates
- Press Add Template
- Enter the email address
- Press Save
- Hit OK
Now, you can send an invoice or an estimate with their email template by simply clicking on the Email dropdown menu in the Send Forms section. Then, you can just move to the File menu, select Send Forms, and choose one of your templates when you send a batch of emails.
How to Setup Email in QuickBooks Online | Guided Steps
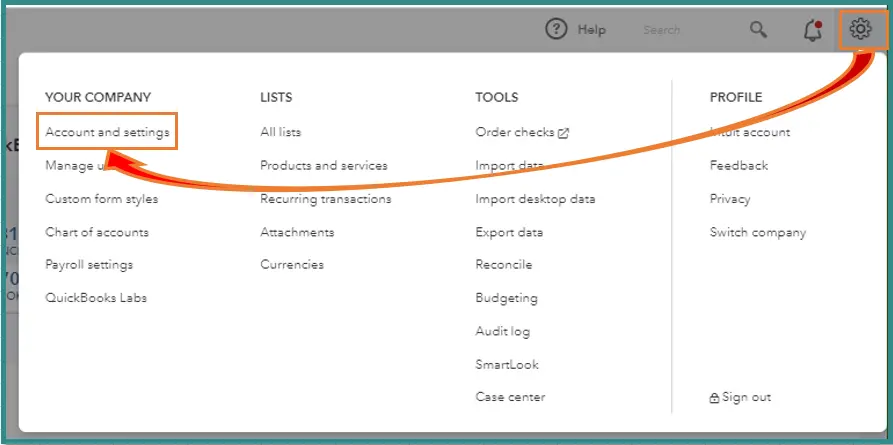
To set up your company’s email address for mailing invoices in QuickBooks Online, you can follow the steps given below:
- Open the QBO website
- Click on the Gear icon
- Select Account Settings

- Choose Company
- Click on the pencil icon in the Contact Info section
- Type in your email address in the Company email field
- Mark the Same as company email checkbox
- Press Save
- Hit Done
The QuickBooks Online email setup should now be done. You can follow the same steps to change your customer-facing email.
How to Setup Email in QuickBooks for Mac | Easy-to-Follow Steps
The steps for QuickBooks email setup on Mac for sending invoices, reports, and sales forms via email are given below:
For QuickBooks Desktop Mac Plus 2022
- Go to the QuickBooks menu
- Click on Preferences
- Then, select the Email icon
- Go to the For sending Emails… section
- Choose one of the two options:
- Send using your Default Email handling application: Use this if you want to use the default email, like Mail or Outlook
- Send directly out of QuickBooks using your Email Account: Use this to add your email account through a separate email account, like Gmail
- If you choose to use your default provider, you’re good to go
- If you choose a different email account, select Gmail or Custom in the Email Provider dropdown menu
- Mark the Enhanced Security checkbox
- Follow the steps to authorize access to your email
- Hit OK
For QuickBooks Desktop Mac 2021 and Earlier
- Go to QuickBooks
- Click on Preferences
- Choose the Email icon
- Go to the For sending Emails… section
- Choose one of the two given options:
- Send using your Default Email handling application: Use this if you want to use the default email, like Mail or Outlook
- Send directly out of QuickBooks using your Email Account: Use this to add your email account through a separate email account, like Gmail
- If you choose the default option, you’re good to go
- If you choose a different email, give the account a name you can easily identify
- Then, fill out the remaining fields
- Hit OK
- QB will attempt to validate the connection to your email provider’s server
- If the connection is valid, QB will close the sheet, and the account will be shown in the Email Accounts list
These were the steps for QuickBooks email setup on Mac. Now, let us see how to set up enhanced security for Gmail in QB Mac.
Set Up Enhanced Security for Gmail in QuickBooks Mac
Given below are the steps for setting up enhanced security for Gmail in QuickBooks Desktop Mac:
For QuickBooks Desktop Mac Plus
You will need to remove the Gmail accounts you’ve set up in QB and then change your email preference
Step 1: Remove Any Gmail Address Using SMTP
- Open the QuickBooks menu
- Click on Settings
- Select the Email setting
- Then, click on the Send directly out of QuickBooks using your Email Account option
- Go to the Email Accounts table
- Select your Gmail account
- Press Edit to view the connection details
- If the Gmail account uses SMTP, you will see a field containing:
- smtp.gmail.com
- Press the Cancel button
- Select the remove button (–) after confirming the connection as SMTP to delete the account
Step 2: Set Up Gmail With Secure Authorization
- Go to the QuickBooks menu
- Click on Settings
- Select the Email settings
- Click on the Send directly out of QuickBooks using your Email Account option
- Choose Gmail as the email provider
- Hit OK
- Continue with Enhanced security selected
- Press OK
- You will be asked to sign in to your Intuit account
- Follow the prompts and sign in to your Google account
- Grant Intuit access
This would set up Gmail to work with QuickBooks Desktop for Mac with enhanced security.
For QuickBooks Desktop Mac 2021 and Below:
These versions don’t have the options for enhanced security to work with Gmail. However, you can set up Apple Mail to use your Gmail account and then tell QB to use the default mail app as a workaround.
QuickBooks Email Setup – A Quick View Table
In the table below is given a concise summary of this blog on the topic of how to setup email in QuickBooks:
| Description | As a user of the QB Desktop application, you get the option for QuickBooks email setup. This helps you in eliminating manually sending invoices, bills, and receipts each and every time. |
| Methods to do so in QB Windows | In QB Desktop for Windows, you can set up mail with Outlook or with Webmail. The steps to do so are as follows: – Open the QBDT app – Go to the Edit menu – Select PreferencesPress Send Forms – Choose either Outlook or Webmail |
| Methods to do so in QB Mac | Open the QB Mac app, go to QuickBooks, select Preferences, click on the Email icon, navigate to the For sending emails… section, then just choose one of the two options you see. |
In a Nutshell
If you wish to send recurring emails, invoices, bills, stubs, and more through the QB Desktop application, you get the option for QuickBooks email setup. We have discussed how you can do the same in both the QB Desktop Windows and Mac with guided steps. If you’re facing an issue while setting up your webmail to work with QuickBooks, contact our experts at 1-855-888-3080 today!
FAQs
How to setup email Services in QuickBooks Desktop?
You can set up Outlook or Webmail to work with QB Desktop using the steps given below:
1. Open the QB Desktop app
2. Navigate to the Edit menu
3. Click on Preferences
4. Press Send Forms
6. Then click on either Outlook or Webmail
How to setup email in QuickBooks on Mac?
You can set up email in QB Mac with the steps given below:
1. Go to the QuickBooks menu
2. Select Preferences
3. Click on the Email icon
4. Navigate to the For sending emails… section
5. Choose the option that best suits you
How to setup QuickBooks email with Gmail?
You can set up Gmail with QuickBooks email with the following steps:
1. Turn on 2-step verification for your Google account
2. Go to the Edit menu in QBDT
3. Click on Preferences
4. Select Send Forms
5. Then, choose the Web Mail option
6. Select Add
7. Now, select the email provider as Gmail from the dropdown menu
8. Enter your Gmail email address
9. Continue with Use enhanced security selected
10. Press OK
11. You’ll be asked to sign in to your Intuit account
12. Your Gmail sign-in page would open
13. Sign in and grant access to Intuit
Read more related articles:
Why QuickBooks Crashes When Sending Emails
Why QuickBooks Cannot Connect to Email Server
How To Fix QuickBooks Email Not Working Issue
How to set up recurring invoices in QuickBooks Online
Fix We Were not Able to Show Your Payroll Info

Erica Watson is writing about accounting and bookkeeping for over 7+ years, making even the difficult technical topics easy to understand. She is skilled at creating content about popular accounting and tax softwares such as QuickBooks, Sage, Xero, Quicken, etc. Erica’s knowledge of such softwares allows her to create articles and guides that are both informative and easy to follow. Her writing builds trust with readers, thanks to her ability to explain things clearly while showing a real understanding of the industry.