QuickBooks is the most popular accounting application among small and medium-sized enterprises. It offers its services through desktop-based applications and the online portal. QuickBooks Desktop is known for the wide range of tools that it provides to its users. One of the latest additions to these features is to merge vendors in QuickBooks. You would need to merge vendors to avoid duplicate transactions. This saves your time as you do not need to transfer the transactions manually. When you merge vendors, transactions in both the accounts come together, eliminating duplicate transactions. You can easily merge up to four vendors together at a time. We will discuss the detailed process and other important aspects of merging vendors in QuickBooks in this article.
“If you come across any issues while trying to merge vendors in QuickBooks and you need an expert to assist you through the merging process, contact ProAdvisor Solutions’ Support at 1.855.888.3080”
You may also see: QuickBooks Inventory adjustment
Table of Contents
Key-points to Note before you Merge Multiple Vendors in QuickBooks
The process of merging vendors is an irreversible process as you cannot undo it, so you should be careful. There are a few key points that you must follow before you go on to merge multiple vendors in QuickBooks. These have been mentioned below for you:
- Create a backup of your company file before you
merge vendors in QuickBooks. It will help you recover your data if an issue
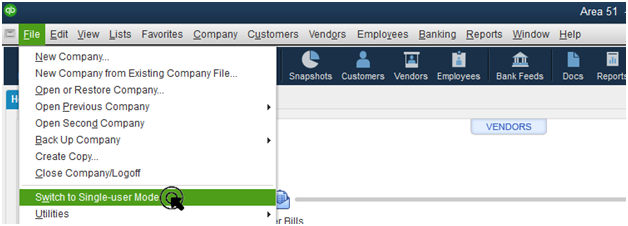
occurs post-merger. - Enable Single User Mode when you start the
process to avoid any interference. If another user adds an entry to one of the
accounts while merging, it can mess up the whole process. Single-user mode
eliminates this possibility.
- Make all the necessary accountant changes before you proceed.
- Do not use the Accountant’s Copy File to merge vendors.
- You should turn off the Multi-Currency feature to ensure consistency.
- You should not merge tax exempted vendors or authorities, direct deposit vendors, or those paid through online banking.
Now that we understand the important aspects related to the merge vendor feature of QuickBooks. Let us proceed to know the detailed steps to merge vendors in QuickBooks.
The Detailed Process to Merge Vendors in QuickBooks Desktop
QuickBooks has reformed the process of merging vendors in its 2019 version. In this section, we will analyze the processes in 2019 as well as the earlier version of QuickBooks Desktop.
How to Merge Vendors in QuickBooks 2018 and before?
If you are wondering how to merge vendors in QuickBooks 2018, follow the steps as provided below:
- QuickBooks 2018 or earlier version has a
separate ‘Vendors’ menu. Go to the ‘Vendors’ menu and then choose
‘Vendor Center.’ - Right-click on the vendor that you want to keep
and select the ‘Edit Vendor’ option. - Copy the name of the vendor and then hit the ‘Cancel’
button. - Select the vendor that you want to merge and
right-click on it. - Choose the ‘Edit Vendor’ option.
- Change the name of the new vendor by pasting the
name you copied earlier. - Press the ‘Yes’ button on the confirmation
prompt that appears.
When you keep the same names for two vendors, they will merge together. The same transactions in both the vendors will appear just once while the unique transactions remain unaltered. This method worked in the previous versions of QuickBooks. Users get a specific merge option in 2019 and later versions. Keep reading the article to know the process.
How to Combine Vendors in QuickBooks 2019 Edition
In the previous section, we learned the process to combine vendors in QuickBooks 2018 and prior versions. If you are using QuickBooks 2019 or later, then the steps to merge vendors in QuickBooks are as follows:
- Open your QuickBooks Desktop application and go
to the ‘Company’ menu. Select ‘Accounting tools’ and then ‘Merge
Vendors’ to open the Merge Vendor window. - QuickBooks Accountant users need to go to the ‘Accountant’
section and then click on ‘Client Date Review.’ Now select the ‘Merge
Vendors’ option to reach the Merge Vendors
window. - Click on the ‘Next’ button after selecting
the vendors that you have to merge.

- Select the Master Vendor, where you want to
reassign all the transactions, and click on ‘Merge.’
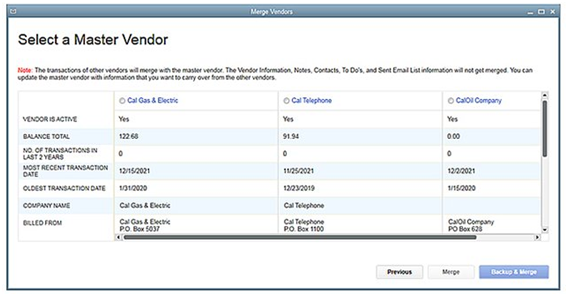
- Click the ‘Yes’ button when prompted for
confirmation and then click ‘OK’ on the Merge Complete Dialogue box appears.
You may also read: How to Fix Incorrect COGS in QuickBooks
By following the steps mentioned above, your desired vendors would merge together. In this article, we discussed the important aspects about the process to merge vendors in QuickBooks. We also explained you the detailed steps to merge vendors in different versions of your QuickBooks Desktop application. If you come across any issues while performing these steps or you need any help, contact ProAdvisor Solutions’ Support at Helpline Number 1.855.888.3080 and talk to our experts.

Erica Watson is writing about accounting and bookkeeping for over 7+ years, making even the difficult technical topics easy to understand. She is skilled at creating content about popular accounting and tax softwares such as QuickBooks, Sage, Xero, Quicken, etc. Erica’s knowledge of such softwares allows her to create articles and guides that are both informative and easy to follow. Her writing builds trust with readers, thanks to her ability to explain things clearly while showing a real understanding of the industry.