QuickBooks offers its services through multiple platforms such as its computer-based applications and web-based portals. The Desktop-based applications, such as QuickBooks Desktop Pro, Premier, or Enterprise, are installed on the user’s desktop and use its memory to run and save the data. They provide robust features and tools to make accounting and related business process easier for its users. QuickBooks Online provides universal accessibility so that you can access your data from anywhere, anytime and you don’t need to be anchored to your computer to access your data. QuickBooks also lets users migrate from one platform to other and thus it provides the option to Import QuickBooks Desktop to Online. Through this article, we will discuss the detailed steps and other aspects of importing QuickBooks Desktop to Online.
Importing QuickBooks Desktop data to QuickBooks Online is simple, provided you follow the steps given below correctly. However, if you don’t want to undertake the import process on your own, you can contact our Pro Advisor Solutions’ support team at 1.855.888.3080 for immediate assistance.
You may see also : QBCFMonitorService not starting or crashing
Table of Contents
Why Should you Import QuickBooks Desktop to Online?
If you are using the desktop-based application of QuickBooks and you need to access your files from anywhere beyond the limitations of time and location, then QuickBooks provide you with the option to do so. QuickBooks Desktop application license is valid for three years, and then you need to either renew it or move to QuickBooks Online (Read more about QuickBooks Desktop Service Discontinuation Policy Here). You can have all your data secured and still move to QuickBooks Online if you export QuickBooks Desktop to Online. You can also avail this feature if you want to move QuickBooks Online for its features.
A user can also move back from QuickBooks Online back to QuickBooks Desktop within 60 days of migration. Once this 60 day period is over, you would need to set up and subscribe to set up a new QuickBooks Online company.
Benefits of Importing QBW File to QuickBooks Online
There are various advantages to using QuickBooks Online over its desktop version and vice versa. If you decide to import QuickBooks Desktop to QuickBooks Online, then you can experience the following advantages –
- QuickBooks Online provides various useful tools and add-on features, like the ability to create custom user roles and permissions, to make the accounting process easier for its users.
- It generally offers a faster working interface and has features to handle inventory. QuickBooks Online Mobile allows more efficient take management is compatible with iPhone, iPads, Android phones and tablets.
- With QuickBooks Online, you can access your business data from anywhere and at any time. The ease of accessibility keeps you up-to-date with the most recent information.
- QuickBooks Online provides a seamless integration process, which makes it more versatile than QuickBooks Desktop. Users have enhanced capabilities, and they can integrate with various business applications.
- QuickBooks Online allows for real-time data syncing and the changes made by users and accountants are synced across all the devices. This lead to up-to-date, correct, and reliable information.
You can easily transfer all your files from the desktop version to the cloud version, but a lot of features work differently on both platforms. Various features also have different names on these platforms.
If you still decide to import QuickBooks Desktop to QuickBooks Online, then follow the steps mentioned below.
Preparation Steps for QuickBooks Data Migration
Before undertaking the migration process, you must prepare your data for migration in the following manner –
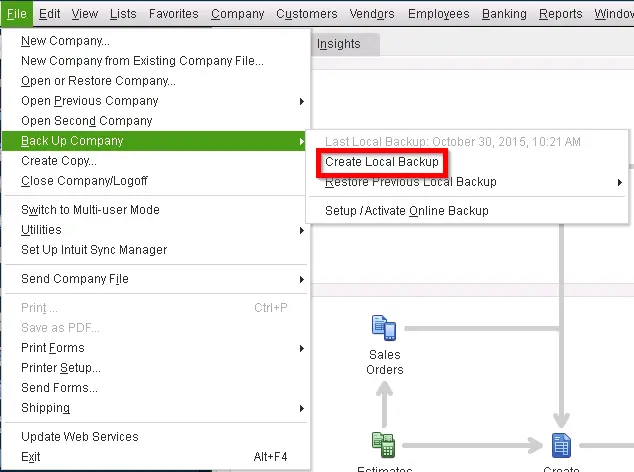
- Firstly, backup your company file in QuickBooks Single-User Mode. Go to the File tab, select Create Backup, and click the Local Backup option.
- After the backup is saved, update QuickBooks Desktop to the latest release and restart the application.
- Open the Product Information window (Ctrl + 1) and check the total targets from the File Info section. If the targets are more than 700,000 for Canada and 500,000 for the UK and South Africa, you can only convert the list and balances.
- After the targets are checked, go to the Suppliers section, select Minsitere du Revenu, and open the supplier. Select Sales Tax Settings, unmark all the boxes, mark the supplier as Active, and click OK. To Remove companies outside of Quebec only.
- Before migrating the data, ensure payroll is turned off to avoid payroll issues in the following manner –
- Select Edit, click Preferences, and select Payroll & Employees.
- Move to the Preferences window, select Company Preferences, and click No Payroll.
- Further, move to the Reports menu and select Suppliers & Payables. Select Sales Tax Liability, then click All from the Dates dropdown and click Save as PDF.
- Choose a folder to save the report and export your reports and lists in the following manner –
- Select Report Center from the Reports menu, open the report, and select the Date range.
- Select Excel and choose to print or save as PDF, then select Create New Worksheet in Excel.
- Select Update Existing Worksheet, click Export, locate the workbook, and click OK.
- Once all the reports are exported, create a QBO account so that you are ready for the migration process. When you reach the company’s dashboard in your QBO account, select the Gear icon and click the Sign Out option.
Once these steps are complete, move to the next section to perform the QuickBooks Desktop to QuickBooks Online migration.
Also See : Why does QuickBooks Migration fail?
Steps to Import QuickBooks Desktop Data to QuickBooks Online
Here is a stepwise guide to importing QuickBooks Desktop data to QuickBooks Online. Follow these steps in the given order to perform the process efficiently.
QuickBooks Desktop Enterprise
If you use QuickBooks Desktop Enterprise, follow the steps given below to migrate your data to QBO –
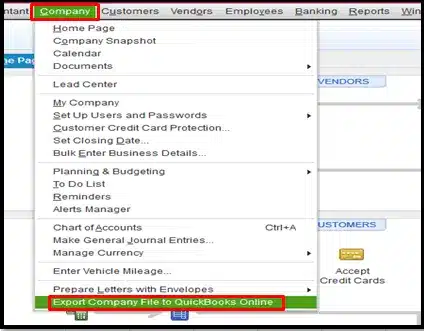
- Firstly, open QBDT and log in as an admin to the company file to want to import. Go to the ‘Company’ option in the QuickBooks Desktop application and select ‘Export Company File to QuickBooks Online’.
- When you select the data to export, your QuickBooks Desktop program will verify that the file is ready to be exported.
- Sign in with your QuickBooks Online credentials when prompted.
- If you want to track the inventory in QuickBooks Desktop, follow these steps –
- Select Yes to bring the inventory over from QBDT and pick the starting date. Then, select the option saying, “Yes, bring over inventory using FIFO, Starting on the date specified below.”
- If you wish to set up new inventory items in QBO, select No to bring the inventory.
- When the conversion is complete, select Complete your Setup from your confirmation email.
- Select your Company in the QuickBooks Online portal.
- QuickBooks will take some time and then show a confirmation screen saying that it is moving your data to the cloud.
- After the process is completed, QuickBooks will send you an email that your file is ready.
- Once the migration ends, you can set up inventory in QuickBooks Online from the Settings menu. Select Accounts and Settings, click Sales, then go to Products and Services, and click Edit. Turn on the products/services, track quantity and price columns, and click Save.
QuickBooks Desktop Pro or Premier
For QuickBooks Desktop Pro or Premier, the following migration steps can help import QBDT to QBO –
- Open QB Desktop, log in as an admin to the company file you want to import and navigate to the Company section.
- Select Export Company File to QuickBooks Online, click Get Started, and click Select Destination.
- Finally, sign in to your QuickBooks Online account and complete the data export.
Now, you can set up payroll, confirm the company settings, and perform other post-migration steps. Once done, you will be able to run QuickBooks Online and perform the data functions successfully.
Recommended to read : What should you do next if the Migrator tool doesn’t open after running the file?
What are the Steps to Perform after the QB Migration Process Ends?
After you migrate QuickBooks Desktop to QuickBooks Online, you must perform the following steps –
- Check your data by comparing the essential reports, like balance sheet and trail balance.
- Confirm the company settings from the Settings menu.
- Configure the sales tax settings from the Taxes section.
- Connect your bank and credit card accounts in QBO.
- Clean up the bank reconciliations from the Settings tab.
- Link payments and credits to the open invoices by turning on the Automatically Apply Credits option.
- Review the account detail types from the Reports menu.
- Complete your payroll setup from the Employees section of the Payroll tab.
- Link your payments account from the Account and Settings section of the Settings tab.
- Add and manage the users in QBO.
- Invite an accountant from the Bookkeeping section.
What Will be Transferred While Converting QuickBooks Desktop to Online?
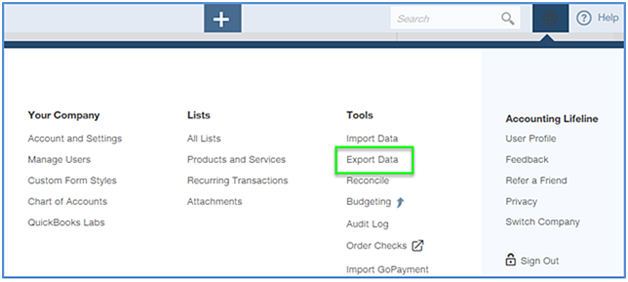
There is an alternative to import QuickBooks Desktop to QuickBooks Online. It exports the lists from the desktop company and then imports them to the online company. The lists that need to be transferred are as follows:
- Chart of Accounts
- Customers
- Vendors
- Products and Services
These lists can be individually exported if you don’t want to export the whole company file when Importing QuickBooks Desktop to QuickBooks Online.
You may read also : How to Fix QuickBooks Error 6177 0
Solutions to Resolve QuickBooks Migration Issues
Sometimes, you might face issues while importing your QuickBooks Desktop data to QuickBooks Online. In such cases, you can use the solutions given below to troubleshoot the migration issues –
Solution – Use the Verify/Rebuild Data Tool
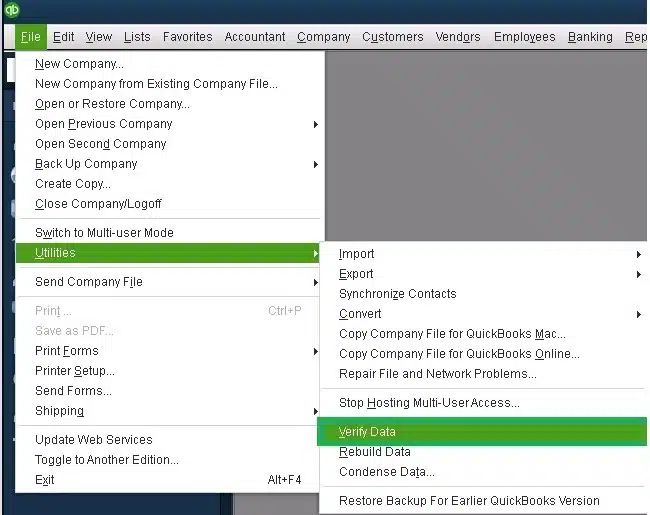
Trouble while exporting the company file data to QBO can occur due to data damage or corruption. You can use the QuickBooks Verify and Rebuild Data tool to identify the issues and rebuild the data.
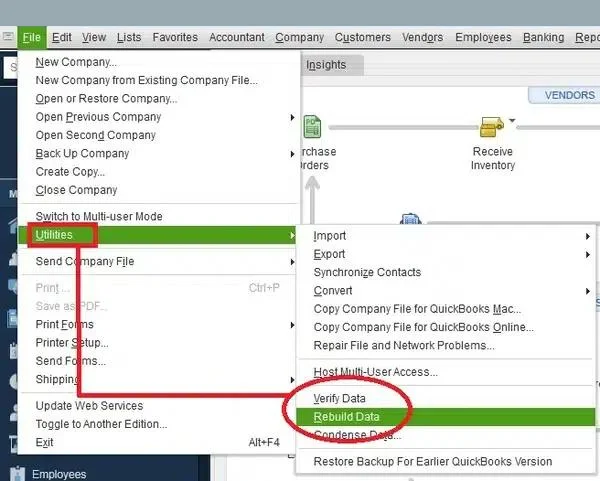
After the tool stops running, start the data export process again. Select Company and click Export Company File to QuickBooks Online, then go through the on-screen prompts.
If this solution doesn’t work, check the solutions for specific error messages as given below –
Error: Please delete all employees already entered in QuickBooks Online
To fix this error, you will need to create a new QuickBooks Online company without a payroll setup.
Error: Your file is too big to export
This error can arise when the file size is too large and the number of targets exceeds the limit. You can check the file size by going to the Product Information window (Ctrl + 1). Then, try condensing your QBDT company file using the Condense Data tool from the File menu.
Error: There was a problem checking this company for import eligibility
To fix this error, sign in to your QuickBooks Online company and complete the interview questions. You can sign in as a primary or company admin to migrate your data from QBDT.
Then, save your company address again, but if the error persists, create a new Online account.
Error in processing data for QuickBooks for Mac
This particular error can occur due to a lack of QB updates or an old QBDT release. To fix it, check for the latest updates, install them, and restart QB. Then, you can run the Verify/Rebuild Data tool to verify the data for any damage or integrity issues.
Error message: We can’t export your data. It may be on a network drive.
If you encounter this error message, locate your company file in QB and copy it to the C Drive. Then, open the file from the new location and go to the File menu. Switch to QuickBooks Single User-Mode and select the Export your Company File to QuickBooks Online option of the Company tab.
Note: this same solution applies if you get an “export QBDT to QBO: error” message while importing QB Desktop to QB Online.
Error: FAILED
Update your company file in QBDT, then try to migrate your data again.
Error: You can’t import because the QuickBooks Online company has been canceled
To resolve this error, sign in to your QBO company and select Settings. Then, click Account and Settings, select Billing & Subscription, and click Resubscribe.
Once the issues and errors while moving your QBDT data are resolved, you can rerun the migration process to ensure the data is exported to QBO successfully.
Conclusion
We hope this detailed article helps you import QuickBooks Desktop to QuickBooks Online. We have also provided steps to resolve any migration issues encountered in the process. If you are still unable to export your data from QBDT or are stuck in the process, you might need outside help. Contact our team of Pro Advisor Solutions’ professionals at 1.855.888.3080 to get immediate assistance in fixing the QB data migration issues.
FAQs
What is not imported while migrating QuickBooks Desktop data to QuickBooks Online?
The following data will not be transferred while undertaking the QuickBooks Desktop migration process –
1. Reconciliation reports for credit cards and banks.
2. Recurring credit card transactions.
3. Audit trail history.
4. QuickBooks Mac inventory data.
5. Custom reports.
How long does it take to migrate QuickBooks Desktop data to Online?
You can complete the QB data migration process in about 30 minutes. However, if you have too much data or the data size is large, the process might take longer.
How can I complete the payroll setup in QuickBooks Online?
After importing QBDT to QBO, you must complete the payroll setup from the Employees tab. Ensure each employee who received a paycheck this year is switched to Yes, and verify your YTD payroll totals. Follow the on-screen prompts to complete the payroll setup and click the Run Payroll option.

Erica Watson is writing about accounting and bookkeeping for over 7+ years, making even the difficult technical topics easy to understand. She is skilled at creating content about popular accounting and tax softwares such as QuickBooks, Sage, Xero, Quicken, etc. Erica’s knowledge of such softwares allows her to create articles and guides that are both informative and easy to follow. Her writing builds trust with readers, thanks to her ability to explain things clearly while showing a real understanding of the industry.

