The accountant’s copy serves as a backup of the company files where the accountant can make the necessary changes without affecting the original company file. Well, the accountant’s copy is not backed up locally, but yet it gets uploaded on Intuit’s secure servers. The blog post will answer your question on How to create an accountant’s copy in QuickBooks Desktop in four simple and easy steps.
The accountant’s copy is generally required when you don’t want the accountants to disturb your work while getting the files reviewed by them. Creating the accountant’s copy ignores the need to mail back and forth and worry about the updated changes. You can still work on your copy while you let the accountants work on the accountant’s copy.
Are you facing difficulties in creating an Accountant’s copy of the company files in QuickBooks Desktop? Dial the toll-free number 1.855.888.3080 and get the expert’s assistance in creating and converting the Accountant’s copy of company files.
Table of Contents
Steps for Creating an Accountant’s Copy in QuickBooks Desktop
Creating an accountant’s copy involves four easy and simple steps. The users must follow the given steps for creating an accountant’s copy in QuickBooks:
- Setting Up the QuickBooks Desktop
- Creating an Accountant’s Copy
- Turning Advanced Inventory Back On
- Importing the Accountant’s Changes
These were the four steps for creating an accountant’s copy of your company file and QuickBooks desktop. Let’s read about each of the following steps in detail.
Step 1: Setting Up the QuickBooks Desktop
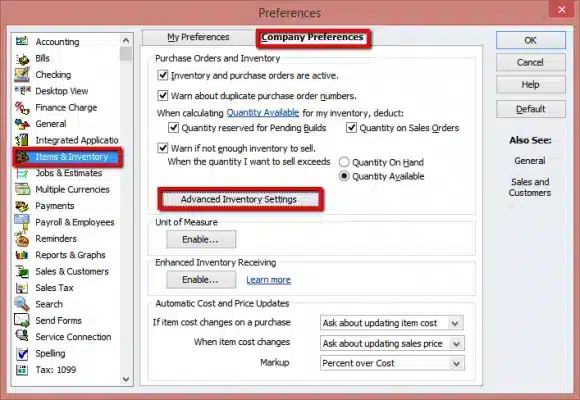
You need to turn off any advanced setting inventory features you currently use. You can easily turn them back on the moment you send the accountant’s copy. The process of turning off the advanced inventory in QuickBooks desktop is as follows:
- You need to select Preference in the Edit menu in QuickBooks Desktop.
- Now, you need to select Items & Inventory and then the Company Preference tab.
- Go to the Advanced Inventory Settings button and turn off each feature you are using presently.

- Keep selecting the OK option to turn off the advanced inventory settings.
The users can choose to skip this issue if they have QuickBooks Desktop Pro or Premier or if they don’t use advanced inventory. Now, let’s move to the second step.
Step 2: Creating an Accountant’s Copy
Now, when you have turned off the advanced inventory features, you must create an accountant’s copy. Well, you usually have two ways to get an Accountant’s copy to your accountant:
- USB/Online hosting service
- Using the accountant’s copy file transfer service
We will discuss both methods on how to create an accountant’s copy in QuickBooks desktop.
Creating an Accountant’s Copy Using USB/Online Hosting Service
Here are the required steps regarding creating an accountant’s copy using a USB/online hosting service.
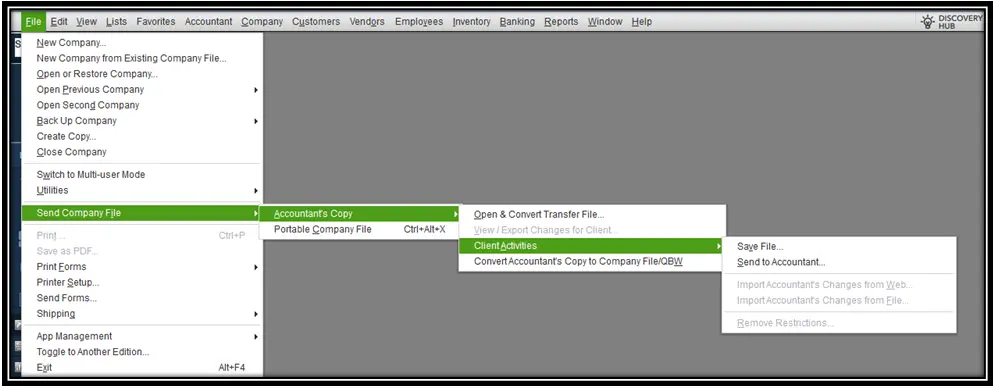
- Hover over the Send Company File in the File menu.
- Now, you need to hover over the Accountant’s Copy and then the Client’s Activities.
- You need to select Save File and then Next.
- The final steps involve the selection of the Accountant’s copy and then Next. You need to enter the dividing date and select Next.
Now, you are ready with the accountant’s copy. The extension of the end of the filename would be .qbx. Now, upload the required file to the USB/Online services, and you are good to share.
Sending a File Through the Accountant’s Copy File Service (ACFS)
Now, you can use the Accountant’s Copy File Service to directly send the accountant’s file. This will directly create an accountant’s copy on the QuickBooks desktop. Here are the steps required to send a file through the ACFS:
- Hover over the Send Company File in the File menu.
- Now, you need to hover over the Accountant’s Copy and then the Client’s Activities.

- Choose the option Send to Accountant and then proceed to the Next option.
- You need to select Accountant’s Copy, proceed to the Next and then enter the dividing date and then proceed to the Next button.
- You now need to enter your and your accountant’s email address. You can also create a file password for this.
- Send the mail when the content is ready.
QuickBooks Desktop will close all the open windows on your computer and send the file. Your accountant will have a time of 14 days to download the file you sent.
Step 3: Turning Advanced Inventory Features On
Now, you can turn on the advanced inventory features while your accountant works on their accountant’s copy. But you need to turn advanced inventory features off again while importing the changes.
Step 4: Importing the Accountant’s Changes
The moment you send an accountant’s copy., QuickBooks will itself add an Accountant’s Changes Pending reminder next to the company file name. It will also try to restrict certain activities to avoid possible conflicts.
The reminder message stays the same until you get the file back and import your accountant’s changes. The process to import is mentioned below:
- First, back up your company File.
- In QuickBooks Desktop, go to the File option and then select Send Company File.
- You need to select Accountant’s Copy and then Client Activities.
- If your accountant sent you the changes through the mail, you need to Import Accountant Changes File.

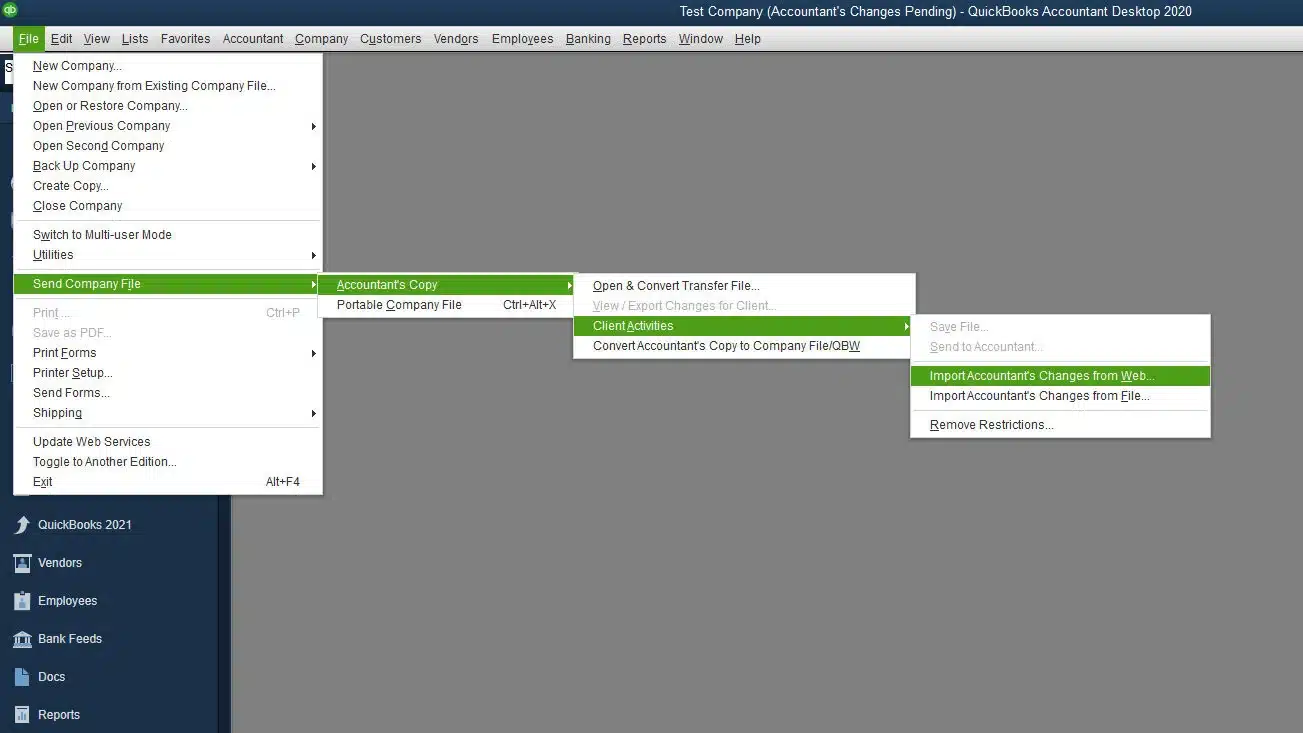
You can easily browse your computer for the received accountant’s file. It must have a .qby extension at the end of the filename. If the accountant has used the Accountant’s Copy File Transfer Service method, then you need to select Import Accountant’s Changes from the Web.
These four easy steps are the answer to the question of how to create an accountant’s copy in QuickBooks Desktop. Now, let’s move to another segment regarding the conversion of the Accountant’s copy to a company file.
Converting Accountant’s Copy to Company File in QuickBooks Desktop
Now, sometimes, you might need to convert an accountant’s copy to a company file. This is exactly the opposite of what we did in the above segments. You can easily convert your accountant’s copy working file (.QBA) or transfer file (.QBX) to a regular company file (.QBW) through QuickBooks Desktop Premier Accountant and Enterprise Accountant. This will enable you to convert your file from an accountant’s file to a normal company file.
How to Convert Accountant’s Copy Quickbooks to Company File?
We have some easy steps for the users to convert the accountant’s file into a regular company file. This will help us to continue recording transactions without any restrictions. Here are the required steps:
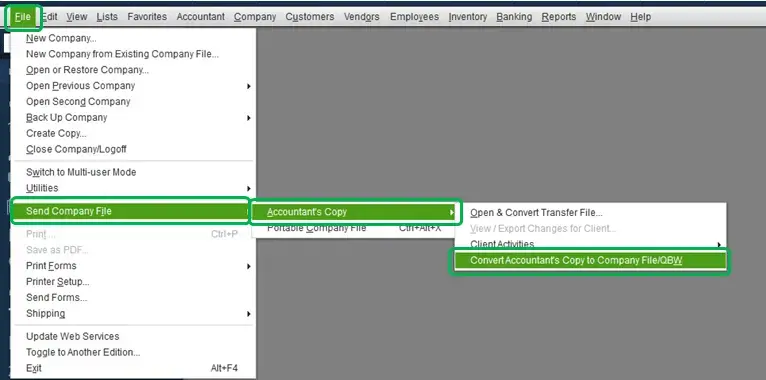
- You need to open your accountant’s copy (.QBX) or (.QBA) and must create a backup.
- Now, you need to select Send Company and then Accountant’s copy in the File menu.
- Now, you need to select the option Convert Accountant’s Copy to Company File/QBW and select OK.

- Open the folder you want to save the .QBW file in, rename the file, and select Save.
This is the process of converting an accountant’s file to a regular company file. Please note that you must re-enter any changes you made to the original company file after creating the accountant’s copy. Also, you can no longer import an accountant’s changes.
That’s All for Today!
We just learned the ways how to create an accountant’s copy in QuickBooks Desktop. The process involved four easy steps: Setting Up the QuickBooks Desktop, Creating an Accountant’s Copy, Turning the Advanced Inventory Back On, and Importing the Accountant’s Changes. We also went through the ways in which we learned the process of how to convert an accountant’s copy to a company file. If you face any kind of difficulty while creating and converting accountant’s copy in QuickBooks, then get direct assistance by contacting Proadvisor solutions’ team of experts at 1.855.888.3080.
Read more related articles :-
QuickBooks Accountant Copy Failed? Here’s What to Do!
Unable to Send Usage Data in QuickBooks Desktop [Easy Fixes]
QuickBooks Invoices Not Being Received [Effective Fixes]
How To Fix QuickBooks Error 400 [Bad Request Issue]
Frequently Asked Questions
How do I create an accountant’s copy in QuickBooks?
You can create an accountant’s copy in QuickBooks Desktop using the four simple steps outlined in the blog: Setting Up the QuickBooks Desktop, Creating an Accountant’s Copy, Turning the Advanced Inventory Back On, and Importing the Accountant’s Changes.
How do I add an accountant to QuickBooks Desktop?
To set up an external user in pro/premiere mode, you need to select the company, set up users and passwords, and then set up users. Then, you need to add a user, fill out all the relevant details, and then proceed to the next. Now, you can add an accountant to the QuickBooks desktop.
How do I access the accountant toolbox in QuickBooks Desktop?
Once you are in your client’s books, a briefcase icon will appear in the upper left corner. Here is every single tool that you might need.

Erica Watson is writing about accounting and bookkeeping for over 7+ years, making even the difficult technical topics easy to understand. She is skilled at creating content about popular accounting and tax softwares such as QuickBooks, Sage, Xero, Quicken, etc. Erica’s knowledge of such softwares allows her to create articles and guides that are both informative and easy to follow. Her writing builds trust with readers, thanks to her ability to explain things clearly while showing a real understanding of the industry.