
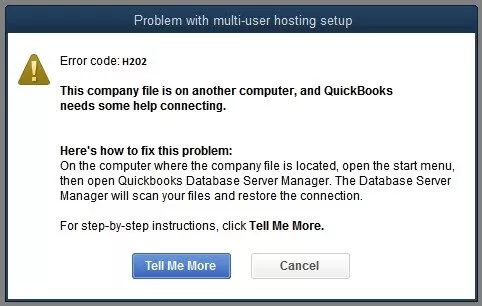
Did the text ‘The company file is on another computer, and QuickBooks needs some time connecting’ ever appear on your screen? This is the QuickBooks Error H202 warning message. QuickBooks users commonly get the error code H202 while toggling between multi-user mode. In the majority of situations, this error arises if the multi-user connection on your server computer holding QuickBooks Company files has been turned off. Also, the fact that you can’t communicate with the server computer won’t permit you to access the QuickBooks company file. ‘Error code H202 QuickBooks’ happens when QuickBooks Desktop attempts to access a company file from another computer but can’t because of an issue with the multi-user hosting configuration.
We discussed all the feasible solutions for QuickBooks error H202 resolution in this blog. They are simple, fast, and can be executed on your own. But in case you still need help, feel free to call our team at +1-(855)-542-9309 at any time for efficient resolutions for your issue and questions.
Table of Contents
Definition of QuickBooks Error H202 (multi-user switching issue )
QuickBooks Error Code H202 is a part of the H-series error. The error is mainly linked to multi-user mode issues. QuickBooks users often counter this error when switching from single-user mode to multi-user mode or opening a company file in multi-user mode. As stated above, you might face this problem while trying to access a company file on another system.
The error message you received after encountering this error is given below.
QuickBooks Error H202: This data file is hosted in another computer, and QuickBooks require some assistance to fix it.

Can't Open the multi-user mode Error H202

These messages indicate that the multi-user connection to the server is blocked. QuickBooks Error H202 shows that the system requires some support in connecting with the company file located on another server.
Because of the multi-user connectivity issues, Getting QuickBooks error h202 becomes quite common and troublesome. Users can’t access company files stored on other computers, delaying work and productivity. In such circumstances, knowing how to handle everything professionally becomes a must.
Several reasons can be responsible for such issues to arise. Let’s look into them to understand the H202 error QuickBooks better.
You may also see: How to Resolve QuickBooks Error 12157
Symptoms of H202 QuickBooks Error
You can easily identify the QuickBooks Error Code H202 just by looking for the following signs and symptoms, which are listed below:
- Cannot transition to multi-user mode in QuickBooks.
- If, despite many efforts, you are unable to open a company file that is located on another computer.
- If the system or the QuickBooks application freezes repeatedly for a couple of seconds.
- QuickBooks is slow or has crashed.
- Another sign is if the error message appears on the screen.
- Windows is taking inputs slowly or is extremely slow.
Once you have detected the error, it is time for you to learn about the ways to fix the error H202 in QuickBooks Desktop. But before that, you need to know about the common causes of the error.
Triggering Points of QuickBooks Error Code H202
Understanding the causes will help you in the process of resolving the error. There can be many triggering points of the QuickBooks error. Some of the popular causes of the H202 error in QuickBooks include:
- The hosting configuration option is wrong. If that is so, then you can face this error.
- Or in case the QB file setting option prevents access to the company file. So, it prevents incoming or outgoing communication.
- In case there is any damage or improper ND files configuration that enables the database file through QuickBooks, then you can observe this error.
- If the QuickBooks application is not able to search the host system’s main IP address, or by means of some other IP address.
- The company data file is not communicating smoothly with the server.
- If the DNS setting is incorrect or incomplete.
- The QuickBooks service such as QuickBooksDBXX/QBCF, is not running.
- Firewall or security software is blocking the communication with the company file, in this case, error H202 is likely to happen.
These are some of the common causes of the error H202 in QuickBooks Desktop. Now, let’s have a look at the ways that will help you to fix the error.
Fixing the QuickBooks Error H202 – 05 Easy Methods
Before you proceed to the steps to repair QuickBooks Error Code H202, make sure you log in to QuickBooks as an admin. You can perform a certain steps to eradicate H202 error in QuickBooks. The following are the solutions to correct the error H202 for QuickBooks:
- Turning Off the UAC Settings in QuickBooks
- Renaming the CPS Folder in QuickBooks
- Host Configurations checking on Workstation and Server
- Disable Hosting on Workstations
- Activating Hosting on the Server Computer
- Pinging the Host Machine from a Workstation
- QuickBooks Tool Hub running on the Server
- Running QuickBooks File Doctor from QB Tool Hub
- Installing and Running QuickBooks Database Server Manager
- Using the QuickBooks Install Diagnostics Tool
These are a few of the general solutions for resolving the H202 Error QuickBooks, which addresses the switching issue for multiple users in the QB software. Let us have a look at the above-mentioned steps in brief.
Solution 1: Turning Off the UAC Settings in QuickBooks
The User Account Control (UAC) settings protect your computer from internet threats that may arise after downloading files from the internet during the download of the OS update. These settings can thus lead to the H202 error in QuickBooks. We will assist you in turning off the UAC to fix this error with the following steps:
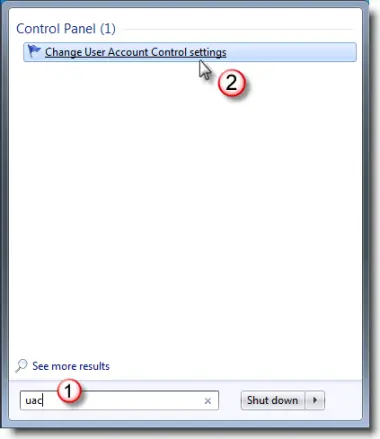
- Proceed to the Windows icon, open the search box, and enter Control Panel.
- Press the Enter button, and in front of you, it will open a window.
- Click User Accounts.
- Select the User Accounts (Classic View) option.
- Go to the “Change user account control settings” section and confirm with a Yes.

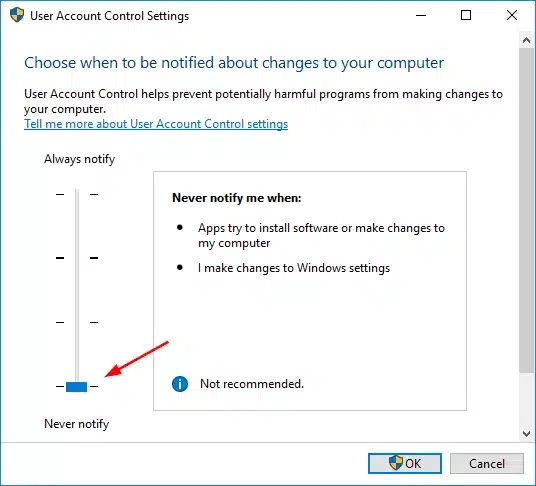
- From a slider that is available on your screen, you can advance through two options.
- By making use of the slider, select Never Notify, which will switch off the UAC.

- Select the Yes option and restart your computer so the changes are saved.
Now, you need to check for the error again. If error h202 QuickBooks is still there, you can move to the next solution.
Solution 2: Renaming the CPS Folder in QuickBooks
The QuickBooks corrupted CPS Folder is an important component in QuickBooks Error Code H202 during the transition to the multi-user mode. Renaming the folder creates a new version of the folder, which will fix the bug introduced by the old one. The steps to rename the QuickBooks CPS folder are as follows:
- Once you have shut down the QuickBooks application, open the Start menu.
- Press the Windows + E key to activate the File Explorer window.
- Click on This PC.
- Double-click the C: Drive option.
- Find the Program Files (x86) folder or the Program Files folder.
- Open the files.
- You then need to move on to the Intuit folder and open the QB folder of the version you are using.
- Open the Components folder and select the Payroll folder.
- After looking into the CPS folder, right click on the folder and choose Rename.
- Add OLD as the name suffix to the folder name. It will resemble CPSOLD.
- Create a fresh CPS folder onto your desktop.
- Paste and copy CPSOLD within this new created folder.
- Successful update of payroll at last.
By following these steps, you can rename the CPS folder in QuickBooks easily to eliminate QuickBooks Error Code H202. If the error is still there, proceed to the next solution.
Solution 3: Host Configurations checking on Workstation and Server
In multi-user mode, only one computer will have to hold the company file and function as the server. This is the computer you can use as the host computer.
The rest of the computers are workstations, and we should not make them host the company file. We have two things to check here. First, we need to disable hosting on all of the workstations but not the host machine. Second, we will check and enable hosting on the host machine.
Step 1: Disable Hosting on Workstations
Go to a workstation and do the following steps.
- Open QuickBooks Desktop on the workstation you get error codes like H101, H303, or H505.
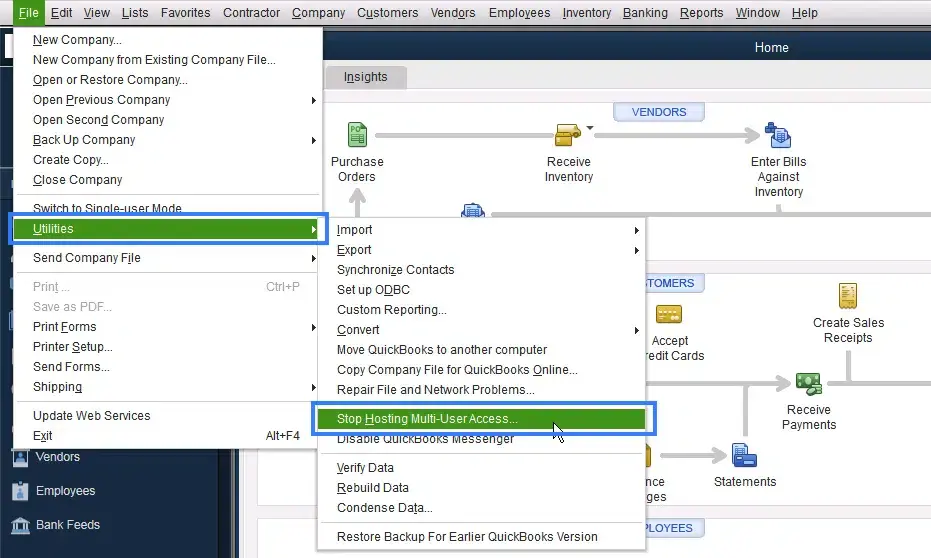
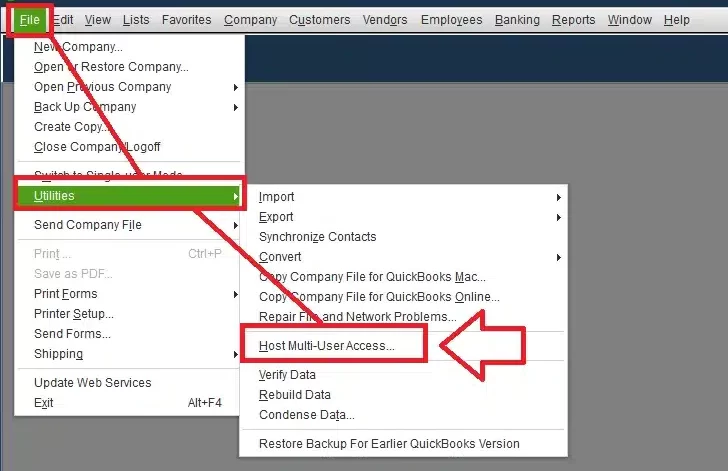
- Do not log into the company file. Go to File, and then Utilities.
- You should now be able to see the Host Multi-User Access option or the Stop Hosting Multi-User Access option.
- If you encounter the Host Multi-User Access option, do not click it. It suggests that hosting is not enabled for this workstation, and this workstation is not the issue. You can move on to the next workstation.
If you notice the Stop Hosting Multi-User Access option, click it. It will freeze the workstation.
Now, perform the steps as described above on all the workstations. After you have done them, go to the next step.
Step 2: Activating Hosting on the Server Computer
Go to the server computer where QuickBooks is to be hosted and activate the hosting there.
- Launch QuickBooks on the host machine (server).
- Go to File, then Utilities.
- You should now be able to view the Host Multi-User Access option or the Stop Hosting Multi-User Access option.
- If you see the Stop Hosting Multi-User Access option, do not select it. This means that the hosting is already turned on in this computer.

- If Host Multi-User Access is shown, choose it. This will initiate hosting on the server computer.

Now come back to the workstation from where you wish to open the company file in multi-user mode. There, open QuickBooks and switch to multi-user mode. But if still the problem persist, then move to the next step.
Solution 4: Pinging the Host Machine from a Workstation
The network should be fine in a way that it can access the company file in the server computer. Otherwise, you will see that QuickBooks will not be able to communicate with the company file. Let us try pinging the host computer from the workstation and check if there is a fine network that connects both of them.
First, you need to go ahead and turn on Network Discovery on your workstations and the server machine. You need to follow the steps given below for that.
- Locate the Start menu on the workstations and the host machine.
- Type Network into the search bar and click on Network and Sharing Center.
- Go ahead and modify advanced sharing settings.
- In the File and Printer Sharing and Network Discovery options, click and make sure Turn on Network Discovery is checked.
Now, you must get the server name from your host computer.
- You need to press the Windows + R keys on your keyboard to open the Run panel.
- In the Run window, type cmd and press Enter.

- Now, in the CMD window, type ipconfig/all and press Enter.
- You will be able to see the Host Name in the Windows IP Configuration area. The server name will be on the right.
- Copy down the hostname, or paste it into an MS Word document.

Lastly, ping your workstations from the server computer to ensure that the connection is working.
- Press the Windows + R keys on your keyboard to launch the Run window.
- After the box appears, you need to type cmd in the Run window, then press Enter.
- Just type in ping [your server name] and press Enter.
- Repeat the same on all the workstations.
If you get a response for a ping on all the workstations with no packet loss, then the network is okay. You can go on to the next solution.
Solution 5: QuickBooks Tool Hub Running on the Server
In this solution, you must run the QB tool hub on the server to resolve the ‘QuickBooks multi-user mode not working H202‘ error. This solution can be categorised into three steps:
- Running QuickBooks File Doctor from QB Tool Hub
- Installing and Running QuickBooks Database Server Manager
- Using the QuickBooks Install Diagnostics Tool
These are the three steps in the first solution that will assist you in proceeding with running QuickBooks Tool Hub to fix the error H202 in QuickBooks Desktop. Let’s take a glance at the three steps briefly in the following sections.
Step 1: Running QuickBooks File Doctor from QB Tool Hub
QuickBooks File Doctor Tool is a tool by means of which you shall be able to diagnose and repair numerous errors. If you want to make use of this tool, then first of all you need to download QBFD from the official Intuit web page; otherwise, you won’t be able to utilize QuickBooks Tool Hub with the assistance of the following steps:
- Firstly, begin downloading QuickBooks Tool Hub on your computer system.
- Now, install and run the QuickBooks tool hub application as per the onscreen instructions.
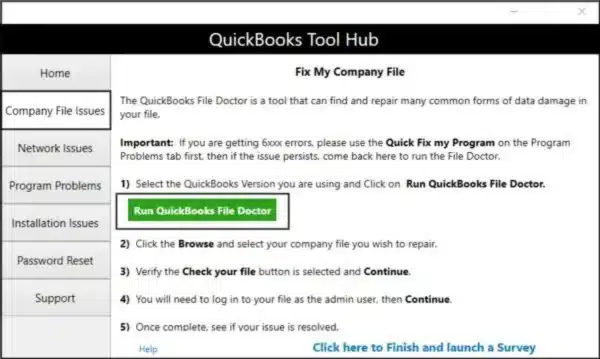
- The next step is to open the QuickBooks Tool Hub and go to company file issues tab.
- Also, click Run QuickBooks File Doctor.

- Now, in QuickBooks file doctor, you must choose Company file from the dropdown menu. If you were not able to locate the file, then click on browse and search in order to locate the file.
- Then you have to click on Check your file and the Network checkbox and then on the Continue tab.
- At the end, you must type your QuickBooks Admin Password and then click on the next tab.
The scan time generally relies on the file size, and in general, it will take approximately 5 minutes. Once the scan is complete, you must launch the QuickBooks software and company file.
Step 2: Installing and Running QuickBooks Database Server Manager
Once you have installed the QB Tool Hub, you must install and run the QB Database Server Manager. This is possible with the help of the following steps:
- Initially, you must open QuickBooks Tool Hub and touch the network issues tab.
- Then, after completing that, touch QuickBooks database server manager. It will open the database server manager on your system.
- After you get done in QuickBooks database server manager, locate the folder where company files are stored. You can also use the Browse option to locate this folder.
- The user will then have to click on the Start Scan tab.
- QBDBSM will automatically correct your firewall permissions.
- After the scanning is finished, you are required to click on the close tab.
- On each of the workstations on which the error is displayed, you should open QuickBooks.
- Also, click on the File menu.
- And then switch to the multi user mode.
If you are already using QuickBooks in multi-user mode, the error won’t be shown. If the error code H202 in QuickBooks Desktop is still there, then proceed to the third step of this solution.
Step 3: Using the QuickBooks Install Diagnostics Tool
This is the step for users who have been facing the H202 error while in single-user mode. You can resolve the ‘H202 error QuickBooks Desktop’ with the help of the following steps:
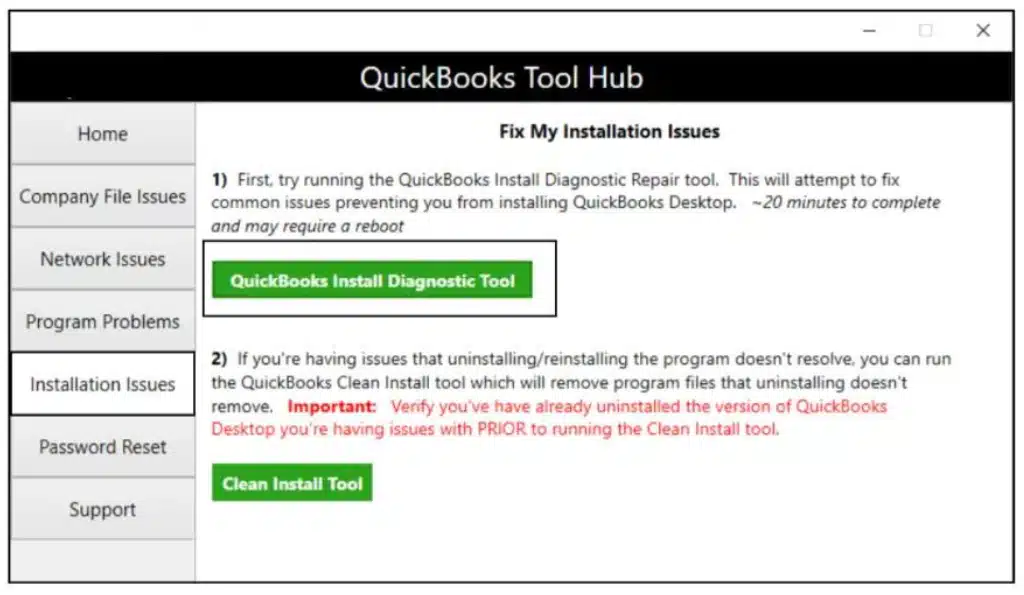
- First, you need to open the QuickBooks tool hub on the server machine.
- Then go to the Installation Issues tab from the tool hub.
- And select the QuickBooks Install Diagnostic Tool from the list.

- Let the tool process for a couple of minutes and this may take a maximum of 20 minutes.
- After opening the tool, you should rescan the folder in which there is the data file.
- Copy the IP address and network interface number
- If there is an Open Ports tab in the firewall status section, then simply activate the ports for QuickBooks.
- Navigate to test the data file connectivity.
Lastly, you need to try to open the company data file and check if the issue persists. If everything is working fine, then you are good to go else you might need professional help.
Wrapping It Up!
QuickBooks error H202 is related to the H series errors that address the problems in QuickBooks Desktop multi-user mode. The ‘QuickBooks error h202 switching to multi-user mode’ usually takes place due to the incorrect hosting configurations, corrupted or damaged ND files, or a firewall/antivirus problem. You can resolve QuickBooks Desktop error H202 simply using the solutions described in the blog. You can even call us at the 1-855 for professional help.
FAQs
What is QuickBooks Error H202?
QuickBooks Error Code H202 is part of the H series error family, often occurring while switching to multi-user mode. Generally, this error occurs by the disabled multi-user connection on your server computer that stores the QuickBooks Company files. This error might also arise due to connectivity issues between workstations and servers, misconfigured DNS or firewall settings
What are the causes of QuickBooks Error H202?
In the majority of cases, QuickBooks H202 error states that the multi-user connection to the server is restricted, hence QuickBooks can’t access the file. It may also be triggered as a result of misconfigured DNS or firewall settings.
How to fix QiuckBooks script error?
To repair QuickBooks script errors, you may attempt to run QuickBooks Tool Hub’s QuickBooks Install Diagnostic Tool, delete Internet Explorer cache and cookies, or add Intuit as a trusted site.
How to fix QuickBooks H202 error?
To repair QuickBooks error H202, you can disable the UAC settings, rename the CPS folder, verify the host configurations on workstations and server, ping the host computer, or use the QuickBooks Tool Hub.
Also Visit these articles:-
How to Fix QuickBooks Error H101 – Multi User Error
Fix QuickBooks Error H303: Issue with Multi User Hosting
Why QuickBooks Multi User Mode Not Working? How to fix it
How to Fix QuickBooks Error H505 – QB Expert’s Guide
How to fix QuickBooks Abort Error (Trusted Guide)

Erica Watson is writing about accounting and bookkeeping for over 7+ years, making even the difficult technical topics easy to understand. She is skilled at creating content about popular accounting and tax softwares such as QuickBooks, Sage, Xero, Quicken, etc. Erica’s knowledge of such softwares allows her to create articles and guides that are both informative and easy to follow. Her writing builds trust with readers, thanks to her ability to explain things clearly while showing a real understanding of the industry.