Small and medium-scale businesses widely use QuickBooks application for accounting and bookkeeping. With time, QuickBooks has broadened its operations and is not limited to accounting only. It also provides solutions to manage several other business processes. Inventory management is a crucial business operation that can get very tricky at times, especially if you run multiple stores. Sometimes, the actual number of inventory may vary with the number shown by QuickBooks. Whether you use QuickBooks Desktop or Online, these variations may appear. You will need to perform QuickBooks Inventory adjustment from time to time to correct it. In this article, we will discuss the detailed steps for that and other related aspects.
“If you face any issues while making QuickBooks Inventory Adjustment, read the whole article, and follow the steps. If you still need help, call Pro Advisor Solutions’ Customer Service Number 1.855.888.3080 and talk to our experts”
You may also see: How to Fix Incorrect COGS in QuickBooks
Table of Contents
When to Adjust Inventory Quantity or Value?
If you are wondering whether to adjust Inventory quantity or value, then here is a guide for you. Adjusting the quantity of a product is a normal process of inventory management. You need to keep your stock updated, and quantity adjustment is made when you restock or register a sale. But, there are other possible scenarios in which you would need to adjust the quantity of inventory. If the stock change is unrelated to a sale or purchase, quantity adjustment is required. If an item breaks or you discover extra items on recounting, you will need to change your stock’s quantity.
There is another type of inventory adjustment based on the item value. The total value of your stock is the average cost of the product multiplied by its quantity. Seasonal demand fluctuation or decay of goods can result in a change in the value of the stock. Now that we know when the specific adjustments are required, let us move on and find out the process.
How to Enter Inventory Adjustment in QuickBooks Online?
If you are using QuickBooks Online Plus, you will not need to record a purchase or sale to match stocks. You can simply enter inventory adjustment in QuickBooks Online and adjust the item’s stock manually. The steps are provided below:
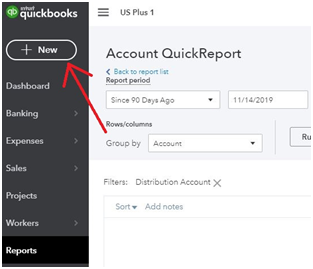
- Click on the ‘+ New’
option and select ‘Inventory Qty Adjustment.’

- Now, fill in the date of
Adjustment and click on the ‘Inventory adjustment account’ dropdown
menu. - Select the account and then
move on to choose the products from the ‘Product’ field. - Provide the new quantity or
the change in quantity for individual items. - Go to the ‘Memo’
field and enter all the details. - Click on the ‘Save and
Close’ button to complete the process.
On successful completion of the process, the adjustments will be recorded automatically in stock Asset, and Cost of Goods Sold accounts. You should keep in mind that the process directly alters your account book and thus should be performed carefully. It is suggested that you perform it under the supervision of your account.
How to Delete Inventory Adjustment in QuickBooks?
QuickBooks Online also provides you the option to delete or edit any adjustments that you have made to your inventory. Here is a stepwise guide on how to delete inventory adjustment in QuickBooks:
- Go to the ‘Search’
icon in the toolbar. - Click on the ‘Advanced
search’ option. - Go to the ‘Inventory
adjustment account’ dropdown and select the account. - Now, reach the ‘All
Transactions’ dropdown and select the ‘Inventory Quantity Adjustment.’ - Click on the ‘Search’
button and select the adjustment that you have to edit from the results. - From here, you can click on
the ‘Delete’ button to erase the adjustment or edit it.
Adjust Inventory Information in QuickBooks Desktop
There is an elaborate method to adjust inventory information in QuickBooks Desktop. We have provided it below in detail for you:
Creating an Inventory Adjustment Account
You need to create an inventory adjustment account to track these adjustments. The steps are as follows:
- Go to the ‘Company’
section and select the ‘Chart of Accounts’ option. - Click on the ‘New’
option from the ‘Account’ dropdown. - Now, select ‘Cost of Goods Sold’ from the ‘Other
Account Types’ section. - Name the account as “Inventory
Adjustment” and then click on the ‘Save and Close’ button.
After creating the account, you can perform further steps for adjustment.
QuickBooks Inventory Adjustment Process
Follow the steps as provided below to perform the QuickBooks Inventory adjustment process:
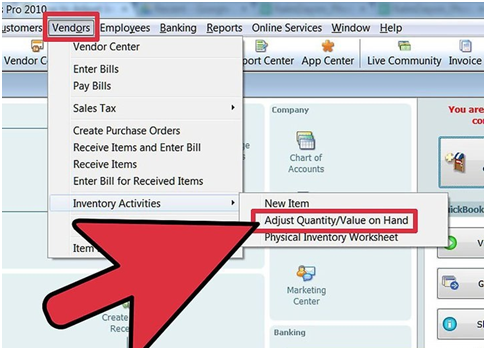
- Click on ‘Vendors’
and then select the ‘Inventory Activities’ option. - Click on ‘Adjust
Quantity/Value on Hand.’

- Go to the ‘Adjustment
Type’ dropdown menu and select ‘Quantity,’ ‘Total Value,’ or
‘Quantity and Total Value.’ select the account and then enter the date
of adjustment. - Add ‘Reference No.’
where you can also assign a customer, job, or class. - From ‘Find and Select
Items,’ choose the item that needs adjustment and click on ‘Add Selected
items.’ - Now, you can add or remove
the quantity or value as per the need. If you have to decrease the quantity or
value of the stock, the difference should b negative. - Click on the ‘Save and
Close’ button to complete the process.
You may also read: QuickBooks Online Undo Reconciliation
Through this article, we discussed the detailed process for QuickBooks Inventory Adjustment in both Desktop and Online variants. You can follow the steps easily and make the necessary adjustments to your inventory manually. If you face any issues in performing the steps, you can call Pro Advisor Solutions’ Helpline Number 1.855.888.3080 and talk to our experts.

Erica Watson is writing about accounting and bookkeeping for over 7+ years, making even the difficult technical topics easy to understand. She is skilled at creating content about popular accounting and tax softwares such as QuickBooks, Sage, Xero, Quicken, etc. Erica’s knowledge of such softwares allows her to create articles and guides that are both informative and easy to follow. Her writing builds trust with readers, thanks to her ability to explain things clearly while showing a real understanding of the industry.

