Reconciliation of the bank account is essential to review financial transactions over a specified period. With QuickBooks, creating a summarized report is significantly easier, saving you time and manual labour. Any changes made to transactions after the last reconciliation are listed in the QuickBooks reconciliation discrepancy report. Thanks to this, you can match and verify the financial data and your bank statement.
You can find discrepancies like duplicate entries, missing data, and more in the reconciled transaction report. These errors can lead to a mismatch in data and further disrupt your workflow; that’s why it’s best to correct them. To ensure accurate tax calculations and uninterrupted work operations, it is essential to resolve these discrepancies at your earliest convenience.
Need support to fix the QuickBooks reconciliation discrepancy? Our specialists are just a call away. Reach out at 1-855-888-3080 and let our ProAdvisors guide you!
Table of Contents
What is a Reconciliation Discrepancy in QuickBooks Online?
After you reconcile your accounts, you get the option to generate a QuickBooks reconciliation discrepancy report. This report identifies and lists discrepancies in transactions, including those related to entering, deleting, or modifying transactions. You will receive a detailed reconciliation report highlighting any discrepancies between the QuickBooks balance and the bank statement balance of an account. Thanks to this, it is easier for you to match the bank statements of the said account in QBO. Some of the key reasons for discrepancy include incorrect ending balance, modified or deleted reconciled transactions, duplicate or missing entries, and unposted or yet to be cleared banking transactions.
Why Do Discrepancies Occur in QuickBooks Reconciliation?
In this segment, we will go through some key sources of the QuickBooks reconciliation discrepancy in your account. Understanding the reason for these discrepancies to show up after you have reconciled can help prevent such errors.
- Someone may have entered an incorrect ending balance at the start of the reconciliation.
- Some transactions could have been edited or deleted by someone before the reconciliation.
- Someone may have made some changes to the opening balance value.
- New transactions were added within the specified dates, even before the last reconciliation.
- There may be missing or unentered transactions.
- It’s possible that there are duplicate transactions in QuickBooks.
- A transaction that has not yet cleared the bank has been entered by you or someone else.
- You might have adjusted your prior or previous reconciliation with a journal entry.
- A duplicate transaction was there, which you reconciled.
- There’s a chance that the transactions are sorted in the wrong section or category.
- You may have mistakenly reconciled the transactions for the wrong account.
These are some of the key sources that lead to QuickBooks reconciliation problems.
Understanding How to Run a Reconciliation Discrepancy Report in QuickBooks Online
In order to run a reconciliation discrepancy report in QBO, you can carry out the following steps.
- Open your preferred browser.
- Log in to your QBO account.
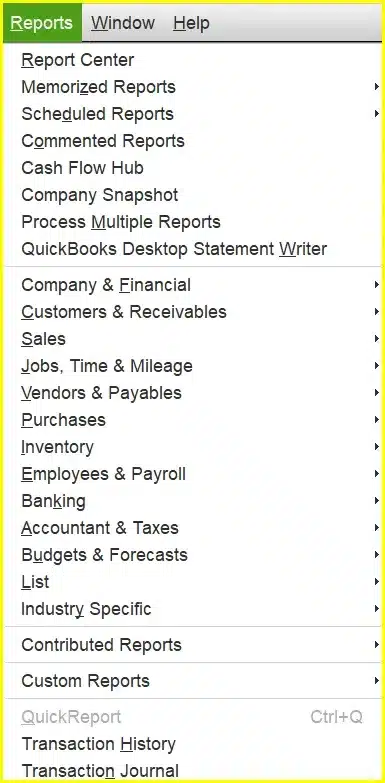
- Expand the Reports menu.
- Click on the Banking option.
- Tap on the Reconciliation Discrepancy button.
- Select the account to run the report.
- Then, press OK.
- Review the report.
- Look for any discrepancies.
If you find any discrepancies, then try to figure out the source of this error. Make sure to update or change it only if necessary.
Detailed Steps to Fix QuickBooks Reconciliation Discrepancy in Desktop
When there are discrepancies in the reconciliation on QuickBooks Desktop, you can correct them with these procedures.
Solution 1. Review the Beginning Balance
When a financial period starts, an amount is entered as the beginning balance. This amount is usually carried forward from the last accounting period of the business. You can verify the beginning balance using the following steps to ensure that it is accurate before reconciliation.
- Head to the Reconcile window.
- Click on the Edit info button.
- Then, select Edit the information from your statement.
- Make sure that the Ending balance and the Ending date are correct.
- Verify them with your bank or credit card statement.
- You can make changes to them if necessary.
- Once done, hit Save.
Now, you can move to run the QuickBooks reconciliation discrepancy report to check if it has been corrected. If not, then move on to the following method.
Solution 2. Review the Opening Balance
When you connect your bank account or credit card to QuickBooks, the amount present in the account is labeled as an opening balance. Although it is not a common factor for any discrepancy, it is safe to ensure the amount is correct. To avoid causing any issues with the ending balance, you can edit or enter the opening balance manually. In order to find it, you can take the outlined steps in QuickBooks Desktop.
- Open the QB Desktop application.
- Expand the Lists menu.

- Tap on the Charts of Accounts option.
- Or, press the Ctrl + A keys.
- There, find the Opening Balance Equity account.
- You can see the account balance.

If you observe that your opening balance is incorrect, then you can correct it. However, if the beginning and opening balance are correct, and you still encounter discrepancies in the QuickBooks reconciliation, it may indicate an issue with the data. Then proceed to the next section.
Solution 3. Conduct a QuickBooks Reconciliation Discrepancy Report
The errors or mismatches are likely a result of changes in transactions. Someone may have made changes since the last time you reconciled. You can run a reconciliation discrepancy report QuickBooks Desktop.
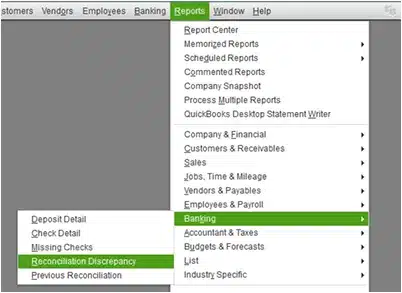
- Launch the QBDT application.
- Click on the Reports menu.
- Expand the Banking option.
- Select Reconciliation Discrepancy from the tab.

- Choose the account for reconciling.
- Hit OK.
- Review the report.
- Find the discrepancies.
You can view changes made in transactions, including who made them and whether they are valid. You can also update it; however, you should correct the mismatches found in the QuickBooks reconciliation discrepancy report. If this method didn’t work, then move on to the following method.
Solution 4. Run the Missing Checks Report
You can use this report to fix the discrepancies as well. It will help you find the missing checks that are impacting the ending balance in QuickBooks.
- Head to QB Enterprise.
- Open the Reports menu from the top bar.

- Expand the Banking tab.
- Click on Missing Checks.
- Select the account to be reconciled.
- Tap OK and review the report.
Now, find the transactions that are visible on the report but not present in your bank statement. The reconciliation window will not display any transactions not present in the bank statement. If you still see a QuickBooks reconciliation discrepancy, then try the next resolution.
Solution 5. Conduct a QuickBooks Transaction Detail Report
You can run this report to find all the transactions that have been changed by you or someone else. Follow the steps given below to use it.
- Head to QuickBooks Desktop.
- Expand the Reports menu.
- Select the Custom Reports option.
- Tap Transaction Detail from the expanded menu.
- Enter the earliest date in the Date From field.
- Also, you can leave it blank.
- Enter the last reconciliation date in the Date to field.
- Now, click on the Filters tab.
- Select the Accounts field.
- Choose the account for reconciliation.
- Tap on the Entered/Last Modified field.
- Enter the last reconciliation date as the Date from.
- Select today’s date in the Date to field.
- Tap OK and run the report.
- Find the transactions that do not match your bank or credit card statement.
- Look for any other discrepancies as well.
If you find any, then confirm why these changes were made and by whom. Make sure to review whether they are valid. If you still see QuickBooks reconciliation problems, then go ahead to the following segment.
Solution 6. Check the Reconciliation Adjustments
Frequently, users make reconciliation adjustments simply to close the reconciliation. Even though the balances mismatch at the end of it. This mismatch can lead to a discrepancy due to an incorrect adjustment during the last reconciliation. Therefore, it is possible that the QuickBooks reconciliation discrepancy occurred because of this. Follow the steps below to check the adjustment and ensure it’s correct and accurate.
- Launch QuickBooks Enterprise.
- Select the Lists menu.
- Choose the Charts of Accounts.
- Open the Reconciliation Discrepancies account.
- Enter the last few reconciliation dates in the Date field.
- Press Enter to run the report.
Now, go through the adjustments and find the adjustments that are impacting the reconciliation and the ending balance. Discover who was responsible for these adjustments and the purpose behind them. You can make changes as per your needs if they are not valid and accurate. Move to the following method to resolve the QuickBooks reconciliation problems.
Solution 7. Undo and Redo the Last Reconciliation
Suppose you failed to resolve the QuickBooks reconciliation discrepancy. Then, as a last resort, you can undo the reconciliation and then do it again. Remember to create a backup of your company file before proceeding with the given steps.
- Make a backup of the company file.
- Open QuickBooks Online.
- Select the Banking menu.
- Tap on the Reconcile button.
- Choose the Undo Last Reconciliation.
- A confirmation message will appear on your screen.
- Tap on OK and then Continue.
- Close the Reconciliation window.
- Now, reopen the Reconciliation window.
Follow the steps outlined for how to run a reconciliation discrepancy report in QuickBooks Online. If any discrepancies are still showing up, then you can try the following method to correct them.
Solution 8. Add a Journal Entry to Make an Adjustment
Suppose none of the given methods and procedures help in resolving the QuickBooks reconciliation problems. Then, you can make an adjustment to close the reconciliations as a last resort by following the steps below.
- Sign in to QB Online.
- Click on the Go to QuickBooks dropdown.
- Choose the company file.
- Hit the +New button.
- Click on Journal Entry.
- Tick the Is Adjusting Journal Entry? Checkbox.
- Do as instructed to record the journal entry.
- Finally, hit Save and Close.
With this, you can close the reconciliation urgently and review the adjustment afterwards. Now, let’s explore the different ways to reconcile an account for generating a reconciliation discrepancy report in QuickBooks Online.
Methods of Account Reconciliation in QuickBooks Online
You can reconcile an account with two methods in QBO. Firstly, there is AI-powered reconciliation, and the second one is manual reconciliation. In this segment, we will explore both approaches.
AI-Powered Reconciliation Tool
This tool is available on the QuickBooks Online Plus or Advanced plan. You will find it in the Reconcile page. To reconcile, you can either activate the automatic importing of bank statements or import them manually. After that, you can take the steps listed below.
- Open QBO in your browser.
- Head to the Transactions page.
- Select the Reconcile tab.
- Specify the account for reconciling.
- Before you upload the statement to QuickBooks Online.
- Verify the beginning balance with your statement.
- If it matches, then upload the statement.
- Ensure that the statement extraction is accurate.
- You have to verify it manually, as the AI is still in an early phase.
- You can return once the verification process is complete.
- Ending balance and Ending date after extracting will be filled in by the Account Agent.
- Then, hit the Start recording button.
- If there are any issues, then the Account Agent will notify you.
- These issues will be displayed with Review in the Status column.
- Check the details in the Explanation column.
- Troubleshoot these issues as you see fit.
These steps are only feasible for the QB Online Plus or Advanced plan, as they support the AI-powered reconciliation tool. You can proceed to the next segment to manually reconcile and generate the QuickBooks reconciliation discrepancy report.
Procedure for Manual Reconciliation
This method can be applied to any version of QuickBooks, regardless of whether it supports the AI-powered reconciliation tool. Simply avoid uploading the bank statement and proceed as follows.
Before we proceed with the manual reconciliation, make sure to verify the following:
- Make sure to review the opening balance if you are reconciling for the first time.
- The bank account or credit card balance should match the opening balance since you started tracking transactions in QuickBooks.
- It is not necessary to connect a bank or credit card to QuickBooks Online for reconciliation. However, QBO will automatically download the transactions and input the starting balance.
Once you have considered the points above, you can proceed with the steps below to manually reconcile your account to create a QuickBooks reconciliation discrepancy report.
How to Reconcile Accounts in QBO Manually
Remember, in case there is reconciliation for multiple months, then start with one statement at a time. We advise you to start with the oldest statement first.
- Open QuickBooks in your browser.
- Select Get Started if this is your first time reconciling.
- Tap on the Accounts menu.
- Choose the account for reconciling.
- The account should be the same as given on the statement.
- If the past reconciliations are displayed on a tab, then verify whether there are any issues.
- Fix the issues before you reconcile accounts.
- Select the We can help you fix it option from the tab.
- Follow the instructions given on your screen.
- The Beginning Balance in QBO should match the statement balance.
- In case they don’t match, proceed to correct it.
- Type in the Ending Balance and Ending Date on your statement.
- The Ending Balance is also referred to as “new balance” or “closing balance”.
- Verify whether your account facilitates online banking.
- If the online banking was not active, then:
- Include the service charges or interest earned throughout this time.
- Once you enter these, review the Last Statement ending date.
- This is the ending date of your last reconciliation.
- Your current account statement should start the day after the previous statement.
- Once you are ready, tap Start reconciling.
- Now, match the transactions in QuickBooks with the statement in chronological order.
- Check off the listed transaction that matches your statement to mark it as reconciled.
- Select Edit if the transactions match the statement, but there are minor errors, like a wrong recipient. Update the details in comparison to your statement.
- Any transaction in QBO that is not listed in your statement can be left unchecked.
- Repeat this process until you reach the end.
- The difference should be $0.00 between your statement and QuickBooks.
- Once you’ve verified it, tap ‘Finish now’.
Important note: If the bank account is connected to QuickBooks Online, the transaction information will be updated directly from your bank. In this scenario, the accounts are usually balanced, and the difference is $0.00.
Steps to Correct the Balance Through Manual Reconciliation in QBO
Sometimes, the difference amount is not $0.00 between the statement and QuickBooks Online. When this occurs, you can take the following steps to correct the QuickBooks reconciliation discrepancy.
- Verify that the dates for each transaction in QuickBooks match the dates listed on your account statement.
- If you notice that there are missing transactions, then:
- Select the +New option.
- Create the missing transactions.
- Also, you can add any needed transactions.
- Take these for when there are more QuickBooks transactions in comparison to the account statement:
- Tap on the Cleared date option.
- You will see all the manually added transactions in QuickBooks.
- Then, you can find discrepancies in your reconciliation.
- Utilize the Audit log option to edit or delete any transactions.
- If the total number of transactions is equal in QuickBooks and the account statement, then:
- Verify that the amount of each QuickBooks transaction is the same as the amount of each transaction in your account statement.
Once you are done, go ahead and verify that the difference in balances is now $0.00. If you encounter any issues in QBO, proceed to the section below.
Troubleshooting the Reconciliation Discrepancy in QuickBooks Online
You can follow the methods below to resolve any issues with your beginning balance for accounts previously reconciled in the QuickBooks reconciliation.
Method 1. Correct the Changed Amount
This happens when someone edits a transaction or moves it to another account. Learn how to correct when the amount of the beginning balance ends up being changed.
- Open QB Online.
- Click on Transactions.
- Wait for the view to expand.
- Tap on the Edit option.
- Adjust the amount or account in the form.
- Once done, hit Save.
- Verify the amount and tap Close.
Once you complete these steps, the amount will be adjusted to the set amount. Now proceed to the next method.
Method 2. Transaction Unreconciled in Register
You may notice that someone has unreconciled a transaction in the register. You can carry out the steps below to reconcile it and avoid the QuickBooks reconciliation discrepancy.
- Head to the Bank Register.
- Choose the Reconcile option.
- Select the Ending balance field.
- Type in your statement info.
- Click on the Ending date field.
- Enter the statement info again.
- Now, press start reconciling.
- Review the transactions.
- Match the transactions and the account statement.
- Tick the checkmark for those who match.
- Leave the unmatching transactions unchecked.
- Once done, click Finish.
You can register the unreconciled transactions in the bank by using these steps. Let’s move on to the next section now.
Method 3. Accidentally Reconciled a Transaction
Sometimes, a transaction might get reconciled by error or mistakenly by the hands of a user. You can take these steps to reverse it.
- Tap on the Transaction.
- Let the view expand.
- Click on the box in the Checkmark column.
- Wait for it to become blank.
- Or, you might see a ‘C’.
- The transaction will be removed from reconciliation.
- Once finished, hit Save.
By doing so, you can avoid more discrepancies in the QuickBooks Online reconciliation. Move on to the following section for deleted transactions.
Method 4. Recreate a Deleted Transaction
Someone might have accidentally deleted a transaction. You can take these steps to recreate it in the QuickBooks reconciliation discrepancy report.
- Tap on +Create.
- Choose one of the following invoice forms:
- Invoice
- Sales
- Receipt
- Expense
- Or more
- Enter the details in the form.
- Once done, tap Save and close.
- Head to Settings.
- Select the Chart of Accounts.
- Find the account with the transaction.
- Click on the View register.
- Tap on Transaction to expand it.
- Choose the checkbox until an ‘R’ appears.
- The transaction will be reconciled manually.
- Now, hit Save.
In case you face an alert the next time you reconcile, then:
- Open the discrepancy report.
- The deleted transaction might be in the report.
- But the difference should remain $0.00.
Once you’ve ensured this, you can return to reconciliation without any hindrance. After you have successfully reviewed the QuickBooks reconciliation discrepancy report, make sure that the Total Discrepancy Difference on the report is US $0.00. Be sure to cross-check the beginning balance in QBO and match it with the beginning balance on your bank statement. Lastly, hit resume reconciling to continue the reconciliation.
Quickview Table for QuickBooks Reconciliation Discrepancy
In this segment, we have provided you with a summary of the blog that provides a concise overview of how to resolve a QuickBooks reconciliation discrepancy in tabular format.
| What it is | Sometimes, discrepancies can occur in accounts that have already been reconciled. In order to review them, you can run the QuickBooks reconciliation discrepancy report. |
| Reason behind the discrepancies | An incorrect ending balance at the start of the reconciliation report, some transactions got edited or deleted before the reconciliation, changes were made to the opening balance amount, new transactions got added within the dates before the last reconciliation, missing or unentered transactions, duplicate transactions are there, transaction yet to be cleared at bank was added, prior or previous reconciliation got adjusted with a journal entry, duplicate transactions got reconciled, the transactions are in the wrong section or category, and accidental reconciliation of the transactions for the wrong account. |
| How to run a reconciliation discrepancy report in QuickBooks Online | Open a browser, log in to QBO, select the Reports menu, tap on Banking, select Reconciliation Discrepancy, choose the account to run the report, and hit OK. Now, review it and check any discrepancies. |
| Troubleshooting the QuickBooks reconciliation discrepancy in Desktop | Review the beginning balance and opening balance, run a QuickBooks reconciliation discrepancy report, or the missing checks report, launch a QuickBooks transaction detail report, verify the reconciliation adjustments, undo and redo the last or prior reconciliation, and add a journal entry for making an adjustment. |
| Methods of account reconciliation in QBO | AI-Powered Reconciliation Tool and Manual Reconciliation. |
| Troubleshooting the QuickBooks reconciliation discrepancy in Online | Update the amount that was changed, register the unreconciled transaction, revert an accidentally reconciled transaction, and recreate a deleted transaction. |
Bringing It All Together
In this blog, we have discussed the QuickBooks reconciliation discrepancy in depth. We went over multiple aspects of it, such as why it occurs, how to run it, and how to troubleshoot any issues. Apart from that, we have listed out how to run a reconciliation discrepancy report QuickBooks Online. However, if you face any problem despite following the steps, then you may contact an expert. Dial 1-855-888-3080 to speak with our professionals and receive guidance to fix QB reconciliation problems.
Frequently Asked Questions (FAQs)
Where is the reconciliation discrepancy report in QuickBooks Online?
In order to find the QuickBooks reconciliation discrepancy report in Online mode, you will first have to open your preferred web browser. Then head to QBO and log in using the admin user ID and password of your Intuit account. After that, expand the Reports menu from the navigation bar at the top and select the Banking option. There, you will find the “Reconciliation Report” button to run the reconciliation discrepancy report. Once you run it successfully, you can review the report and see the details of any discrepancies within that reconciliation.
Does QuickBooks Online have a reconciliation discrepancy report?
Yes, there is a feature that reconciles the QuickBooks balance with the bank account to identify any discrepancies in transactions. Sometimes, there are certain mismatches or other discrepancies in the transactions, related to entering, deleting, or modifying transactions. You can run the QuickBooks reconciliation discrepancy report to get a detailed report of all the mismatches between the QB balance and the bank statement balance of an account. It will help you figure out the exact cause of these discrepancies, which you can later fix with easy methods.
How to get a reconciliation discrepancy report in QuickBooks Online?
If you are looking for ways to get the QuickBooks reconciliation discrepancy report in Online mode, then you can carry out the steps outlined below.
1. Go to QuickBooks Online.
2. Sign in to your account.
3. Click on the Reports menu.
4. Select the Banking option.
5. Tap on the Reconciliation Report.
6. Choose the right bank or credit card account.
7. Hit OK to run the report.
8. Review for any discrepancies.
How to fix QuickBooks reconciliation discrepancy?
There are various methods to resolve the QuickBooks reconciliation discrepancy in both the Online and Desktop versions. In desktop mode, you can do the following: check the beginning balance and opening balance, run a missing checks report or transaction detail report, confirm the reconciliation adjustments, or undo and redo the last reconciliation, or add a journal entry to adjust. Whereas, in online mode, you can update the changed amount, register the unreconciled transaction, undo an accidentally reconciled transaction, or recreate a transaction that got deleted.
How to print reconciliation discrepancy report in QuickBooks Online?
If you are interested in printing the QuickBooks reconciliation discrepancy report, then you can do this. Begin by logging into QBO on your browser and expanding the Reports menu. Then, move your cursor over the Banking option to extend its options on the right side. From the extended panel, simply click on Reconciliation Report and select the correct account. Then, you can just hit the Ctrl + P keys on your keyboard to print it.
Read more related articles :
How to Reconcile in QuickBooks Desktop (Updated Methods)
Reactivate your QuickBooks Payroll subscription
Lost my QuickBooks Data After the Update
QuickBooks Migrator Tool stops working
Fixing QuickBooks Error 2308: Expert Tips and Solutions

Erica Watson is writing about accounting and bookkeeping for over 7+ years, making even the difficult technical topics easy to understand. She is skilled at creating content about popular accounting and tax softwares such as QuickBooks, Sage, Xero, Quicken, etc. Erica’s knowledge of such softwares allows her to create articles and guides that are both informative and easy to follow. Her writing builds trust with readers, thanks to her ability to explain things clearly while showing a real understanding of the industry.