QuickBooks ODBC driver is a fantastic utility to custom report through various powerful data analyzing tools from the data file. The sky is the limit to the extent of personalization of the data once you set up the QuickBooks ODBC driver. However, it is not a simple task for users from a non-technical background and requires extreme IT knowledge. In the given blog, we have tried to reduce the technical terms into simple steps to perform and configure QuickBooks ODBC driver. Read it till the end.
“If you require any technical help between the steps mentioned below, contact ProAdvisor Solutions’ Support at 1.855.888.3080 and get in touch with an expert on the matter immediately”
You may also see: QuickBooks error 15106
Table of Contents
How to Install and Set up the QuickBooks ODBC Driver?
Below are mentioned all the relevant steps to install QuickBooks ODBC Driver and configure it.
- Firstly, download ODBC Driver for QuickBooks Enterprise from the Intuit server.
- Double-click on the downloaded file to run it and follow through with all the onscreen instructions coming in the installation wizard.
- Open QuickBooks after the installation process completes.
- Click on the File menu and select Utilities.
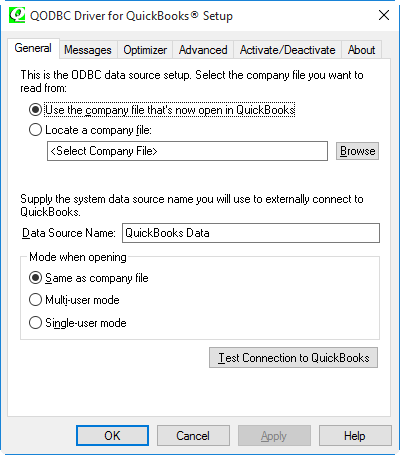
- Click on Configure ODBC and visit the General tab.
- Choose Use the Company file that’s now open in QuickBooks option, and under the Data Source Name, type QuickBooks Data.

- Ensure that you are signed in to the company file as Admin and click on the Test Connection to QuickBooks.
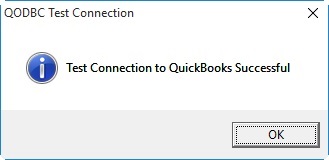
- Once the screen reads Test Connection to QuickBooks Successful, click on OK and choose Apply.

- Exit from the General tab and go to the Messages tab.
- Clear the checkbox of Detail Tracing (Slow) and click on the Display Optimizer Status Panel checkbox.

- At last, click on Apply and exit from the Messages tab.
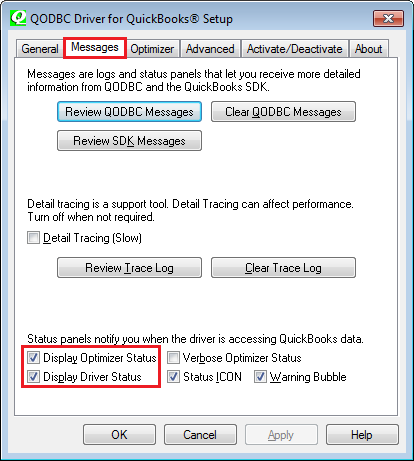
Note: As an optional feature, you can click on the Display Driver Status Panel to view the details of the current ODBC activities and the number of records it has processed.
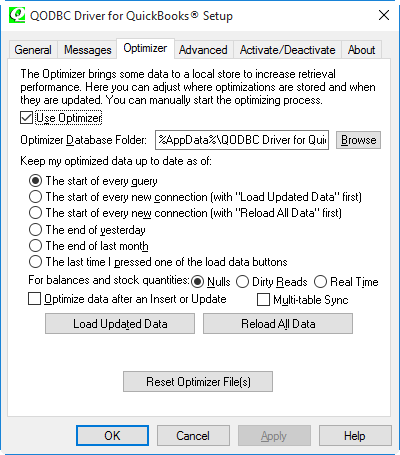
- Head to the Optimizer tab and click on the Use Optimizer checkbox.
- The recommended file path to use is (%AppData%\ODBC Driver for QuickBooks\Optimizer). Verify that it is also the default Optimizer file path.
- Click on The start of every query and choose Apply.
- At last, click on OK to exit the configuration window.
Important: Before the initial optimization completes, the data connection with QuickBooks may run slow. The optimization process generally takes about 24 hours. However, it may take longer depending on the company file size.
How to Connect the QuickBooks Open Database Connectivity Driver to the Third-party Applications?
As we learned above, the ODBC driver helps retrieve the data of your company file and access it on third-party applications like MS Excel, Access, or Crystal Reports. However, you need to configure the connection of ODBC with these applications beforehand. Follow the steps stated below to establish the connection.
Note: An ODBC user account needs to be created to connect to the mentioned third-party applications successfully.
While Connecting to Microsoft Excel
- Go to Excel and click on the Data menu.
- Choose From Other Sources and click on From Microsoft Query.
- Choose Browse and look for the datasource file.
- Click on the file and verify your ODBC user credentials.
Note: The datasource file is stored in the same folder as the QuickBooks data file and has the same name, except with a .DSN extension to it.
While Connecting to Microsoft Access
- Go to
Microsoft Access and create a blank database. - Click on
the External Data menu and select More. - Choose ODBC Database and click on the Import
the source data into a new table in the current database option. - Click on
OK and look for the file data source to establish the connection. - Go to
the Look in: section and click on the Folder icon. - Locate
the .DSN file and verify your ODBC user credentials.
Important: After the user authenticates in Microsoft Access and Crystal Reports, a list of database tables will appear on the screen, some of which are system tables that are not accessible to the ODBC user. Locate the tables beginning with QBReportAdminGroup to avail the dataset for custom reporting. Select any of them and begin creating your reports.
While Connecting to Crystal Reports
- Go to
Crystal Reports and open a new report. - Click on
the Database Expert and choose Create New Connection. - Click on
ODBC (RDO) and select the Find File DSN option. - Locate
the .DSN file and verify your ODBC user credentials.
For some more information on how to set up and retrieve your data with third-party applications compliant with QuickBooks ODBC, click on the following links.
- Instructions on ODBC Setup Options
- Instructions on QuickBooks ODBC Setup for
third-party applications in compliance with the ODBC
FAQs
What is Custom Reporting and How does ODBC Driver Helps in it?
Sometimes, the users require to create custom reports on the company file data using applications like Microsoft Access or Excel. Through custom reporting, the user gets read-only access to the QuickBooks database that is generally procured through an additional tool known as the Open Database Connectivity driver. The applications must be ODBC compatible, only then can the user view or even procreate data using the admin access to the company file. The ODBC driver helps the user to create spreadsheets, tables, reports in Microsoft Excel, Access, and Crystal Reports, respectively. If you update the drive to get the writing rights, you can design reports from scratch using multiple company file’s data and write queries using Structured Query Language (SQL).
Are ODBC Users Different from the Regular QuickBooks Users?
Yes, ODBC users are quite different from QuickBooks users. They have separate login credentials and require no permissions for custom reporting, while the QuickBooks users, even the admin, have to create different user credentials for the same.
You may also read: How to fix QuickBooks error 15101
At this point, we would like to conclude the blog on the steps to configure QuickBooks ODBC Driver. We hope that the information given above is easy to understand and relevant to your searched query. We tried to answer all the necessary questions on the subject, however, if the blog misses out on something, feel free to contact ProAdvisor Solutions Support at 1.855.888.3080 to clear out your queries.

Erica Watson is writing about accounting and bookkeeping for over 7+ years, making even the difficult technical topics easy to understand. She is skilled at creating content about popular accounting and tax softwares such as QuickBooks, Sage, Xero, Quicken, etc. Erica’s knowledge of such softwares allows her to create articles and guides that are both informative and easy to follow. Her writing builds trust with readers, thanks to her ability to explain things clearly while showing a real understanding of the industry.